
At least with the old non-index lever shifters, you could loosen the tension screw and it would just flop around. So as long as there isnt' much friction in the cable itself, and/or you have a stronger spring on the throttle return end, it'd pull back to zero just fine.
You are using an out of date browser. It may not display this or other websites correctly.
You should upgrade or use an alternative browser.
You should upgrade or use an alternative browser.
Show us your handlebars.
- Thread starter StudEbiker
- Start date
biohazardman
100 kW
corkscrew said:biohazardman said:I don't like to many things on my bars. This the most I carry except for maybe one more Magicshine for the summer night rides. You wanted to see other ways of doing throttles. I just ran the front derailleur cable to my rear bag and hooked it up to a thumb throttle. Stays nice and dry in the bag and leaves the bars looking stock.

Do you have any other photos of your throttle setup? I like the idea, but am unsure of how it would work using a shifter. EG, shifters usually stay where you put them.
This is just a regular indexed Shamano rapid shift front derailleur unit unmodded, three gears two detents, so you use your thumb lever, usually used to shift to a larger chainring, for throttle 0-25 MPH and it returns on its own unless you push it far enough to click into the next gear which is like cruise control and holds at 25MPH until you release it with the finger lever, usually used to shift to a smaller chainring. Hope that makes sense slack left after the first click is variable speed from 25MPH up till it clicks again past 35 then double click with the finger to get back to 0-25 again. Pic below is a stock thumb throttle mounted on a plastic rod with a bolt through it in the bag that has a 3/16th ABS insert to protect batteries. Easy to get used to and safe so long as you have a brake switch installed on one of your levers that will disengage the motor when the brakes are used.
If you use the regular twist grip shifters you can pull them apart and remove the detent spring so they will always return to the no throttle position. I have bikes done both ways and both are great.

amberwolf said:At least with the old non-index lever shifters, you could loosen the tension screw and it would just flop around. So as long as there isnt' much friction in the cable itself, and/or you have a stronger spring on the throttle return end, it'd pull back to zero just fine.
I had the same thoughts provided your using an older style friction shifter, but was more confused about using an indexed trigger shifter.
")
This is just a regular indexed Shamano rapid shift front derailleur unit unmodded, three gears two detents, so you use your thumb lever, usually used to shift to a larger chainring, for throttle 0-25 MPH and it returns on its own unless you push it far enough to click into the next gear which is like cruise control and holds at 25MPH until you release it with the finger lever, usually used to shift to a smaller chainring. Hope that makes sense slack left after the first click is variable speed from 25MPH up till it clicks again past 35 then double click with the finger to get back to 0-25 again. Pic below is a stock thumb throttle mounted on a plastic rod with a bolt through it in the bag that has a 3/16th ABS insert to protect batteries. Easy to get used to and safe so long as you have a brake switch installed on one of your levers that will disengage the motor when the brakes are used.
If you use the regular twist grip shifters you can pull them apart and remove the detent spring so they will always return to the no throttle position. I have bikes done both ways and both are great.
Yes that makes sense. I like how you assembled the housing stop in the bag also.
For the sake of weatherproofness, I'm considering doing something like this on my trike build. Thanks for the additional pictures.
biohazardman
100 kW
Glad it was helpful. Here is a link to the first remote throttle I did for more ideas. http://goldenmotor.com/SMF/index.php?topic=279.msg3408#msg3408
alsmith
100 kW
I've just seen a pic in the post
by amberwolf » Sat Mar 26, 2011 2:39 am
- it looks like a very large pannier holding the battery (with very little lean left for corners!). I've got a 36V 20Ah lump mounted above the rear wheel but it feels a bit top-heavy at times. Is the large pannier on one side a practical solution? Doesn't it unbalance the bike? Surely it must affect the handling and stability in turns?
[imghttp://www.endless-sphere.com/forums/download/file.php?id=45545][/img]
alsmith
100 kW
I've just seen a pic in the post
by amberwolf » Sat Mar 26, 2011 2:39 am
- it looks like a very large pannier holding the battery (with very little lean left for corners!). I've got a 36V 20Ah lump mounted above the rear wheel but it feels a bit top-heavy at times. Is the large pannier on one side a practical solution? Doesn't it unbalance the bike? Surely it must affect the handling and stability in turns?
Yes, it does affect the handling, but since I don't ride very fast on it (usually 15-18MPH) I don't have to lean too far in a turn. Righthand turns are much more common for me to make, especially at any speed, so there's no real issue with it on the left side. Almost all left turns are very wide anyway, across an intersection, for instance, so it doesnt' tend to get in the way much.alsmith said:I've just seen a pic in the post
by amberwolf » Sat Mar 26, 2011 2:39 am
- it looks like a very large pannier holding the battery (with very little lean left for corners!). I've got a 36V 20Ah lump mounted above the rear wheel but it feels a bit top-heavy at times. Is the large pannier on one side a practical solution? Doesn't it unbalance the bike? Surely it must affect the handling and stability in turns?
The pannier itself is actually for cargo; it just happens to now hold a battery, too, until I can put that in the triangle (it's too big right now; used to use 3 SLA in, above, and below the triangle).
The side pannier is FAR better than anything on the rack, for handling. I haul some hefty cargo (big bags of dogfood, etc.) not infrequently, and putting it in the side is always easier to handle than on the rear, even if all that weight is only on one side. It's easy and quick to learn (without even really trying) to compensate for the side-weight, but there are things the top-heaviness causes that I don't seem able to compensate for.
In future I would recommend asking questions in a more related thread, though, since this one is about handlebars/controls/etc., and your question is about the other end of the bike.
I have copied your question and my answer to my DayGlo Avenger thread, where it would be more relevant.http://www.endless-sphere.com/forums/viewtopic.php?p=396573#p396573
darkone040
10 W
a bit OT but im looking for a mirror to put on my handlebars, the ends of my handlebars are solid so i cant use one of the ones that slip into the handlebar..
any suggestions?
cheers adrian
any suggestions?
cheers adrian
You can use any scooter mirror if you are willing to repurpose a seatpost clamp. Take a look at my DayGlo Avenger (DGA) pics and thread for some details (I think the pics of that are still mostly intact).
oldpiper
1 kW
darkone040 said:a bit OT but im looking for a mirror to put on my handlebars, the ends of my handlebars are solid so i cant use one of the ones that slip into the handlebar..
any suggestions?
cheers adrian
I picked up a round Schwinn mirror for mine, which has a Velcro strap to fasten it onto the grip. You can ditch the Velcro and fasten it more securely, but I have found that it doesn't make the mirror vibrate a lot, and is easy to nudge a degree or so while you're riding to get exactly what you want in the image (I don't know about how you ride, but my bike tilts right and left a lot more than my car does
Cameron
Kingfish
100 MW
Doctorbass: You give us cause to aspire; well done!
Mine is in transition; it’s about to get completely reorganized in the next month in preparation for the next road trip. However – I’ve been running with this setup (or one nearly like it between the two ebikes P0 & P1) since last Fall; L to R with me behind the wheel, the list is:
This month I will rewire the ebike to support 2WD and Signal/Brake indicators. The lighting control that I’ve modified for 3-Way/Cruise will shift to the gap on the right side, whilst the new motorcycle-grade L/R-Horn control in the vacated left spot. Mirrors are a challenge: I don’t care much for the one I have now (not shown in any image); however I really want both L/R mirrors, especially when I start pulling a trailer.

Front view before faring, with a boat-load of wiring…
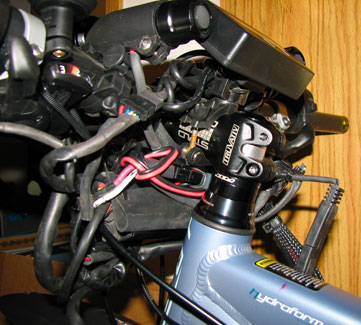
…and from the rear. The DC-DC converter is on the opposite side of the steerer.
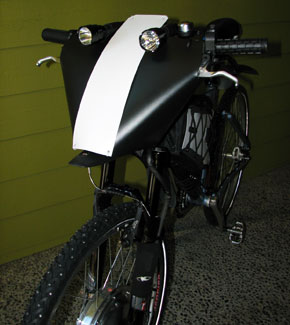
Front view with the winter faring mounted; it does a good job of slicing through the wind and deflecting rain.
Now if I can just figure out where to put my hands…
~KF
Mine is in transition; it’s about to get completely reorganized in the next month in preparation for the next road trip. However – I’ve been running with this setup (or one nearly like it between the two ebikes P0 & P1) since last Fall; L to R with me behind the wheel, the list is:
- Bar-end mirror
- Grip
- Control: 3-way & Cruise (modified Hi-Low beam switch & horn button) *
- Front Brake with custom integrated microswitch eBrake
- Front Derailleur lever, 3-position
- Bike People Bell <ding-ding>
- Left Hi-Power Cree UniqueFire Flashlight, modified
- Centerline: 6FET Controller in front, DC-DC converter on the right-side, and CA mounted behind facing the rider
- Right Hi-Power Cree UniqueFire Flashlight, modified
- A gap wide enough for another control *
- Rear Derailleur lever, 9-position
- Rear Brake
- Throttle
This month I will rewire the ebike to support 2WD and Signal/Brake indicators. The lighting control that I’ve modified for 3-Way/Cruise will shift to the gap on the right side, whilst the new motorcycle-grade L/R-Horn control in the vacated left spot. Mirrors are a challenge: I don’t care much for the one I have now (not shown in any image); however I really want both L/R mirrors, especially when I start pulling a trailer.
Front view before faring, with a boat-load of wiring…
…and from the rear. The DC-DC converter is on the opposite side of the steerer.
Front view with the winter faring mounted; it does a good job of slicing through the wind and deflecting rain.
Now if I can just figure out where to put my hands…
~KF
def215
10 kW
i feel like my bars are a bit bare compared to some of yours. heres mine:

this is how it looks like when im riding. now i feel like i can use more stuff on my bars. :lol:
this is how it looks like when im riding. now i feel like i can use more stuff on my bars. :lol:
StudEbiker
100 kW
Got my bars sorted on the Bike E. It wasn't easy to get everything on the bars that I wanted. I had to try lots of different combinations, but I finally figured out a way. I actually REALLY like having both shifters on the left too. It's really pretty nice. L to R- 3spd. IGH shifter, brake lever, 7 speed derailleur shifter, the all important coffee mug, Spiderfire 900 lmn light, brake lever, Sigma cycle computer, Magura twist throttle.

I actually REALLY like having both shifters on the left too. It's really pretty nice. L to R- 3spd. IGH shifter, brake lever, 7 speed derailleur shifter, the all important coffee mug, Spiderfire 900 lmn light, brake lever, Sigma cycle computer, Magura twist throttle.DrkAngel
1 GW
Red- mini horn, tail-turn light; High-Low-Strobe LED light w/mount reversed for better balance; Large horn; Speedometer-odometer +++ computer; Throttle with fuel gauge LEDs, PAS\TAG switch; LCD voltmeter missing ... ?

Oops! - There it is.
Alternate Bike

Just taped it to the reflector.
Oops! - There it is.
Alternate Bike
Just taped it to the reflector.

fizzit
10 kW
as of wednesday

they can only get better, right
they can only get better, right
Kingfish
100 MW
Update
I changed the handlebar assembly slightly before heading out on my road trip in July; I have kept it the same since, although I am toying with removing the aerobars cos although they look cool, the functionality is a bust and it prevents my people-bell from ringing.

Top-to-bottom, left-to-right:
Notes:
The bar-end mirrors fold in nicely when going through doorways; they are the widest part of the entire bike (including the trailer). There's a small pocket created by the faring on each side, and it makes a great place to stow my gloves when the bike is parked. The aerobars do have one useful feature: It's a great place to hang my helmet. :lol:
Cheers, KF
I changed the handlebar assembly slightly before heading out on my road trip in July; I have kept it the same since, although I am toying with removing the aerobars cos although they look cool, the functionality is a bust and it prevents my people-bell from ringing.
Top-to-bottom, left-to-right:
- Left Bar-end mirror
- Grip
- Front Brake with custom integrated microswitch eBrake (two: one for brake light and one for the eBrake)
- Front Derailleur lever, 3-position, SRAM Attack
- Bike People Bell <ding-ding>
- Control: Hi/Low Headlights, L/R indicators & Horn (n/c) (Motorcycle/ATV Hi-Low beam switch & horn button) *
- Aerobar Left-mount & pad
- Left Hi-Power Cree UniqueFire Flashlight, modified
- Centerline: Da Black Box in front (Master On/Off Key Switch for all power, DC-DC converter which supplies the Aux power to all devices except controllers, and Signal Relay), and CAs mounted behind facing the rider:
- Top CA is for the front wheel, and the bottom CA is for the rear. The top keeps the total Odometer reading, but I found the lower kinda flakes-out periodically, so I used it to keep the daily-only Odometer.
- Right Hi-Power Cree UniqueFire Flashlight, modified
- A gap wide enough for another control *
- USB-Port (x2) power adapter (used for cellphone), suspended below handlebar (barely visible just above the lower CA)
- Aerobar Right-mount & pad
- Control: 3-Way Current Control & Cruise Control (modified Hi-Low beam switch & horn button) *
- Rear Derailleur lever, 9-position, SRAM Attack
- Rear Brake
- Throttle
- Right Bar-end mirror
Notes:
The bar-end mirrors fold in nicely when going through doorways; they are the widest part of the entire bike (including the trailer). There's a small pocket created by the faring on each side, and it makes a great place to stow my gloves when the bike is parked. The aerobars do have one useful feature: It's a great place to hang my helmet. :lol:
Cheers, KF
Left-side Mirrycle, bar ends, ebrake levers, cheap Shimano grip shifters, Serfas TSL-500 headlight, Cateye Strada computer, thumb throttle on a 6061-T6 Bontrager bar. I'm waiting for a CA to arrive, then I'll ditch the Cateye (This model doesn't even have a backlight).
Attachments

StudEbiker
100 kW
That looks like a really long reach to your throttle. I really like my top bar shifters with thumb throttle I use on the TidalForce bike. Those seven speed top bar shifters are cheap and easy to find in 7 spd and would be more comfortable for you I think.
iovaykind
10 kW
Kingfish, what's that fairing made from, did you make it yourself? More info on it please very interested in doing something similar
very interested in doing something similarKingfish
100 MW
Hi iovaykindiovaykind said:Kingfish, what's that fairing made from, did you make it yourself? More info on it please
This might be thread-stealing and OT, but here goes…
I made all my farings from High-Density Polyethylene (HDPE) from Tap Plastics.
Take a look at my P0 and P1 bike builds. I started out using manila cardboard or some sort of craft paper, even butcher paper will do – just something to start out with for modeling. Once you have a pattern figured out, then place it on the plastic, and trace it out with a marker. A steel rule or sometimes a large L-shaped square like carpenters use makes for a great edge to guide a sharp X-acto knife. I prefer to place the HDPE on top of heavy cardboard or plywood, and then cut against that in one stroke. Dull blades might take two – but then yer playing with danger when they get that way. In all the prototyping, I have only cut myself maybe twice.
I like to use black or white zippy cable ties for assembly. I swear I wished I was a stockholder in the company that makes then as I have gone through 100’s of them, I kid you not! :lol:
Seattle Fabrics has an excellent selection of reflective tapes and other fun materials for decorating farings, and for making epic bike bags.
One thing about HDPE is that it cannot be glued; superglue will hold for a short time on static assemblies - although eventually will fail. However HDPE can be sewn, punched, molded by heat to retain it shape, moderately stretched, and it is self-lubricating – lending a soapy-like slipperiness to the surface. Lastly, I use alcohol to clean up the marker pen when the assembly is finished.
These types of farings are very lightweight. The front faring added 2 mph to my top speed by slicing/deflecting the wind. The triangle bag of P1 is protected by an outer shell made of three sheets, and is stitched together with Velcro. The trailer (P2) is covered by HDPE, with the top having silver marine vinyl stitched in.
Maybe we need a thread on faring construction. :wink:
Enjoy! KF
cwah
100 MW
Here is my handlebar:

My handlebar is not as crowded as some I've seen. But my colleague still ask me if my bike can fly :lol:
My GPS is huge, anyone know if there is stealthier GPS holder?
My handlebar is not as crowded as some I've seen. But my colleague still ask me if my bike can fly :lol:
My GPS is huge, anyone know if there is stealthier GPS holder?
StudEbiker
100 kW
Your left brake doesn't look very functional in that picture. :|
thewmatusmoloki
10 kW
Could be one of them new one's that use "the force" instead of a cable.
Need a strong mind though !
Need a strong mind though !
cwah
100 MW
lol. I'm for now using the "power" of my shoes... One shoes on the ground makes me brake :lol:
Now I have a very dangerous bike because the brakes are not working very well. For the front brake, I spend my time adjusting the caliper but it's loose the next day. I don't know how to fix that.

And for the rear brake... there is not caliper (it broke):

Any idea where I can find the right size caliper and with quality? It seems it needs 160 mm size from the front one.
Now I have a very dangerous bike because the brakes are not working very well. For the front brake, I spend my time adjusting the caliper but it's loose the next day. I don't know how to fix that.
And for the rear brake... there is not caliper (it broke):
Any idea where I can find the right size caliper and with quality? It seems it needs 160 mm size from the front one.
Similar threads
- Replies
- 53
- Views
- 6,797
- Replies
- 11
- Views
- 1,970