Show Us Your Homemade Battery Housing

So this is my battery plans, my idea is to keep the batteries intact and just use them as they are. Next step is to make the compartments where they will sit in the frame. But first I will reinforce the frame with another vertical bar.

A literal sack of happiness!!
25159b0070bab4471504708363.jpg
 

Attachments

  • 99759affd4dd47361504705869.jpg
    99759affd4dd47361504705869.jpg
    72.9 KB · Views: 5,850
  • 00559b00505daab21504707845.jpg
    00559b00505daab21504707845.jpg
    45.7 KB · Views: 5,850
More good ideas. I love the diversity of things that people come up with.
My batteries go at the back because my bike has a step-through frame and I can't put anything in that space- I need it to get onto my bike because I can't lift my legs high enough to get over a crossbar. As time has gone on I sometimes now struggle a bit even with the step-through. Panniers on the rear seem to be the best place for me(motor is a big Crystalyte 5300 on the front) but I wish I could use that space under a crossbar.
 
augidog said:
whereswally606 said:
A really neat build, smart too. I wonder what the range is? The motorcycle fairing on the bars seems a bit daft though. Well done.

Sent from my ALE-L02 using Tapatalk

thank you.

when i traveled with the gas drive, i carried almost 200 miles of fuel. now i carry about 50 miles, and i use a portion of that generating electricity. the hub gives me an extra 1/2hp to help the 1.5hp engine on steep grades. also, i use the electric and pedals, no gas, to be polite when the situation calls for it. i always arrive home with the same charge i left with.

the scooter fairing doesn't provide any aero benefits, but it will deflect rain past my faceshield if i tuck behind it. now, if by "daft" you mean "poser" I assure you it's about "function." i run full-time lighting, always have, front and rear, with brake light. the reflector headlight fairing has saved my bacon more than once. plus, it's a great home for my dashboard, which started life as a trashcan flip top.

View attachment 2
View attachment 1


apologies for my off topic replies, this is an excellent thread chock full of great ideas.


Hello, I'd like to know more about the Regen braking ( how you did it in details, parts and such) I'd really like to put in on my ebike. Thank you.
 
Luizlife said:
So this is my battery plans, my idea is to keep the batteries intact and just use them as they are. Next step is to make the compartments where they will sit in the frame. But first I will reinforce the frame with another vertical bar.

Very cool. I'm using Kobalt batteries also, at the same time I'm also building a battery pack out of 18650's. I soldered some Kobalt batteries in parallel to add ah and a smaller footprint. Then I made a quick insert in to the bag that came with my kit. Works great, I just slide the batteries in and I'm off. I got the original idea from YouTuber, vuaeco. I actually used three of his ideas so far. His original box was vertical stacks my is a flat stack. These Kobalt batteries were not very expensive, easy to get and so far very reliable. Anyway can't wait to see your finished product. Good luck.
 

Attachments

  • temp box 1.jpg
    temp box 1.jpg
    70.6 KB · Views: 5,761
chefkendra said:
Luizlife said:
So this is my battery plans, my idea is to keep the batteries intact and just use them as they are. Next step is to make the compartments where they will sit in the frame. But first I will reinforce the frame with another vertical bar.

Very cool. I'm using Kobalt batteries also, at the same time I'm also building a battery pack out of 18650's. I soldered some Kobalt batteries in parallel to add ah and a smaller footprint. Then I made a quick insert in to the bag that came with my kit. Works great, I just slide the batteries in and I'm off. I got the original idea from YouTuber, vuaeco. I actually used three of his ideas so far. His original box was vertical stacks my is a flat stack. These Kobalt batteries were not very expensive, easy to get and so far very reliable. Anyway can't wait to see your finished product. Good luck.


Yes!! Thank you. That's who it was. (I had forgotten(seen a thumbnail on my YouTube feed)) he makes really great stuff.

93259b2808de98b01504870541.jpg

This is how it is currently looking, I added support to the frame, also left a little cubby hole for the controller.
 

Attachments

  • 54059b281a2a5f361504870818.jpg
    54059b281a2a5f361504870818.jpg
    58.1 KB · Views: 5,770
Oh yeah, that's a smart spot to stick the controller. Very creative project. :)
 
30959beb2a00ab641505669792.jpg

This is how it currently looks like. All made from plywood. I have all of the size and measures correct to the point where the batteries can slide in and out well enough for me.


But I have a question. What should I use the put all of the wood pieces together? Glue, nails etc..?
 
Your freaking me out with that frame.....you have to triangulate......squares and rectangles are bad for strength.

As hillhater mentioned.....loose those pack shells and rid your self of that weight.

Please don't ride that bike like it is.....

Tom
 
Luizlife, while it is possible there will be no problems with the frame design, I think you should re-read this post
https://endless-sphere.com/forums/viewtopic.php?f=3&t=12847&start=500#p1316965

Untriangulated, the only thing I can think of that will resist folding stresses is if you put stiff sides on it, that are fastened to the metal frame itself, all along all of the edges of the metal parallelogram.

If the wooden box itself was stiff enough, you might be able to fasten to it, as long as it fully attached to and filling the metal frame (if there are gaps it will allow flex of the frame which will eventually stress and break it).

But either of these things will require you to extend the frame or the box outward so that it is wider than the batteries, so the sides can attach to it.

If you never hit any bumps or potholes, or do any curb hopping, it might not have enough stress to have a problem.
 
I can't recall the term for them, but have used them, coarse threaded (for max bit in wood) brass thingies (inserts?) that have a slot to screw then in with a flat blade driver, and they have a machine screw threaded center. So you screw them in the wood, permanent, and then use machine screws to attach whatever. They hold great, I have some of my home built plane in the baggage area, for access to the elevator pushrod.
 
Yes, I have them in the ends of all the signs I recycled to make the wooden deck and seat/cargobox of SB Cruiser. The ones I've got are crappy die-cast ones that are as big around as my pinky, with 1/4"-20 threads inside. But they make smaller ones.

To use them for the edges of the side covers on the battery box, though, you'd still have to extend the box itself past the batteries.
 
Wanted to add my 2 pence to the list:

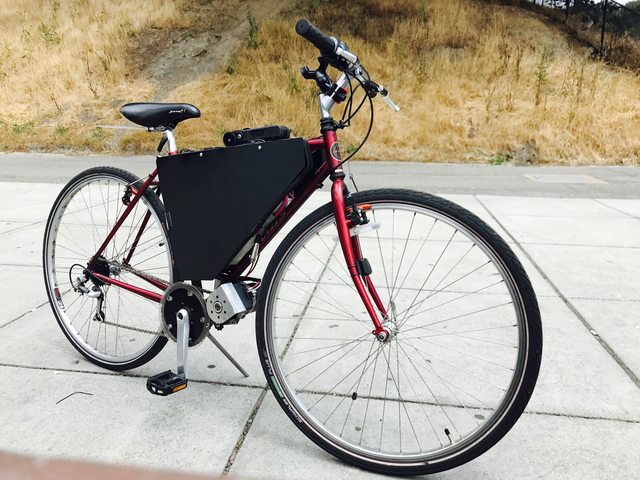
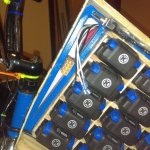
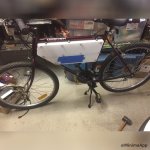
Bike is a 1997 Jamis Aragon with a 48V 15Ah Ping battery. Max Speed is 34 mph on flats with me weighing 200 lbs.


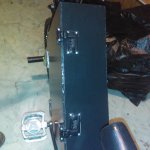
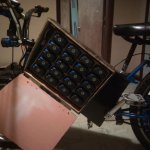
The housing is made of 1 PVC sheet (left side panel), 1 alum. sheet (right side panel), 2" wide flat bar, some cutout alum. sheet rectangles to bend around frame, 1" wide steel flat bar, and alum. angle bar secured together with steel rivet nuts, rivets, and M8 nuts and bolts.

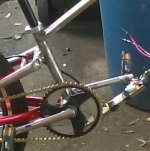
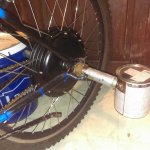
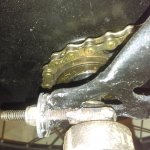
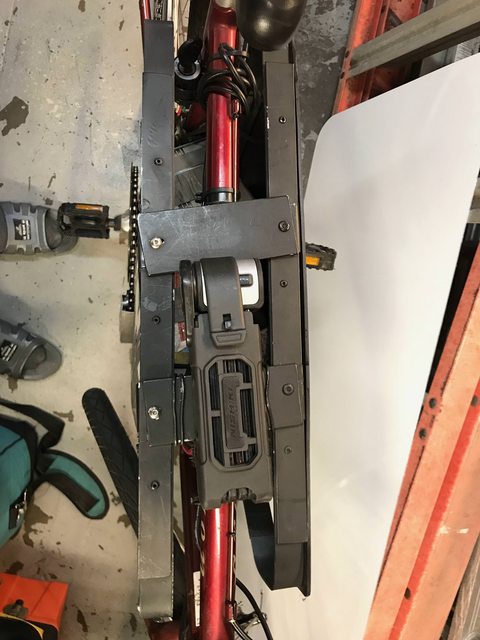
From a design point of view, I spent a lot of time trying to figure out how to make the frame as accessible (especially on the road) as possible with just my Allen wrench set, and I finally found the solution! Two words: Rivet Nuts. They allow me to make a blind threaded hole so parts don't have to be held via nuts and bolts. To demonstrate the serviceability of the frame, it breaks down into 3 groups: panels, left side frame, right side frame. It's held together with 3 nuts and 8 bolts, using pliers or wrench and Allen wrench to reassemble. The main 3 points of contact with the bike frame are the 2 inch wide aluminum flat bars (pain in the ass to cut), with 2 on top and 1 in the rear. The weight of the frame rests on the top two flat bars along with the weight of the battery. I know they shouldn't be used this way, but the rivets holding them to the left side of the frame (right side with bolts) act as pivots to swivel them when disassembling. In total it takes about 10-15 min to take apart, and thankfully I haven't had the need to in a while.

Price-wise ( or Penny-wise :D 
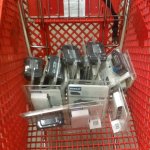
), just the metal frame (fasteners not included) cost around $25 in parts at my local Lowe's. As for my panels, my dad's a contractor so I "borrowed" :wink: them from him, but if I had to do without the expensive aluminum and PVC sheets, I'd just use Coroplast instead and 2-ply that on both sides (around $20 for a 4 x 8 ft sheet). What surprised me was how expensive rivet nuts and bolts cost plus shipping: around $27 on Fastenal :eek: ! Although, I have to say it did include the parts necessary to use a rivet nut in the first place. The rivet nuts were also annoyingly difficult to use right.

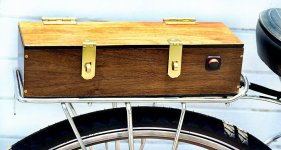
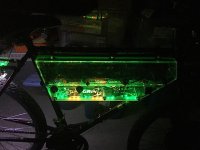
As you can probably tell, it's more a function over form build, but it gets the job done :D 
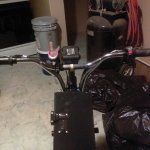
. The right side panel is aluminum because the bike leans left when locked up and the sun had caused the previously PVC right side panel to warp :( . From the front, there's nothing bracing the front of the panels which causes it to bend out a bit there.

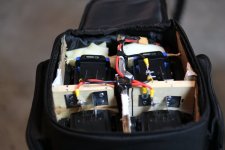
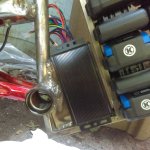
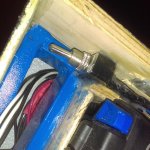
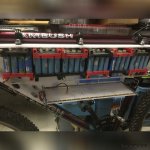
Vibration and bumps-wise, the battery is suspended with wire to prevent it from smashing the wires underneath, but I haven't figured out how to hold the controller in place, causing it to rub against the right panel on bumpy roads.

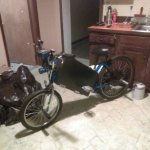
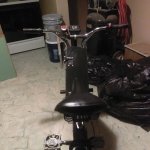
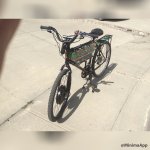
Here's my baby in whole :D :
 
I have been a lurker for years but I finally registered because I am building two more. A Qulbix 76r and a EEB Endurobike (the chinese stealth knockoff) But since I never posted a photo of my last one, this looks like a good as any place to start.

I found that bag on ebay, at the time I didnt even know who em3ev was. But I built this bike from scratch. It started as a GT Aggressor 2.0 I found of Craiglist for 200 bucks and I had never built a electric bike before so there were several iterations before this final photo.

This is a 52V20AH battery with a BMC 6T motor. I got the Marzocchi's off ebay for 250 and had a local bike shop build me a new DH rim after I ruined the stock Suntour forks and rim. I also went thru several back tires and tubes before I landed on this specialized ground control and that tire still amazes me. I have run it over glass and nails sharp rocks and even flat for several miles and it's still good to go. The front tire is a Maxxis Holly Roller and I just bought it cause it looked cool and I will never run another type for as long as I ride. That tire runs perfect on all my regular street trail paths I take and both of them have over 1800 miles on them now.

My hobbies have been elseware the last few years but I still go ride everyday at dusk and usually one big trip every few weekends somewhere in the DFW area. There are 100's of miles of bike trials here. But a few weeks ago my planetary gear in the BMC finally gave out and so now I am back on bikes. I have my floor littered with boxes and parts and I will make some posts on my findings. As I stated I am building one quilbix 76r with all the good stuff and one EEB Chinese knock off frame with all 'reliable' but cheap parts. They both will be powered with the EDGE 1500 watt hub motor. I may go to a MXUS later. I just dont think I will need it after the reviews on the EDGE. I am old and my young dirt bike days have destroyed most of my body parts so I dont ride hard anymore. I just like to ride. The 76r is for me the EEB is for my friend. He is a cheapskate so I thought I would make a project out of it and document the differences between a ~1100 and ~2500 build

I get about 55 miles on a charge with my current setup and have been averaging 17-19 watt hours it tops out at about 31mph. But now that I am building these two new ones all the sudden now all my friends want ebikes too so I was here looking at battery box options for those that just want to convert their MTB. I really liked the little triangle pack in the fat bike. thanks for the idea. I never would have thought to cut PVC in half and flatten it out. Genius.
 
What do you guys think of the almost finished product?

I still have to add the car horn to it..

I've already put over 70 miles on it. There is nothing wrong as I can see. I get a total of 30 mile range on one full charge.

Total price is $584
 

Attachments

  • IMAG0615_resized.jpg
    IMAG0615_resized.jpg
    49.1 KB · Views: 5,235
  • IMAG0616_resized.jpg
    IMAG0616_resized.jpg
    44.4 KB · Views: 5,236
  • IMAG0617_resized.jpg
    IMAG0617_resized.jpg
    43.2 KB · Views: 5,236
  • IMAG0618_resized.jpg
    IMAG0618_resized.jpg
    52 KB · Views: 5,236
  • IMAG0619_resized.jpg
    IMAG0619_resized.jpg
    41.7 KB · Views: 5,235
  • IMAG0622_resized.jpg
    IMAG0622_resized.jpg
    43.4 KB · Views: 5,236
  • IMAG0623_resized.jpg
    IMAG0623_resized.jpg
    74.5 KB · Views: 5,236
  • IMAG0624_resized.jpg
    IMAG0624_resized.jpg
    42.3 KB · Views: 5,236
  • IMAG0625_resized.jpg
    IMAG0625_resized.jpg
    40.9 KB · Views: 5,235
  • IMAG0626_resized.jpg
    IMAG0626_resized.jpg
    67.1 KB · Views: 5,235
  • IMAG0627_resized.jpg
    IMAG0627_resized.jpg
    61.1 KB · Views: 5,235
36 volt 27.2 amp hours 10s8p pack. compact and light weight. NO welding or soldering. A circuit board at the bottom and top makes changing an individual battery easy.
 

Attachments

  • 0503ws2.jpg
    0503ws2.jpg
    154.7 KB · Views: 4,509
Here’s what I came up with when doing my MTB conversion last year.... a box made from 4mm acrylic sheet, 2 sections, one for the 96 cell battery pack, the other for the controller and wiring connections.

I was warned that acrylic is not the best because of cracking with vibration and stress but so far no issues, except when I dropped the side cover on concrete during assembly. All in all it has proven to be a pretty good solution on how to mount a battery onto the bike frame.

An added bonus to using this method was the ability to illuminate the box for night riding. Makes my ride a little unique.

If anyone would like to see more details, I shot some video of my conversion project including the assembly of the box.
 

Attachments

  • EE01A594-940C-40A4-AF46-D5F445AE0EF7.jpeg
    EE01A594-940C-40A4-AF46-D5F445AE0EF7.jpeg
    161.5 KB · Views: 4,443
  • 0A04874F-EC89-4D94-B11A-7153AAA994F7.jpeg
    0A04874F-EC89-4D94-B11A-7153AAA994F7.jpeg
    160.1 KB · Views: 4,443
  • 02AB0C3D-263F-4C23-9B23-6FCC7F55A85C.jpeg
    02AB0C3D-263F-4C23-9B23-6FCC7F55A85C.jpeg
    162.3 KB · Views: 4,443
  • A0AB2713-B2B5-4EA4-893E-847DD49C8E0B.jpeg
    A0AB2713-B2B5-4EA4-893E-847DD49C8E0B.jpeg
    41.5 KB · Views: 4,443
My homemade battery housing - 3.5mm perspex with double layer on the base for strength. Held on with 3 x 12mm u-bolts.
Holds my 14S19P PF EM3EV pack. Used to have controller inside enclosure (note vents on the rear. Has air-intake built into bottom of enclosure)
30A Controller was moved next to crank - (dont recommend for off roading!!) Good for stealth though.
charge port built into back and key switch on the top.
Motor is 6T Mac.
IMG_1800-2.jpgIMG_1793-2.jpgIMG_1799-2.JPGIMG_1801-2.jpg
 
Bobw said:
Here’s what I came up with when doing my MTB conversion last year.... a box made from 4mm acrylic sheet, 2 sections, one for the 96 cell battery pack, the other for the controller and wiring connections.

I was warned that acrylic is not the best because of cracking with vibration and stress but so far no issues, except when I dropped the side cover on concrete during assembly. All in all it has proven to be a pretty good solution on how to mount a battery onto the bike frame.

An added bonus to using this method was the ability to illuminate the box for night riding. Makes my ride a little unique.

If anyone would like to see more details, I shot some video of my conversion project including the assembly of the box.

Are those solderless battery terminals? I have been looking into some other ones and those look pretty heavy duty. The ones I saw have the plastic caps slide over the ends but yours appear to be in blocks which are then bolted together. Do you have any issues with them losing contact? Do you recommend using them and where did you get them? Thanks you!
 
http://www.batteryblocs.com/

Used 8P 12S on my bike. Seems to work well so far. I don’t run a BMS on my pack and do a split pack charge when balancing is required.
 
Bobw said:
http://www.batteryblocs.com/

Used 8P 12S on my bike. Seems to work well so far. I don’t run a BMS on my pack and do a split pack charge when balancing is required.

Very cool, thank you for the link. :) I like how they bolt together. I would think if they ever did start intermittently lose connection on bumps a quick retightening of the bolts would fix it :) I also like the concept because after your batteries die over time you can upgrade to newer batteries and keep your housing, etc.
 
sale thread
https://endless-sphere.com/forums/viewtopic.php?f=31&t=76205&p=1150890&hilit=*batteryblocs*#p1150890

user threads/posts
https://endless-sphere.com/forums/search.php?st=0&sk=t&sd=d&sr=posts&keywords=*batteryblocs*&start=25
 
John and Cecil said:
Bobw said:
http://www.batteryblocs.com/

Used 8P 12S on my bike. Seems to work well so far. I don’t run a BMS on my pack and do a split pack charge when balancing is required.

Very cool, thank you for the link. :) I like how they bolt together. I would think if they ever did start intermittently lose connection on bumps a quick retightening of the bolts would fix it :) I also like the concept because after your batteries die over time you can upgrade to newer batteries and keep your housing, etc.
Neodymium magnets dislike heat, as long as the pack never gets a hot cell or 3, all is well. Batteryblocs are quite large and take up space. But they do work. I like the V2 Vruzend for a more compact solderless build, and no magnets.

Bob’s box rocks! I like it!
 
Back
Top