Dui said:
Not entirely finished but real close, so I thought I'd share it here too...
So this is the battery box I'm building for my motorbike, It all started up with some blue foam:
IMG_5880.JPG
Little update: I finally finished this battery box a few months ago.
First thing was to prepare the BMS by adding some large copper tabs:

Then I designed and 3D printed an enclosure for it, which includes some active cooling with fans and ducts:


Next step was a lot more complex: I decided to design an Air conditioning system capable of both cooling or heating the battery depending on its actual temperature. It works using Peltier Modules, which can generate either heat or cold depending on the voltage polarity you supply to them. This was a lot of work and a long journey...
I started by designing a prototype board to test the functions:

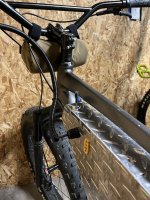
Had to make sure that it could fit under a little removable cover, in front of the battery box:

Once I got satisfied with the results, I designed a more permanent PCB and had it made by a professional PCB company for very cheap. It was quite interesting to do, I had to learn a lot of stuff to get there but eventually it worked out just fine!:

I then installed it on the box:

An actively controlled temperature box can only be effective if there is at least some amount of insulation between the outside and the inside. I had very little space left at this point, so I had to go for a very efficient insulator. I chose to go for a facncy material: aerogel silicate.
I chose this material for two reasons:
-It's the best insulator material I know of, basically 10 mm of this thing is equivalent to 50mm of expansed polyurethane foam
-It can resist to insanely high temperatures for extended periods of time. You can litterally fire a blowtorch directly on it while keeping your hand against the other side, it won't get hot. This might help containing a fire in case of a catastrophic event. At least it should delay it for a little while.
I covered it with Kapton tape because this thing makes aa lot of dust and tiny particles otherwise.


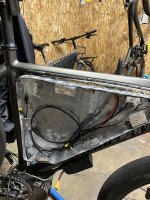
An air cooling system can only work if air is able to go ll around the battery. So I had to desing some channels and some ducts to get the air all around the insides of the box. This was very challenging because I had very little space left after installing the insulation.
Basically, a fan sucks the air from the front of the battery, then the air goes through the Peltier module's heatsinks and goes all around the battery through various channels. Here is a little drawing to make it a bit more clear hopefully:

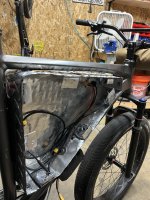
These internal panels also had to feature some channels for the wirign, as well as attachment points and some adjustable brackets to compress the battery so it doesn't move around. I also had to make some room for the BMS wires to go to the battery box as well as the main power wires.
It was really, really hard to get everything in the tight space that I had left, but eventually I got it working!:
Here is the main fan and one of the two temperature/humidity sensor:


The internals completed:

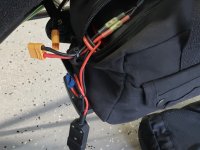
It was then time to make the power wiring:

Last but not least, a good coat of wrinkle paint on the BMS enclosure:


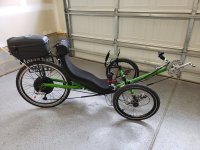
Finally, installed the box back into the frame:

Then the battery....:

And voila, finally job done!

I'll just have to close the lid, but I prefer tto wait a little bit just to make sure everything's fine!
That was a long journey and a lot of work to get there, but it worked out well and I learned a ton of stuff. Didn't know how to make any of that before this build, most of the stuff here was my first attempt, like carbon fiber, PCB making, peltier modules, etc.
Sorry for the very long post, hopefully it will give some inspiration to you guys!

 Don't let your battery get low