The Cycle Satiator, universal charger for the enthusiasts

BVH said:
Tracking shows my Satiator as being delivered tomorrow! Very excited! Looking forward to setting up two profiles for my two identical 51.2 nominal, 12 Ah LiFeP04 packs. 1st is a termination of 3.5 Volts per cell and 2nd is 3.65 Volts per cell. I'll execute the 1st profile charge and when finished, will execute the 2nd to see how much additional capacity goes in.

Hi BVH, did you get a chance to do this?
I've attached in the .zip file a set of charge profiles for 10S and 13S lithium packs at 3.90, 3.95, 4.00, 4.05, 4.10 ,4.15, and 4.20 V/cell respectively. These were used these to charge a battery at each subsequent charge level and used the Satiator's displayed amp-hours to see the incremental amount of additional charge in each phase. It takes a little while since it's in the CV charge mode, so each additional top-up charge required a few hours for the current to settle at exactly 0A. Here's what the results look like for an Allcell 20Ah pack with LG cells, and eZee 15Ah pack with Sony cells, and an an internal 10sx3p pack made with Samsung 25R cells.

Cell Voltage vs SOC, Satiator Data.jpg

You can see that even though the cells all have similar nominal voltage range, the actual relationship between voltage and capacity is pretty unique. With the LG cells, the each additional 0.05V results in a 5% increase in the state of charge. With the Sony cells, it's a ~6% increase up to 4.1V/cell, but then going from 4.10-4.15V and from 4.15-4.2V we only have a 3% increase. While with the Samsung 25R cells, going from 4.00V to 4.05V / cell resulted in way more capacity uptake (over 10%) compared to 4.05->4.10V, which only resulted in an additional 3% charge increase.

In the default profiles that ship with the Satiator I somewhat arbitrarily called a 4.05V/cell charge an "80%" charge, but this was pulled from thin air. Now we can see that in reality, charging to 4.05 V/cell results in an 87% charge with the Sony pack, an 85% charge with the LG pack, and a 91% charge on the Samsung 25R pack. If you just want an 80% charge, then 4.00 V/cell is more appropriate.

I was really curious to see how well we could derive this same %SOC vs. charge voltage relationship from the _discharge_ curve of a battery pack, since that is a lot easier to get than charging to discrete voltages, waiting for ages for the current to trickle down, and then recording the incremental Ah that went in at each stage.

In the basic modal of a battery pack, where the cell is assumed to have some voltage based on the state of charge, and a fixed internal resistance, then we have the simple relationship:
Vterminal = V(SOC) - IR.
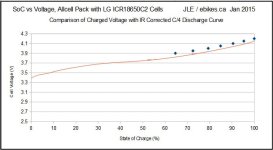
In which case we could get the desired Voltage-SOC relationship by simply accounting for the voltage drop lost to the DC internal resistance [ ie. V(SOC) = Vterminal + IR]. However, when the two data sets are plotted, they don't quite work out that way. Here is the data with the Allcell pack, where we accounted for the internal resistance on the discharge curve with the actual measured pack impedance (0.13 mohms)
SOC vs Voltage, Graph with Expected IR term.jpg

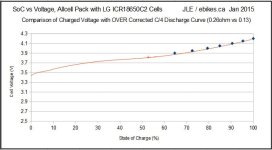
That this says is that if we charge a cell to 3.9V it will be about 65% charged. However, if we discharge the cell to 3.9V, even accounting for the internal resistance (so that might be 3.7V, 3.8V etc. depending on the current draw), it will wind up at around 75% charged. Ideally we would expect the cell to be at the same capacity whether we got there by charging or discharge. But the shape of the curve is still similar, and if I doubled the internal resistance term then it effectively made the discharge curve match up very neatly with the charging points that were measured before
SOC vs Voltage, Graph with Doubled IR term.jpg

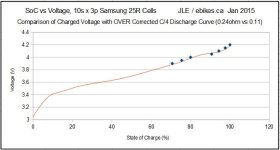
The same trick worked fairly well with the Samsung pack, and you can see that the funky business between 4.0 and 4.05V exist on the discharge curve just like we noticed when charging to these points
SOC vs Voltage, Samsung 25R.jpg

The point of the exercise was so that we could provide people with a more accurate figure for determining how much capacity they'll have for different partial charge levels, but what it made clear instead is that this relationship is quite dependent on the exact cells that are used.
 

Attachments

  • 3.9 to 4.2V Charge Characterizations.zip
    1 KB · Views: 42
New goodies for 2015 everyone. We'd been planning to have some kind of web application for the Satiator to help people create custom charge profiles, but the data we were seeing from my previous post made it clear that we really needed a comprehensive charge simulator to give people the required info. Simulating a battery charge might seem as exciting as simulating paint dry, but it's actually a lot more interesting than I was expecting.

First, go here:
http://www.ebikes.ca/SatiatorWebApp/main.php

On the top left, you can choose your battery pack from the drop down (we have the Allcells, eZee, and several EM3EV packs modeled), OR, you can choose the "custom battery" option and then select the cell type and the series/parallel cell count.
Web App Pack Selection.jpg

At the moment we've only got 4 cells modeled here, the Samsung 22P and 25R cells as well as the LG and Sony cells used in Allcell and eZee packs respectively, but we'll plan to get a lot more choices up there when we have the time to source and characterize them. Once you have the pack, you can then set your desired charge profile in terms of the % charge level, bulk current rate, and charge complete threshold current, and presto it will show up the expected charging graph.

Web App Example Curve.jpg

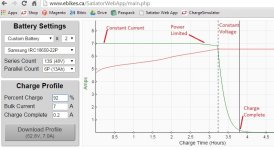
The example above shows what you'd see with two 13s 6p Samsung 22P batteries in parallel, for a total 26Ah, when charging with a 7A charge profile to 92% capacity (or 24Ah). You can see the 7A constant current region for the first 2.7 hours, and at that point the voltage has raised to the point where the Satiator is power limited at 360W. So from 2.7 hours to 3.2 hours the current decreases a bit from 7A to 6.8A as the power is maxed.
Then at just over 3.2 hours the satiator hits the constant voltage target, and we have the current ramp down exponentially until at 3.6 hours it has dropped below the 0.2A "charge complete" threshold and the Satiator would say "complete" (even though you can see it is still clearly trickle charging right until 4hrs).

Now for the fun bit, click the button "Download Profile" and you should get a pop-up dialog to save the afore mentioned profile into a .xml file which you can then open up in the Satiator software suite and program to your device. The profile download function so far is only tested on Chrome, we haven't validated it with other browsers, but you should get the idea.

Download Profile from Web App.jpg
 
"BVH wrote:Tracking shows my Satiator as being delivered tomorrow! Very excited! Looking forward to setting up two profiles for my two identical 51.2 nominal, 12 Ah LiFeP04 packs. 1st is a termination of 3.5 Volts per cell and 2nd is 3.65 Volts per cell. I'll execute the 1st profile charge and when finished, will execute the 2nd to see how much additional capacity goes in."


I did do this but I don't remember the exact number. But I do remember it was negligible. I settled on 3.6 VPC since I don't know anything about the balancing BMS inside the case - whether or not it takes a threshold Voltage to initiate the balancing sequence. After the next ride, I'll do it again and report back. These are LiFeP04 packs so such a small increase in termination Voltage is going to result in almost nothing - IIRC.

Great to see all the new "extras" in your posts!!
 
justin_le said:
On the note of firmware updates, we've just done a V0.916 build which is available if you click "check for latest software". This should address two issues. First, a couple people had contacted us after getting an erroneous "power fault: restart" error message right at the end of charging with the V0.914 builds even though everything was in principle perfectly fine, which would be fixed in this release.

With firmware 0.914 I have been getting the "Pwr: Fault" error at the start of charge about 1 out of every 4 times I start charging a battery. It has only been a nuisance as I have learned to wait until I see that charging has started before leaving the charger unattended. But, since 0.914 I have not seen a charging session cut short by this error, nor have I seen the message appear at the end of the charge cycle as others have reported.

My batteries have been 7s LiPo with 46-92 Ah capacity.

I will update to 0.916 and report back if I see this error reappear.
 
How did this work out for you?

Marc S. said:
Ahem Justin...

I've used a text editor and changed the 60V max voltage restriction for Lithium batterys in the current firmware (v 0.914.4) to 63V to be able to fully charge a 15s/55.5V lithium battery.
Unfortunately the battery is full already, so I couldn't run a proper charge cycle yet. The Satiator correctly states the battery is full at 63V, though.

Any potential harm for the Satiator with this little firmware 'hack'?
As far as I could decipher the firmware code, lead and nickel battery profiles have a 63V max voltage restriction as well.
 
zlagger said:
How did this work out for you?

Marc S. said:
Ahem Justin...

I've used a text editor and changed the 60V max voltage restriction for Lithium batterys in the current firmware (v 0.914.4) to 63V to be able to fully charge a 15s/55.5V lithium battery.
Unfortunately the battery is full already, so I couldn't run a proper charge cycle yet. The Satiator correctly states the battery is full at 63V, though.

Any potential harm for the Satiator with this little firmware 'hack'?
As far as I could decipher the firmware code, lead and nickel battery profiles have a 63V max voltage restriction as well.

Well, it works.
I really like my Satiator 638. :D
 
Marc S. said:
Ahem Justin...
Any potential harm for the Satiator with this little firmware 'hack'?

No there isn't really risk of harm. We've been a little undecided about how to deal with the needs to charge just slightly over 60V (to 63V, as occasionally needed for 48V nominal Nickel or even 48V lead in equalizing voltage) while still having it certified as a low voltage device which states the output voltage must no more than 60V. But for now it is only enforced in setting up the profiles on the software end or via the satiator buttons, but not if you directly load the XML file with the higher value. There are hard limits that ARE taken care of by the firmware regardless of the parameter file (like the 63V, and 8A currents) but the 60V is more of a soft limit.

-Justin
 
justin_le said:
Marc S. said:
Ahem Justin...
Any potential harm for the Satiator with this little firmware 'hack'?

No there isn't really risk of harm. We've been a little undecided about how to deal with the needs to charge just slightly over 60V (to 63V, as occasionally needed for 48V nominal Nickel or even 48V lead in equalizing voltage) while still having it certified as a low voltage device which states the output voltage must no more than 60V. But for now it is only enforced in setting up the profiles on the software end or via the satiator buttons, but not if you directly load the XML file with the higher value. There are hard limits that ARE taken care of by the firmware regardless of the parameter file (like the 63V, and 8A currents) but the 60V is more of a soft limit.

-Justin

Thats about what I thought.
I've seen the 63V limits at the nickel and lead chemistries and had a feeling I wouldn't do much harm.

Why was there a min voltage limit of 12V?
Is it possible/advisible to go under the 12V limit? I have some 2s LiPo packs and it would be nice to be able to use the Satiator for some occasional bulk charge (to 4.1V max) when I'm 'on the road'.
 
justin_le said:
But for now it is only enforced in setting up the profiles on the software end or via the satiator buttons, but not if you directly load the XML file with the higher value. There are hard limits that ARE taken care of by the firmware regardless of the parameter file (like the 63V, and 8A currents) but the 60V is more of a soft limit.

-Justin

Good to know! So, I don't actually have to edit the firmware file...

It is probably way safer for every body who likes to charge to 63V to edit the XML file of the charging profiles.
Or simply use the Satiator Web App to create a 15s 63V charging profile. Nice work-a-round.


Satiator Web App:
Downloading a charging profile doesn't work with Firefox 35.0.1 on OSX 10.8.5 or Win7 64. No luck with Safari 5.1.7 under Win7 either.
Safari 6.2.2 on OSX 10.8.5 will not open a download window but opens the XML file in the same window.
 
BVH said:
I did do this but I don't remember the exact number. But I do remember it was negligible. I settled on 3.6 VPC since I don't know anything about the balancing BMS inside the case - whether or not it takes a threshold Voltage to initiate the balancing sequence. After the next ride, I'll do it again and report back. These are LiFeP04 packs so such a small increase in termination Voltage is going to result in almost nothing - IIRC.

Went for a nice long ride today. Brought in my charger to update to .916. Did a crazy thing - opened the ProfileEditor and connected to the unit. Without observing too carefully, I chose "Write Profiles" and sent an empty "list" of profiles to the unit. This erased all profiles in the unit. Unfortunately, I then terminated communication. When I re-established communication, I could not enter Setup no matter what I tired including the Up and Down button push and hold. So I ended up having to create a dummy profile using the unit buttons. Once created, I could then enter Setup and finish creating and writing my profiles via the Profile Editor. What a comedy of errors I made! Maybe on the next update, allow the user to enter Setup no mater the state of profiles?

I'm using two each, 51.2V/12 Ah pouch LiFeP04 packs in parallel when I ride so they will be completely equalized when I start charging one at a time. I will charge each pack to 3.5 VPC, let each one sit for an hour and then charge each one to 3.65 VPC and record the additional mAh and report here.
 
BVH said:
Went for a nice long ride today. Brought in my charger to update to .916. Did a crazy thing - opened the ProfileEditor and connected to the unit. Without observing too carefully, I chose "Write Profiles" and sent an empty "list" of profiles to the unit. This erased all profiles in the unit. Unfortunately, I then terminated communication. When I re-established communication, I could not enter Setup no matter what I tired including the Up and Down button push and hold. So I ended up having to create a dummy profile using the unit buttons. Once created, I could then enter Setup and finish creating and writing my profiles via the Profile Editor. What a comedy of errors I made! Maybe on the next update, allow the user to enter Setup no mater the state of profiles?

Yes, currently if the Satiator has no profiles active, then the behavior on power up is that it prompts you to enable at least one profile before it can then go into normal operation from which setup menu is accessed etc. That's just a consequence of the startup code being written well before we had the setup menu, it should be changed that a double button press even from here enters the setup menu too. Remember that you can always get the satiator to be in communication mode by holding down the lower button when you apply AC power, but it takes an annoyingly long amount of time for the satiator to turn off when you unplug it so often it's faster just to create a quick profile than to power cycle the device.

I'm using two each, 51.2V/12 Ah pouch LiFeP04 packs in parallel when I ride so they will be completely equalized when I start charging one at a time. I will charge each pack to 3.5 VPC, let each one sit for an hour and then charge each one to 3.65 VPC and record the additional mAh and report here.

OK, with a balanced LiFePO4 pack I doubt you'll even get enough additional Ah to register on the display when going from 3.5 to 3.65V. It's more with the other flavors of lithium that this gets interesting.
 
Battery #1: Took 7.74 Ah to 56 Volt (3.50 VPC) termination profile. Took a whopping additional .02 Ah and 1.5 Wh to 58.4 Volt (3.65 VPC) termination.
 
http://www.ebikes.ca/SatiatorWebApp/main.php

Refresh your browser if you checked it out already, and you should now see a table under the graph showing the numeric totals of each section. So you can see the time spent during bulk charging versus the constant voltage regime, and the respective amp-hours and watt-hours into the pack for each section. (The Trickle region is remaining charge after the Satiator says "charge complete" where the current is less than the charge complete current threshold).

Data Table.jpg

As expected, when you choose packs that are made with cells that have low resistance like the Samsung 25R's, the amount of time spent in a constant voltage regime is quite short and almost all the charging is completed in the bulk charge period, but packs with higher resistance cells will have slower decay of current in the constant voltage (CV) section. However, if you play around with the Percent Charge value for a given battery, you'll see that the duration of the CV period can vary quite a bit depending on the slope of the SOC vs Voltage relationship at that particular point. If it's fairly flat, then there will be a long CV period, while steeper slope has a shorter duration.

Here's an example, with an EM3EV pack using Samsung 22P cells and a 0.5A complete current. With a 100% charge the CV period lasts 0.19 hours, while on a 90% charge profile it lasts over 3 times as long, 0.66 hours, resulting in a somewhat odd phenomenon that it takes _longer_ overall to charge the pack to 90% of capacity than to 100% capacity. Go figure. The 90% profile goes into constant voltage mode earlier of course, but it takes so much more time at that voltage to trickle down to the Complete Amps threshold that the overall charge period lasts an extra 7 minutes more, for 1.2 fewer amp-hours in the pack.

CV Time at 100% with 22P cells.jpg
CV Time at 90% with 22P Cells.jpg

but it's actually a lot more interesting than I was expecting.

As I was sayin' !
 
Pardon my ignorance on the device, but can you shorten charge time considerably and achieve a similar (approx. 90%) charge level with the Satiator just by choosing a higher termination current? For example, set termination voltage to 4.20V for Li-Co but set termination current for the CV portion of the charge to 500mA or whatever results in a 90% SOC?
 
rscamp said:
Pardon my ignorance on the device, but can you shorten charge time considerably and achieve a similar (approx. 90%) charge level with the Satiator just by choosing a higher termination current? For example, set termination voltage to 4.20V for Li-Co but set termination current for the CV portion of the charge to 500mA or whatever results in a 90% SOC?

That should work to some extent too if the Satiator actually stopped outputting once it hit the charge complete current, but you wouldn't have quite as much control over the exact charge level in the pack once it terminates since it would change with the internal resistance of the battery (which changes both due to aging and temperature). The main strategy we were planning to reduce the CV time is by doing an IR compensation for the internal battery resistance as discussed and illustrated here:
http://endless-sphere.com/forums/viewtopic.php?p=963149#p963149
But it may prove more complicated than I was initially hoping to get right, since there are a lot of chemical relaxation and hysteresis effects, in which case maybe just a quick cutoff shortly after CV may be easiest.

But yes it will be one of the Satiator development goals to rapidly reach a target SOC on the battery without a prolonged exponential current decay.
 
justin_le said:
...But yes it will be one of the Satiator development goals to rapidly reach a target SOC on the battery without a prolonged exponential current decay.

I know that using charge termination current is a moving target. One of the nice things about this charger is it''s relative portability. The exact charge level isn't that important to someone on the road who wants a quick charge boost to reach a destination. I like the idea of a selectable "quick charge" mode that terminates at the end of, or shortly after the end of, the CC portion of the charge. This functionality seems to be a good fit for this device. If there is another way to achieve a fast charge, great!

I know someone can always pull the battery off the charger sooner. But if this charger has an audible signal on "quick-charge" completion, then the rider can get on his/her way quicker. For that matter, if the Satiator could be programmed to provide an alarm on completion of the CC portion of the charge in normal CC-CV mode, then that would be equally helpful in this scenario.
 
rscamp said:
[I know someone can always pull the battery off the charger sooner. But if this charger has an audible signal on "quick-charge" completion, then the rider can get on his/her way quicker. For that matter, if the Satiator could be programmed to provide an alarm on completion of the CC portion of the charge in normal CC-CV mode, then that would be equally helpful in this scenario.

The Satiator screen gives this information. If the voltage is the termination voltage and the current less than the set CC current then the charger is in CV mode.

I would like to see the data for the previous charge session (e.g. charge time and amps-hour restored to the battery) remain on the display after the charger is disconnected from a battery. With current firmware (0.916), that information is lost the moment the battery is disconnected.
 
mrbill said:
rscamp said:
[I know someone can always pull the battery off the charger sooner. But if this charger has an audible signal on "quick-charge" completion, then the rider can get on his/her way quicker. For that matter, if the Satiator could be programmed to provide an alarm on completion of the CC portion of the charge in normal CC-CV mode, then that would be equally helpful in this scenario.

The Satiator screen gives this information. If the voltage is the termination voltage and the current less than the set CC current then the charger is in CV mode.

I would like to see the data for the previous charge session (e.g. charge time and amps-hour restored to the battery) remain on the display after the charger is disconnected from a battery. With current firmware, that information is lost the moment the battery is disconnected.


I like this suggestion too. It would come in handy in some situations
 
Justin,

Just had my first oportunity to recharge my "36 volt", 30 Ah Ping pack, since updating to VO.916. I have the Full Volts set to 45.0V, the Bulk Amps set to 8.0A, and the Complete A set to 0.40A. This setting had allowed me to get all 12 LEDs lite on the BMS, and then the charge to finish soon after. However, with the VO.914 upgrade I had seen the Pw faulty: restart error message shortly after charge finished.

This time, with VO.916, it got to 45 volts as the eleventh LED lite, but before the twelfth could come on, the voltage started jumping around from the 30s to the 50s, and then went to the error message even before charge ended.
 
Warren said:
This time, with VO.916, it got to 45 volts as the eleventh LED lite, but before the twelfth could come on, the voltage started jumping around from the 30s to the 50s, and then went to the error message even before charge ended.

I've seen the charge voltage jump briefly above the set termination voltage as a BMS-protected battery reaches its maximum state of charge, where I suspect that the BMS is shunting current. But, I did not see large jumps in voltage. For a termination voltage of 29.4, I was seeing the voltage jump rapidly and alternately from 30 to 31.5 volts. I saw no Pwr: Fault error at that time.
 
Warren said:
Justin,

Just had my first oportunity to recharge my "36 volt", 30 Ah Ping pack, since updating to VO.916. I have the Full Volts set to 45.0V, the Bulk Amps set to 8.0A, and the Complete A set to 0.40A. This setting had allowed me to get all 12 LEDs lite on the BMS, and then the charge to finish soon after. However, with the VO.914 upgrade I had seen the Pw faulty: restart error message shortly after charge finished.

This time, with VO.916, it got to 45 volts as the eleventh LED lite, but before the twelfth could come on, the voltage started jumping around from the 30s to the 50s, and then went to the error message even before charge ended.

Hey Warren,

This is likely the BMS 'tripping' as some of the per-cell voltages are over the specified amount. Do you know what the actual per cell voltage upper limit on the BMS is? 3.75V/cell charging I could see easily being too close to this limit if the cells are out of balance. Typically we'd be charging LiFe cells to 3.65V/Cell. Would you be willing to repeat your testing at 44.0V and see if the charger will enter this voltage fluctuation?
 
robbie,

"This is likely the BMS 'tripping' as some of the per-cell voltages are over the specified amount."

Why didn't I see the problem with the original software? The LEDs usually all light within a minute.

"Do you know what the actual per cell voltage upper limit on the BMS is?

Charging for several years at 45 volts, 10 amps, with paralleled Ping chargers, if I let it sit on the charger, cycling on and off for 15 minutes at the end, the unplugged battery would sit at 44.4 volts, so 3.7 volts per cell.

"Would you be willing to repeat your testing at 44.0V and see if the charger will enter this voltage fluctuation?"

It would probably double my charge time.
 
Back
Top