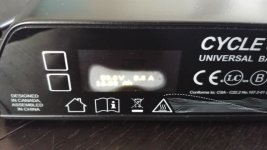
Does anyone know if it would be possible to use the charger as a DC input to a LIPO charger? My Bafang motor is dead and I don't use the charger that much these days. I have started flying drones and charge LIPO batteries. I have a LIPO charger that takes 24-32v DC input and it would be perfect to use the Cycle satiator charger as input. Is the charger to smart or can I make it dumb enough to act as a DC input?
You are using an out of date browser. It may not display this or other websites correctly.
You should upgrade or use an alternative browser.
You should upgrade or use an alternative browser.
The Cycle Satiator, universal charger for the enthusiasts
- Thread starter justin_le
- Start date
JackFlorey
100 kW
You can use it using the "force start" feature. You can set up termination criteria that are never met to ensure it doesn't power off prematurely.
Dumb question - why don't you just use the Satiator to charge your battery? Is the charge voltage below 12 volts? Even 3S batteries are 12.6V.
Dumb question - why don't you just use the Satiator to charge your battery? Is the charge voltage below 12 volts? Even 3S batteries are 12.6V.
Has there been any announcement of a fix or recall for the screen problem yet? Grin's video about replacing the display shows there is a second piece of plastic underneath the sticker faceplate.
https://www.youtube.com/watch?v=VzpCg_TYk00&t=57s
It appears air bubbles are trapped between them during manufacturing which can lead to condensation forming. This charger hasn't left my desk and has never been exposed to water.
https://www.youtube.com/watch?v=VzpCg_TYk00&t=57s
It appears air bubbles are trapped between them during manufacturing which can lead to condensation forming. This charger hasn't left my desk and has never been exposed to water.
Attachments
markz
100 TW
I would like an on/off switch on my Cycle Satiator, I can deal with the bubble on the screen.
I just unplug the Satiator because I dont want the screen to burn in, yes the text does move around so good call on that. :thumb:
Not sure if this is the right thing to do but after the charge on my battery is complete I just abort the charge. The other option in the manual linked below is tp just unplug the battery. I just feel as though "aborting" a charge is a negative and the product Grin puts out is very positive and should be Feng Shui, so maybe top button should be quickly depressed to confirm charge complete and go to main menu of charge voltages/currents, and hold down bottom button is abort.
https://endless-sphere.com/forums/viewtopic.php?f=14&t=60169&p=914827&hilit=abort#p914827
2014 -
Going to the manual
https://ebikes.ca/amfile/file/download/file/198/product/58/
1.4 - Terminating Charge
The charge process can be stopped by allowing the charge to finish, unplugging
the battery, or by aborting charge.
1.41 - Charge Complete
If the battery is left charging until reaching a full charge,
the title bar will invert and say CHARGE COMPLETE
allowing you to see from a distance that the cycle has
finished. You will also see a summary of the elapsed
charge time and amp-hours delivered to the battery.
Figure 7: On charge complete,
voltage, time, and amp-hours still visible
With batteries that have a constant voltage end of charge mode, it is possible for
small currents to continue flowing into the battery when the output says
complete. CHARGE COMPLETE does not mean that the output is disabled, just that
the full voltage has been reached and the charge current has decayed below the
charge complete amperage threshold specified for the profile.
1.42 - Pack Disconnect
You can also stop the charge by simply disconnecting the battery from the
charger. Once the battery is removed, the screen will return to saying CONNECT
BATTERY. At this point, it will continue to show the previous charge amp-hours on
the display. If the battery is plugged back in within 5 seconds, then it will resume
charging from the previous amp-hours and time, but if the delay is longer then it
will start a new charge cycle with the amp-hours and time starting from zero
again.
I just unplug the Satiator because I dont want the screen to burn in, yes the text does move around so good call on that. :thumb:
Not sure if this is the right thing to do but after the charge on my battery is complete I just abort the charge. The other option in the manual linked below is tp just unplug the battery. I just feel as though "aborting" a charge is a negative and the product Grin puts out is very positive and should be Feng Shui, so maybe top button should be quickly depressed to confirm charge complete and go to main menu of charge voltages/currents, and hold down bottom button is abort.
https://endless-sphere.com/forums/viewtopic.php?f=14&t=60169&p=914827&hilit=abort#p914827
2014 -
Well functionality has changed to this. I bought mine 2 yrs ago I think, I gotta base it on during covid or before and I cant remember."So that will need to be addressed, and we'll have something like pressing both buttons together will abort a charge that is underway and return you to the profiles list. "
Going to the manual
https://ebikes.ca/amfile/file/download/file/198/product/58/
1.4 - Terminating Charge
The charge process can be stopped by allowing the charge to finish, unplugging
the battery, or by aborting charge.
1.41 - Charge Complete
If the battery is left charging until reaching a full charge,
the title bar will invert and say CHARGE COMPLETE
allowing you to see from a distance that the cycle has
finished. You will also see a summary of the elapsed
charge time and amp-hours delivered to the battery.
Figure 7: On charge complete,
voltage, time, and amp-hours still visible
With batteries that have a constant voltage end of charge mode, it is possible for
small currents to continue flowing into the battery when the output says
complete. CHARGE COMPLETE does not mean that the output is disabled, just that
the full voltage has been reached and the charge current has decayed below the
charge complete amperage threshold specified for the profile.
1.42 - Pack Disconnect
You can also stop the charge by simply disconnecting the battery from the
charger. Once the battery is removed, the screen will return to saying CONNECT
BATTERY. At this point, it will continue to show the previous charge amp-hours on
the display. If the battery is plugged back in within 5 seconds, then it will resume
charging from the previous amp-hours and time, but if the delay is longer then it
will start a new charge cycle with the amp-hours and time starting from zero
again.
I have a 72V Satiator and was using it without issue for about a year until a few months ago it started reporting "Power Fault" randomly. Usually power cycling fixed it, but recently it's happening more and more. I noticed it does it more on higher amp settings and measuring the output it is giving about 0.3-0.4A more than stated. I can't charge above 4.3A or it always faults.
Lately it also errors with a short error and shows 0.2-0.3v shorted.
Initially I thought it might be my AC power cable, so replaced that, but it continues. I opened it up to see if I could find anything wrong but it all looks fine.
Does anyone have any idea and know what I can look at?
Is this kind of issue something a firmware update is likely to fix? I do have the USB->Serial cable, but would need to make up an XLR adaptor to use it...is it worth the hassle?
Cheers
markz
100 TW
I have no clue how all the pre-programmed charging profiles got deleted on my Satiator.
After I am done charging I unplug the charging cable and unplug the power input cable to Satiator.
Now I have to edit the only profile I have, from 57.5V @ various amps usually 5A, to 58.8V at 8A but sometimes I want it at 52V at 2A. I tried scrolling through the Satiators menu and nothing stood out to add more profiles. I will take a closer look at the menu and have to read the instructions.
On the battery I purchased from Grintech, I switched the Powerpoles to XT90 because thats what my controller uses. I thought the DC barrel on the Satiator charger was another method for charging but its a communications port. Luckily I never tried to find a DC plug for that to charge my Makita :lol:
https://ebikes.ca/shop/electric-bicycle-parts/charger-accessories/xlr-st3.html
Well I dont know if I want to spend $16 + shipping for XT60, means I need to swap out the Makitas from XT90 to XT60.
https://ebikes.ca/shop/electric-bicycle-parts/charger-accessories/xlr-to-male-xt60.html
or buy the other side of the 3 pin ST female and just not use the 3rd pin.
Come to think of it, I know my local shop has XLR, I can just go directly from the charger output pins to Makita.
https://www.be-electronics.com/searchresults.asp?Search=xlr
I went to the local store and bought this, took the Satiator cord in with my and it fits nice.
$7.01 - https://www.be-electronics.com/product_p/a3f.htm
I need to go back to the store to buy some 3 conductor cable with black housing that will fit the rubber seal on the A3F nicely. Will try to throw some heat shrink inside the housing to cover the solder job but it will probably be to short a wire for that. Maybe just throw in some electrical tape around each solder job.
The connection points for the A3F are V shaped for a solder job.
Seems to be all light colored cables https://www.be-electronics.com/product_p/5301.htm
https://www.be-electronics.com/product_p/4198.htm
https://www.be-electronics.com/product_p/4200.htm
https://www.be-electronics.com/product_p/e3043s.htm
Just need to figure out what all 3 pins do when the plug is keyed in.
I need to hit up an RC store to buy some XT90's and I should be able to bulk charge the Makita pack as a single pack instead of split for the first time ever (bulk charge as one unit)
I actually hit up a store today, they wanted $14 for a male and female XT90.
Just checked another local store, they want $12.99 for the same thing.
Another store wanted $8 for the same thing.
To bad Hobbyking is all out of XT90, can buy a set of 5 pairs for $8.
edit -
Thank God Justin makes a dumb-proof charger.
As I wipe the sweat from my face.
The connector on the cable non-charger sides are 3 pin Neutrik XLR connector, I believe the musical world uses them so should be real sturdy and quality otherwise why would Grintech use them.
FYI don't go by a random website on XLR pinout
The pinout can be whatever anyone wants I guess :shrug:
Satiator 3 pin XLR pinout
https://ebikes.ca/amfile/file/download/file/156/product/679/
https://www.neutrik.com/en/product/nc3fxx?c=audio
Click on the PDF download -- Drawing NC3FXX
Leads you to a pic, this is female side of the attachment which connects to the main cable.
I dont know what the twist on connector is for the charger side. Much narrower spacing.
View attachment 2
So ya, I wired it up to as shown.
Now there is nothing wonky going on with the charging process of only + and -
The XLR I bought works.
Same as the link above but here it is again.
https://www.be-electronics.com/product_p/a3f.htm
I just did not strip back the insulation to the proper length and went to far
Its got to be pretty close for these XLR's and the stupid little lock threads are a real b.tch to deal with.
Well the 8A Satiator I have can not charge below 24V, I need 21.00V to charge each half of my pack to the same voltage. My DMM only reads to one decimal point when its in the 10's range which rounds up or down. Readings usually go 20.2V and 20.3V, so will set bulk charge of full pack to 41.8V for 10S.
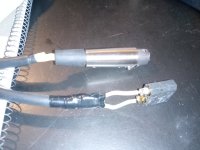
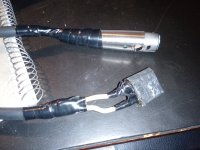
Some final pictures
Thank god for electrical tape too
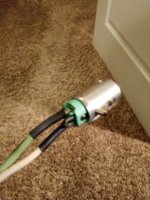
The metal casing doesnt have a set screw, lost it. It comes with it already threaded all the way in, and I unscrewed it and tried to thread it in from the top, doesnt work, upon looking closer screw looks to big so it must thread outward and push up on casing. I dont know. You can clearly see the set screw with the metal tab piece for casing grounding.
After I am done charging I unplug the charging cable and unplug the power input cable to Satiator.
Now I have to edit the only profile I have, from 57.5V @ various amps usually 5A, to 58.8V at 8A but sometimes I want it at 52V at 2A. I tried scrolling through the Satiators menu and nothing stood out to add more profiles. I will take a closer look at the menu and have to read the instructions.
On the battery I purchased from Grintech, I switched the Powerpoles to XT90 because thats what my controller uses. I thought the DC barrel on the Satiator charger was another method for charging but its a communications port. Luckily I never tried to find a DC plug for that to charge my Makita :lol:
https://ebikes.ca/shop/electric-bicycle-parts/charger-accessories/xlr-st3.html
XLR to 3 Pin ST charger plug. Includes the TRS cable for communications with a PC using USB adapter for the Cycle Satiator
Well I dont know if I want to spend $16 + shipping for XT60, means I need to swap out the Makitas from XT90 to XT60.
https://ebikes.ca/shop/electric-bicycle-parts/charger-accessories/xlr-to-male-xt60.html
or buy the other side of the 3 pin ST female and just not use the 3rd pin.
Come to think of it, I know my local shop has XLR, I can just go directly from the charger output pins to Makita.
https://www.be-electronics.com/searchresults.asp?Search=xlr
I went to the local store and bought this, took the Satiator cord in with my and it fits nice.
$7.01 - https://www.be-electronics.com/product_p/a3f.htm
I need to go back to the store to buy some 3 conductor cable with black housing that will fit the rubber seal on the A3F nicely. Will try to throw some heat shrink inside the housing to cover the solder job but it will probably be to short a wire for that. Maybe just throw in some electrical tape around each solder job.
The connection points for the A3F are V shaped for a solder job.
Seems to be all light colored cables https://www.be-electronics.com/product_p/5301.htm
https://www.be-electronics.com/product_p/4198.htm
https://www.be-electronics.com/product_p/4200.htm
https://www.be-electronics.com/product_p/e3043s.htm
Just need to figure out what all 3 pins do when the plug is keyed in.
I need to hit up an RC store to buy some XT90's and I should be able to bulk charge the Makita pack as a single pack instead of split for the first time ever (bulk charge as one unit)
I actually hit up a store today, they wanted $14 for a male and female XT90.
Just checked another local store, they want $12.99 for the same thing.
Another store wanted $8 for the same thing.
To bad Hobbyking is all out of XT90, can buy a set of 5 pairs for $8.
edit -
Thank God Justin makes a dumb-proof charger.
As I wipe the sweat from my face.
The connector on the cable non-charger sides are 3 pin Neutrik XLR connector, I believe the musical world uses them so should be real sturdy and quality otherwise why would Grintech use them.
FYI don't go by a random website on XLR pinout
The pinout can be whatever anyone wants I guess :shrug:
Satiator 3 pin XLR pinout
https://ebikes.ca/amfile/file/download/file/156/product/679/
Google that leads to thisNeutrik XLR connector
https://www.neutrik.com/en/product/nc3fxx?c=audio
Click on the PDF download -- Drawing NC3FXX
Leads you to a pic, this is female side of the attachment which connects to the main cable.
I dont know what the twist on connector is for the charger side. Much narrower spacing.
View attachment 2
So ya, I wired it up to as shown.
Now there is nothing wonky going on with the charging process of only + and -
The XLR I bought works.
Same as the link above but here it is again.
https://www.be-electronics.com/product_p/a3f.htm
I just did not strip back the insulation to the proper length and went to far
Its got to be pretty close for these XLR's and the stupid little lock threads are a real b.tch to deal with.
Well the 8A Satiator I have can not charge below 24V, I need 21.00V to charge each half of my pack to the same voltage. My DMM only reads to one decimal point when its in the 10's range which rounds up or down. Readings usually go 20.2V and 20.3V, so will set bulk charge of full pack to 41.8V for 10S.
Some final pictures
Thank god for electrical tape too
The metal casing doesnt have a set screw, lost it. It comes with it already threaded all the way in, and I unscrewed it and tried to thread it in from the top, doesnt work, upon looking closer screw looks to big so it must thread outward and push up on casing. I dont know. You can clearly see the set screw with the metal tab piece for casing grounding.


Thanks for the reply. It's not a heat issue. Happens regardless of how hot it is and sometimes soon after starting a charge.BVH said:Could be a heat issue. Try running it with a 6" or larger fan blowing on the case. If that works, then a component is probably on it's way out.
Are the 3pin charge connectors on these (not sure what type it is) known to have issues at all?
Cheers
Cowardlyduck said:Are the 3pin charge connectors on these (not sure what type it is) known to have issues at all?
I'm not sure if you're talking about a ST3 adapter cable or the XLR connector connected to the statiator side?
I have had to replace my XLR -> ST3 adapter battery cable before:
https://ebikes.ca/shop/electric-bicycle-parts/charger-accessories/xlr-st3.html
Before I replaced it when charging the statiator was showing the voltage moving up and down erratically sometimes higher than the 58.8V high voltage cutoff that was set.
If you haven't already done so you might want to contact Grin's tech email to troubleshoot your problem, they've been very helpful when I've contacted them for help.
markz
100 TW
Yeah thats because you lost conductivity from connector or wire or loose connection or something.
Probably gnd.
Same symptoms happened to me with only + hooked up, or only - hooked up. It would go above set charge voltage and drop erractically just like you.
BTW you can open up the XLR side, but its a tight fit, I never investigated further if you could slide the plastic compartment out.
Probably gnd.
Same symptoms happened to me with only + hooked up, or only - hooked up. It would go above set charge voltage and drop erractically just like you.
BTW you can open up the XLR side, but its a tight fit, I never investigated further if you could slide the plastic compartment out.
jPas said:Before I replaced it when charging the statiator was showing the voltage moving up and down erratically sometimes higher than the 58.8V high voltage cutoff that was set.
If you haven't already done so you might want to contact Grin's tech email to troubleshoot your problem, they've been very helpful when I've contacted them for help.
Thanks, yeah it's the ST3 adapter I was referring to. It seems like not the greatest connector IMO for 5A, but could be wrong. My voltage doesn't do what you're saying though, it just works normally when it works. By 'works' I do mean it can overshoot the set voltage for a brief few seconds when initially charging, and then settle back down...I'm assuming this is normal though.jPas said:I'm not sure if you're talking about a ST3 adapter cable or the XLR connector connected to the statiator side?
I have had to replace my XLR -> ST3 adapter battery cable before:
https://ebikes.ca/shop/electric-bicycle-parts/charger-accessories/xlr-st3.html
Before I replaced it when charging the statiator was showing the voltage moving up and down erratically sometimes higher than the 58.8V high voltage cutoff that was set.
If you haven't already done so you might want to contact Grin's tech email to troubleshoot your problem, they've been very helpful when I've contacted them for help.
Sounds like I might have to hassle Grin...was hoping to avoid that.
Thanks again for the suggestions.
Cheers
ColdRider
10 mW
i have bought the satiator 7205 , planned to charge my 21S PWR pack , about that 3rd wire on the charging lead could i use it to monitor the Pwr pack temp as it is charging ? is there anything else it can be used for ? My BMS is an ANT with BT Android App , i have not powered it up ( the BMS ) yet and waiting on answer from seller as to find out if the BMS has data outputs i could link to charger or controller so they can chat with one another . 1 other question : i have planned to make two PWR pack [(21s8p) x 2 ] and set them up in parallel on the bike -> smaller in square inch's but wider overall , both will have their own BMS . anything special i have to do ( Connection wise ) to discharge and charge them up as one unit ? i read of diodes and resistors simple circuits but none of that is clear so i'm asking here . I have tested my Satiator on my 52V Pwr pack and was working flawlessly barely heated up . THANKS Justin & all the Grinn Team for once again for greatly improving the LEV's Enthusiasts way of filling up our energy tanks level and ride those cells for all they can give and last for as long as they can .
FYI : Gas vehicule blind spot , LEARN ABOUT THEM they can kill a cyclist in seconds , another 3 died in my city this year ALL were hit when in the cars/trucks blind spot . Ride safe Cheers
FYI : Gas vehicule blind spot , LEARN ABOUT THEM they can kill a cyclist in seconds , another 3 died in my city this year ALL were hit when in the cars/trucks blind spot . Ride safe Cheers
Chalo
100 TW
ColdRider said:FYI : Gas vehicule blind spot , LEARN ABOUT THEM they can kill a cyclist in seconds
Sociopathic motorists (which is almost all of them) have a 360 degree blind spot when their snouts are in their phones
Juls
1 µW
- Joined
- Nov 2, 2021
- Messages
- 2
G'day fellas, I'm chasing a charger that does me 42v and 52v li-ion's and also occasionally me 12v agm's. Would youse recommend the Cycle Satiator 4808?
Also can I use the Cycle Satiator as a power supply? Nothing hectic just need power supply I can set to 14-15v so I can set up me dc voltage converters to output only 12v.
Regards Julian
Also can I use the Cycle Satiator as a power supply? Nothing hectic just need power supply I can set to 14-15v so I can set up me dc voltage converters to output only 12v.
Regards Julian
Grin Satiator is a great little adjustable charger, very safe and reliable, only ~300W each but can be stacked.
the model you want "24V-52V" #4808 @8A might only have an output range of 24-63V but the manual states 12-63V. Might depend on the firmware version?
Best to ask GrinTech directly on that, please let us know what they say.
...
Just to be complete
#2415 "12-24V" max output 36V @15A
#7205 "36V-84V" outputs 36-103V but best for over 52V (manual states 20-103V), 4-5A
...
Power supply mode is, "it depends"
https://endless-sphere.com/forums/viewtopic.php?t=60169&start=475#p1095459
Juls
1 µW
- Joined
- Nov 2, 2021
- Messages
- 2
john61ct said:Grin Satiator is a great little adjustable charger, very safe and reliable, only ~300W each but can be stacked.
the model you want "24V-52V" #4808 @8A might only have an output range of 24-63V but the manual states 12-63V. Might depend on the firmware version?
Best to ask GrinTech directly on that, please let us know what they say.
...
Just to be complete
#2415 "12-24V" max output 36V @15A
#7205 "36V-84V" outputs 36-103V but best for over 52V (manual states 20-103V), 4-5A
...
Power supply mode is, "it depends"
https://endless-sphere.com/forums/viewtopic.php?t=60169&start=475#p1095459
Legend mate thanks for the reply. So you reckon I can use it as a power supply? Reading from that link if I was to use the "force start" function it should work?
I am just guessing if I say yes, Justin states very clearly it depends on the load type
and he's forgotten more electrickery than I'll ever know.
Maybe putting a cheap "load dump buffer" battery in parallel fully charged at your desired voltage for that use will help smooth things out
I would reach out to them at Grin, giving specifics.
Also ask about those discrepancies about min voltage specs please
and report back let us know.
Hi guy's,
So really long (painful) story, but I've ended up with 2 Satiators due to stuff ups from Grin in shipping during RMA.
The replacement one, although used/scuffed, works fine and I've been able to update the firmware/load profiles etc.
My original Satiator is partially broken and only charges normally some of the time, stopping at 56V, often present a short error, or other power fault error and buzzing.
Grin seemed to think a replacement power output board might fix it, but I can't get that now that I've got a replacement charger instead and I can't find the replacement board for sale on it's own. I'm really hesitant to request this from Grin considering the huge stuff around it has already been getting a replacement charger.
I also tried updating the firmware on the broken one, but it will not communicate with my PC at all and I cannot get it to work like the replacement charger which does work.
So my question is, what can I do with this partially broken Satiator? Can I get the output board elsewhere somehow?
Is there a component that is most likely faulty like a capacitor I could replace?
Cheers
markz
100 TW
Unfortunately it is still the case with having only one preset and I haven't looked into it further aside from just playing with the C.S. menu. I use the Cycle Satiator for the 52V 14S battery to either over night voltage of 56V and 3-4A charge when I get home or before I ride I charge it to 58.8V at 8A. So I have to edit the same preset all the time. I will look into flashing it, I've never done anything like that in the past to anything. I was unplugging the CS to keep the screen from frosting but I see the screen saver image moves around the screen. The 36V battery I just bring my other charger with me as its more durable and cheap. Having just one charger isnt an issue for the winter as there is little casual aimless riding the ebike. But once spring and summer roll around I ride aimlessly all the time.
markz said:I have no clue how all the pre-programmed charging profiles got deleted on my Satiator.
After I am done charging I unplug the charging cable and unplug the power input cable to Satiator.
Now I have to edit the only profile I have, from 57.5V @ various amps usually 5A, to 58.8V at 8A but sometimes I want it at 52V at 2A. I tried scrolling through the Satiators menu and nothing stood out to add more profiles. I will take a closer look at the menu and have to read the instructions.
Since it won't communicate, and it has output issues, it sounds like there might be something wrong with the connection from the external cable to the internal board(s).Cowardlyduck said:I also tried updating the firmware on the broken one, but it will not communicate with my PC at all and I cannot get it to work like the replacement charger which does work.
If the cable itself is not at fault, then there is a board just inside that the connector is mounted on, IIRC. (been a couple years since I had mine open for a screen fix).
If that board has a connection problem to the main board itself, particularly in the ground wire, it could affect both communication and power. I don't remember any active parts on the output / connector board, just the connector and wires, but you'd have to visually check yours to be sure.
If it's a capacitor issue, there are a few rectangular caps that Grin had trouble with certain batches of that caused power faults. I don't remember which board they're on, but if there are any on the output board then you could try replacing them. IIRC there was some visible sign of damage (discoloration?) on the bad ones that Grin saw. I think that's either in this thread or on their blog pages.
Thank you! Exactly the kind of info I was afteramberwolf said:Since it won't communicate, and it has output issues, it sounds like there might be something wrong with the connection from the external cable to the internal board(s).
If the cable itself is not at fault, then there is a board just inside that the connector is mounted on, IIRC. (been a couple years since I had mine open for a screen fix).
If that board has a connection problem to the main board itself, particularly in the ground wire, it could affect both communication and power. I don't remember any active parts on the output / connector board, just the connector and wires, but you'd have to visually check yours to be sure.
If it's a capacitor issue, there are a few rectangular caps that Grin had trouble with certain batches of that caused power faults. I don't remember which board they're on, but if there are any on the output board then you could try replacing them. IIRC there was some visible sign of damage (discoloration?) on the bad ones that Grin saw. I think that's either in this thread or on their blog pages.
Yeah, I did try the cable that came with the new charger and had the same issues so know it's not the cable.
I cracked open the broken charger and took these photo's.
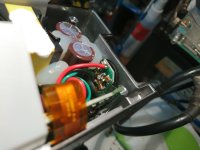
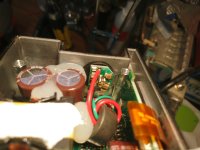
I could be wrong, but the cap just below 'C4' looks slightly discoloured to me. Or it could be solder smeared on it...not sure.
I guess I could remove/de-solder it, but it does still partially work at lower power levels, so I'm hesitant to do anything that could permanently and completely break it. Maybe I will give it a while, then ask Grin if they will sell me an output board on it's own. At least then I won't be concerned about breaking this one in an attempt to fix it.
Cheers
Those caps are probably not at fault. (Could be, but....) The ones Grin had troulbe with are larger, probably around 1/4" thick, 1/2" tall or more, and an inch long or more. They kinda look like automotive blade fuses but aren't.Cowardlyduck said:I cracked open the broken charger and took these photo's.
DSC_6899.JPG
DSC_6901.JPG
I could be wrong, but the cap just below 'C4' looks slightly discoloured to me. Or it could be solder smeared on it...not sure.
I guess I could remove/de-solder it, but it does still partially work at lower power levels, so I'm hesitant to do anything that could permanently and completely break it. Maybe I will give it a while, then ask Grin if they will sell me an output board on it's own. At least then I won't be concerned about breaking this one in an attempt to fix it.
I would first verify the connection between the actual pin in the outside connnector for the green wire, to wherever that green wire connects.
Also verify the ground black wire, because if that's a problem it will affect both communications and power.
IIRC I had a mostly broken wire (but don't recall which one) from the output board to the main board, as well as the flat metal "Shield" ground connection that goes from the output board down to the screw point on the corner down below the display board fracturing at that point. Most likely these happened from the connector shell breaking and the nut coming off of it, so every time I moved the cable (or plugged it back in when it fell out due to the connector problem) it wiggled the metal and eventually broke it. It's been too long to remember for sure, though I probasbly typed it up somewhere in this thread or my SB Cruiser trike thread.
Similar threads
- Replies
- 14
- Views
- 28,855
- Replies
- 64
- Views
- 21,788
- Replies
- 28
- Views
- 10,599
- Replies
- 31
- Views
- 16,989


