The SB Cruiser : Amberwolf's 2WD Heavy Cargo Trike & Dog Carrier

A closer look at the two first links above shows the black box battery can only provide 25A, so it's not usable, regardless of it's other specs.

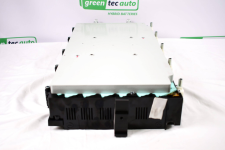
The second one with teh cooling plate can do over 200A, so that would have plenty of unused capability with my present setup (two phaserunners, two motors, probably around 80A for a few seconds then settling down to half or less of that. A bit higher cost / kwh than the ones I posted about above, but the free shipping takes it down to less than that, and it's way easier to use. The large heavy cooling plate doesnt appear to come with it, but is probably sold separately, and could also be repurposed for something else, since it's not likely that I would be pushing this hard enough to need it. I'd probably have to make covers for it, to protect the bare cell ends.

It's about teh same volume and weight as my originally-4kwh EIG pack, but different dimensions:
Length: 20 1/2 inches
Width: 11 1/16
Height: 3 inches
Weight: 34.5lb
I think the length is greater than the space available in the underseat cargo/battery/etc box, so it would probalby have to ride on the floor of the cargo area behind me (so it's weight would be more on the already-heavily-loaded rear wheels, though still in front of them).
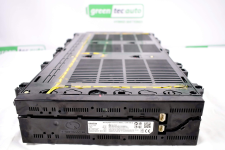
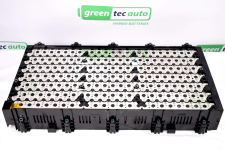
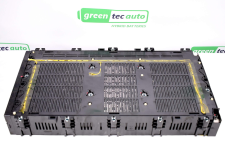
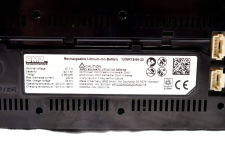
INR18650M29 LG Chem 48V 62.7Ah 2.99kWh BMZ Module
Original price was: $300.00. Current price is: $200.00.
Price per kWh: $100/kWh $66/kWh!!
Years: 2020
Shipping: Free Ground Shipping
Warranty: 6 Months, Extendable
INR18650M29 LG Chem 48V 62.7Ah 2.99kWh BMZ Module quantity

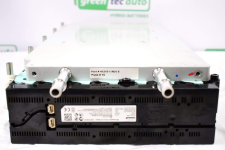
A 48V module made out of INR18650M29 LG Chem cells. The 13S configuration offers an ideal 48V battery pack. The cooling plate is sandwiched between 2 modules. One or both sides of the module that meet the cooling plate have no cover, instead, there is a thermal transfer pad that comes off. So the module you receive may or may not have the plastic cover over the busbars and the thermal pad could be missing as well. Cooling plate listing coming soon.
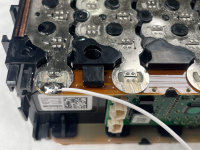
The last 4 pictures show the best place to make a BMS voltage tap connection. You could solder on the BMS voltage taps to the busbar as shown in the 9th picture. The busbar is made of solid nickel and is extremely easy to solder. There is some glue in that area, but it was easily scraped away with a razor blade. The scraping and soldering took less than 30 seconds if you have all the tools in front of you.
The BMS is under the cover with the large sticker. The BMS takes power from the battery pack it is monitoring to power itself. We unplugged the ribbon cable and plugged it back in and a Green light turned on for about one minute and turned off. The BMS wakes up but does NOT balance and is NOT a working BMS. We monitored the BMS closely and it does not drain the battery after a long period of inactivity. The Sleep mode does not use much energy. If you plan on storing this battery for any length of time over a few months, we recommend unplugging the BMS so it does not drain your battery, shorter durations are of no consequence.
Nominal Module Energy: 2.99kWh
Nominal Module Capacity: 62.7Ah
Nominal Cell Capacity: 2.85Ah
Module Configuration: 13s22p

Max Module Voltage: 54.6V
Nominal Module Voltage: 47.7V
Min Module Voltage: 32.5V

Max Cell Voltage: 4.2V
Nominal Cell Voltage: 3.67V
Min Cell Voltage: 2.5V
Length: 20 1/2 inches
Width: 11 1/16
Height: 3 inches
Weight: 34.5lb

Length with cooling plate: 22 inches
Height with brackets: 3 9/16
Weight with cooling plate: 44.6lb

Peak Discharge Current: 220A
Nominal Discharge Current: 132A
Nominal Charge Current: 30.25A
Peak Charge Current: 60.5A


1736742046308.png 1736742119478.png 1736742166702.png 1736742224132.png 1736742260385.png 1736742287118.png 1736742371149.png
 
A closer look at the two first links above shows the black box battery can only provide 25A, so it's not usable, regardless of it's other specs.

Interesting, I didn't notice that. I guess it's a limitation of the nickel bus. Surmounting it would put it back in the "hokey homebuild" category. Anyway, not useful here unless someone in USA wants abnormal range for his sub-350W e-bike, or craves a really heavy battery for audio and lighting.
 
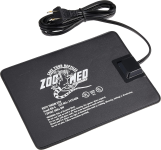
I keep meaning to dig out a couple of old terrarium heating mats to stick on either side of the pack that can be plugged into the wall for overnight warming, but every year I forget about it after it gets warm, and while it's cold I'm usually trying to get other stuff done that I can't do when it's hot out there.
I finally remembered to do this today, though I only had time to insert one down between the lighting pack and the traction pack, and then the other down the other side of the traction pack. The AC cords just run out the back edge of the almost-closed lid of the seatbox, so ther'e some heat leakage that way, but their direct contact with the batteries means most of their heat goes into those to keep them from getting so close to freezing.

(IIRC wiithout any heating the batteries on their outsides are still a good 10F+ above whatever ambient is by the time it actually gets to freezing out there, but they don't perform well when that cold)

I put them in about 8pm or so when it was still about 48F out there (all temperatures measured with a cheap IR gun) and the battery was at 56F, and a few minutes ago at 1130pm I checked up on it*** and the air temp was down to 30-32F depending on where I pointed, and the wood of the trike down to 35F on the outside of the battery area. Inside the battery area, air temp was 54F and the battery read 55F.

So, it works as expected.

They're really small, about 6" x 8", only 8w, essentially the same thing as this
1736836963531.png

***I went to check because I could smell (well, really was choking from) burning rubber even inside the house...which is usualy just from the assholes that do donuts and/or lock their non-drive-wheel brakes while they smoke the drive wheels, for minutes at a time, in the general area--far enough away I can't usually hear them inside the house, but close enough for the smoke to fill the whole neighborhoods for a long long way around, making it very hard to breathe and nearly as hard to see if they're close enough, especially when its' cold outside so the stuff just settles down toward the ground instead of being carried away by rising hot air like in the summer.

That's what it was this time, too, but since the pads are rubber, I had to make sure it wasnt' the trike on fire or something. ;)
 
A closer look at the two first links above shows the black box battery can only provide 25A, so it's not usable, regardless of it's other specs.
Could run two in parallel?

I'd need at least four in parallel for my peak current level (about 80A? have to go look at the CA).

Might be worse than that; I just went to see how much they weigh each, and found these specs I missed before:

Peak Discharge Current: 25A
Nominal Discharge Current: 8.5A
Weight: 38lb
Length:18.75 inches
Width: 7.75 inches
Height: 6.25 inches

So that 25A is only peak, and even four of them paralleled would only supply about 35A *total* continuously. I don't know how long the peak rating is for (if it says, I missed it), so if it's only a second or few, that might be an occasional problem when I'm heavily loaded with cargo, etc.

But the real problem is that each of those is almost 40lbs, and I couldn't reasonably carry 160lbs of battery all the time just to get enough current

I guess a plus is I'd have enough capacity from four of them to run for nearly a month and a half of commutes without recharging. :lol:

If I had to buy something right now, I'd rather just go with the last one I posted above. ;) I'd guess that there are even better options on one of the sites, but I haven't had energy to read up on them yet.
 
Ok, so, first Dogman did the sensible thing, and laid out the basics of the frontend on the driveway, drawing it up an dmeasuring it out, copying and modifying as needed from the ReBike (whose geometry seems to work great at low speeds and is low and long and easy to reproduce with stuff I have here).
View attachment 6
View attachment 162037


Once he'd got it laid out, he cut the metal for it out of scrap I had here, and between us we got it welded up. Then we needed a headtube that would fit a threadless fork (cuz I have at least 3 of those, and it's easier to do remote steering setups on them, and other stuff, whcih I thought I would end up doing with this due to the distance from seat to steerer).

I found a bike Randall (local friend) had given me for parts/etc a few years ago, which I'd used bits off here and there, that had the right size headtube to accept the races off the alloy Mongoose Hatchet frame from Bill that goes with the crappy 29er Elements fork that's on the trike (for now, until I get something better, or fix the Manitou Skareb fork).
View attachment 10
View attachment 9
View attachment 162034
View attachment 162035

When I cut the headtube off teh frame, I left a good several inches of downtube to be inserted into the big square tube that forms the downtube of the trike's frontend, as it is a perfect fit, and should make the whole thing stronger there (as opposed to just fishmouthing the square tube to go right up to a bare headtube). I also left teh whole toptube, so that it oculd either be bent downward to make a triangulation, or left straight to go back to the top of teh remote steering pivot tube, or whatever. it's still uncut and unused, and will probably get shortened a lot and the area used as a controller space. That was all then welded to the main frame.


After some issues with fork height vs design, we went with the crappy element fork cuz it's taller (29er vs 26) but I may go back to a 26 later. Not sure. I also have a slightly better 700c fork that i might be able to get to work for rim brakes on here, but it's not a threadless type, complicationg steering setup, and it's also alloy so will probably break with an x5304 in there. ;)
View attachment 162038


I have a lot better 26" manitou skareb fork, but I have to make a tube with dropouts on it to go over the bottom fo each fork leg, cuz I broke the droputs on it in the x5304 offground testing. :( It's also alloy.

I have a not-great suntour 26" fork, too, used to be on CrazyBike2, but it's wearing out and feels loose in the bushings around the fork legs. Buut it has rim bosses for brakes, and so it would simplify that part.

For now, the steel element fork will stay, and i'll have to add rim brake bosses to it. it's steel so they can be welded right on.


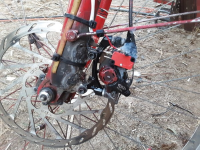
Have to add those cuz there's no disc mounts on x5304 I have, and no other brakes yet. Had used a promax 160mm disc on a regular bike wheel but since the easiest way to add the motor to the trike is a front hub....
View attachment 162039


Brake handles...presently there is a locking lever taken from DayGlo Avenger (which hasn't been used in years, so it's getting cannibalized for this project, too), and a WuXing lever from Dogman, both on the right side. WX is used for ebrake handle, and will also run a mechanical brake if needed (but not disc cuz it's the wrong mechanical advantage). Locking lever did run the disc fine (correct MA), and will run the rim brakes so I can physically lock the wheel so the trike doesn't roll off on slopes.

I didn't have a long enough cable for the brakes, so I "tied" two together by adding cable stops to teh steering tiller tube, and running housing up to those on each side, and no housing between, and using the pinch bolt off a junk bmx brake, drilled out for two cables, to clamp them together betwen the stops. It works ok so far, but i'll wanna get some fresh cables that are long enough before I really trust this thing.
View attachment 162040
View attachment 162041


There's a dual brake lever from AussieJester a few years back that will run the rear brakes.

Those will be a pair off a kid's BMX. Calipers, but better than most I've had off that type. Dunno how well they work yet, as I ahve to add mounts for them. Dogman already cut and fishmouthed a crossbar for them to bolt to on each wheel, but some mods to the bars those go on need to be made to ensure the kennel or cargo does not interfere with brake operation.


Cargo area: I got rid of the whole rack and only kept most of the frame around each wheel, and the front crossbar. This is to make the most of the volume back there, and to put that closest to teh ground I can, so COG stays low to improve anti-tipping.


I added square tubing (as seen in OP of thread) to extend the cargo area out past the rear wheel some distance, to give a big volume without *too* much risck of wheelieing the trike with a big load back there.

Basicallly this carg oarea has about as much space as the original kid's trailer I started with, that Hachi's trailer (mkII) had been sometimes (or intended to; I forget) bolted to, and that I used for Tiny's kennel trailer (mkII) as well.

It still needs fenders around hte wheels so that cargo can't rub on them, desing for those is shown in OP, minus the coroplast that will get cut and bent and tied around them.

Also still needs a ball hitch to pull the trailer if it has to. (like if I wanna take both dogs somewhere, I can get or make another kennel to go on the trailer, and use the existing one on the trike, or vice-versa). But that hitch will have to go on an extension out around a foot from the existng backend, cuz otherwise it'll be inside the kennel.


Steering...have no handelbars or stems lng enough to reach the bars from the seat, so I made a tiller out of a piece fo toptube or downtube off antoher old bike that already had donated it's seattube to the delta tripper's hadnelbar pivot tube, which i left intact in case I need it for remote steering. The tiller has the dt's old bars on it, so that they are positioned like CB2's for ride comfort. But when i need to steer more than a little i'll have tost op pedalling and leave my legs even so my knees clear the swinging bars. I'm ok with tah for a more comfy regular position. would be better with remote steering butthis si simlper and quciker so that's what we get for now.

I couldn't bend the tiller bar so Dogman had to do that for me.


I was gonna use the black suntour forks but didn't hae a star washer in it to screw the top down into, and the whilte elment forks do, so thye got used.


sorry if this is disjointed i keep dozing off writing it. more later.
BTW, this is awesome!!! The red on at the end is super cool!
 
BTW, this is awesome!!! The red on at the end is super cool!
I don't know what a "red on" is?

At the end of what?
 
Re: Infamous 'bed rails'... They contain excess carbon and an inconsistent variety of undesireable elements. (A.K.A junk steel). Welding the stuff frequently causes embrittlment (cracking) in the HAZ. If you spoil drill bits attempting create a fresh hole in it, then I'd strongly discourage using the stuff on anything your life depended on. As always, it's entirely your call.
I've been keeping an eye on the whole keel area at and around the bedrail reinforcement addition, and have not yet seen any issues. Doesn't mean there won't be any, but so far it's ok, since the above in October 2023, so a year and a half of 5-day-a-week commuting plus the various weekend grocery/etc trips.

Let's hope I got lucky and used a good quality bedframe (unlikely, but...). :)
 
I have had this front QR come loose a number of times now over the years. I've done all the usual re-adjustments, lubrications, and checks and it hasn't made any difference. I've put the lever in all sorts of "clock positions", pointing up, down, forward, back, angled, over the fork, over the air, etc. These days i leave it in some upward postion so it's really easy to see when it's not secure, because it wont' be up, it'll be down.

I changed to the present QR skewer a while back after the first few times it happened (the previous problematic one was one of those newer aluminum CNC-looking types). This one is oldschool steel; I think it came off a 1990s Nishiki but I don't remember for sure.

1744868184614.png
Doesn't matter which side the lever is on, vs the nut, either
1744869734175.png


When it happens, it's pretty sudden. I'tll be perfectly fine for months, then I'll get home, park it, and when I go to ride the next morning, the lever will be flopped loose. It doesn't come loose during a ride, and it doesn't come loose while parked at work or the grocery store, etc. Only sitting overnight (or longer) at home, parked in the shed.

I'd suspect tampering if it weren't so unlikely (nigh impossible) that someone could or would silently come into my yard despite my giant monster (st bernard) Jellybeantheperfectlynormalschmoo (and also back when I still had Kirin and Yogi), drag open the noisy hard to open bent-up shed doors, get around the trike to get to the front of it, frock with the skewer lever, then get back around the trike and out the shed doors, close them exactly the same way I left them (which is really hard to do the same way each time because of how hard they are to slide because of being bent up), get past the dogs again and out of the yard without making them all bark and chase and bark)....


Back here in Oct 2022 I thought I had found "the problem", but it was just one source of the issue. The lawyer lip would catch the edge of the skewer or nut just as it was being tightened and not quite seat correclty. Fixed that and it helped, but didn't stop the issue. It did stop the ones that hapepend with sideload / bumps during riding.


IIRC I had a problem with a previous hub where the bearings / cones /e tc weren't staying seated correctly (I think hte hub eventually failed) and that allwoed it to loosen up, but that's not happening with this hub AFAICT. The cones and locknuts are tight and secure, no play, etc. The SB Cruiser : Amberwolf's 2WD Heavy Cargo Trike & Dog Carrier


Another problem I haven't had time / energy to deal with is that the lights on the front fork aren't working correctly; the turn signals both flash dimly together, regardless of which side is engaged. The rest of the trike including hte front canopy signals work fine, so I suspect a ground to the fork lights has failed. The car headlight doesn't work either. The small LED headlight works fine, but AFAICR it has it's own ground.


The ground could be broken inside the cable from the lighting bus inside the front triangle, or it could be broken at the connection busbar at teh bottom of that enclosed triangle. If the latter it could be a spade that's come off the bussbar there. Fi it's ion the calbe it'll just be a broken wire probably inside the isnulation and harder to see/ find.
 
The next morning... What about thermals? If the bike sits outside, that might be enough to make the lever come undone.
I considered that previously, but if that were the case, I would expect it to happen much more regularly rather than just every so often. It happens so infrequyently that i forget to keep checking the skewer, until the day I finallly find it loose. :/

Temperature changes vary but are fairly extreme here in the desert since we have very low humidity most of the year, anywhere from 30F delta to 50F delta on really extreme days. Inside the shed the delta is less, but it is usually hotter in there (it's ventilated passively and is insulated on the roof I(styrofoam inside, old rubber mats with styrfoam under them on the top outside, under a tree that shades most of the top of the shed, and two smaller trees taht shade the front of it; the back of the shed is shaded by the big tree and the wooden fence a few feet away, and the sun-side of the shed is shaded by another shed.


In cooler weather I may not park it in the shed, but just under the shade of a different tree at the house itself, so in winter and start of spring it may see extremes of cold (for the desert ;) ) at night and then cool but warmer temperatures in the day.

It also should have happened to other bikes I've used QR wheels on, but hasn't. Just this one. I suspect it has something to do with the sideloading because of it being a trike's front wheel, where on a bike that same kind of loading doesnt' happen under the same conditions. But I don't think that's the complete story, because if it was I would expect it to come loose during a ride, specifically during a turn where sideloading is highest....but that doesnt' happen.
 
Cut a strip of inner tube heavy duty rubber band and tie it up. I'd bet it won't happen again.
 
Cut a strip of inner tube heavy duty rubber band and tie it up. I'd bet it won't happen again.

Since something is causing the skewer to loosen (tension decreasing on the skewer; whcih probably doesn't have anything directly to do with the lever itself) all that will do is keep the lever in place so I can't see that it has loosened. ;)

That's why I leave the lever in the up position so it's obvious in a preflight glance at things taht it's wrong.

I'd still feel it when I started riding, but since at that point I'm moving and if something went wrong to allow the wheel to come out of the fork because of the loose skewer, I'd then have the fork plowing into the road and destroying the trike and possibly killing me depending on exactly what happens, I'd rather just not do that.


The lever itself won't just come loose and flop unless the tension on the skewer has decreased, and securing the lever even with a hose clamp won't stop whatever is causing the tension to decrease.


If it was just that the lever was being pulled out then the band or a clamp would certainly work, but that can't be what is happening, unless someone is coming into my yard past the dogs and opening hte noisy shed doors without anyone hearing it and the dogs not hearing it and not barking furiously and chasing them (and probably causing them to yell and run away...wouldn't *you* run from a 150lb+ dog running toward you, the intruder in their yard? ;) ), then they get past the trike inside the shed to it's front end in the dark (no lights in there unless I connect them at the house first) then loosen the lever then out the doors, close teh noisy doors back to exactly the way I left them, get past the dogs and out of the yard.... No, it's not being pulled open by someone messing with it.... (I mean, I could put a camera out there to be sure, but really, I think by this time I'd've noticed something at the time it was happening :lol: ).


I still don't know what causes the decrease in tension to the point that the lever suddenly releases while just sitting there after a ride, when I don't have any wiggle or other issues during any ride leading up to it. :( And always only at home, not at the other end of my commute sitting there at work.

Have you taken the skewer off and inspected every component under a microscope? Do you have a new skewer to replace it with?

It sounds unreal. Do set up a camera. Maybe you'll find that you were sleep walking and you are the one who flipped the lever? ;)
 
Lubricating the QR cam gives a better ratio of tightening force to clamping force. If you're not using an all steel closed cam skewer, get one. Open cam and aluminum skewers don't do good work.

Also, inspect the threads on your problem QR skewer to see if the pitch length inboard of the QR nut is the same as that outboard of the nut. If the clamped section has elongated, you have a soft skewer and you should ditch it fast.
 
Yeah, to be honest if a safety-critical component like that even looked at me funny, let alone come undone on it its own, I couldn't replace it fast enough. The price of a skewer at this point must be between zero and its value as scrap.
 
Yes, it's a steel closed-cam type; oldschool (from the old 90s nishiki MTB IIRC), steel nut on the other end, steel skewer rod too. I'll have to check the threads.

I already did replace the skewer (from the aluminum open-cam type to this one), but the problem persists. While it could still be the skewer, it's possible that it is something else, and that's why I'm inviting ideas. :)

The thing that is so wierd is when it happens...I would expect it to come loose *while riding*, and specificaly when the most sideloading occurs, but it never happens then, just when sitting there parked.

The previous problem I had with it coming loose *did* happen then, (or any other time it was loaded up enough), because the end-nut or the cam-unit face would catch on the lawyer lip and so it wasn't really seated fully or correctly, so when it was loaded enough to pull it off the lip it would detension the skewer and the lever would flop open; that kind of failure I totally understand and was easily able to fix once I figured it out.

The current problem doens't even make sense to *my* screwed up brain, so....
 
I already did replace the skewer (from the aluminum open-cam type to this one), but the problem persists. While it could still be the skewer, it's possible that it is something else, and that's why I'm inviting ideas. :)

The other thing I can think of is the axle locknuts getting smooshed (if aluminum) or the dropout faces becoming indented.
 
The thing that is so wierd is when it happens...I would expect it to come loose *while riding*, and specificaly when the most sideloading occurs, but it never happens then, just when sitting there parked.
Could it be that it's a two step process? It gets part way loosened while riding, then the temperature differentials during storage loosen it further until the lever opens?

Hope by now you've added front skewer inspection to your "Pre-Flight Checklist!"
 
The other thing I can think of is the axle locknuts getting smooshed (if aluminum) or the dropout faces becoming indented.
Yeah, generally speaking there's one reason why a skewer would open - lost tension.

And since it's an opposed system, it can be broken down into either (or both!):
* skewer elongating
* the hub (well everything it clamps on) shortening

- both of the above of course meant relative to each other, not absolutely.

If a new skewer didn't fix it, if the dropouts and the fork material seem fine, the only logical conclusion is that the hub's locknut edge to locknut edge is shrinking.
 
I have had this front QR come loose a number of times now over the years.
"....over the years?"

Do you have a dial or digital measuring caliper handy? I'd urge you to pull the front wheel and measure across the jam-nuts of the axle - Disassemble the hub and closely inspect the hub, bearings, and the axle.
 
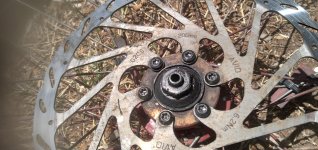
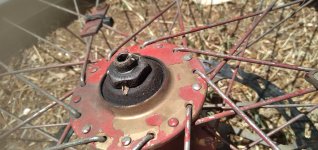
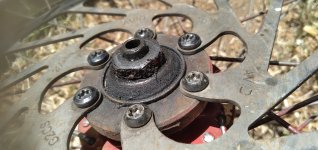
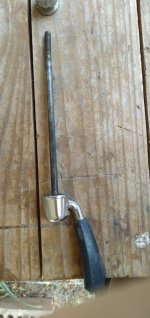
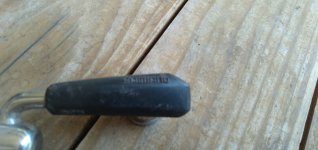
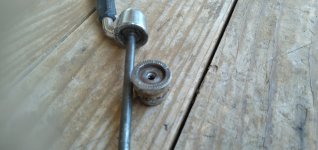
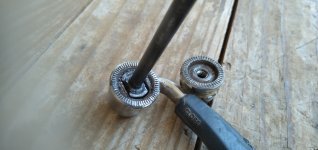
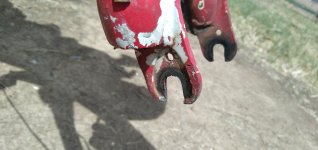
I didn't see the last two replies till just now, but replies are below, and at the end are pics of the skewer, nuts, dropouts, and hub that I took earlier today while fixing the broken ground wire for the front headlight and turn signals. I got distracted by Jellybeantheperfectlynormalschmoo squeaking her pickle for playtime, so I forgot to disassemble the hub itself to get pics of bearings, cups, and cone-nuts' internal faces. Have to go back out later and do that, and the measurement in the last reply above.

In the pics you can see the skewer itself is slightly bent at the threaded end. The nut still threads on normally all the way from the outer end down to the end of the threaded area, isn't loose but it rolls on easily for teh whole length.

It's possible the bend itself could cause the issue, but I would expect it to be like a spoke--wehn tensioned, it wouldn't matter...but it would take a lot of tension to straighten something this thick, so...dunno. Still gonna check everything else too.

I don't know what caused the bend; it shouldn't be possible for wheel loading to do that since the axle takes that along the dropouts. Maybe it's always been bent and I just never noticed before.

The other thing I can think of is the axle locknuts getting smooshed (if aluminum) or the dropout faces becoming indented.
Axle hardware is all steel too (hub itself is aluminum though). Dropouts are steel, though cheap (crappy suspension fork lowers) There are indents from the ridges in the hub locknuts, but they "look" the same as the last time I took it off some time back to change the tire. I didn't take pics then so nothing to compare to except my unwarrantied memories. ;)


Could it be that it's a two step process? It gets part way loosened while riding, then the temperature differentials during storage loosen it further until the lever opens?

Hope by now you've added front skewer inspection to your "Pre-Flight Checklist!"
I've had it on the PFC for a long time (noted somewhere above on this page).

I'm sure it is a multipart process, but the problem is figuring out what exactly that process is, because none of the steps that I would expect to cause it appear to be happening (it isn't ever loose after the ride, if I touch it I can feel it's still locked).


Yeah, generally speaking there's one reason why a skewer would open - lost tension.

And since it's an opposed system, it can be broken down into either (or both!):
* skewer elongating
* the hub (well everything it clamps on) shortening

- both of the above of course meant relative to each other, not absolutely.

If a new skewer didn't fix it, if the dropouts and the fork material seem fine, the only logical conclusion is that the hub's locknut edge to locknut edge is shrinking.
That's something that happened with a different hub, and is why I changed to this hub--the bearing cups in the hub failed (but that one didn't have a skewer issue, it was just the sudden cup failure).

I have to check the hub itself, opening it up and verifying cups, cones, bearings, etc. It doesn't have any issue rolling or spinning freely offground, unlike the one whose cups failed. A while back (year? two? don't recall) I had opened it up and checked, cleaned, and regreased this hub; I probably have a post in this thread with pics of that but haven't looked.


@amberwolf , How about swapping the hollow QR axle for a solid one? I've got some solid front axles that I can send you.
Will they fit? I didn't want to use QR on a previous hub on this trike, but was stuck with it because none of the regular front bike wheel axles I had from any wheel (some quite ancient, all the way up to stuff that might even be from this century :lol: ) would work; I don't remember why they didn't fit it but they didn't.

I don't remember trying to do it on this hub (probably because I assumed that if they didn't fit the other one they wouldn't fit this one either), but if they do, I can try the ones I have first.


"....over the years?"

Do you have a dial or digital measuring caliper handy? I'd urge you to pull the front wheel and measure across the jam-nuts of the axle - If less than 100mm, disassemble the hub and closely inspect the hub, bearings, and the axle.
Don't know why that didn't occur to me to check :oops: but I'll try that later today when I go out to open up the hub to check the cones/cups/bearings.


If all else fails I can switch the whole front wheel out to one of the Jump bike bafang hubmotor wheels that have disc rotor mounts, even though I wouldn't be using it as a motor, until I can build another disc-capable wheel.

Would need to use that existing JB wheel for a while as I might have to make the hub as I don't think I have any more disc-capable ones except an identical one to the present QR one that I'd have to unlace from an old 24" wheel, and I'd have to make it to fit the spokes needed for whatever rim I end up using off another wheel (no budget for new spokes / hubs / etc).


EDIT: pics didn't upload, had to retry:
 

Attachments

  • 20250421_121033.jpg
    20250421_121033.jpg
    4 MB · Views: 2
  • 20250421_121044.jpg
    20250421_121044.jpg
    4 MB · Views: 1
  • 20250421_121057.jpg
    20250421_121057.jpg
    4 MB · Views: 2
  • 20250421_121317.jpg
    20250421_121317.jpg
    1.3 MB · Views: 2
  • 20250421_121322.jpg
    20250421_121322.jpg
    1.3 MB · Views: 2
  • 20250421_121336.jpg
    20250421_121336.jpg
    2 MB · Views: 3
  • 20250421_121349.jpg
    20250421_121349.jpg
    2 MB · Views: 3
  • 20250421_121401.jpg
    20250421_121401.jpg
    2 MB · Views: 3
  • 20250421_121451.jpg
    20250421_121451.jpg
    2 MB · Views: 2
  • 20250421_121459.jpg
    20250421_121459.jpg
    4 MB · Views: 1
  • 20250421_121634.jpg
    20250421_121634.jpg
    4 MB · Views: 1
  • 20250421_121646.jpg
    20250421_121646.jpg
    8 MB · Views: 2
  • 20250421_121700.jpg
    20250421_121700.jpg
    4 MB · Views: 2
Last edited:
I'll try that later today when I go out to open up the hub to check the cones/cups/bearings.
Measure first... before you disassemble. If you can't get your caliper to fit between the spokes, just grab a known good fork and confirm 100mm between the inside of the dropouts. Then drop your wheel in and see if there's any side-to--side slack.
 
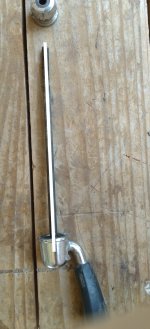
Is this QR skewer bent a bit (meaning it doesn't have consistent clamping force)?

Edit: I'd check for why it's bent, rather than believing this loosening is caused by the bent. Maybe fork legs are "wandering" around?
 

Attachments

  • Bent QR Skewer.jpg
    Bent QR Skewer.jpg
    1.2 MB · Views: 5
Last edited:
Back
Top