Tom's mini dirt bike build thread

Funny I saw that one on Ebay too but it was up north? Tyne and Wear? same bike?

Anyway they are a fun little machine for the smaller ebiker, not so sure it would take much abuse with me sat on top of it! ha ha oh and Black Arrows was one of the best conversions you will ever see, that was ripping fast and a heads up beefy conversion of one of these. 8)

The cyclone should be fun, it wont blow your socks off but it will be acceptable, I think these make a great base for little perm motor like the Lemco 130 but you would have to stretch out the frame, if you did do this you could make the batteries fit the frame in something better than the ammo box, which will work but looks bad :cry:

I would pick one of these up but would use one of my Mega motors (modified Currie Kollmorgen motors) and simply swap it with the original motor, this way you can get 1.6KW straight out to the wheel, not so sure the nuvinci is the way to go they are heavy, expensive and are prone to slip under heavy starts.

I have a garage full of e-bikes so I would have to be given one of these really but it one came up cheap locally I think I would get one and uprate it for my son to keep him off my BMX! ha ha

OH and you can gain more ground clearance by making a simple spacer for that new shock, get your feet off the ground maybe :wink:

Interested to watch this though and good luck with it.

Knoxie
 
Thanks for your support Knoxie, I'll keep posting updates. I'm only 5'6 myself so it's not too small for me really. Plus it slides into the back of my little hatchback easier than my 26" mountainbike. I'm hoping to gear it for torque rather than top speed, want to be hopping over rocks and steep ledges rather than top speed, this will never be used on the road ;)
 
Re BB:

I took a quick stab at one of my BBs... quite snug. They are prolly threaded-in while the paint is still curing.

Here is what might work:
  • Remove the wheel from the swingarm.
    Remove the swingarm from the frame.
    Grip the flats of the race in a bench-vise and heat the tube with the gas axe.
    When hot, turn the swingarm to unscrew it from the race.

Works for stubborn freewheels...
 
nonlineartom said:
Thanks for your support Knoxie, I'll keep posting updates. I'm only 5'6 myself so it's not too small for me really. Plus it slides into the back of my little hatchback easier than my 26" mountainbike. I'm hoping to gear it for torque rather than top speed, want to be hopping over rocks and steep ledges rather than top speed, this will never be used on the road ;)

Yes you will have fun on it then as it will fit you just right 8) I am 6 foot 3 inches! and about 200lbs so maybe not me (says the man who rides an electric BMX sometimes :lol: ) love the progress you have made on it so far, keep trying the bottom bracket, I had the same problem on my Proflex took me an hour and 1 tin of gas to get it off, looking at that it may spin anti clockwise, I have also seen these press fitted before and not threaded at all.

Ahh be great fun on the road :twisted: wheelie time!! I have a Lemco 130 in the loft ha ha be great on one of these, but then it would be great in my BMX also :twisted: Oh also love the polaroid effect with the phone, I dont know all that technology and you are making retro 70s grainy photos :wink: :wink:

Keep us all posted on you progress, remember the nights are drawing in now you need this done whilst we still have summer? have we had any summer yet?
 
Just looked up the lemco 130. That thing would fold the bike in half. Too much power!
I was thinking of diving in with lipo for this build but I'm concerned it will be more than I'm willing to get into right now with investing in lower supplies and chargers. Ping said he would
Build me a custom lifepo4 pack to fit snuggly in the frame there in a metal box. Seems my best option. If you are flogging any second hand bits or got unused kit sitting in your loft I'll take it off your hands ;)
 
Ping is fine see what the costs run too, dont be scared off by lipo, just got my packs in under a week from HK, there were no customs charges as they send them as replacement parts (you always need replacements right?) you could make a 50V 10AH pack for 140 quid hard to beat that isnt it?

Hmm I have so much in my loft its where to start, I have 20 kol motors all with internal controllers a Lemco 130 about 10 different hub motors, 10 controllers well it goes on and on, I work on a principle of it will come in handy even if i never use it ha ha
 
knoxie said:
...keep trying the bottom bracket, I had the same problem on my Proflex took me an hour and 1 tin of gas to get it off, looking at that it may spin anti clockwise,...
Yep it's a lefty.
 

Attachments

  • IMG_8775_800.jpg
    IMG_8775_800.jpg
    66.4 KB · Views: 2,042
TylerDurden said:
knoxie said:
...keep trying the bottom bracket, I had the same problem on my Proflex took me an hour and 1 tin of gas to get it off, looking at that it may spin anti clockwise,...
Yep it's a lefty.


So I've been turning that thing with the force of a spartan army, TIGHTENING it all the way........ pardon me whilst I go cry in a corner.
 
"Precession of right side BB cups is less obvious because the rotating load is only partial. The largest load being chain tension, that together with the moderately large downward force on the right crank and the smaller upward force from pushing down on the left crank, make 3/4 of a fully rotating load. For this reason some right BB cups have used right hand threads and some with left hand threads have loosened. The left BB cup with no significant rotating load has little tendency to turn."

http://endless-sphere.com/forums/viewtopic.php?f=3&t=26305
 
I've just spent an hour with a wrench and that thing will. not. budge. I've got the bike upside down now to keep it steady, I cant seem to get a really decent grip on it because it's so thin, the pipe wrench I'm using keeps slipping off and threatening to remove knuckles.

So I'm looking at it now. upside down, looking at this, on the right hand side of the bike (if you were sitting on the bike looking down) which way should I be cranking it to get it off?
 
I DID IT.

I'M SO HAPPY!!!


Turns out the right tools make all the difference, after much hunting around I found a local shop that sold the 36mm tool. No where else stocked it as apparently it's an extinct fitting. put the proper oval shaped ring spanner on, gave it a whack with a mallet and it came off in seconds. What a relief!

to be continued.....
 
the build continues...

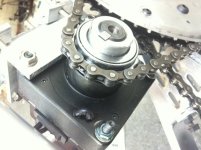
Wrestled with the motor mount for a while and modified the motor mounting plate so that it fits better on the bent swing arm bar

photo (17).JPG

By default the motor sites too far out, it's about 3mm further out that the chain wheel and the motor gear catches on the crank. Fixed the problem by stuffing washers between the motor and the mount to space it correctly. The chain tensioner is designed to push IN on the chain but there just isn't the room for it so I thought I'd be all clever and do this setup

photo (18).JPG

Now who can tell me what is wrong with this picture?...

I put my head in my hands when I fired up the motor, what an idiot, the motor pulls the chain around the left hand side, which just pulls the chain tensioner and make the chain try to eat itself. *sigh*

back to square one, can't find a neat solution to get a steady taught chain, this is the best I've got so far

photo (15).JPG

It's not very clear in the picture, but I've mounted the chain tensioner using a U bolt from a torque arm kit. It doesn't really work at all. Need to finder a better solution. Calling it a night for now, open to any suggestions or words of wisdom.
 
hi tom, i have one of these in my garage so im keen to watch what you do with it.
may be its coz im a little worse for wear ;) but Im not understanding why you are tensioning? there is no chain travel on the goose swingarm is there??
i may be being stupid here, but why cant you take some links out of the chain run it direct from the freewheel on the cyclone straight around the crank freewheel, and then tension to you liking by adjusting the motor closer or further away from the crank?

D
 
A very good question, I originally wanted to do just that, keep it really simple with no tensioner, like with the main chain. But there is a little problem, with it's current setup, the perfect chain length falls between 2 links. I can either have it so they chain is flapping around too loose or ever so slightly too short to join up, I can't move the motor any higher up, because the top mountain bracket is flush against the suspension mount, and I can't move it down because of the bend in the pipe.

I may modify the top mounting clamp so it has a notch in it, allowing the motor to be mounted half an inch higher, this could give me the extra tension on the chain when use a shorter chain with no tensioner.

Alternatively I could mount the motor on the other side of the swing arm vertical bar, not entirely sure what that would achieve but it might give me some more flexibility to add a tensioner on the other side.

I can't wait to see how this thing goes, I've got some Turnigy LiPo on order which if my calculations are correct should just fit inside the original battery box for 48V 20ah, with room to spare for buzzers and a watt meter. Maybe.
 
nonlineartom said:
I may modify the top mounting clamp so it has a notch in it, allowing the motor to be mounted half an inch higher, this could give me the extra tension on the chain when use a shorter chain with no tensioner.

winner for me.
what is the motor? have you worked out all the gearings etc? also are you staying single speed? im not seeing how your going to get any speed?

D
 
The motor is a Cyclone 1200W, although the 1200W is identical to the 500W model so if you are buying without controller, got for that one. I haven't worked out the gearings as I don't really have much choice in the matter, I was just going to see how it was like with the stock system and then start playing around with it after I had a working system. I'd like to build a custom back wheel using a nexus 3 speed rear hub, ultra strong spokes and BMX rim but that's for version two I think. I'm after torque not speed on this build as it will be for tight trail riding. There is no room for a derailer on this frame so it would have to be a hub gearbox really and I'm struggling to find one reasonably priced.
 
oh ok, i see now,yes gear hubs are costly, i paid a fair amount for my dual drive and my astro 3210 ate it for breakfast, £'s to ride seconds worked out about 20 to 1 lol
adjust the bracket and take it for a spin when the packs turn up ;)

D
 
Hey Tom, nice build so far. I would forgo the tensioner and just notch that up motor mount where it is hitting the shock mount, if you don't feel its strong enough maybe double it up with another piece of steel bent to the same contour. One problem I see with your current tensioner setup is the lack of tooth wrap on that freewheel sprocket, it looks like you only have like 5 teeth engaged in the system at on time. For torque duties and off road abuse I would try to get closer to half the sprocket wrapped by the chain. Seems like you could mount a tensioner arm off one of those motor mount bolts and try to wrap the chain further than 180 degrees around then when power is applied it will have closer to half sprocket engagement.
 
Instead of notching the bracket, you might consider moving the location of the bolt holes on the angled plate. It might require flathead stove-bolts.
 

Attachments

  • Bracket1.png
    Bracket1.png
    48.4 KB · Views: 1,790
Update time!!!!

photo (17).JPG

Following advice on this thread I ditched the tensioner and just wiggled the motor around until I got some tension on the chain, now I know it all works I plan to mount the motor as high as it will go on the swing arm by allowing the U frame bracket to sit closer to the centre point, that way either of them will be on a curve and able to get more bite. So i donned the 36 LifePo4 rucksack pack and tried going up the drive, as predicted it cut out under load, when the battery dipped below something like 35V. So I did as instructed and cut the green wire, a helpful person on the forum on another thread told me that the LVC is in the throttle itself and activates the brake cutoff. Cutting the brake cutoff fixed that!

photo (18).JPG

Great! no more cutoff. A quick bomb around the pavement and grass outside with a mild incline showed about 1200W being pulled. 40a max pulled in the test. My 750W hub motor could pull 60a peak.

So how was it? well, the throttle is a bit jerky, the lowest speed setting makes the bike jerk forward a bit, something I'm not used to. There isn't enough torque to pull a wheely from standing, even if I sit far back, small wheels and a heavy steel frame I guess. It's not as noisy as I was expecting, you can hear it coming but it's not an ear bleeding whine. Buckets of torque though, it climbed a fair slope without feeling like it was dying. After only two minutes the motor was very hot though, not untouchably hot but you could warm your hands on it alright. I've got some metal fins to put around the motor to keep it cool and a few temp sensors on the way to keep and eye on the heat. It looks set to be a lot of fun and I can't wait to try it @48V. At the moment the chain runs to a 20t on the back, thats being replaced with a 9t next week and I might move the chain up to the much larger chain ring on the front, if the motor wines too much I'll put it back to the smaller front gear. I'm guessing it tops out at 15mph at the moment, but with 20" wheels and an almost vertical front fork bouncing around, it feels a lot faster. The front fork is to be replaced with a bomber Jr fork, which will probably half the bike weight!

One big concern though, after my quick test ride I spotted this...

photo (19).JPG

That appears to be gearbox grease seeping out the front of the motor, o oh! should that hole be plugged? it wasn't out of the box, the hole is threaded and I think I can see gears in there, probably shouldn't be exposed? help!?

Finally just wanted to say thanks to everyone who's lended their opinions and expertise to this project, it's proved invaluable and will continue to do so. Stay tuned.
 
Update time!

IMG_1703.jpg

I'm quite short on tools where I live so I took the bike 100 miles to my parents house where I had access to welding kit and steel cutters e.t.c. I've modified the rear dropouts to take the 14mm axle of the new rear wheel with its 9T freewheel. I decided to move the seat back 6 inches on the frame so that it makes for a better riding position and leaves room upfront for that fat ugly Headway controller to sit where the "fuel tank" would traditionally go.

IMG_1709.jpg

Using a bit of sheet steel we made this sort of tunnel which the front of the seat bolts onto, it also acts as a ptoective tunnel for the wiring loom out the back of the controller, on the other side is a small cutout just big enough to thread the cables through, the result should be no visible wires anywhere on the bike.

IMG_1711.jpg

Made this tray to bolt the controller to, made a curved front by hammering it around a bit of gas pipe, it's for decoration more than anything, the top of the curve sits just below the fine of the heatsink. I've heard tales of these controllers popping so I want to really maximise the airflow over the controller. I've got a couple of temperature sensors to fit just for peace of mind.

IMG_1717.jpg

Here is the extra bit of frame added on and painted, quite pleased how it worked out in the end, my welding skills are zero so big thanks to my dad for lending his engineering skills to this bit.

I was worried about the way the motor was mounted as it would be constantly trying to tear itself off the swing arm, the way the load was distributed was less than ideal, so we came up with this...

IMG_1718.jpg

A nice big chunk of oak. The motor now mounts where the original Currie Drive went so makes use of the slots for adjustment. It needs a bit of cleaning up but now the force is directed downwards so it's trying to crush that mount rather than rip the mount off sideways. Also with this solution I'm able to use the big and the small chainring without the chain eating a bolt of catching on something.

no one chimed in with any info on whether or not the hole should be plugged in the front of the motor that was seeping gearbox grease, the problem still stands if anyone can lend any wisdom?
 
I think I should name this bike "Playmobil one" due to it's current colour scheme.

photo (20).JPG

The Bomber forks look great, just having a problem with the headset, the forks wobble around inside the steerer tube with buckets of play and I can't seem to get it to work at all. The bearings seem to be a few mm wider at their narrowest point than the diameter of the forks, which makes no sense, ah well.

5 speed SRAM rear hub with a motorbike tire is on the way, might be selling this once the bike is complete if anyone is interested. I have other projects in the pipeline that need funding and I won't be able to take this out as much as it deserves.

Also measured up the battery box and it should hold 8 6s 5000mah Turnigy packs with room for the wires for 48V 20ah

Still no response from anyone about the gearbox holes :cry:
 
photo (21).JPG

CA and one of three temperature gauges are on,
 
I'd plug the hole with something. You definitely don't want dirt or water to get in there, anyway.
 
Back
Top