Building my first e-bike, questions

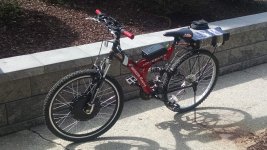
I tested everything, and it seems to work fine on the bench, This controller works pretty nice, the default pretty much run without brakes or pedal sensor connected, and it is 36 or 48 volt compatible.
Here is where I show my ignorance what is 12g? I am getting info from the maker as to the length and tension of the spokes Monday. The work was really simple, anyone that can solder could splice color for color, It took a couple of hours in total, and I would've been watching TV or something useless otherwise. I guess I could've been working a Jukebox amp I have on the bench.
 
Last edited:
Good job! 12g is 12 gauge , size (diameter) of the spoke.

edit: did you twist the heavy gauge phase wires together before soldering (to get copper to copper contact)? Or just laid them next to each other before soldering (no copper to copper contact)? Solder melts at t lower temperature than copper. If the phase amps is too high for the solder to handle, it will melt. If your motor stops working one day after climbing a steep hill, check those solder connections. It would have been better if you used crimp connectors for those high current phase wire connections.
 
Last edited:
Here is where I show my ignorance what is 12g?

That's 12 gauge spokes, which are made from wire 2.7mmn in diameter. It's a common mistake among electric bike buyers and manufacturers to use spokes that are too thick for bicycle rims. Either they won't stay tight, or they damage the rims, or both.

Use 14ga, 13-14ga single butted, or 14-15ga double butted spokes and you'll have much better results.
How does that work? Gauge of the spokes has to match the strength of the rim? Stronger rims such as motorcycle rims, which are wider, thicker, and smaller in diameter need heavier gauge spokes? Is there a formula for choosing spokes?
 
How does that work? Gauge of the spokes has to match the strength of the rim?

Spokes must be stretched elastically to work. The thicker they are, the more tension it takes for them to follow the rim's flexing under load without going slack. But if the rim can't withstand that much tension without buckling or cracking, then the thick spokes will slacken constantly in normal operation, loosening and chafing against the other parts.

Stronger rims such as motorcycle rims, which are wider, thicker, and smaller in diameter need heavier gauge spokes?

They don't need thick spokes, but they can tolerate the higher tensions that thick spokes require.

There isn't a formula for spoke gauge as far as I know, but bicycle rims of any kind work best with 14ga (2.0mm) or thinner spokes.
 
edit: did you twist the heavy gauge phase wires together before soldering (to get copper to copper contact)? Or just laid them next to each other before soldering (no copper to copper contact)? Solder melts at t lower temperature than copper. If the phase amps is too high for the solder to handle, it will melt. If your motor stops working one day after climbing a steep hill, check those solder connections. It would have been better if you used crimp connectors for those high current phase wire connections.
I wove them together, but if it does get hot enough to melt the solder, they could possibly come apart, so if it fails, next time I will crimp, and solder. Good Idea!
 
I wove them together, but if it does get hot enough to melt the solder, they could possibly come apart, so if it fails, next time I will crimp, and solder. Good Idea!
Never got my motor wires very hot at all, but others have and posted their pictures. Seems like the connectors often melt first. If not that, then the insulation on the phase wires melts. Both short circuit the harness and fry parts in the controller. The hot rodders who have super heavy motor wires will see the solder in the motor windings melt while the enamel burns off the core windings,

If you did a good job soldering your cable, it will probably be OK. The big concern is that solder is brittle, so the solder area needs some strain relief. I used to put a splint around a motor cable where I soldered it.


.
 
I wove them together, but if it does get hot enough to melt the solder, they could possibly come apart, so if it fails, next time I will crimp, and solder. Good Idea!
How's the project going? 2 wires wove together then solder is better than laying 2 wires next to each other then solder.

Just came across this video by Will Prowse of DIY Solar where he talks about crimping vs soldering lug connections.
 
Still waiting on parts, The pedal sensor came (it was missing from the kit) the wiring does not match, so I had to order some pigtails to mate it to the controller, the spoke tools are also on order. The weather has been too crappy to work on it outside. I still need to get the pedal removing tools to install the sensor, The rear rack for the battery is also on it's way.
Pretty good video!
 
Last edited:
First ride today, has decent power for the hills I have to climb, I still have to tidy things up and get some straps to hold the battery to the rack. The first try didn't go well, I went 3 feet and everything died, I thought I has a 30 amp fuse in the battery, but it was 15 amp, I only had 25, so I installed that, and lowered the amps in the controller to 23, and off I went. The controller says 830w when full throttle, I had it to 18mph for the short test, so for a first ride things went ok. The rack I got will be replaced as soon as I find a better one, and the seat is a butt killer for me. Regen braking is working and seems not too excessive. I am not a speed demon, so performance looks like it can work for me, I also am not likely to put over 50 miles a week, unless i lose some weight, and my legs get stronger, which will take a little while. the wheel is slightly out of true, but i will take care of that pretty quick.
 
My Tryout today didn't go as planned, the first thing that happened was the fuse failed when the power connector was plugged in. The fuse didn't blow, but the weld in the fuse cap failed, I didn't have another 25 amp fuse , so I tried a 20amp, and started the ride,
Then a 1/2 mile later that fuse blew, the controller can do 28amps, but I made a mistake, and thought I was lowering the amps in the settings, but actually was lowering the wheel size. aside from the comedy of errors, it wasn't a bad ride, also I am changing the seat! Te bike is mostly finished for the beginning rides, I need ti get some tie-downs for the battery, and if things go well a better rack, the rack is barely stiff enough to hold together, but for testing, it'll work. The bike has plenty of power, and If I get tired or lazy, it will take me up most of the hills close to home. This is not a commuter, off-road, or cargo bike, and light duty will work for now.
The pink and grey wires hanging out enable and disable regenerative braking, which is not super strong, but it will save brake pads and put a little back in the battery. I also need to get a couple more screws for the controller box. I reread the controller instructions, and found out I accidentally had the "road legal" wire plugged in, so more performance is there, if I need it.
 

Attachments

  • IMG_20250420_112126267.jpg
    IMG_20250420_112126267.jpg
    2.9 MB · Views: 15
  • IMG_20250420_112602372_HDR.jpg
    IMG_20250420_112602372_HDR.jpg
    3.9 MB · Views: 15
  • IMG_20250420_114947541.jpg
    IMG_20250420_114947541.jpg
    4.4 MB · Views: 13
  • IMG_20250420_115007373.jpg
    IMG_20250420_115007373.jpg
    4.3 MB · Views: 15
Last edited:
My Tryout today didn't go as planned, the first thing that happened was the fuse failed when the power connector was plugged in. The fuse didn't blow, but the weld in the fuse cap failed,
What specifically do you mean?

Some thoughts:

It's very common to have fuse *holders* that are poorly made, that can cause fuse failures, or poor system operation, because of excess resistance in the crimps, welds, solder, etc. , of the contacts to the fuse, or insufficient springiness of the fuseholder contacts to securely hold the fuse. All of those cause excess heating inside the fuseholder as well, which can cause plastic casings of the holders to deform and further increase resistance, and sometimes cause gaps between contacts and fuse, which at best cause nonoperation of a system that *looks* like a blown fuse (replacing hte fuse usually fixes the contact temporarily), and at worst can cause wiring fires. :(
The holder was fine, the fuse has a weak spot in the middle designed to open during an overload, and is soldered or welded to the end cap inside the fuse, this is a glass type. I have seen bad fuse holders of the clip type, get high resistance, and get hot, and melt the solder in the fuse cap, this was not that type of failure, it looked like a mechanical break, with a little deposit inside the glass. The fuse failed upon connecting to the battery, like the split second surge filling the capacitor opened the weld.
Thanks for your thoughts! Happy Easter!
 
Last edited:
I use a frame bag that velcros to the bike for a battery holder, I found it at the thrift store. Take a 20" tire tube and cut it longways then stretch it over the motor rim, it will help keep a blow out from happening. You might be able to fabricate some crude torque arms for your forks that pipe clamp to the forks, just for insurance.
 
A little over 9 lbs
This seat post mounted rear rack could possibly work. Rated to 22 lbs.

I have been using the older version on my FS downhill bike for several years. 1000s of miles without problem. Frequently check the welds and tubing for fatigue cracks or bends; for me so far so good! I use largish panniers and the side extensions help secure the panniers and keep them from flopping into the wheel.

s-l960.jpg

Unless you are riding on gnarly trails, this could be a good solution.
 
There is already a liner covering the nipples inside the rim if that is what you are referring to. I certainly would like to find a battery bag like you are referring to, as currently a set of rubber hold downs are what I'm using I do have torque arms installed, but I see a better way with the small ones secured with a bolt through the bottom of the fork (there is a hole there already for it). Thanks for the suggestions!
 
This seat post mounted rear rack could possibly work. Rated to 22 lbs.

I have been using the older version on my FS downhill bike for several years. 1000s of miles without problem. Frequently check the welds and tubing for fatigue cracks or bends; for me so far so good! I use largish panniers and the side extensions help secure the panniers and keep them from flopping into the wheel.

View attachment 369047

Unless you are riding on gnarly trails, this could be a good solution.
Believe me gnarly trails will never happen, I'm too old for that! Bookmarked, looks great! As soon as I get some things settlrd on the bike, I will order and swap it in.
 
I have a theory that rims are the suspect for flats, and changing a flat on a motor wheel locked down with torque arms is a hassle, not to mention the danger of a front flat while going 20mph. Slime tubes are a joke, and messy. Anyhow hope you are having a good ride!
 
Back
Top