Active pre-charge/inrush control

ryerson2019 said:
How are you powering your 12V LED? My boards arrived and I'll put them together when I'm through with finals.
with 12V coming from my 40V->12V converter. adding a resistor to reduce 40V to 12V is quite bit, and will get hot. so this is a no-go. there often can be 12V found inside the controller as well. you may have to look for it.
 
Hey Everybody,
I've been following this build for a little while. I am also interested in building one of these circuits for my large-sparking problem when hooking up my battery to controller. I would like to build the version Fetcher posted on page 6 that includes a switch. I also have 48volt battery to Infineon controller that takes up to 40Amps. Unfortunately, I have no experience soldering SMD parts to a board. I am trying to get a parts list together on Mouser based with through-hole components. Just wondering how are you all soldering these together? I really love the idea of a nicely printed board from OSHPark though! Thanks for that Izeman!
 
The circuit has so few parts that building one on perforated board is not hard. I just bend the legs on the parts to make the traces and solder. A nice chunk of aluminum for the heat sink can also be used as one of the terminals. Sorry I don't have a picture of one made like this, but I think there are some layout pics in the thread that would help.
 
Just to be a bit of a pain:
how about an led on the board, which comes on when caps are charged up?
( i used an led which got dim when the caps were charged, just an led in series with the inrush resistors) but an led that comes
on when caps are charged would be cool.
 
whatever said:
Just to be a bit of a pain:
how about an led on the board, which comes on when caps are charged up?
( i used an led which got dim when the caps were charged, just an led in series with the inrush resistors) but an led that comes
on when caps are charged would be cool.
this makes no sense to me, as the circuit is buried deep in the bike and can not be seen from the outside.
i added a 12V through line that will light my push button switch's led when pushed.
if you need to know when FETs are charged: this doesn't make any sense either. charging takes below 1s. so you flip the switch and you're done. no charge time or anything you need to be aware of.
 
for those of you planing to build my variant of this circuit, here are some pics. i received the boards today. still waiting for the smd zener, so i didn't install all the smd parts. those are self explaining anyway.

here is a pic before soldering. just the FETs with the middle pin removed, and the copper solid rod, bent to shape.

IMG_0298.JPG

this is with the view from the side. you can see GATE bent down and going into the thru hole, the SOURCE touching the copper rod.

IMG_0299.JPG

this is the final soldered board. i attached the 2 GND wires. DRAIN (going to controller) is the upper one, SOURCE (coming from battery) is the lower one.

IMG_0300.JPG

i realized that the FET's source pin connected to the copper rod is a very thin connection. of course those little pins must be able to carry the FET's rated current, but i guess i will add some wire to it as well.
the heatsink (to be mounted on the back) is NOT installed either. it makes soldering the FET's drain to the board more difficult and will be added when all is done.
 
How about if you insert the solid copper jumper from the other side, then bend the legs toward the FETs. This would give you more copper in the path.
 
Hello everyone!

I'm searching for only a switch. I just need to press a button and it powers on the ESC.
I don't need anything else. If it's there, it's no problem, but the most important is the switch!
Can you help me?

Thanks!
 
You're in the right place.

What this PCB does is divert a small flow of power through a switch.

When activated, the switch opens the MOSFET transistor gates, allowing power to flow.

The bill of materials and PCB order pages are linked to this document. If you want a premade thing, I believe Enertion (Electric Skateboards) sells an accessory made of the same parts for the same purpose.
 
So, I have built the circuit (switched version) by Fetcher from page 6. I used the layout he provided as I figured it would be easier to follow that way. Spent the last three nights after work trying to figure out why it is not working. I definitely feel like this is probably some horrible soldering job on my part or something stupid I have overlooked. Not sure what's wrong. Still getting a large spark and my switch seems to have no effect on the voltage. Voltage from end to end of my circuit is still reading 54volts even when the switch is off! I did continuity tests on every single component, including paths and all are working. (even un-soldered the capacitor and checked it; still works fine at 1uf). I must be doing something wrong? I know this can work somehow!!
 
It is hard to see the pics.

The capacitor looks like it might be polarized. The capacitor needs to be a non-polar type. If all you have is polarized ones, you can use a pair back-to-back in series to make it non-polar.

If your capacitor is a non-polar, then we need closer pics.
 
Hey, sorry about the bad photos (was a little tired last night). Attached are two new pics of top and bottom of the circuit. Also attached are overlay versions of the circuit diagram (from page 6 - the "switched" version) to make it easier to see what I did. The capacitors are definitely non-polar. Here is the datasheet for the capacitors: http://www.mouser.com/ds/2/88/SN-20470.pdf

The copper bus bars are made from some thin double-sided copper PCB. (I know I probably should etch this to make it nicer, but I have never etched a circuit before....). The larger copper bar on the back is my heat-sink for the MOSFETS. Originally I was trying to use those for the bus bars but quickly realized they were impossible to solder too. Still not sure what I did wrong here.
 

Attachments

  • Precharger_top_detail_sm.jpg
    Precharger_top_detail_sm.jpg
    110.6 KB · Views: 1,273
  • Precharger_bottom_detail_sm.jpg
    Precharger_bottom_detail_sm.jpg
    100.7 KB · Views: 1,273
  • Precharger_top_detail_circuit.jpg
    Precharger_top_detail_circuit.jpg
    114.2 KB · Views: 1,273
Much better pictures. :wink:

I don't see anything obviously miswired.

I suggest apply battery voltage, then measure the voltage on the gate with respect to the source (you can use your B- and C connections). With the switch off, the gate voltage should be zero. When the switch is turned on, it should jump up to around 2v for a second or so, then go up to 12v.
 
Yea, there is definitely something wrong. So I tested it as suggested. When the switch is off the voltage reads at zero...when the switch is on the voltage only reads at 22 millivolts and stays there. It doesn't rise at all. So I am thinking my MOSFETs are probably blown if they are not rising? Thank you again for helping me test this!
 
If the gate voltage is staying low but you have full output going to the load, then I'd guess the FETs are blown.

With power off and switch off, try measuring resistance in both directions across the drain to source. It should measure like a diode. If it reads zero ohms in both directions, the FETs are shorted.

You could also try disconnecting the gates and see what the voltage on the wire going to the gates reads with power applied.
 
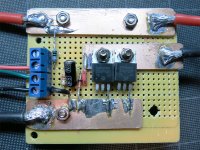
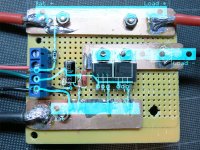
With your help Fechter, I believe I now have it narrowed down. So with the switch and power off, it would read .8 ohms in the correct direction and then zero in the other. That made me wonder some. So then I disconnected the gates of the MOSFETs from the wire going to them and applied the battery power to the circuit. Measuring from the wire that went to gates: it was zero with the switch off and 11.4 volts with the switch turned on (oddly it took a couple measures to actually see the zener diode voltage go through). Looks like the zener diode is working fine. I also have two more new MOSFETs that I tested to compare, and their resistance seems like it is half of that. Around .452 ohms. I think the MOSFETs are definitely damaged, maybe not fried completely, but probably need to be replaced.

Thank you again for the help!

Starting to wonder if maybe I should get an etching kit and try to redo my circuit one more time so it's neater. Maybe that way there will be less of a question about any soldering issues.
 
I really liked your boards from oshpark! Two things kept me from ordering it originally: 1) being that I wasn't sure at first if you were using a switch to cut off the battery completely (after re-reading some of the earlier pages 15-19 again I now realize I might have been missing some info) and 2) I have just never used smd parts/solder paste before.

I also noticed after reading again about that extra 1M resistor across the gate to source in the revised "3b version" and wondering if that is also what's causing problems for me too?

I'm going to try fixing my circuit again first, but I think I might order yours.
 
Back
Top