Adaptto Mini-E/Max-E Owner's Thread

Found this on another website :

This is just a FYI post.

I've written this before, but I think that it may help someone if I post this info in it's own thread. So here you go...

Just a little helpful info on copper heatsinks.

Making the base plate out of copper offers a few advantages over aluminum with the main reason being that <b>copper transfers heat faster</b> than aluminum. However, <b>copper retains heat longer</b>. Aluminum does everything the opposite way. It transfers heat more slowly, but retains it for a much shorter period of time.

So the best design is to have a copper baseplate on the bottom of your aluminum heatsink to transfer the heat away from your CPU quickly. Then the aluminum transfers the heat a little more slowly from the copper to itself. Then, finally, the aluminum releases the heat to the air more quickly than the copper, thus forming the optimum heatsink system.

This is probably the reason why the Hedgehog (all-copper heatsink) works poorly with a stock fan. Because it retains heat really bad and cools poorly if it doesn't have a mammoth CFM fan to assist it in releasing that heat. If it has a great fan -one that is big enough to suck the heat away fast enough for the high transfer speed of copper to perform at it's best- then the headgehog will work great (you would also need some good case fans to keep the ambient air inside the case cool enough to keep up the heat transfer efficiency).

If you ask me, you are better off with a smaller copper/aluminum heatsink. Because it's more effective for it's size, less noisy (since you don't need as many fans or as big), it doesn't stress your motherboard with it's weight, and costs less.

To sum it all up:

Copper= Transfer fast, release slow
Aluminum= Transfer slow, release fast

So basically what I was going to do was mount a probably 1cm thick plate to the top of where the current heatsink bolts to the controller case, then use some copper pipe or box section to join it to another copper plate outside the case, then mount a aluminium heatsink to the copper plate outside the bike. So basically the bike moving forward is a substitute for the fan, as a laptop doesn't move along at 30-40 mph, so needs a fan to push air through the heatsink, where as the bike moving through the air would achieve the same thing. This would keep the controller inside the case, but allow it to cool then, which is the same as a laptop cpu is cooled, as the fan blows the air through the heatsink, and not onto the cpu directly, and they get a damn site hotter too !, so in theory this should all work fine, especially in the winter time, when the wind chill from the cold air should keep the heatsink near enough at zero degrees.
 
i saw these things, which I thought was a pretty cool solution to transferring the heat http://www.amecthermasol.co.uk/product412.php?url=1&page=282&ty=30&gr=30&fg=148
 
Iv been reading this and a couple of other posts on it, looks promising :)
http://www.benchtest.com/heat_pipe1.html
 
hmm be nice to see it in english soon.
id really like to learn more about some of the advanced settings and how to adjust them for specific motor.. angle corr, ind ,pwr etc etc.
 
oh , is that the same one? :oops:
it did look a little different....with the bms instructions etc..or perhaps i have an old version,yes. more likely.
 
If you download the pdf, then stick it into google translates document translator it gives you a vague idea of the contents.
 
striker54 said:
crea2k your battery box is made of aluminium, that is a very good heat conductor. If you don't mind of gluing your controller on the box you can use this http://www.henkel.co.uk/loctite-4087.htm?nodeid=8802629353473 and all the heat from the controller will be transferred to the box.

I have made this with one of my controllers and a metal box (Steel sheet) with very good results. I bougth the coumpound from here http://xtrack.nl/.


The controller already is stuck to the battery box with cpu heat transfer pads, and then held tight with bolts. I know its working as it always dries the mud on the top of the box, when the rest of the bike is still wet.
 
Thanks for the info on your specific use case - you're right, that really doesn't lend itself to external mounting!

crea2k said:
The controller already is stuck to the battery box with cpu heat transfer pads, and then held tight with bolts. I know its working as it always dries the mud on the top of the box, when the rest of the bike is still wet.

TIM pads are actually quite shitty as far as thermal resistance goes. Because they have some thickness your bolt tension will actually distort the battery case in a subtle way and you won't be getting particularly good transfer.

The laptop heatsink you posted earlier actually contains heatpipes, as do almost all compact heat management solutions in common electronics these days. Back in the day I was right into high end PC's and all the heat problems that came along with them, I picked up a lot of good experience in cooling down hot things efficiently as I really hated the noise that came along with the high performance cooling solutions of the day (small screaming fans).

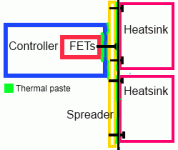
Best way to reject heat is for you to bolt a heat spreader to the side of the controller like you mentioned. Something like a 1cm thick block of copper would be ideal, aluminium is a close second and is more available/lighter/cheaper though. Key to this is removing all imperfections in the interface between the two materials, that means that the stock paint on the controller (at least the FET side) needs to go! Tape a sheet of fine grit sandpaper to a large flat surface, the easiest to find close to flat surface is a mirror. Wet the sandpaper and move the controller enclosure against the paper rather than the other way around. Start with 400 grit, then 600, 1000 and 1200 progressively. This takes some time but will make quite an enormous difference. Both sides are important obviously. Make the spreader as large as will physically bolt flat to your battery enclosure to spread heat as much as possible.

Likewise internally the interface between the spreader bar the FET's are bolted to and the side case needs to be improved. The thermal grease that the controllers are built with is not good, this all needs to be cleaned off and the surfaces flattened as much as possible. Buy some Gelid GC-Extreme thermal paste and use this on all interface surfaces.

Drill out the very small screws through the controller enclosure and re-tap for something like m4 countersunk machine screws. Bolt the spreader plate to the controller using these so they're flush with plate surface. Drill and tap mount points to suit your heatsinks in the spreader plate, then bolt on the external heatsink through the battery enclosure. As you can't get the surface of the enclosure truly flat this will help clamp up and overcome some distortion in the thin wall aluminium.

Regarding heatsinks, there's tons of awesome highly engineered stuff available. Just like power supplies, server cooling is highly developed and available cheap. Check out this for an example I found searching for 'server heatsink'. Copper base, heatpipes to spread amongst the fins and you get two for the price of one! Drill out the existing bolt pattern, flatten off the bottom and bolt both onto your heat spreader and you shouldn't have any more heat issues.

heatspreader.gif
 
GCinDC said:
i think there would be a market for an upgraded enclosure that improved cooling, in case (pardon the pun) any one's got the skills/motivation...

For almost everyone I wouldn't have thought that it was a big deal? I certainly struggle to get mini or max hot, not really even warm! If I do encounter difficult I will bolt some smaller heatsinks to the side of the controller directly like you previously experimented with. As long as they're in airflow this will pretty dramatically improve cooling. crea2k has a different and much more difficult issue moving from sealed environment to external while clearly running quite a bit of power, probably more than it's possible to use on the street at sane top speeds.

GC - what do you see in terms of economy on your daily commute going mad through traffic? I'm averaging ~26wh/km, seemingly dependant on wind speed more than anything. This morning ride in was 22wh/km over 17km at an average speed of 39km/h. I can't really ride too much harder or faster than that in the traffic I'm in. As it is i'm probably overtaking 400 cars a day. Offroad is another story...
 
Ohbse said:
GC - what do you see in terms of economy on your daily commute going mad through traffic?
been off the bike for a month after shoulder surgery, so i had to dig back to april photos to find this, which i think was fairly typical:
20140422_072005.jpg
 
Wow, I'm surprised how high you managed to get that! Nice work. That was with HS40 motor? You really were pushing the mini as hard as it could go. Be interesting to see if that figure goes up once you're back on the bike with the max...

Running my HS3540 my economy over the same journey with exact same riding style/speed limiter (which I cruise up against) resulted in 32wh/km compared with my 26-ish average with Cromotor. That results in something like 115 degrees C at end of the trip on the HS3540 but only 40c on the Cro. Cro is in a 24" wheel VS 26" for the Crystalyte. Unintentional consequence of building for power/reliability appears to be pretty good economy.
 
district9prawn said:
Arghh I burned a couple of bms boards by plugging a battery in the wrong order!

Anyone else do this or am I the first :oops:

Is there a problem running the battery off remaining working boards? So far it seems to be ok and nothing is plugged in to the smoked boards.

I'm pretty surprised that no one else has had this issue.

Last week I found these on pages 7 and 8.

Routybouty said:
The BMS started acting up. It can't really be related as I didn't mess with the BMS. Board #2 is now broken, cell 1 and 2 read empty on board 2. It has been giving me some fits earlier. A couple times now I have gotten a "Low Batt" within a minute of riding on a fresh battery, I lose power, but only for a 1/2 second and then it resumes normal.

My question is can you skip a board? Can I plug the battery #2 into board #3, battery #3 into board #4 and so on?

Allex said:
Yeah you can skip a board.

You can just config the bad board as "0" and not use that one at all. Then just config the others as "4" or whatever they should be. Just triple check and plug in your connectors slowly. I would also check the resistance across all the pins on the board just to make sure the other ones are good.
 
Yes iv done with this one board and I think it was Offroader or possibly another person that burnt one too, its soooooo easy to do.
 
By the way the best way of not connecting stuff the wrong way is to do as I did and get a black marker pen and paint one side of the connector black on every connector, as well as the battery power leads too, this way even if you are half asleep as long as black is lined up with black you are good to go, well as long as you don't plug a battery into a battery, that's how one of my bms banks got fried.
 
I have a few Eatons for sale now, they are brand new.
http://endless-sphere.com/forums/viewtopic.php?f=31&t=62545
From left: Eaton 1800W, Adaptto Max-e, 1500W Cherokee CAR1248FP
file.php
 
district9prawn said:
Arghh I burned a couple of bms boards by plugging a battery in the wrong order!

Anyone else do this or am I the first :oops:

Is there a problem running the battery off remaining working boards? So far it seems to be ok and nothing is plugged in to the smoked boards.

I actually didn't hook up my BMS yet but I did enough reading and research about it. This whole BMS stuff is simply just scary when not running 4s packs.

Correct me if I am wrong here but here is what I determined.

Unless you're running 4s packs, you will burn your BMS board out if you connect your pack in series in a different way while balance leads are connected the same way to the BMS. It makes sense because the individual cell voltages will now be different. I don't know what will happen exactly if you do this with 4s packs?

Unless you're running 4s packs, If your packs are hooked in series and the series disconnects while balance leads are in BMS, you will burn out your BMS. Just think how easy this can be done, you want to remove your batteries and you disconnect the series first before removing the balance leads.

Scary stuff when you think about how easy it is to burn the BMS. It doesn't surprise me that people are burning out their BMS. You have to be very careful if not running 4s packs. When I finally get around to hooking my BMS I am going to solder my main battery wires into series instead of using connectors.

Another thing that surprises me is that nobody really talks about just how easy it is to burn out your BMS if hooked incorrectly when not using 4s packs. I guess mostly everybody who buys these controllers are all highly experienced technically.

Luckily if you burn out your BMS it will not burn out all the boards and you can use the spare ones with no drawbacks.

For me I have found no real need for the BMS because I keep all my 24 packs wired in parallel and the voltages stay the same. I can also tap into my individual cells in seconds if I want to read voltages. I can also balance charge my pack with a hobby charger easily.
 
Im trying to do firmware upgrade (RC9e) but I cant get my SD card working. I did use same card before but now I get error everytime I try to write firmware to sd card. I have tryed format and assignin new letter for the card but RSDwriter gives error message everytime.. Any solutions? Should I format my card to ntfs, fat32, exfat?
 
Do you have the write protect tab on your sd card slid across into write protect ?, its on the side if it has one, some dont.
 
Dear friends!

Its our pleasure to announce the launch of our new web-site: http://adaptto.com/.

For now we have included all the essential information about our products but we will do our best to constantly update the web-site by combining all the popular topics and relevant questions into a single handy web-resource.

You can already use the web-site for your orders! There is only a bank transfer option for payments now but we will also make credit card payments available on the web-site during the next 1-2 months for your convenience.

I would highly appreciate your ideas and advices regarding site improvements/information to include etc.

In the near future we're going to introduce our Micro-E (1 Kw) controller with amazingly small dimensions and weight. PAS sensor is also being prepared.

I would also like to remind you our e-mails:
sales@adaptto.ru - for order questions
techsupport@adaptto.ru - for all the technical enquiries
And my personal: olegk@adaptto.ru for dealerhip questions

All the best!
Oleg
 
Back
Top