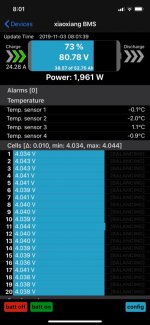
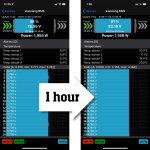
AliExpress battery pack unboxing (for my eZuma project)

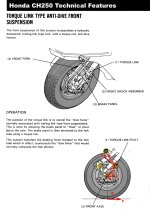
I really hate the crummy front forks that came with the bike -- typical harsh cheap stuff from you-know-where. The rear suspension, however, is now well-behaved. But the front forks are more often than not quite jarring. So call me crazy, but one of my winter projects will be to install and customize a trailing arm front suspension borrowed from a 1987 Honda Elite CH250. Even though the CH250 only had drum brakes I'm pretty sure this puppy should align up with my existing 220mm disk rotor without too much trouble. But like most things, it's all in the details. Naturally I'll upgrade to nitrogen shocks and an upgraded AliExpress brake caliper at the same time. Crossing my fingers that it will be worth it and won't involve any serious hacking, particularly to the headset. A used front suspension assembly has been ordered via eBay and should arrive in a week. I'll start by de-rusting it, grinding off unnecessary attachment points, and cleaning up the welds. Then I'll proceed from there.

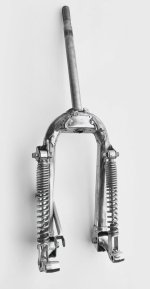
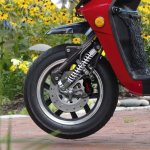
Current front suspension:
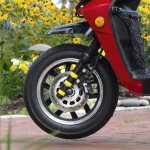
Trailing Arm slice1a.1280.jpg

Proposed trailing arm front suspension (sketch):
Trailing Arm slice1b.1280.jpg
 
There are fork upgrades for the zuma, I admire your willingness to go big or go home!


One future idea for the battery pack problem, order multiple smaller packs. Wouldn't this mitigate the weaknesses you dealt with in the larger pack?
 
The used CH250 front fork arrived care of eBay. A bit rusty, but nothing a good cleaning won't fix. The quality of Honda's steel and welds is so much better than the Chinese equivalent. This should likely be a big improvement in safety and comfort.

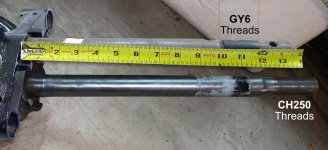
However, one issue revealed itself -- the length of the CH250 stem is much longer than the Chinese one on my bike. Gonna need to figure this out. There are many options from shortening the CH250 stem, to welding the GY6 top half to the CH250 bottom, to getting creative with how the CH250 stem mounts at the top -- perhaps machining a custom spacer or something. Much to mull about. In the meantime, I've got my winter project lined up. Gonna be fun!

compare stems IMG_9562.jpg
 
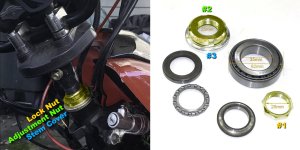
This is what the top of the steering stem currently looks like. Additionally, I "believe" I have identified the specific set of bearings on AliExpress that are used for this particular stem (but as with all things Chinese one needs to verify all dimensions prior to ordering as there are dozens of subtle variations between vendors).

As for the bottom of the stem, the hope is to keep it mostly "Honda" parts, but that remains to be seen. The key difference between the two is that the Honda shaft is 30mm in diameter while the Chinese clone shaft is 35mm.

slice1.1600.jpg
 
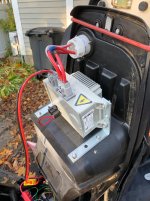
So the Elcon 1.8kW Level 2 charger finally arrived from AliExpress and I spent a few hours yesterday installing it under the seat bucket. Two 5" L brackets from Lowes did the trick. As you can see, the 240V inlet fits nicely in the old gas filler opening. I used 8AWG wire to connect the charger to the 240V inlet and 10AWG wire to connect to the battery via an Anderson plug. I'm now getting 24A charging versus 5A from my old el-cheapo Level 1 charger!

Note that there are two versions of the Elcon: one for CANBUS and one without. I purchased the version without CANBUS. Also note that there is a little undocumented trick to getting this version of the charger to turn on: you need to short the last two pins together (see the the red patch cord in the photo). I'm likely going to add an on/off switch there "just in case" but for the most part, when I'm done charging I'm simply going to pull the 240V plug out and be done with it.

IMG_9578.1280.jpg

IMG_9577.jpg

M
 
Nice charger. Can you adjust the current?
Something like that might be overkill for my packs.
 
fechter said:
Nice charger. Can you adjust the current?
Something like that might be overkill for my packs.

There is no external adjustment. One orders the charger set by the factory to your specifications. That being said, there was some discussion some years back on ES about ways to electronically adjust the power on Elcon chargers -- whether that is still valid is anyone's guess. As is, I'm happy with the unit.
 
Well the new Elcon 1.8kW Level 2 charger is the real deal. As my first test, the battery was at 48% charge. I gave it one hour on the new charger and the battery was at 91% when I pulled the plug. This is going to be a game changer for me. Going forward, I'll likely keep the battery between 60-75% and give it a quick 30 minute boost right before I venture out. So far, I'm a believer.

IMG_9601.combo.jpg
 
If you've been following this thread, you know that I have had enough of the nasty front shocks on my Chinese Zuma clone. While I "could" take a chance that some $400-$600 performance forks from AliExpress might help, I decided to go old school -- specifically a set of forks from a 1986 Honda Elite 250. (see previous posts). These were purchased for $89 from a seller on eBay.

These are trailing arm design, so in theory I can install any brand of 300mm shock I want (within reason of course). My expectation is that even with the stock Honda shocks, it will be much smoother than the harsh ride I'm getting at present.

Anyway, here are two photos of the actual forks I purchased via eBay a few weeks ago:


View attachment 1

I started by using a wire wheel to clean off the rust. Additionally, I wanted to grind off the extraneous bits that held the covers and speedometer cable. But I guess I got a bit carried away... There is not a lick of paint left on these puppies! Given how clean they are now, I'll probably opt for powder coating the forks themselves. I'd like to keep the connecting bits shiny metal, but given that they are steel not aluminum I'll have to paint them either way.

IMG_9755.1200.jpg

Note: the tab on the right is to hold the speedometer housing in place -- given that this is for an electric eScooter, I'll probably grind that off but for now it is what it is.
 
Wow, sweet.

Think they'd be robust enough to handle the twisting of a front hub motor?
 
john61ct said:
Think they'd be robust enough to handle the twisting of a front hub motor?

In my application I'm using a rear 8000W hub motor.

But to your point -- these are solid steel not aluminum. So I would imagine they would do the trick for a front hub motor with 12" or 13" rim. You'd have to extend them and add longer shocks for a 16" rim. That might be cool but the travel won't be to your liking as the geometry is for a 12" rim.
 
Unlike the previous el-cheapo speedometer from AliExpress, the QSmotor CT-22 speedometer console will require a bit more work with regards to wiring. Here's what I believe to be what will be needed for my particular application.

View attachment 259963
I know the thread is a bit old, but I love how well you're documenting each step. And also the mockups you make for suspension/dashboard. Really amazing.

I'm dealing the same issue with the speedometer, my original was set for phase wire voltage and it was just randomly displaying values. It started happening when changing from a regular PWM controller to a FOC LingBo GEN 5 72352, which leads me to think that due to the FOC algorithm, phase wire voltage is not linear to speed.

I did try changing the solder point inside the PCB to "hall" and connecting to the One-Lin (LIN Bus?) hall speed line in my controller without success.
After that I soldered a wire to the phase voltage wire traces and used an ESP32 to translate hall pulses to 1-5v, I could get the numbers on the speedo to move, but without any logic. That experience ended with a blown trace and blown MCU after that wire accidentally touched B+ 72v.

What did you end up using and how easy was the connection?
 
Back
Top