Finally: better electrodes!!!! 
I scored some 3/16" X 8" Elkonite® rods off eBay. There are several different formulae for Elkonite, and the seller didn't know which particular ones these were, unfortunately, but they all are basically Copper-Tungsten in varying percentages, some with a few other metals as minor alloying constituents.

Previously, the most successful electrodes I had tried was that plain old copper heavy grounding wire as reported in the early pages. I tried Beryllium-Copper, which gave nice, solid welds, but the electrodes stuck to the work very badly and needed re-sharpening after every weld because of having to break them free.
Tried 'pure' tungsten... Again, nice welds, but again, major tip problems: They didn't stick like the BeCu... The tips just 'blasted off'

Tried another couple of metals with dismal results. Never did get the chromium copper that I wanted to try. Found the material at a decent price, but shipping would have been $50.00 and ordering was a hassle too.
And of course, the plain copper needs re-sharpening all too often too.
But finally this Elkonite stuff is durable and gives good welds in all of the conditions I have tried it so far.
The one negative is that it has a lot of resistance, so you need to have the wire/cable attached close to the tip. If you connect it at the far end, after about 5 quick welds it gets uncomfortably hot.... and having the connection that close to the work is a bit unwieldy and could be a little dangerous.
Fortunately, there is a (fairly) simple solution!
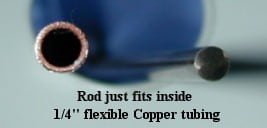
It just so happens that the 3/16" Elkonite fits just about perfectly inside 1/4" flexible copper tubing:


And you make something like a 'pencil' out of it:

First, I polished all the oxide off the Elkonite rod; and while it could be done by hand, or an electric drill, I chucked the rod into my lathe; turned it on to a couple hundred RPM and sort of 'spun fit' the copper tubing onto it... this method has the added effect of grinding off any oxidation on the inside of the copper tube for better electrical conductivity.
It was a pretty tight fit, but once the tube was on the rod, I fed it through the lathe chuck an inch or two at a time and really tightened the chuck hard to provide a strong crimp, just to be sure.
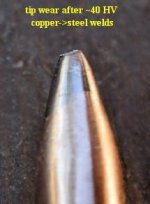
Grind the tip to a point (as in the photo above) and clean up the tool marks off the outside of the assembled electrode and you are almost ready to weld.
But a little insulation/handle is nice. I just happened to have some old ceramic tubes that I got off of (I think) American Science and Surplus several years ago for an electric kiln project I never got around to starting... Just about the right size for a handle, and the hole down the center is a perfect fit:

Now I can connect my welding cables to the end of the electrodes where they are safe and out of the way, and have even better conductivity overall.
The quality of the welds on Nickel tab material (at 14.5V)and .005 Copper (at 23V) to steel is about like that with the plain copper electrodes:
View attachment 3
But for the first time I can crank up the voltage enough to weld .008" copper to steel..... Yeah, I could do that before, but at that voltage the copper electrodes welded themselves to the work too, and when you pulled them off (with some difficulty) often the tabs came off the battery too.

Now it works great!.
Tip wear is decent; Still have to sharpen several times if you are building a big battery pack using copper tabs, but at least 5 times better than with plain copper electrodes.:

---------------------------------------------------------
A few other new details:
1: Previously when welding the .005 copper,by the time I cranked up the voltage enough to weld it, I was puncturing the copper and just leaving sort of a thin halo of a weld around a hole in the copper, and sometimes 'blasting through" the material below too

. The electrical connection from such welds was OK, but very little shear strength. The tip diameter that worked fine with Nickel and gave excellent welds that you could cluster close together was just too narrow to work well on the higher voltages and dual pulse necessary for copper. So, now for copper, I'm using about .075" -.085" tip diameter instead of the about half that I was using before.
2: Pretty much no matter what voltage you use on this simple setup or similar home-built CD welders; whenever welding copper, if you put both electrodes on the copper strip/sheet, you don't get a great weld.... You might get ones that will work, but they are far from strong. (This after all is a form of RESISTANCE welding, and there isn't much resistance if it the welding path is just mostly along the copper itself. So, for stronger welds, if at all possible, put one electrode on the work (IE: steel battery can) itself. That provides a better resistance weld path and gives much stronger welds.
3: I had noticed it before, but it wasn't highly obvious until I started using these Elkonite electrodes: The positive electrode "sticks" much more solidly than the negative electrode. When welding Nickel tabs at lower volts, it is insignificant, but at higher volts it can get to be an impediment. I need to test it further, but it seems that the best method of welding copper is to use the negative electrode with an about .075 tip diameter on the copper strip/sheet and a significantly thicker point on the base material.... as large as you can get to fit would be fine... In fact, some of my best results last night were from flipping the electrode over and using the non-pointed end as the contact on the base.
And one last thing for now: I found a couple of different kinds of connectors at Lowe's or Home Depot in the electrical department. A little more 'elegant' and conductive than the galvanized cable clamps recommended originally and a lot less trouble, if somewhat bulkier than the ones I machined out of some copper rod previously:

Umm... Looks like I've run out of attachments allowed for one post: I'll finish up in another.


