C Cab Hot Rod Power Advice

Thanks for the suggestion Hillhater.

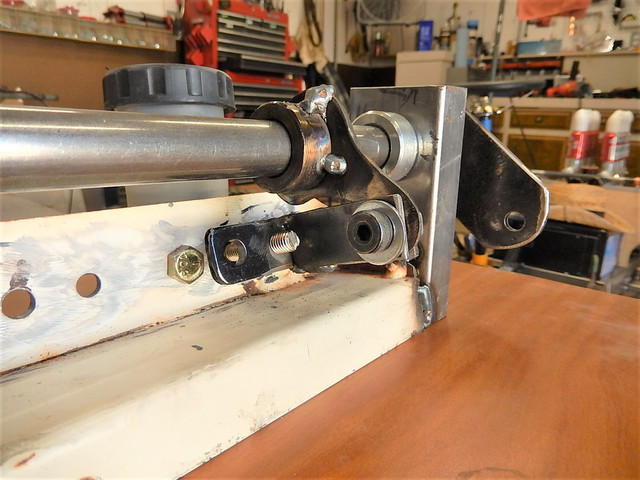
Looking at the video, it looks like the cylinder he is using is a single piston dual line cylinder for two brake lines...right? That may be OK, except (correct me if I'm wrong) my cylinder has two separate chambers, (3 ports) thus if I lose one line, the other line is still functional. I'm blocking one port on the dual port side.

That being the case I would need two of them for my system which is what my set up requires. The difference is that I'm using a 3 port cylinder opposed to his 2 port cylinder.

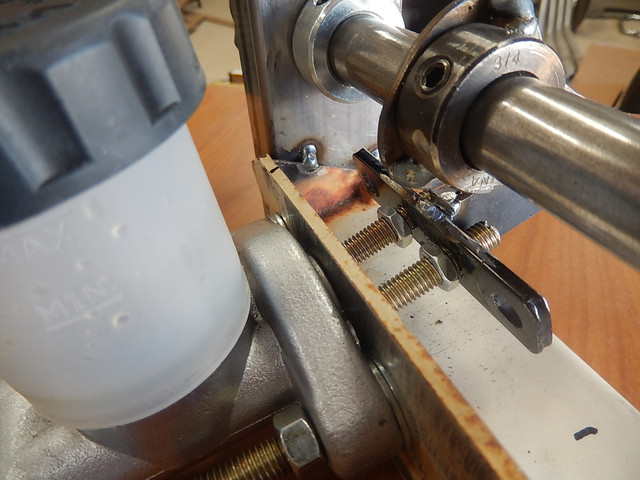
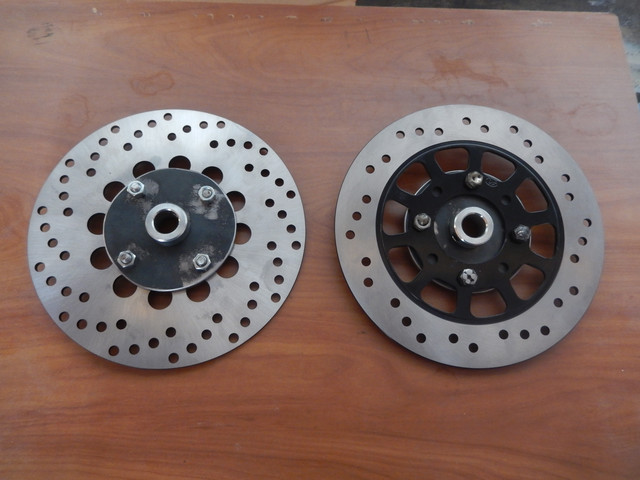
Why? Well I needed to order another complete set to include the master cylinder, lines, calipers and disc to complete my set up for 4 wheel braking. Also, I needed another 'rear' caliper that came with the parking brake set up.

So two dual-port master cylinders will be required...one for the front two brakes and the other for the rear two brakes.
 
No Ed,
With the dual system master cylinders the two brake cuircuits are completely separate other than a common top up reservior . If on circuit leaks or fails completely, the other system still functions normally.
That is the whole reason they were developed.
The video is quite clear on that.
 
Hillhater said:
No Ed,
With the dual system master cylinders the two brake cuircuits are completely separate other than a common top up reservior . If on circuit leaks or fails completely, the other system still functions normally.
That is the whole reason they were developed.
The video is quite clear on that.

Point taken, I'll look at the video again. Always learning.
But what I have, is what I have, so I will use what I have... :)

OK I watched the video again (sound on :oops: ) Hey it was early a.m. OK?
I understand better now, and will keep it in mind for any future project. Thanks
 
I'm not sure why you feel you need 2 cylinders. They use them on cars for safety reasons. One brake cylinder will stop your cart just fine. Just like on a bike the rear brakes don't do much for stopping power anyway. Like they do on cars, you can use a hydraulic proportioning valve to fine tune front vs rear brakes.
 
nicobie said:
I'm not sure why you feel you need 2 cylinders. They use them on cars for safety reasons. One brake cylinder will stop your cart just fine. Just like on a bike the rear brakes don't do much for stopping power anyway. Like they do on cars, you can use a hydraulic proportioning valve to fine tune front vs rear brakes.

Not being real knowledgeable about these things, I assumed this.

The brake cylinder I first got comes with three ports. Not enough for four wheel brake set up. Yes I could have used a splitter on one hose, but I reasoned that, that would possibly deminish the effectiveness of the brakes.

I needed two sets of brakes, so bought a second set. With that thought I again reasoned that one cylinder for each two brakes ( 2x4 ) would work quite well. I'm not knowledgeable of what the performance factors are for master cylinders of any size. So maybe it is over kill.
 
Well with respect to Hydraulics, would worry about volume first. Not even suggesting you have a problem. Splitting a line or adding a Tee will not weaken the pressure. It might slow down activation. To increase the power of a slave cylinder you increase it's volume as long as the master can feed it enough fluid. Think of dual cylinders on one rotor, twice the volume.
 
Just_Ed said:
Not being real knowledgeable about these things, I assumed this.

The brake cylinder I first got comes with three ports. Not enough for four wheel brake set up. Yes I could have used a splitter on one hose, but I reasoned that, that would possibly deminish the effectiveness of the brakes.
Ed ..watch that video again...
Most car master cylinders only have 2 or 3 ports.
Nearly every car uses a single master cylinder (dual piston) and splits the lines to 4 separate calipers..that is normal.
Sure , the designers have to be sure that master cylinder “displacement” is sufficient to operate the relavent Caliper choice, but again, that is well sorted on most systems.
Useful reading..
http://www.auto-repair-help.com/automotive_maintenance/master_cylinder.php
Keep up the good work . :wink:
 
This is one of the kits I am using.

https://www.ebay.com/p/3014020616?iid=173419230184&chn=ps&norover=1&mkevt=1&mkrid=711-117182-37290-0&mkcid=2&itemid=173419230184&targetid=935431405133&device=c&mktype=pla&googleloc=1013549&poi=&campaignid=10877149894&mkgroupid=107912403275&rlsatarget=pla-935431405133&abcId=9300400&merchantid=101687617&gclid=EAIaIQobChMIh9atm9T16wIVBh6tBh1IjAoqEAQYBiABEgKeAfD_BwE

After viewing the video and reading the recommended text, I have a better understanding. I understood the text to describe the system I am attempting to build...although it be with two separate MC's. In other words instead of a one-piece dual master cylinder, I am using two to do the same thing.

I understand that only one of my MC's will be sufficient to work the system. Looking at my MC, it appears that one chamber has two ports and the other has only one. The single port for the single rear caliper and the other two ports are for the front two calipers.( One port for each caliper )

If I use a single MC

So to activate two rear calipers I will need to split the line from the single port going to each rear caliper. And I understand that single MC setup will be sufficient to operate my system.

Or I can continue with my planned use of the two MC's and each caliper will have their own dedicated port/line.

A plus to this, is if one of the MC's doesn't work I will be able to modify the system and use just the one MC.
 
. Looking at my MC, it appears that one chamber has two ports and the other has only one. The single port for the single rear caliper and the other two ports are for the front two calipers.( One port for each caliper )
So, you are saying that you already have a “dual piston” master cylinder ?
If so you really do not need to use both MC’s
Those Karts would use a separate line from the MC to the front calipers because the MC is right out front near the axle.
One port for each caliper is no different in function than a single port and a splitter in the brake line.
Infact it is a simpler system using a single port , as normally you would run a single line to the rear axle and then just have short lines to each caliper from a “T” spliter !.....less pipework, easier to bleed, and neater.
Ditto for the front.
But remember also, two MC’s in parallel as you were planning , would mean you will need double the pressure on the brake pedal for the same brake performance !
(Because you are effectively doubling the MC piston area .)
 
Ok, I'm convinced. I came here for advice, and it's been great, so thank you.

I will work on hooking up just one MC first. Give it test and see how that will work.
If not I can always hook up the other MC.

So now I need to find the right 'T', that doesn't ship from China, and take two months to get here.
 
nicobie said:
Isn't it just a standard flare fitting? You can buy a cheap HF tool that makes the lines or do what I usually did and just buy already made up brake lines.

I wished it would be flared fittings. I have the tools for that. But the kits I bought have banjo fittings on them. All the lines have banjo fittings as well.

So I need something like this.

https://www.amazon.com/Motorcycle-Hydraulic-Connector-Adapter-Modification/dp/B07T3TW91H/ref=asc_df_B07T3TW91H/?tag=hyprod-20&linkCode=df0&hvadid=390880032701&hvpos=&hvnetw=g&hvrand=10287890673233532382&hvpone=&hvptwo=&hvqmt=&hvdev=c&hvdvcmdl=&hvlocint=&hvlocphy=1013549&hvtargid=pla-841329429052&psc=1&tag=&ref=&adgrpid=79833126213&hvpone=&hvptwo=&hvadid=390880032701&hvpos=&hvnetw=g&hvrand=10287890673233532382&hvqmt=&hvdev=c&hvdvcmdl=&hvlocint=&hvlocphy=1013549&hvtargid=pla-841329429052
 
Brake actuator done and tested.

https://www.youtube.com/watch?v=-NhKuOVAapc


That looks pretty good. At least you can adjust it so they are both engaging at the same spot. Use Loctite.
 
fechter said:
That looks pretty good. At least you can adjust it so they are both engaging at the same spot. Use Loctite.

Thanks fechter. Loctite for sure. Also some lock nuts as well.
 
Finally got 'undepressed' long enough to work on the brake foot lever.

From an old Gannon fork tine, back when I had a garden tractor.

DSCN4790.JPG

Cut angled welded drilled and semi ground smooth.
Still have cosmetic holes to drill out and trim to length.

DSCN4791.JPG

Trial fit of mounting hardware
The end of the shaft had a washer welded on and ground smooth.

DSCN4792.JPG

Trial fit onto the frame

DSCN4793.JPG

Just room enough to fit next to the steering box.
Need to trim off about a 1/4" off the end of the shaft.

DSCN4794.JPG

The brake lever will pivot on the shaft
Temporary scrap aluminum connecting bar. It works as intended. Just need to make another/final connecting bar.

DSCN4795.JPG

The shaft collars are welded to the frame and the 3/4" shaft is secured with the set screws.

DSCN4797.JPG

Haven't decided on a foot 'pad' or 'peg'. I think I need to try and be symmetrical with the throttle pedal.
So a flat plate design may be forthcoming, that will mirror each other on the two functions.

The peg version...maybe.

DSCN4765.JPG

This is sorta what I'm thinking of doing.
 

Attachments

  • Foot pedals.png
    Foot pedals.png
    1.1 KB · Views: 804
nicobie said:
Just like on a bike the rear brakes don't do much for stopping power anyway.
From experience with SB Cruiser, this isn't necessarily true of a heavily-loaded-rear long-wheelbase trike (or quad). The rear brakes are actually the main brakes on my trike, because while the front brake will stop the trike by itself, under various conditions it cant' be used at full strength without losing steering control, or it will skid too early because of road conditions while the rear brakes don't because there's a lot more weight on those.
 
amberwolf said:
From experience with SB Cruiser, this isn't necessarily true of a heavily-loaded-rear long-wheelbase trike (or quad). The rear brakes are actually the main brakes on my trike because while the front brake will stop the trike by itself, under various conditions it cant' be used at full strength without losing steering control, or it will skid too early because of road conditions while the rear brakes don't because there's a lot more weight on those.

My thought about using just one master cylinder has changed back to my original design. Two separate systems.
The bracket is already made for two MC's. There will be two 8.25" discs/calipers in the rear operated by their own separate MC. Because the vehicle is geared to go no more than 25 mph, there will be more than enough stopping power, IMO.

If I properly adjust them the front will engage a fraction before the rear. Which I understand is correct for my type of application.
 
The weather in the last couple of days has been super.
I have been energized to get out in the shop and work on something, anything.

I chose to make the hubs for mounting the rear brake discs, and here is some progress.

But first

When your cutting discs get too small do you throw them out?
If so, you're missing out on two uses for them.

The smaller ones work great for making those really small tight curving cuts.
They are also useful as a template for all sorts of circle sizes.
I'm thinking of marking a select number of sizes and putting them away until needed.


4" circle being used here.


I'm using a 3/16" plate (4.78mm)
3/4" center for axle.


Marking outer diameter for each mounting hole.


All that remains is to weld on the shaft collars. I think one on each side of the hub. Two set screws being better than one.
 
All that remains is to weld on the shaft collars. I think one on each side of the hub. Two set screws being better than one....
:shock: “Set screws” ?......for brake hubs ?
That isnt going to last.!
Keyways and keys needed
Why dont you just use Kart components ?....they are readily available and cheap.
 
Hillhater said:
All that remains is to weld on the shaft collars. I think one on each side of the hub. Two set screws being better than one....
:shock: “Set screws” ?......for brake hubs ?
That isnt going to last.!
Keyways and keys needed
Why dont you just use Kart components ?....they are readily available and cheap.

Yeah!...you are more than likely right.

The set crews will be replaced with Grade 8 machine bolts/screws for through the shaft application. I've used the method before with no problems. I guess it will remain to be seen if it will hold up.

This application will be twice the number of bolts. The set screws are there only to facilitate construction and for marking the final mounting position (for drilling). I have often looked at go-kart components, but nothing I found works for my build. Mainly due to the size limitations of the kart parts. To use them would mean changing the design to accommodate the kart part, which isn't an option. The same thing goes for using golf kart parts which I wanted to use in the beginning, but that would have also meant changing my design.

Besides, I enjoy the challenge of design and function. If I think I can make it, vs buy it, then that is what I strive to do.
When I wear a hat that says, " I Made It', it will be true.

For example, the front wheels are homemade. Two bicycle rims connected together to form a single 'double-wide ' rim with offset spokes. You can't find wheels like them. When people see them they can't believe I made them. That's really good for one's ego... don't you think? :D
 
Just_Ed said:
I originally was going to go with
images


But they aren't available anymore, unless you pay big bucks online.
If I could come up with about eight empty (cosmetically good) 'Full Throttle' cans I would use them.
While looking at your custom front wheel posts, I ran across this again, and thought that perhaps you could print out your own labels to wrap your existing cans with (and then lacquer or clearcoat them to weatherproof them). If you use several side views of the cans, you can "unwrap" the label into a flat image by adding each panel to the next, then print that out to scale for the cans you have. Wouldn't have to be perfect, just enough to get the idea across.

You could even edit the ingredients list to be a parts list for the build, including blood, sweat, and tears. ;)

https://www.google.com/search?sa=X&source=univ&tbm=isch&q=full+throttle+energy+drink+can+label+image&ved=2ahUKEwiH_JjixoPtAhXBIDQIHSZnCycQjJkEegQICRAB&biw=1054&bih=576&dpr=1.75

https://www.drinkfullthrottle.com/product-page.html

full-throttle-citrus-can.png

full-throttle-agave-can.png

full-throttle-energy-drink-logo-bottom-1.png
 
Back
Top