

-
Hello ES! We could use some help to get us past the finish line on building the new knowledgebase for the forum.
Can you donate? Please see our fundraising page. Thank you!
You are using an out of date browser. It may not display this or other websites correctly.
You should upgrade or use an alternative browser.
You should upgrade or use an alternative browser.
DIY College EBike
- Thread starter GoFastGus
- Start date


GoFastGus
⚡ Regular
Did you drill and tap two extra holes to put the bolts through?A shout out from Lake Wisconsin!
I put 4 bolts in my downtube battery holder. Riv-nut kits are cheap. Use stainless, not aluminum riv-nuts.
Cool idea! I haven't had any failures from my Topeak rack yet, but I try to be watchful of the bottom bolts starting to deform or shear. It mostly just holds my backpack and bike lock, but I've filled the crate to the brim with tools and taken it for miles and its held just fine. I've been considering upgrading to a higher capacity rack that clamps onto the rear triangle and the seat post, something like this:A word of caution on the rack support. Mine broke after the first year or so. It carries just the battery (14s5p). I sleeved each of the main support tubes inside with a solid aluminum shaft potted in epoxy. Been good so fr (3 years).
View attachment 379582
Amazon heavy-duty rack
I'm interested in having either the ability to have two large-capacity panniers or a jump seat. I've been considering this or the equivalent from a reputable brand might as a starting point, but your idea might need to be thrown in contention.
GoFastGus
⚡ Regular
I have noticed that this bike is more of a top speed creature than an accelerate from a dig creature. For a future build (which is happening sooner than I planned), I should go with a higher voltage, higher winding powertrain.Honestly, if you’re riding in traffic, I’d consider swapping out the motor for one better suited for that, in the long run. The 3T winding is better suited for a purpose built project (an aero application as mentioned, or small wheel, etc.), since you don’t have the torque to accelerate out of traffic situations with the wheel size and voltage you’re running. A 4T or 5T at 60v or 72v would be a huge improvement. You could use the 3T for something like a fun pit bike project later. I’d ride the bike as is and have fun until the battery dies and map out your upgrade plan
The family appreciates when I put a couple EBike dollars towards safety. Funnily enough, they like seeing me around the holidays.PS. Good idea on the helmet. Im sure if your parents are paying for school, they’d support that investment.
I'll keep an eye out for good ones, material and strength are primary concerns for me.There aren’t many racks that hold up with e-bikes, especially on rough roads or trails. After destroying a couple, I ended up redoing and rearranging the supports to increase strength where the failures occurred. So far, so good.
GoFastGus
⚡ Regular
Did you drill and tap two extra holes to put the bolts through?A shout out from Lake Wisconsin!
I put 4 bolts in my downtube battery holder. Riv-nut kits are cheap. Use stainless, not aluminum riv-nuts.
Cool idea! I haven't had any failures from my Topeak rack yet , but I try to be watchful of the bottom bolts starting to deform or shear. It mostly just holds my backpack and bike lock, but I've filled the crate to the brim with tools and taken it for miles and its held just fine. I'm considering upgrading to a higher capacity rack that clamps onto the rear triangle and the seat post, something like this:A word of caution on the rack support. Mine broke after the first year or so. It carries just the battery (14s5p). I sleeved each of the main support tubes inside with a solid aluminum shaft potted in epoxy. Been good so fr (3 years).
View attachment 379582
Amazon heavy-duty rack. I'll have to check out the link you sent as well. I'd like something that will give me the option to have two large-capacity panniers or a jump seat, so I'll need to do more research.

You’ll be much happier and safer with a 4T or 5T.I have noticed that this bike is more of a top speed creature than an accelerate from a dig creature. For a future build (which is happening sooner than I planned), I should go with a higher voltage, higher winding powertrain.
GoFastGus
⚡ Regular
It's my daily mode of transportation, but it's about as reliable as a '70s British car.Looks like a fun project and I hope it eventually reaches the stage where you can just charge it, lube the chain (or wax), pump the tires and ride it.
I biked around last winter on a pedal bike and I learned a lot about what I need for winter equipment. The first time I lost traction on a patch of ice, I was so grateful I spend $200 (several times what the bike was worth) on studded Schwalbe tires. This winter, I'll be getting studded tires for whatever I'm riding. I'll be making muffs from a milk jug sawed in half and wearing thick gloves, a scarf, a full-face helmet, a motorcycle jacket, and chaps. I'm gonna look ridiculous going to class.Another thing, in Madison Wi you are gonna need some different tires with tread if you plan to keep riding in winter. Maybe even some studded tires. And some warm clothes.
GoFastGus
⚡ Regular
Sorry for confusion, I made two, only showed pictures of one.You need two torque arms, not one.
Do not run more than the weakest regen until you get two.
GoFastGus
⚡ Regular
Currently running tubed Maxxis Hookworms. I'll read up more on tire options.No one here likes flats. Good tires and tubes. I run Schwalbe Marathon Plus. There are others, a few threads on tires tubes.
I need to build my mini tool bag to carry with me. Spare tube, alan & torx multitools, patches, CO2 inflator, anything else?I tried the fix a flat in tires they plugged up my valve stems. Good tires are not cheap. Most here carry extra tubes not so many patches and small tool bag. Carry mini pump or CO2 canaster.
Skip the milk jug. Get a pair of these and your hands will be nice and toasty.I'll be making muffs from a milk jug sawed in half and wearing thick gloves

I never go through both sides of tubing with a bolt. Way too easy to crush and weaken the tube. Just drill a hole on one side, insert a riv-nut that matches the diameter bolt you want to use, crimp the riv-nut with its tool and you have a heavy duty anchor point. I lined up four of them for my downtube battery. (Plenty of Youtube how-tos on riv-nuts.)Did you drill and tap two extra holes to put the bolts through?
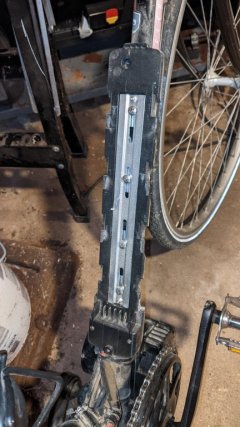
I run Schwalbe Marathon tires as they don't make a Marathon Plus in my size. Yet, I've used up two of them in the rear and never have had a flat (knock-on-wood)......
Last edited:
Are you carrying a big ass wrench? If not, how will you replace a tube? Flatout in the tube and a C02 inflator is what I use, since nothing (extra tubes, tire liners, thick tires, etc.) is going to stop a bigger flat than what Flatout will handle anyway.Currently running tubed Maxxis Hookworms. I'll read up more on tire options.
I need to build my mini tool bag to carry with me. Spare tube, alan & torx multitools, patches, CO2 inflator, anything else?
Luckily the hookworms are easy to remove enough to patch, unlike Schwable tires, which are a real pain, unless you’re in your garage. But Flatout will seal anything a patch can seal.
We have BikeLink lockers around where I live, so I look for nearby lockers before I go on a long ride so I know how far I’ll be pushing it to store in the nearest locker, so I can get my truck to load it up. Not sure what options there are in your area. On my last flat, I got the clerk at a gas station to let me keep it there while I went to get my truck.

The main issue with that rack design is there is no solid mount to the seattube or seatstays. The "twisty" bits of flat metal are very flexible, and allow the rest of the rack to move / sway.Cool idea! I haven't had any failures from my Topeak rack yet , but I try to be watchful of the bottom bolts starting to deform or shear.
That rack is better designed than the one you're using, mostly because it has a secure "toptube" that clamps to the seattube to minimize lateral sway.It mostly just holds my backpack and bike lock, but I've filled the crate to the brim with tools and taken it for miles and its held just fine. I'm considering upgrading to a higher capacity rack that clamps onto the rear triangle and the seat post, something like this:
Amazon heavy-duty rack.
LS is what breaks racks in the way Diggs shows.
(it can be exacerbated by using the rack as a handle for manipulating the bike, or lifting the rear end, as this adds other stress cycling to it).
Steel racks will be better than aluminum for this kind of issue, because you have more of a chance to see a deformation before failure. Aluminum can show some stress cracks before complete failure, but it doesn't always do that. :/ The cracks can be completely inside it until failure.
But preventing LS of the rack is even better, which requires a different design.
LS is less of an issue for non-pedaled bikes, but if you pedal the bike will sway laterally on every downstroke, and the rack will wag like a tail, even teeny tiny amounts add up over time. The more load, the farther out toward the back of the bike away from the seat, the worse the wag (LS).
If by jump seat you mean something for a passenger, then keep in mind that every bump you hit multiplies the weight on the rack by however much force that bump creates (which is also related to your speed when you hit the bump, size of the bump, etc).I'll have to check out the link you sent as well. I'd like something that will give me the option to have two large-capacity panniers or a jump seat, so I'll need to do more research.
So a rack rated for say, 50lbs, with a person on it, will already be doubly overloaded, and every bump may place two to ten or more times the load on it at peak. It may not fail immediately, but it will be stressed beyond design limits each time, which can cause fractures or deformations, etc. (see my various posts about racks for different situations, including pics of one of the "indestructible" racks).
Also, the points to which the rack is mounted must also be designed for / capable of whatever load and type of loading is going to happen, or they themselves can fail. (I've broken frames at the seatstays from the lateral loading of an "indestructible" rack, such as the one I used on DayGlo Avenger).
Tire levers, duct tape, tie-wraps, nitrile gloves, small rag, wrench for the axle nuts, hand warmers (to activate and put in your gloves if conditions change for the worse during your ride.) Optional: flashlight.I need to build my mini tool bag to carry with me. Spare tube, alan & torx multitools, patches, CO2 inflator, anything else?
GoFastGus
⚡ Regular
P5: Controller Craziness
This is the part where I really regret not getting a nicer controller. I started when I noticed smoke coming out of my controller bag after a long ride. Upon further inspection, this was the damage I found:
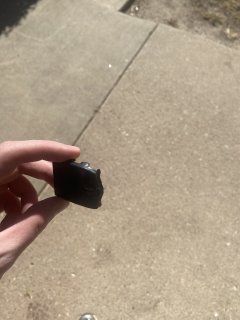
(Hard to see in the light, but the plastic top of the housing had melted)
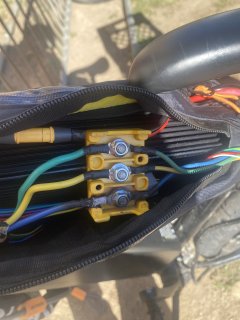

The ebrake line melted by the bad crimp:
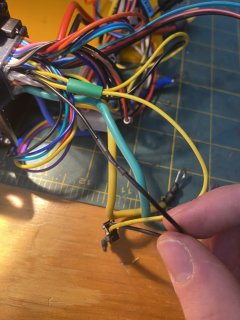
Upon bringing my bike into the local makerspace, I was informed that the blue lead had a bad crimp. I cut, re-crimped, and re-fitted the wires, and the bike worked as normal. I also re-soldered the ebrake wire and shrink wrapped it.
When this happened a second time I was exasperated but not left wondering what to do. I connected all three with nuts and bolts and put heat shrink over them all. Not pictured: heat shrink melting from the final crimp going bad and melting the pictured white connector.
At this point, all three of these leads were swapped to wire nuts. This is the lead setup I had up until my bike was stolen.

I also installed headlights, brake lights, and turn signals:
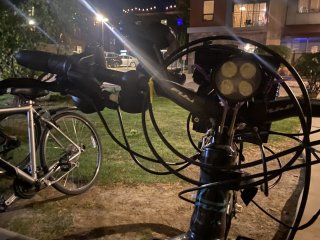
I did my best with a ruler, a paint maker, and a drill. Any tips on how to mount it straighter onto the next one?

My final issue before my bike's fateful disappearance (I'm holding out hope like Glen Miller fans did) was it beginning to cog. I looked on here and came to the conclusion that it was a bad lead, or a bad controller, or a bad motor, in order from most to least likely. I opened by controller bag, and this is the site that greeted me:

Note the distinct lack of a wire nut on the blue lead, since the other end wasn't stripped back far enough to hold it in strongly. I burst out laughing after seeing this, because I was so worried I was going to have to replace my controller or motor. Now I get to replace everything!
Not pictured: a week-long struggle to make a derailleur and shift mechanism work on this bike. Long story short: when I clamp the right torque arm down, the freewheel mechanism is locked up, no matter how much I sand washers down to make it fit. Spun freely when not mounted, but wouldn't spin with any torque to the torque arm. Gave up on it and decided it wouldn't be a pedal bike.
This is the part where I really regret not getting a nicer controller. I started when I noticed smoke coming out of my controller bag after a long ride. Upon further inspection, this was the damage I found:
(Hard to see in the light, but the plastic top of the housing had melted)
The ebrake line melted by the bad crimp:
Upon bringing my bike into the local makerspace, I was informed that the blue lead had a bad crimp. I cut, re-crimped, and re-fitted the wires, and the bike worked as normal. I also re-soldered the ebrake wire and shrink wrapped it.
When this happened a second time I was exasperated but not left wondering what to do. I connected all three with nuts and bolts and put heat shrink over them all. Not pictured: heat shrink melting from the final crimp going bad and melting the pictured white connector.
At this point, all three of these leads were swapped to wire nuts. This is the lead setup I had up until my bike was stolen.
I also installed headlights, brake lights, and turn signals:
I did my best with a ruler, a paint maker, and a drill. Any tips on how to mount it straighter onto the next one?
My final issue before my bike's fateful disappearance (I'm holding out hope like Glen Miller fans did) was it beginning to cog. I looked on here and came to the conclusion that it was a bad lead, or a bad controller, or a bad motor, in order from most to least likely. I opened by controller bag, and this is the site that greeted me:
Note the distinct lack of a wire nut on the blue lead, since the other end wasn't stripped back far enough to hold it in strongly. I burst out laughing after seeing this, because I was so worried I was going to have to replace my controller or motor. Now I get to replace everything!
Not pictured: a week-long struggle to make a derailleur and shift mechanism work on this bike. Long story short: when I clamp the right torque arm down, the freewheel mechanism is locked up, no matter how much I sand washers down to make it fit. Spun freely when not mounted, but wouldn't spin with any torque to the torque arm. Gave up on it and decided it wouldn't be a pedal bike.
gromike
🚴♂️ Mega poster
Never thought to use wire nuts on an ebike installation. Never will either, though I guess for testing purposes a maybe.
If you have to use something like wire nuts, I recommend Posi-lock, like these:

While experimenting with different motors and controllers, I used them successfully on phase and battery wires (and much smaller ones for low current/voltage signal wires) for a while (couple of years?) on the SB Cruiser, in our usually-dry desert environment but with occasional flash floods that submerges all that wiring under the trike while riding home for a few minutes at a time).
While experimenting with different motors and controllers, I used them successfully on phase and battery wires (and much smaller ones for low current/voltage signal wires) for a while (couple of years?) on the SB Cruiser, in our usually-dry desert environment but with occasional flash floods that submerges all that wiring under the trike while riding home for a few minutes at a time).
GoFastGus
⚡ Regular
That’s a good idea, I’ll look into that for whatever battery I run next!I never go through both sides of tubing with a bolt. Way too easy to crush and weaken the tube. Just drill a hole on one side, insert a riv-nut that matches the diameter bolt you want to use, crimp the riv-nut with its tool and you have a heavy duty anchor point. I lined up four of them for my downtube battery. (Plenty of Youtube how-tos on riv-nuts.)
View attachment 379600
GoFastGus
⚡ Regular
Is flatout like tire sealant in a car? If the puncture’s repairable, I’d prefer to patch instead of tire sealant, because tire sealant will throw my tire out of balance at high speeds.Are you carrying a big ass wrench? If not, how will you replace a tube? Flatout in the tube and a C02 inflator is what I use, since nothing (extra tubes, tire liners, thick tires, etc.) is going to stop a bigger flat than what Flatout will handle anyway.
Yeah nothing like that around here, that would be cool though!We have BikeLink lockers around where I live, so I look for nearby lockers before I go on a long ride so I know how far I’ll be pushing it to store in the nearest locker, so I can get my truck to load it up. Not sure what options there are in your area. On my last flat, I got the clerk at a gas station to let me keep it there while I went to get my truck.
If you say so. E-bikes aren’t that fast. You need a motorcycle to go fast. No balance issue at 50mph+ though, so I guess you mean higher speeds than that.Is flatout like tire sealant in a car? If the puncture’s repairable, I’d prefer to patch instead of tire sealant, because tire sealant will throw my tire out of balance at high speeds.
So you’re carrying a big ass wrench for swapping out your tube?
have no place on an ebike, or any vehicle subject to movement and vibration. Same goes for solid copper conductor wires (except for motor windings.)wire nuts
Soldering is an art form, as is crimping. Look at some good YT tutorials, learn, and practice. Also helps to use good tools and materials. Avoids similar problems in the future.

2Phast2Delirious
⚡ Regular
- Joined
- Mar 16, 2022
- Messages
- 140
Here’s a short list of basic e-bike and scooter connectors that’ll really help clean up your wiring and make it look more professional.
2/3/4/6 pin Connectors
Bullet Connectors
Crimper Tool
2/3/4/6 pin Connectors
Bullet Connectors
Crimper Tool
Can you check your Motorcycle Brass Bullet Connector Male & Female Electrical Terminal 4.0mm with a magnet and report back?Bullet Connectors
Pardon Our Interruption...
2Phast2Delirious
⚡ Regular
- Joined
- Mar 16, 2022
- Messages
- 140
Just tested it, the bullet connector isn’t magnetic.Can you check your Motorcycle Brass Bullet Connector Male & Female Electrical Terminal 4.0mm with a magnet and report back?
Good!Just tested it, the bullet connector isn’t magnetic.
Reason I asked is that I bought some high current banana plugs that were supposed to be gold plated brass but it was magnetic!
Similar threads

- Replies
- 21
- Views
- 5,036


- Replies
- 41
- Views
- 2,070
- Replies
- 15
- Views
- 4,728