DIY Resistance Soldering Setups - How to solder massive connectors

scianiac

1 kW
Joined
Oct 24, 2018
Messages
349
In the kWeld thread I saw qwertyES talk about using the kSupply to make a resistance soldering setup and seeing as this technology is pretty rare (in spite of it being super simple and useful) I figured I would share my experience with it as over the years I've made a number of setups and found lots of ways to do and not do things. If people are interested I'll fill this thread out with more details and some pictures but for now I'll stick to the most important stuff in a very concise manner.

Resistance soldering is simply applying lots of current, generally across two contacts and through the part you want to heat up, to heat up large parts that would otherwise be difficult to heat up fast enough and controlled enough. This is great for soldering very large power connectors, especially those that have plastic parts as you can heat them very quickly.

The setup is generally some form of tweezers with high temperature electrodes connected to a foot switch and a low voltage (less than 5v) high current (20A+) power supply.

Currently I'm using a 40A benchtop CC/CV power supply set to 6v and 40A. This is plenty of power and too much more current would probably start to cause problems unless you are working with larger pieces (they do in fact make resistance setups for pipe sweating). The CC/CV power supply helps as it can adjust for variable resistances due to material contact. To switch it I have it running through a 30A automotive relay which I expected to blow up long ago and I would replace it with something more appropriate but it just takes it.

The tweezers are the trickiest part and I've made several with various levels of success. A fair bit of heat actually comes from the tips so high temperature and higher resistance materials are often used. Graphite is very common. I've tried Nichrome wire before and while it's useful for small tips it can be a pain as it can get hot enough to bend so you can't apply enough force and once it gets hot it has a tendency to oxidize the surface and you have to wiggle it to make it make good contact. I've tried poor grades of graphite from battery electrodes and they work OK but are brittle. What you want is to get some EDM graphite, you can often find EDM graphite sinker scrap on ebay for cheap and this stuff works great. The other thing you want to keep in mind is quite a lot of heat that is generated in the graphite will be transferred back through the copper leads so you want to insulate those from your hand. Also you want them sturdy enough that you can apply good pressure to make good electrical contact.

The other advantage of these setups that makes them even more useful than irons in many cases is that you can use the tweezers to hold a wire and a connector together, apply heat, solder, and then cut the power and leave the tweezers there to hold the parts in place while the solder cools.

Here's my current tweezer setup:
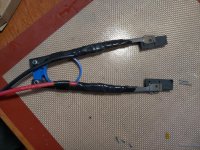
IMG_20230905_172335e.jpg
 
This is great for soldering very large power connectors, especially those that have plastic parts as you can heat them very quickly.
I know little about this.

I do have the experience of attempting to solder the pigtail leads from a Grin Baserunner to the 4 blade connector in a battery cradle, and the plastic housing the blades melted first. A shop did it with a more powerful soldering set up.

Do you think your approach is suitable for this or can you clarify what the boundary is?
 
I have run into not being able to get enough heat in. I assumed I needed a bigger iron. Perhaps You can post a few more photos please?
 
This is an interesting approach to this problem!
I've been able to get by so far when soldering large connectors by using a flame torch to add extra heat to my soldering iron. This works, but is tricky.
The other thing that should be said is that larger connectors like Andersons SB120 or other similar large connectors can (and should) be crimped rather than soldered. A proper high pressure crimp will cold weld the wire to the connector forming a better electrical connection than solder.

Cheers
 
I do have the experience of attempting to solder the pigtail leads from a Grin Baserunner to the 4 blade connector in a battery cradle, and the plastic housing the blades melted first. A shop did it with a more powerful soldering set up.

Do you think your approach is suitable for this or can you clarify what the boundary is?
I would say it's probably your best option, to solder connectors inside of plastic casings the options seem to be first apply more heat faster, the faster you can get it to soldering temperature and get it soldered the less time that heat has to travel though the metal and soak into the plastic. Other options are cooling gels and heatsinks which also work even better when you can apply more heat since they suck up some heat so it takes longer and back to the fast heat problem. The last time I used it was to solder some QS8 connectors and you can get one of those and the wire in it up to temp in maybe 3-4 seconds maybe less. When you're soldering a wire to a connector you can clamp them so the current is passing through both to heat evenly and the higher resistance of the current passing through all of it.

You can apply a lot of power to a very small space, really only limited by your power supply. The trick really is the power supply, it's certainly possible to use a more basic power supply or even a battery but it's not nearly as controllable. I tried long ago with a high current constant voltage power supply but it was unreliable but maybe with better electrodes it would be possible.

I have run into not being able to get enough heat in. I assumed I needed a bigger iron. Perhaps You can post a few more photos please?

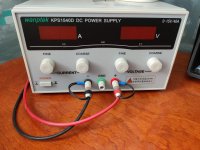
If I have some time I may shoot a quick video of a solder joint, this is the power supply I'm using, the foot switch and relay wiring are frankly too embarrassing to show as I made those probably over 10 years ago, I think the relay still has 16ga teflon wire which is quite undersized.
IMG_20230906_114849e.jpg

This is an interesting approach to this problem!
I've been able to get by so far when soldering large connectors by using a flame torch to add extra heat to my soldering iron. This works, but is tricky.
The other thing that should be said is that larger connectors like Andersons SB120 or other similar large connectors can (and should) be crimped rather than soldered. A proper high pressure crimp will cold weld the wire to the connector forming a better electrical connection than solder.

Cheers
I too have resorted to torches in the past but even the mini ones are hard to control sometimes, this is much better and honestly much nicer for soldering in general. The one exception is the catalyst mini torch soldering attachments which are pretty good, not as good as the resistance setup but pretty good. My soldering iron with the largest tip is also pretty good though, it's a Aoyue 2930 with the integrated tip heaters, integrated tip heaters are amazing. For connectors that can be crimped though I totally agree and have a hydraulic crimper for those but many connectors that's not an option, like large bullet style connectors either alone or in connectors like the XT and QS connectors. This is totally overkill for XT90s and those QS8s I probably could have done with the iron but this is so much faster so much less melting risk.
 
too embarrassing to show
Not at all. You should see some of the soldering jobs I did. If I posted them I'd be run out of (the ES) town.

My client wants an AWD (front and rear) with a split throttle wire to each controller. He wants to power this from a MASSIVELY heavy LiPO in a rear rack trunk. The leads from the battery split to each controller and I must say I needed A LOT more heat to make it pretty. Argh.

Can you send more pics of the leads. I have a DC power supply but (argh again) its 60V 5A.

using a flame torch to add extra heat

Thank you Cowardly Duck. Flame seems like I need another pair of hands

I'll swap to a larger tip and turn up the temp (450?) next time.
 
I'll swap to a larger tip

Use one the size of your pinky, called a Chisel tip, with a high-wattage iron (60-80w), and the large tip will hold enough heat to rapidly begin the soldering process, and the high wattage will "recharge" the heat in the tip as you do your work.

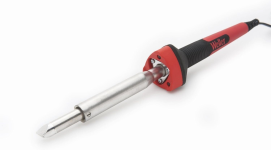
I use a much older version of this
1694051509380.png
for all sorts of high-thermal-mass soldering work (and also for *un*soldering things rapidly without damaging PCBs, etc).

I also have a Weller temperature controlled station for smaller stuff.

I crimp all power connections I possibly can, as long as the connector is suitable for this (some aren't, and I avoid using those wherever possible), because it makes a better connection that has less chance of failure under vibration later (from wicking solder up into the wires causing flexibility issues), and it doesn't require heating things that can damage insulation, etc. (or burning my fingers, and I haven't crushed anything in the crimper in a very very long time ;) ).

and turn up the temp (450?) next time.
Is that C or F?
 
Is that C or F?
Holy smokes! Of course its F! This here (with apologies to the rest of the world) is the land of the imperial unit. I was supposed to be converted to the metric system in elementary school.
I'm assuming 662F (350 C) is absolutely crazy for a soldering temp. Tell me otherwise please.

I remember we used melted pots of salt to drive out the moisture in the plastic pellets we were manufacturing (back three lifetimes ago).
At least we're not the UK. Weight in stone?

Sorry, off topic rant over.
 
Holy smokes! Of course its F! This here (with apologies to the rest of the world) is the land of the imperial unit. I was supposed to be converted to the metric system in elementary school.
I'm assuming 662F (350 C) is absolutely crazy for a soldering temp. Tell me otherwise please.
This is why I asked, because if it was C, that would be in the right range...but too cold since it's F.

Most of the (leaded, 60/40-ish, rosin core) solder I've worked with would be used at 650-800F (even though it begins to melt at as little as half of that). I usually have my Weller station set to 720F because it's used more for power-bus soldering than fine stuff.

If you're using lead-free stuff, probably have to add 50F.

I would guess you could start melting 60/40 at around 350F, but it probably isn't going to bond well.

The exact temperature to use would depend on the specific solder, sometimes it's size, and definitely the parts you're soldering to. Weller (and other soldering station/etc makers), and solder makers, have guides for various uses, and many parts' spec sheets state their soldering temperature and time limits, if you need it. This is the guide from Mouser for Weller stuff, for example; it's pretty general so only recommends 700-800F and doesn't give different examples.
 
Back
Top