• Hello ES! We could use some help to get us past the finish line on building the new knowledgebase for the forum.
    Can you donate? Please see our fundraising page. Thank you!

Electric CRF Moto Build

juman

Established
Joined
Sep 25, 2021
Messages
55
Kinda just been doing this on the side but since my battery finally arrived really think I need to write this out more. I'm no e-moto builder, I'm just a motorcycle guy that feels confident enough with electrical things but the electric motor aspect/batteries/etc is all new to me.

Goal here isn't for some crazy bike that matches up to the original 450 engine, just looking to have fun building an e-moto and am purposefully setting my sights kinda low because I don't want to strive for perfection in this first try, would love 20kw of power, ain't going to happen right now. If I make something that can roll for 25 miles on it's own, I'm happy.

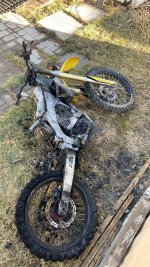
Started with a '03 CRF450 I got for $1200, it would...sorta run but it had 18 years of neglect as well so went through things. Figured since I have no plans to massively modify frame components, worst case, I throw the engine back in and it's back to it's old self.
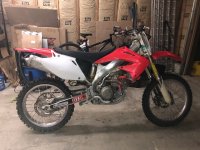
08142021-CRF450R.jpg

Rebuilt stuff and started fitting electrical components, I kinda measured before-hand but also saw others do similar builds. For the motor I really was overthinking things, I was looking at way higher powered motors and ended up wanting to keep it simpler so I went with QS138v3 and Votol EM-200 controller. To me for what I want, 12-15kw is goal but not what's going to happen to start.
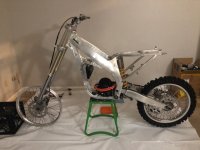
09272021-ERF.jpg

So the bike kinda sat in that form for about 1.5 months while I waited on a battery from China. Now since this is just a fun project I wasn't worried on shipping times and went with a cheap battery, 72v50ah BUT the main reason I went with it is because the business had them priced at $275 shipped. Unfortunately when I got the battery it was slightly damaged from shipping where it was cracked on the casing but that did allow me to see inside and see Liitokala Lii-50e batteries 20s10p configuration thus I figure....if nothing else, these are good supplies if I want to deconstruct this battery and build a new one.
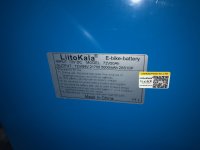
12192021-EBikeBattery-02.JPG

Last few days been cutting some temporary engine mounts because I didn't really want the motor sitting free when it's powered on, worried it'd go flying or something.
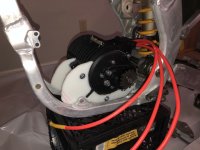
12222021-EMotor.JPG

And ensuring my sprocket is kinda lined up but I see with this setup the motor needs to move up and back just slightly, no worries since I need to make new mounts anyway, eventually going to make them out of something more durable than plastic but it's easy to work on at home.
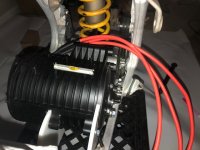
12222021-EMotor-02.JPG

Test fitting things and I might need to move my seat up an inch, I mean the seat plastic does bend and it'll just bend up in the front but need to fit this a little better. Think I'll try to raise the middle mount on the seat about 1".
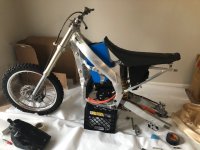
12222021-ERF.JPG

So now I have a kinda good base I'd like to start wiring up to actually test my electric components. Gotta dig into some wiring diagrams and work one out, China does not like color coding wiring very well. I do have a feeling I only need like half these wires connected to test things like I just want to ensure the motor spins and controller is functional.
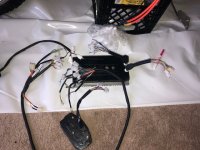
12222021-Wiring.JPG

Next Steps:
  • Charger for battery
  • Connector for my battery leads
  • Fuse/contactor/key switch/kill switch
  • I'm sure about half a dozen other small items I'll find as I'm building

Anyway bit of a slow going project because I'm learning as I go but fun to do. I'll blame the Zero test-ride day for this whole endeavor, I gotta know how things work before I'll buy an entire bike pre-made. Welcome any input on things, as I said I'm learning but not striving for perfection here, really do want to see the motor spin though, that'll be fun.
 
Hohohoo,
my santa brought me a crf250r!
Still on the trailer, make room in the garage.

Also got the qs 138 70h v3 engine. Votol 150 controller, battery (for the time begin) surron. I have enough experience with the votol, with my surron tuning! It will be alright.
You have not (yet?) Attached the motor with the swing arm?
What power can your battery provide (continuous - great?) These cheap China batteries are often only built up to 50A current ... Unfortunately, a good battery is always expensive ...
It will be great fun 👍
 
Have you checked your "damaged" battery exactly? A later short circuit (enduro / trial / cross-vibration) is no fun!
 

Attachments

  • 169686319_453055079299650_4466506163224294137_n.jpg
    169686319_453055079299650_4466506163224294137_n.jpg
    417.2 KB · Views: 1,544
Paulflieg said:
Hohohoo,
my santa brought me a crf250r!
Still on the trailer, make room in the garage.

Also got the qs 138 70h v3 engine. Votol 150 controller, battery (for the time begin) surron. I have enough experience with the votol, with my surron tuning! It will be alright.
You have not (yet?) Attached the motor with the swing arm?
What power can your battery provide (continuous - great?) These cheap China batteries are often only built up to 50A current ... Unfortunately, a good battery is always expensive ...
It will be great fun 👍

I haven't yet mounted to the swingarm, both sides of the motor mounts don't look to line up so think I'll just attach from one side of the motor and bolt through. Should actually be a simple mount just a piece that goes from swingarm bolt to motor and then spacers on swingarm bolt to fill in so those seals are held. I do need to move the motor back just slightly and change my front mounts to go forward more to the front of the frame. Big reason I made this from plastic, some of this stuff I just need to see to be like, "oh yea that ain't right."

This build as it stands should be 50a from the battery and they claim 100a burst but that's probably BMS shutdown or something. It's nothing fancy, I figure I'm going big enough with a 'full size' bike as my real first electric build I wasn't going to over-do the battery and if that's the sole limiting factor creates for a simple upgrade. I knew I overbuilt the controller but figured that's more of less brains of things so no reason to overload it and kinda underbuilt the motor because I just didn't want to try to squeeze a big motor in and have no space for battery. Truthfully if I ever got 15kw of power out of this motor/build that'd impress me but I believe at 3kw power I can be a registered electric scooter (with some lights).

I almost went with an expensive battery that claimed upwards of 300a output but was close to $1k and power complicates the build. I'm willing to spend $1k to get a nice battery on this once I prove I can build it hah.

Paulflieg said:
Have you checked your "damaged" battery exactly? A later short circuit (enduro / trial / cross-vibration) is no fun!

I'll admit not a deep dive like removing all the wrapping and the battery does live under a fireproof welding blanket for now. The external blue wrapping is ripped so you can see the batteries but I did not see any damage to any connections/batteries. I did see that post and thought long and hard on batteries, definitely doing things slowly because I'm trying to be safe like I haven't even charged the battery or tested anything just yet but think I have things mostly setup to see if the motor spins/battery works.

Honestly I got this battery because they mis-priced it and I didn't think I'd get it so $270 for 72v50ah. I don't expect to thrash hard and this is kinda a proof of concept for me still. As I build the bike I get the feeling I'll either have to build my own battery or figure out a contact to build one. This may become in a few weeks me tearing off all the blue wrapping on the battery though just to inspect and really see quality of the battery, who knows, maybe it's decently made just with a cheap BMS.

This battery if anyone interested but $550 now and damaged the same way the 2nd to last review showed:
https://www.aliexpress.com/item/1005002768350847.html
 
Hi there,im also building a 2010 crf450 r and will be watching your build along the way.Motor position wise undo the lower shock/linkage bolt so the swing arm moves freely and have it sit nice and flat/horizontal and both the top and bottom part of the chain should not touch or if a small sprocket is used both equally touching the chain guide.Ill be running the same motor on 26s and 315 dc amps on my build.
 
speedy1984 said:
Hi there,im also building a 2010 crf450 r and will be watching your build along the way.Motor position wise undo the lower shock/linkage bolt so the swing arm moves freely and have it sit nice and flat/horizontal and both the top and bottom part of the chain should not touch or if a small sprocket is used both equally touching the chain guide.Ill be running the same motor on 26s and 315 dc amps on my build.

Great info man!! I knew there was a reason I didn't torque down my linkage bolts yet!

Today aim to finish up engine mounts, start charging the battery and dig into simple wiring to test motor, think I still need a few pieces before I hookup like I want a robust switch for the battery just to be sure I can control it's power draw. Man if I could get this working and build up to maxing out the EM-200 controller for power, 15-20kw would make for a really nice trail bike in my mind, what you're talking would make a CRF250R blush :).

Paulflieg said:
Which battery? Homemade? Which dimensions? And cells?

Posted a link to it above, bought battery, it's kinda big like 15-16" tall, 200 Lii-50 21700 cells and since it's a cheaper battery just 50-100a discharge so nothing crazy. I wanted cheaper and with cheaper comes less power which I'm accepting for now as this is my first build. Motor can handle more, controller can handle more and building parts around the bike like fuses/wiring to support higher amperage not the 50-100a range I have now.
 
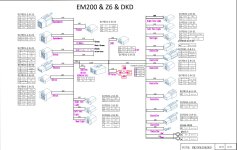
Was a bit lost without this diagram that I just got from Siaecosys for the wiring harness. Some of the wires are labeled but many aren't:
WirningHarnessDiagram.jpg

Officially connected the battery to a charger. Charger came with 3-pin XLR connector and battery had a DC adapter on it so I had to make a XLR->DC adapter (I didn't want to cut wires on stuff). So far it appears as though the battery is fully charged as the charger stayed green for the LED, never went red for charging which kinda makes sense to me from the factory.

Next up is wiring an XT90 on the battery since it's bare leads and then going over my wiring harness connections to ensure I have everything like I think I need a 12v relay and some other pieces, gotta read through that diagram above more.

Edit: And I was mistaken thinking the spot in the harness was for a +12v relay....that's actually a 72v relay which I assume they wired this for instead of a contactor since it's more complicated and for higher power.
 
Oh, this package comes with a wiring harness ... Nice!
Is the dc / dc (72v / 12v) converter also included?
Is the controller already configured correctly for the 138 h70v3?
Would you save the configuration without making any changes !?
That would be nice. I would love to see the config.

When connecting the controller for the first time, it is good to precharge with a resistor ...
 
Paulflieg said:
Oh, this package comes with a wiring harness ... Nice!
Is the dc / dc (72v / 12v) converter also included?
Is the controller already configured correctly for the 138 h70v3?
Would you save the configuration without making any changes !?
That would be nice. I would love to see the config.

When connecting the controller for the first time, it is good to precharge with a resistor ...

I paid extra for the harness/DC converter because....well, Keep It Simple Stupid :) and it was like $30 more. But you can order it all from Siaecosys so it all comes in one box. The only things I don't see that I need are a 72v relay and ignition switch (as well as pre-charge).

The controller should be configured for the motor since it was all bought as a kit from them. I would surely save the OEM configs for reference, love doing that stuff, I do it with my ECU's which is just a controller for gas engines.

Great info on the controller, I need to lookup more with that and confirm the connections before I connect any power to it. May wait for contactor/resistor until I even connect the controller. Was looking at this thread on pre-charge since you mentioned:
https://www.diyelectriccar.com/threads/precharge-what-is-it-why-do-i-need-it-how-do-i-do-it.25419/

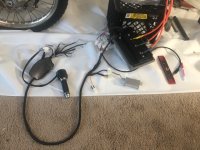
Thinking I have most necessary connections done, there are added connections for lights/turn signals/horn/etc that aren't connected:
01012022-Ebike-01.JPG

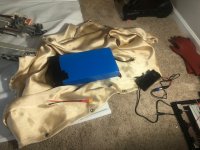
Officially connected my first 72v battery to a charger and didn't get an explosion or sparks, was happy about that hah:
01012022-Ebike-02.JPG

While I wait on switch/relay can aim to finish up mounting the motor in a better spot and possibly find better way to mount the battery. Gotta laugh at myself I still haven't even tested my battery with multimeter yet but we rolling now, I plan to get a better battery if this build works anyway.
 
Plugged in charger, battery just stayed green, went through things and found the DC adapter for the charge port I couldn't see voltage. Spliced in an XLR plug to the charge port after confirming I got voltage on the bare wires from the battery and NOW my charger is red which is charging.

Was a bit worried because my battery leads were showing 70.1V but when I was testing the charge port I got nothing. Was more worried that it was a problem with the battery pack from the case damage, something I didn't see but so far 30 minutes on the charger, voltage has gone up to 71.3V and everything is cool to touch, charger is lightly warm but the fan is running as expected, nothing hot, feeling successful.

Now back to reading up on making a pre-charge circuit while I wait on few other parts that'll take a few weeks.
 
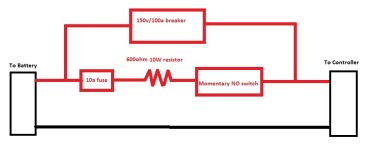
Thinking of keeping pre-charge circuit rather simple since this setup is really limited to 100A max, I'm not sure if that's where BMS shuts off but I'm going to set that since manufacturer parameters and kinda sorta trust this battery. Thinking make a connector with a breaker/fuse/resistor and momentary NO switch:
01072022-PrechargeCircuit.jpg

If I decide that I want more power or something this is easy enough to re-think but this setup would mean breaker OFF when connecting battery. Connect battery, press button for pre-charge and then flip breaker. I might not really need the 10a fuse, might be useless there.
 
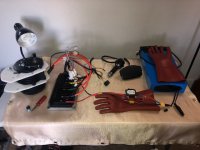
Broke my ankle (riding) so this kinda took a back seat to other things the last few months but I was also waiting for some parts. Finally got it all together and my motor spins! How well it spins, how well everything is working is not a concern but alls I know is I got it all to turn on including the LCD and spins as expected with throttle.

Oh and no explosions/fire/smoke/sparks/heat buildup, all nice and....really uneventful....except me being giddy that the motor is spinning.
03192022-Ebike-01.jpg

Really thankful they've programmed the controller in some way from the factory because that'd be another hurdle if I had to do it now, have not logged into the controller yet, think I'll try that tomorrow to see settings.
 
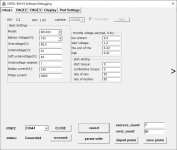
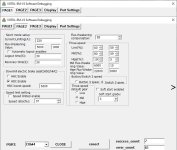
And successfully got into the software for the controller. I did have to use the drivers from Prolific instead of the ones Siaecosys has listed on their website:
http://www.prolific.com.tw/US/ShowProduct.aspx?p_id=223&pcid=126

Then ensure you select "CAN Enable" on the program.

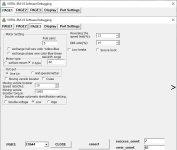
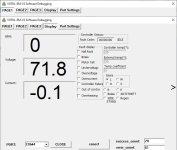
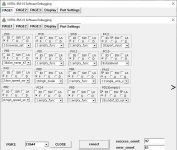
03202022-EM200_Page1.jpg

03202022-EM200_Page2.jpg

03202022-EM200_Page3.jpg

03202022-EM200_Page4.jpg

03202022-EM200_Page5.jpg

Not changing anything in here since I dunno what I'm doing and it's working enough right now. Thankful this was all pre-programmed for things. Now it's turning to mounting things back on the bike in some kinda way.
 
I'd be happy for you if the battery delivers those amps. I will test these settings (original from qs?) on the Em150....
 
Paulflieg said:
I'd be happy for you if the battery delivers those amps. I will test these settings (original from qs?) on the Em150....

Nah it won't, I need to edit that but these are completely OEM settings for things. My breaker should blow at 100amps so I have things limited, I doubt my battery can go over 100amps in current state. Wanted to capture this info since I don't see it listed anywhere.
 
Lets bring this one back from the dead, took a long backseat because of battery issues and this was always a fun side project for me more about learning and building than anything.

Anyway I've got a new battery that I feel better about, LifePo4 and I haven't tested to it's limits but I expect it'll go to 100amps but either way I have the bike back working again. Before this I had it 'working' on a stand but once I got it all in the bike I had battery issues. By 'working' I mean I can connect it all, turns on as expected, no heat/scary sparks, 3-modes work but it is not connected to any load (sprocket isn't connected to wheel).

Will say the Votol software is a bit buggy, when I hooked up my diagnostic cable this time it would cause the throttle to stop working and the software would report under-voltage as well as no battery voltage/amps/rpms. Tried multiple things then I disconnected it all, turned it off/on, reconnected and it auto-magically worked. Maybe this is related to some fancy sparks....

Next step is to finish a battery box out of HDPE and mount in the bike, my previous battery was more rectangular this one is more boxey so it fits in the bike better lower which I do love keeping the weight low. I need to cut a bit of metal from the bike's frame to give myself another inch of battery space but these were used for the original motor and no plants to use them for this. Once the battery is mounted, cleanup wires and can actually RIDE it to test more since I can't feel issues under load right now.

I do have a very jury-rigged setup for my wiring that I need to fix, currently I just have a 100amp DC breaker between my battery and controller since it was easy but I feel that should be a contactor setup.

Finally....as this is a learning experience and I often learn through failures as much as anything....while coming back to this I saw a wire disconnected that I thought went to another wire, maybe luckily....I did this with power on because as I went to connect it may have made a flash and a black mark on the connector. Not sure what it was for....kinda ignoring it for now because everything seems to be working and maybe I didn't damage anything but yea....this project has involved multiple fancy sparks :).
 

Attachments

  • 20260102 - EBike.jpg
    20260102 - EBike.jpg
    979.8 KB · Views: 13
Since this battery isn't protected decided to make a battery box out of 1/4" HDPE. Will say I don't 'trust' this battery to do what it says or to really last but this is all just for fun and it was fairly cheap and should be LifePO4. Like first thing I noticed is it has 7awg leads which....makes me question 150amps going out from this battery safely :).
IMG_8188.jpg

Used some metal brackets for the corners, there are small screws used to hold this together and then GFlex epoxy since it's supposed to be able to adhere to HDPE, West Systems is good epoxy either way. Going to pad the inside of the box with some neoprene to help absorb impacts. Still gotta figure how exactly I'm 'mounting' this but can just put some mounting points on this box. While I do think of battery heat....this is a LifePO4 battery so I'm kinda thinking of just risking it and seeing what happens.
IMG_8187.jpg

And cut a little bit more from my frame to open up a bit, basically thinking of this setup to have the controller up top where the gas tank used to be, battery slides in from either side (originally I was thinking battery from the top). Keeps the controller in a safe spot, should still get good airflow for cooling and keeps the wiring safer. Only the battery box/motor going to be low where rocks/junk will hit it.
IMG_8190.jpg

Tomorrow box should be cured so I can work on fitting it into the bike. Still need to finish the lid on the box, have some hinges so I can easily open it when needed. Really as soon as this stuff is somewhat mounted in the bike, I'm going to take a quick loop around the block (probably breaking something in the process!). Never actually had this thing 'move' on it's own yet, honestly haven't hooked up a chain to it.
 
Feel like I'm making some progress, battery box fits in the frame, since I had to grind away some of the frame to do this (old mounting points for the engine), it fits fairly snug up/down, basically the bike frame will hold it for up/down motion which to me is the majority of hits.

The part I need to figure out is holding it side to side, while it's fairly snug it does need a good clamp for that aspect. I want it to be removable from the side but also needs to be 'snug'. Thinking I might use like a 1/4" aluminum strip on the sides which would mount to the frame where the yellow lines are....aluminum is easy to work with and can get one at local store.
20260131 - Box-01 - Copy.jpg

And I was sorta worried on the width of the battery but after seeing it, I feel fine, it sticks out a small amount but I've had engines that were wider without trouble. It's above the footpegs so my pegs will hit before this.
20260131 - Box-02.jpg

Once I get the battery mounted might zip-tie the controller where the gas tank used to be just to test things like nothing serious but I'd like to see this roll under it's own power. So far just seen the sprocket spin but nothing else :).
 
My original battery was much taller and I had cut the gas tank for it to fit and now when I look at things, I want the top of the gas tank back so going to get new one eventually which will allow me to mount the shrouds again because I like the look.

Good news is I have finally, truly packed everything into the bike where it can roll under it's own power. I just had a strap on the battery box for now for side-to-side motion but it's in there fairly snug as-is. Rolls and moves but need to go over a lot of little things before I ride it more than a few feet otherwise I'll break a bunch.

For instance I don't even have my axle adjusters in so my rear axle is really just held by the axle bolt, just screwing around in my driveway the torque on the motor was able to move the axle. Nothing is really torqued down properly and need to clean up wiring a TON.
IMG_8197.jpg

Either way this has been like 3 years in the making to get this bike to roll under electric power, mostly my own doing for that delay but hey, I'm here now! Cleanup a few things and can start testing like no idea how long this 40ah battery will truly last riding and ideally....if I can register as an e-scooter can possibly ride it to work since work is only 8 miles away.
 
For the first time since this project started I got to ride this thing around! Just cleaned up some wiring and wanted to feel it/see if something was rubbing really badly. Amazingly it seems entirely fine and I don't even have battery fully mounted yet. Just hearing chain noise as I ride, nothing sounds off, nothing is getting hot and I rode around the block for ~10mins. I did go full throttle and it's nothing crazy but more importantly, nothing blew up. Speedo is way off, throttle isn't bad but isn't great, it's something I'll futz with more in the controller settings and I do have the controller power currently turned down to be safe.

Key takeaway for me is that I need to finish cleaning up the wiring/mounting since I personally don't feel comfortable if I know things aren't entirely 'set' while riding like this mess of wiring on the right side I thought wouldn't bother me for a test ride but it does bother me since it impacts the brake pedal.
20260208 - Ebike.jpg

I also tried to clutch in....and shift multiple times on this ride, electric stuff still feels 'weird' to me. :)

So:
  • Clean-up wiring and tie down better - The orange power wires need to be 'in' the frame more
  • Top for my battery box and holes for the wires thru the box (never drilled holes for these)
  • Better side to side mounts for the battery box
At that point I should be able to really beat on it to test things and if it survives some beatings, maybe throw some lights on it and register as e-scooter (it's already registered as an OHV for trails). Really from the start the goal was just an electric trail bike but also would be cool to use it for some light city commuting but I know riding a bike like this would draw attention in town so want to be sure I'm legit (hooligans on dirt bikes ruin it for us).
 
In case this helps anyone else, I've had inconsistent results getting into the EM-200 controller, literally since I've had this thing getting into diagnostics via serial is wonky. Found today this seems to be glitchy software rather than any 'problem' that I'm seeing.

I'd try to connect and get this very helpful error message:
1771101208485.png

Nothing I seemed to do would fix this and I had previously connected this way using this same computer/software/etc so it was working. What I ended up doing to fix was:

1. Connect everything, diag USB cable to computer, diag cable to the controller and power on controller so that side is 'ready'
2. Went into Windows device manager and uninstalled the USB drivers, specifically PL2303_Prolific_DriverInstaller_v110 driver which I read to use here.
3. Reboot computer
4. Re-install PL2303_Prolific_DriverInstaller_v110 driver software
5. Reboot computer
6. After this reboot the USB diag is now detected again as a com-port and the Votol software now works to connect

Something with the pl2303 driver for the USB diag that Windows 11 does not like and when I started today my computer was detecting it properly as PL2303 but had to go through this song and dance to get things working.

Oh and have to connect via CAN:
1771101678363.png
 
Feel like I'm lucky or something, while I've had issues my stuff is all 'working'. Been going around the block, got it to 45mph and quite happy with that....well I wasn't using sport mode which I do have configured up to 150a but limited in my use of sport mode so far. Need to finish the top of the battery box and little cleanup items but it's working. I may be a motorcycle rider and....totally forgot there's no clutch here and it's always in gear....the bike shot forward about 6feet and went down for the first time but hey no real damage except broke the grip :).
20240216 - EBike.jpg

Anyway with LifePo4 battery that charges at 87.6v and reading that regen can go 1-2v higher than this number set my over-volt to 85v and wanted to be safe on under-volting thinking same thing. LifePO4 should be 'good' until 63.6v but set controller at 65v cut-off with 68v where it lower power. My busbar I set to 120a since battery is claimed to be 150a. Only other thing I've changed so far is the start-voltage of my throttle lowered it a bit so it's a bit more snappy.
1771266674434.png

Then pg2 set sport-mode to 150a which is my max of the battery so it says, from OEM just removed soft-start. I haven't ridden with soft-start disabled, had it set to 16 before which was good but wanted to see what it feels like with more snap. Rest is just from the factory, didn't touch any flux-weakening settings. From my understanding the HDC set to 6200 is just to slow the motor if it starts going faster than 6200rpm.
1771266834452.png

Did no changes to pg3, just left from the factory (this controller/motor came together):
1771267055717.png

Finally I haven't ridden with this active since I wasn't clear on it, just activated regen clicking the SW box for PD15. So far I've ridden without this and was thinking it was free-wheeling nicely, felt kinda like my 2-stroke. The EBS regen % I left as factory OEM, will play with it some more.
1771267106596.png

From where I've been testing, the current changes are really added regen and turned off soft-start. Cleanup things and got an appointment in 2-weeks with the DMV to hopefully register as low-power e-scooter which I confirmed in mode-1 at 3500w it only goes 25mph.
 
Now that things are working, cleaning it up a lot.
20260221 - Ebike-01.jpg

For how simple it is, the box was the hardest part but finally finished it. No battery in it here just for test fitting.
20260221 - Ebike-05.jpg

Battery box looks a bit janky because after I put it together...the epoxy sorta worked but I didn't want the screws to be so stressed so I wrapped the box in 8" wide flex tape which is fairly thick vinyl type stuff and flexible. Janky but functional, story of my life.
20260221 - Ebike-04.jpg

Modified these old engine mounts where they will screw in to each side to hold the battery, 1-bolt to remove and battery slides out the side. Going to figure in some rubber padding in these areas to really hold it in nicely.
20260221 - Ebike-02.jpg

Was slightly worried on my battery box width since it was sorta sticking out but cut things back a little and feel satisfied with this. It was ~1" further to the right before and I had touched it a few times with my brake foot.
20260221 - Ebike-03.jpg

  • Make some rubber mounts for the battery
  • Need 70mm bolts for my new engine mounts....got 60mm and just slightly too short
  • Re-wire my key and mount on handlebars
  • Re-check chain tension before really riding more (kinda half ass setup for my chain tensioners)
  • Figure out some lighting...this is a CRF450 without any lights and even as a low power scooter I want some lights for safety
I might....get a Tusk lighting kit with it's own battery so all my 12v stuff is run from it's own little battery. I do have a 12v converter for my 72v system but for simplicity might only use it for the headlight. Far as I've read low-power scooters here are basically bicycle rules on the road so I don't think I 'require' lights but I feel I should have them.
 
Back
Top