Electric Jeepster - New(ish)member new build

OK, here is my down-and-dirty thermo-forming tutorial. if any of this is harmful or toxic I don't know so its on you to decide.
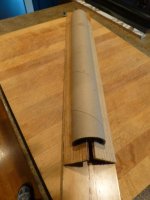
First make a mold or form it does not have to be fancy but it should be out of relatively smooth materials. Here is mine held together entirely with hot glue:
P1000329.jpg
View attachment 9
I just played around with the sizes and angles until I got what i wanted and then glued them in place. I sectioned the thick cardboard tube (had it on hand from a paper roll off a plotter) with a hand saw and cleaned it up with a razor knife. After the mold is ready you have to figure out how to hold the hot plastic to the mold. The only limit is your imagination. For this process I got help and used two National Geographic magazines to clamp the round part and then my helper clamped on two short pieces of ply to shape the flat wings. The key is to have it all planned out and everything ready and in easy reach because the plastic firms up pretty fast. So Here is all of the stuff I need layed out and ready to go.
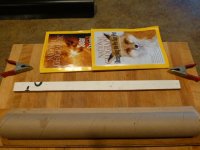
P1000332.JPG
Cut a piece of plastic and make it well oversized since it will shrink in the oven some and you want margins to allow for slight missalignments that you can trim later. I marked center lines on both the form and the plastic to help line it up quickly with the form when it comes out of the oven:
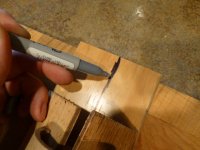
P1000333.JPG
P1000334.JPG

Getting the right temprature on the oven was tricky and I messed the first try up due to it being too hot. Found 290F to be about the sweet spot for this material (1/16" low density polyethelene, LDPE). The big problem with temp is that there is a small range between "not flexible enough" and "Sticks to the oven rack". So set your oven:
P1000335.JPG
And let it come up to temp. Then throw that sucker in:
P1000336.JPG

DISCLAIMER: These pictures are not of the actual event. It is just a poorly acted pantomine with scrap material to show the steps.

Now put on some gloves and start getting ready while it heats. Turn on the oven light and begin to check the plastic often. It will only take a few minutes. When the plastic starts to sag between the oven rack gaps you are right there and you need to be sure to get a move on before it starts to stick. Keep checking the flexibilty with your gloved hand and just go when it feels right to you. If it begins to stick to the rack even slightly, go immediately! Pull the plastic out but be careful not to let it touch itself because it will fuse together and you will be DONE. Just start over with another piece trust me. Move the plastic onto the form and align your centering marks quickly:
P1000337.JPG
Get the magazines in place and press evrything tight over the form and into the corner:
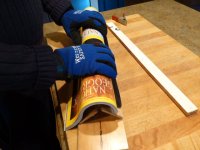
P1000340.JPG
Now, while you hold the curved part in place with the magazines, have your partner put the ply over the flat part and spring clamp the ends:
View attachment 1
and then do the same to the opposite side flat wing with another piece of ply and spring clamps. Let it sit for several minutes so it can cool slowly, the wood and magazines will provide some insulation so it will cool slower than you think. just keep the pressure on until it is just luke warm to the touch. After that it is just a matter of marking it up trimming it to shape:
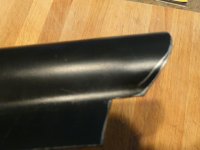
P1000345.JPG
This stuff cuts pretty easily with a razor knife. Hope this helps.
 
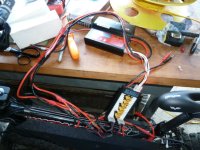
Charging lessons for a Noob. So now that I have this bike running it came time to do some charging. Now i had what I thought was a pretty good theoretical understanding of the charging process and had acquired all the elements I needed to promulgate this activity. Thats a fancy way of saying the noob thought he understood. The reality was a bit different but now i learned some good safety lessons (DAMHIKT) and have got my charging routine down to a pretty quick and safe method. To start with I am using the iCharger 306B and a meanwell SP-320-24 that I posted about before (since then I have added a pair of bannana plug recievers on the front for convenience). I am using these components in conjunction with the icecube57 harness system and i really reccomnd it but it is the only one I have used to date so take that into account. Here is a picture of the whole thing set up and charging on my bike:
P1090216.JPG
Bench is pretty messy in that photo but i Have cleaned it up since :wink:. I am using the paraboard that came with the charger to parallel the balance wyes that come off of each side of the triangle. I will be converting this to straight extensions when the parts arrive so that when I do a periodic balance charge I can do each battery individually and get individual balance lead information to the charger. So I did my first charge as a balance charge with the balance wyes as shown in the picture. I set the parameters that I thought would be correct into the charger and twisted its tail. All seemed to be good until it terminated as having reached the 8aH limit I had set (since each battery is rated for 8aH) but the voltage was still very low. After thinking about this for a bit I realized that I had the halves of my four packs connected in parallel via the balance leads so I should double the aH setting to 16. Got that all set and started it again. A few hours later it terminated at 16aH and it still only had about a half charge. OK now I started thinking that really all of the packs were connected in parallel via the charging harness so the limit should really be 32aH. Once again i reset the charger for 32 aH and started it up. I was in new teritory here and really did not want cook anything but I felt pretty safe since the upper limit of the cell voltage was set at 4.12 and the charger seemed to monitoring that correctly. Regardless, I monitored it pretty closely. Well, after about 10 hours of total charge time it completed a full charge. Yes I said 10 hours! I says to myself "this can't be right". So I dug into the ES posts and a picture began to emerge. The problem was that the default setting (which I paid no attention to) on the iCharger is 2A. OK, that is slow but what is safe? dig, dig, beg for help, dig some more and eureka. This is a subject that is sparsley talked about at least according to my meager search skills. So the best explination I could come up with was that the C rating applies loosley to both the discharge rate and the charge rate (makes sense to me now) So by multiplying the C rating (30 in my case) by the aH you get a number that represents the amount of amps that you can either pull or apply safely. If this is wrong then I hope someone will straighten me out. So here is my math 8 aH X 4 (batteries)=32 X 30(C)=960A. could that possibly be right? that seems like a really big number. But i figured that even if I used only 8aHs X 30(C) i got 240A at the very lowest. That is a long way from the 2A I used in the first charge cycle. Now the iCharger is rated for a maximum of 30A charging so i figured I would be well within a huge safety margin if I charged at 25A for a test that I would closely monitor. Got the charger set and off it went.......only to terminate with no explination minutes later. I noticed that the charging amps indicator was switching around frantically most of the time. Hmmmmmmm? Now I got this power supply before I knew any of the preceeding and I thought it might be a good idea to review its specs. Sure enough, its only capable of supplying 13A. Not such a good deal after all maybe. Although for $30 shipped even if it is underpowered it was probably worth the lesson. So I reset the icharger for a 13A charge and "Bob's your uncle"!! 2 hours 4minutes charge time bottom to top. Now that is a charge time I can live with! I'll still have to see how it performs when I get the other two batteries installed (got em in the mail today, now just have to figure out how to mount em). So today I took the bike out for a test ride and kept track of some of the numbers. Here is a list
4 batteries 6s 8aH each for 22.2V nominal (arranged in 12s2p for 44.4V @ 16aH)
Topped off night before at 49.1V by my ride the next day they were down to 48.9V
The following is the CA info after the ride:
Trip distance=15.86 miles
End V (while riding)=43.8V (this is the number i have chosen as my soft bottom)
End V (stopped)=44.3V
total aH used=10.97
Max speed=25.4mph
Avg speed=16.1mph
Minimum Amps=5.56
Max amps=35.7
%regen=.7%
Regen aH=.0872
Watt hrs=502.23
Wh/mi=31.3
and the BBQ sensor got up to a max of 110 deg.C
Bottom to top charge time=2hours 4 min.
I ran view ranger on my mobile device for the ride and got a total trip distance of 14.6 miles.

So this information produces some head scratching. First why the disparity in distance? either the view ranger is off or the CA is off or both. On this ride I peddle assisted less than I normally do since I was really looking at the aH capability primarily but I still peddled quite a bit. The terrain was hilly but nothing really big. For a 16 aH pack 11aH seems a bit low. That leaves 5ah on the table; a full extra turnigy battery. I know that I am not charging to the full 4.2 per cell and am discharging well above the max but does this seem like normal performance? Overall I am really happy with the performance, its a ton of fun..exilarating! but I would like a bit more range and a bit more power/toque on the hills. I am hopping that I will get that with the two extra batts I am adding.

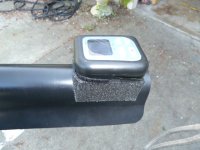
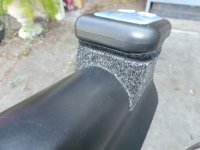
In other news I signed up for the SF makerfair today. I thought it would be fun to meet up with some of the other ES folk who are coming and show off the new build. I added a few small details today. Made a small Closed cell foam velcro landing pad on the back of the top tube tunnel to mount the BBQ sensor (it was getting hammered in the other location) and it seems to be good and secure. Here are pics:
P1090211.JPG
P1090212.JPG
Front fender:
View attachment 2
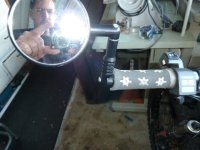
Handlebar mirror (with a faint background image of the rascal himself):
P1090213.JPG
And a new comfy seat (the old one that came with the frame was a STONE):
P1090215.JPG
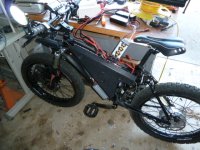
Anyway that is how she sits for now. The family has decided to call this bike the "Electric Jeepster" and as for me I'm just having fun tearing it up. Next episode: How to mount extra batteries when all the good spots are taken.
 
Nice! You got my vote for Best Build from a new(ish) Sphericle :D

How about suspending those batt's -> saddle bag style from the fork clamp? It would be 'sprung' weight..
 
Thanks Stevil and Pendragon. As for the two extra batts, as I see it there are really only three options: seatpost rack, below the down tube in front of the controller, or out in front of the head tube. I have been giving it considerable thought and I think that I'm going to put them in a pelican 1120 case (it really small and the two batts fit in there perfectly) mounted in front of the head tube. Below the down tube would be within the front suspension range and the seat post tube would be pretty pricy for the quality and fabrication I would do to it. Also my wife thinks the case over the front wheel adds to the "Electric Jeepster" look that has emerged. Just got to figure out the details of mounting, I'm close to a good system but have to work out a few more details. It would sure be easier of I had dual crown forks. Anybody got some that they would like to get rid of cheap? I've been prowling pinkbike and eBay for a while. Hey Stevil, what's a sphericle? Is that code for noob? I don't know about best build, there is some pretty cool stuff out there but thanks anyway.
 
and the BBQ sensor got up to a max of 110 deg.C

This means you are taking full advantage of the motor's ability, you would improve range with road tires ( less weight and less drag means more miles per wh )

does it get this hot on level ground, full throttle, no pedaling ?.. or only when climbing hills at full throttle ?

she's looking really nice man !.. great job !
 
Ypedal, you are running a bike with this motor, right? What voltage are you using? If my temp is getting to 110 I'm a bit concerned about what it will do at 66.6V. I don't have any real venting right now but I am not opposed. In fact I have some ideas to make it more efficient if I do. The 110 was right at the end of my ride at WOT on low volts and just following the two toughest hills of the ride but both still were not too hard; maybe 30 sec. each. By increasing the voltage do motors become more efficient on hills? Other than momentary spikes, the highest current I have seen is in the mid to upper 20s. At some point I will have to start looking at the settings programmed into the controller and maybe play around with them. Another whole learning curve.
 
Nope, it's a V2.3, I kind of agonized over which to get but most of the parameters that were setable in the V3 should be achievable via my Lyen controller. Also, since I am already planning another build, this bike will likely be used primarily by the wife. Getting this one together and learning as much as I could for future projects was the main focus. I ultimately plan to have a couple (at least) profiles arranged in the controller that operate off the 3-position switch. Right now I plan to use something similar to the current performance profile that I can use for better range and greater exercise on position #II and then look for maximum safe performance on position #III. Position #1 I will have to think about. I made a punch list of final clean-up items today and it was alarmingly long. I would normally have taken my time on these but now that I am going to be showing it at the SF Makerfaire. I figure I better get a move on. I decided to wait until I have all the parts in hand for the final upgrades to begin the list though since I only want to take the side covers off once. I'll get it all tidied up and then post some finalized pictures and try to figure out how to do some video too. I don't have a fancy Go-Pro like GCinDC but I'll think of something. :p
 
oh yeah the Lyen has the power mode switch. thats a good alternative. Hyena sugested to me and i was going to do this anyway but yeah "limit the power to that used at max required speed" that could be a good switch position for you to not compromise top speed while keeping it efficient and not melting hot :)

I reakon you bike would look beter IRL as most bike do. IMO you bike "The Jeepster" looks really clean and tough! so dont stress to much, I hope you can enjoy the day.
btw, you could add that to the name of the thread "Electric Jeepster" ;)
 
Good idea about adding "Electric Jeepster" to the name of the thread pendragon...ummm...how do you do that? Would it stop notifications to people who are subscribed to the original thread name?
 
Obiwan007 said:
It would sure be easier of I had dual crown forks.. ..Anybody got some that they would like to get rid of cheap?

I have a NOS set of el cheapo dual-crown forks hanging from the rafters in my shop. Has posts for mounting rim brakes, but no caliper mount. Sorry ..kinda' useless.

Hey Stevil, what's a sphericle? Is that code for noob?

Dood, YOU coined that term in the application you submitted for one of Justin's golden tickets. :lol:

I don't know about best build, there is some pretty cool stuff out there but thanks anyway.

To me, 'Sphericle' sounds like the perfect description for an E-S noob that did their research before knocking out a remarkable 1st build!
 
Thanks for the try on the forks Stevil but, yeah, I would need the caliper mounts. OK now I'm confused, I don't recall coining the spherical term nor applying for a golden ticket (whatever that is). My memory is getting worse but that seems like something I would recall. Then again it is kind of clever and cool. Maybe I should just take credit and shut up. Any help on a good place to stay in the neighborhood (riding distance) from the Makerfaire?
 
Ok, I've searched it. The only returns I got back were these last four posts starting with the one from Stevil. Either way, I am shutting up now and taking credit. :pancake:
 
Straight up LOL! Now that I see the evidence I realize that that is exactly what I said and clearly meant to be a witty and clever term that I freshly created on the spot. Anybody who wants to claim that it had something to do with a predictive text algorithm is just jealous.
 
Oh, this is beautiful. I love those tires, can't find that you named them and I'm curious.

From the title I was expecting some sort of, well, Jeep. Since you show off some fabrication skills, you're probably more than ready to build build a cheap electric Jeep for these trips, though you'll have to come up with the electric part. Instead of plywood I'm planning a different method I've been learning about lately, but just following the instructions should work fine for you.

http://www.struck-kit.com

Keep in mind that when you pay $49 for the plans they give you a $60 gift certificate for buying any parts from them.
 
digging the stem 8)

file.php
 
That stem and the bars came with the bike. The logo is the only markings on it. The guy I bought it from was a real kook from up in your neck of the wood Stevil. According to him the stem was half the value of the bike. I have not been able to find any reference to it since. I like it though...about as much as I hate the bars. The cross bar really limits where I can mount the controls. I plan to replace it.
 
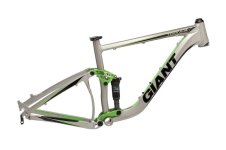
So a friend of mine mentioned that he saw a bike with lots of triangle space. It is the Giant Trance X series:
image.jpg

That looks like a LOT of area. There is an X1 and an X3 (i dont know if there is an X2) and they come in a large size AND an XL size. The trace, apparently has gone through a few revisions and the ones with the straight top tube and all the lucious triangle room are the 2011s, 2012 and 2013 but the water is muddy. The Giant site says that the top tube length for the large is 24" and for the XL it's 25". Unfortunately, they are pricey. I also wish they came stock with dual crown forks. I'm going to have to do some extrapolation an figure how many batteries I can get in there.
 
I just checked the top tube length on my Kona Manomano and its only 19". Compared to the XL Trace that is an extra 6" of space and the down tube on my Kona is straight compared to the swept rear part of the Trace. I think I could easily put 6 batteries in there and probably 8. Hmmmm. Anybody got one they want to get rid of?
 
Back
Top