Obiwan007
1 kW
OK, here is my down-and-dirty thermo-forming tutorial. if any of this is harmful or toxic I don't know so its on you to decide.
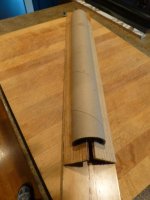
First make a mold or form it does not have to be fancy but it should be out of relatively smooth materials. Here is mine held together entirely with hot glue:
View attachment 9
I just played around with the sizes and angles until I got what i wanted and then glued them in place. I sectioned the thick cardboard tube (had it on hand from a paper roll off a plotter) with a hand saw and cleaned it up with a razor knife. After the mold is ready you have to figure out how to hold the hot plastic to the mold. The only limit is your imagination. For this process I got help and used two National Geographic magazines to clamp the round part and then my helper clamped on two short pieces of ply to shape the flat wings. The key is to have it all planned out and everything ready and in easy reach because the plastic firms up pretty fast. So Here is all of the stuff I need layed out and ready to go.
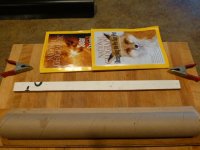
Cut a piece of plastic and make it well oversized since it will shrink in the oven some and you want margins to allow for slight missalignments that you can trim later. I marked center lines on both the form and the plastic to help line it up quickly with the form when it comes out of the oven:
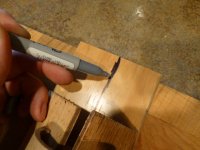
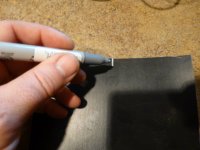
Getting the right temprature on the oven was tricky and I messed the first try up due to it being too hot. Found 290F to be about the sweet spot for this material (1/16" low density polyethelene, LDPE). The big problem with temp is that there is a small range between "not flexible enough" and "Sticks to the oven rack". So set your oven:

And let it come up to temp. Then throw that sucker in:

DISCLAIMER: These pictures are not of the actual event. It is just a poorly acted pantomine with scrap material to show the steps.
Now put on some gloves and start getting ready while it heats. Turn on the oven light and begin to check the plastic often. It will only take a few minutes. When the plastic starts to sag between the oven rack gaps you are right there and you need to be sure to get a move on before it starts to stick. Keep checking the flexibilty with your gloved hand and just go when it feels right to you. If it begins to stick to the rack even slightly, go immediately! Pull the plastic out but be careful not to let it touch itself because it will fuse together and you will be DONE. Just start over with another piece trust me. Move the plastic onto the form and align your centering marks quickly:

Get the magazines in place and press evrything tight over the form and into the corner:
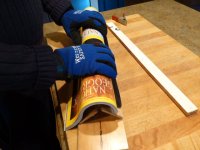
Now, while you hold the curved part in place with the magazines, have your partner put the ply over the flat part and spring clamp the ends:
View attachment 1
and then do the same to the opposite side flat wing with another piece of ply and spring clamps. Let it sit for several minutes so it can cool slowly, the wood and magazines will provide some insulation so it will cool slower than you think. just keep the pressure on until it is just luke warm to the touch. After that it is just a matter of marking it up trimming it to shape:
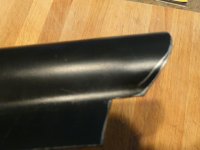
This stuff cuts pretty easily with a razor knife. Hope this helps.
First make a mold or form it does not have to be fancy but it should be out of relatively smooth materials. Here is mine held together entirely with hot glue:

View attachment 9
I just played around with the sizes and angles until I got what i wanted and then glued them in place. I sectioned the thick cardboard tube (had it on hand from a paper roll off a plotter) with a hand saw and cleaned it up with a razor knife. After the mold is ready you have to figure out how to hold the hot plastic to the mold. The only limit is your imagination. For this process I got help and used two National Geographic magazines to clamp the round part and then my helper clamped on two short pieces of ply to shape the flat wings. The key is to have it all planned out and everything ready and in easy reach because the plastic firms up pretty fast. So Here is all of the stuff I need layed out and ready to go.

Cut a piece of plastic and make it well oversized since it will shrink in the oven some and you want margins to allow for slight missalignments that you can trim later. I marked center lines on both the form and the plastic to help line it up quickly with the form when it comes out of the oven:


Getting the right temprature on the oven was tricky and I messed the first try up due to it being too hot. Found 290F to be about the sweet spot for this material (1/16" low density polyethelene, LDPE). The big problem with temp is that there is a small range between "not flexible enough" and "Sticks to the oven rack". So set your oven:

And let it come up to temp. Then throw that sucker in:

DISCLAIMER: These pictures are not of the actual event. It is just a poorly acted pantomine with scrap material to show the steps.
Now put on some gloves and start getting ready while it heats. Turn on the oven light and begin to check the plastic often. It will only take a few minutes. When the plastic starts to sag between the oven rack gaps you are right there and you need to be sure to get a move on before it starts to stick. Keep checking the flexibilty with your gloved hand and just go when it feels right to you. If it begins to stick to the rack even slightly, go immediately! Pull the plastic out but be careful not to let it touch itself because it will fuse together and you will be DONE. Just start over with another piece trust me. Move the plastic onto the form and align your centering marks quickly:

Get the magazines in place and press evrything tight over the form and into the corner:

Now, while you hold the curved part in place with the magazines, have your partner put the ply over the flat part and spring clamp the ends:
View attachment 1
and then do the same to the opposite side flat wing with another piece of ply and spring clamps. Let it sit for several minutes so it can cool slowly, the wood and magazines will provide some insulation so it will cool slower than you think. just keep the pressure on until it is just luke warm to the touch. After that it is just a matter of marking it up trimming it to shape:

This stuff cuts pretty easily with a razor knife. Hope this helps.


