Eric's Project #002

vanilla ice said:
Its all relative. I think $264 is way too much.

Hey, I agree with you... my last batteries were only $138 so having to fork out $264 is going to seem painful.

The chargers will tack on another $100 too.
 

You guys are cheap! I think the fair comparison is to make is comparing it to the price of a car. You could buy a complete junker for $4000 or an awesome ebike.
 
Dashboard Made

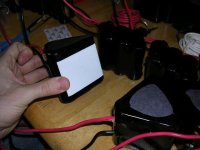
I used my grinder to remove the protrutions from the edges of my two meters, and then glued them together using PVC cement. I think it looks great and I don't have to build them into their own box. One meter will show voltage and the other will show current. I bought these meters on ebay for about $20-25 total (I forget). The shunt in the picture is a 50 amp shunt that came with the ampmeter.

Actually these two meters are almost identical. I think the range of volts and/or amps is set with jumpers inside the device so the same meter can be sold as an ampmeter or voltmeter with whatever range you want.


Attachments

  • DSCN0745.JPG
    DSCN0745.JPG
    50.5 KB · Views: 2,283
Beagle123 said:
You guys are cheap!

My family has even been said to have a "Cheap Gene". :lol:

The Tesla roadster isn't cheap either so I guess at this stage of the game pure economy might not be the only factor.

I'm just trying to keep the prices down whenever possible. If I can actually beat the price of gasoline (which I have very easily so far) then it makes for a good argument for switching to electricity based on economic factors alone.

Don't let us spoil your party... it's looking good... :)
 
Beagle123 said:

You guys are cheap! I think the fair comparison is to make is comparing it to the price of a car. You could buy a complete junker for $4000 or an awesome ebike.

I paid $400 for my old junker car. 8)
 
Cool meters 8)

They look purple in the picture. Is that the actual color?

Check around your junk pile for an old cell phone charger. Many of them have a 5v output :wink:
 
Spending $$ on LiMn is a no-brainer. Proven durable, powerful and safe.

Slick meters, Dogbreath. :mrgreen:
 
Hi all,

I am a noob to the forum but I have been commuting on my e-bike for a few months and running electric power in gliders. planes, and helicopters for years.

http://endless-sphere.com/forums/viewtopic.php?t=2872

I posted in the bike general discussion forum and my plan seems similar to yours, except I don't care about having a fast charge time. I was going to build 4 cell parallel modules (fifteen of them) and then connect them in series to discharge and disconnect them and charge each separately using the 2A wall chargers (fifteen of them). It seemed like a great idea but as I did more research I found some information that appears to be against connecting the cells this way.

http://www.batteryuniversity.com/partone-24.htm

After reading this it looks like the parallel strings could hide a rather serious problem of having a low capacity cell. They will obviously all be at the same voltage but it looks like this imbalance in capacity would not be easy to spot. Would someone please read through this and tell me what I am missing?

Thanks,

Steve
 
After reading this it looks like the parallel strings could hide a rather serious problem of having a low capacity cell.

You're not missing anything. You're right that a low cpacity cell could go undetected for a little while. There's no way to reconfigure your batteries so cells don't go bad. All you can do is try to minimize the impact. In a serial configuration, the bad cell would take the whole string down. But using a parallel configuration, it just sits there contributing its pathetic little amount of current. In fact, that's a really good argument to use parallel configuration--even your worst cells are still contributing as much as they can.

I plan to check each sub-pack's voltage every few weeks. I'll ride my bike so all the sub-packs will have an equal amount of energy drained. Then if there is a bad cell in one of the packs, its voltage will be lower. Sounds like a foolproof system to me. If you don't beleive me, try reading some of the other threadds on this site where people are trying to find bad cells.

From your article:

A high resistance or open cell is less critical in a parallel circuit than the serial configuration but the parallel pack will have reduced load capability and a shorter runtime

If one of the cells in one of my 6p packs goes completely bad then it will operate at 5/6th power.

If you can think of a way around all this, please let me know.

 
vanilla ice said:
Its all relative. I think $264 is way too much.

Put me in the camp of paying a lot for exotic batteries. With parking costs at $20 to 30/day where I live it wasn't too hard to justify. Add to it the value of the e-bike grin, 3 hours of extra time a week not spent in frustrating rush hour traffic and new respect from the kids on my block and I know for sure I'm better off!
 
safe said:
I can't believe
how much people are spending on batteries. :shock:

I think spending money on good quality batteries is a wise choice.
It's like paying for a bigger prefilled gas tank with premium fuel.
The bikes run better stronger and for many years, it's a win win situation enjoyed daily, yearly. Although I've only used Nicad's 4 years and Li-mn for a few months.
But I'm going straight ahead and buy me $800 worth of LIfbatt cells in Jan, or Feb.
Quit picken on my buddy Beagle123, he has a big bike to build :) all in jest.
 
Thanks, I really like the bike. It works great for a commuter bike.

The link was buried in a prior post.

http://home.comcast.net/~steveandbeck/ebike.htm

Appreciate the insight on the parallel strings as well, that helps a lot. I am going to go ahead and build the 1s4p packs. I really like the idea of having small easily replaceable modules. I will probably go buy all my supplies today and start soldering.

Steve
 
Start a thread and show us how you build your pack. We love pictures here.
 
swade said:
With parking costs at $20 to 30/day where I live it wasn't too hard to justify. Add to it the value of the e-bike grin, 3 hours of extra time a week not spent in frustrating rush hour traffic and new respect from the kids on my block and I know for sure I'm better off!

Right, you've proved my point. Its all relative.
 
Thanks Frank:


Back in Action!


I spent 5 weeks building my bike, and spend 6 weeks waiting to get my batteries back from the spot welder guy. But They're finally here!

I finally get to try the idea I've been talking about for weeks:

Using andersens connectors to make a plug so I can switch from connecting my batteries in series for riding to a parallel connection for charging. Wish me luck.

I started velcroing the battts together. I will velcro them to the bottom of the battery box too. I've attached half the andersens connectors. I broke-down and bought the $50 crimping tool. It works great. When I crimped them before, I had a couple come loose, but now they're really tight.

As always, I have pics for y'all:
 

Attachments

  • DSCN0761.JPG
    DSCN0761.JPG
    43.8 KB · Views: 2,624
  • DSCN0762.JPG
    DSCN0762.JPG
    41.7 KB · Views: 2,629
  • DSCN0764.JPG
    DSCN0764.JPG
    62.6 KB · Views: 2,635

It Works!

I hooked-up all the andersens connectors, and it worked. However, I have one concern: I had to jiggle the plug to get it to connect. That's not very encouraging. I noticed that one wire in particular had a slightly flatter contact, and when I jiggled it, it connected the whole circuit. Strangely, the one it fit into also had a slightly flat contact, so together they could have made a problem. I'm hoping these things make good connections. The stiff 10 guage wires aren't helping the situation either. These connectors rely on little springs inside them to hold the contacts together. A bunch of external pressure may interfere.

More pics.


Attachments

  • DSCN0766.JPG
    DSCN0766.JPG
    59.8 KB · Views: 2,608
wow holy crap... thats a lot of wires and andersen connectors!!!!

nice work dude but since i'm an idiot... its way too complicated for me that setup?!
 
Getting Close to Being Done

I lined the battery box with foam rubber from a yoga mat to insulate it, then stuck velcro to the entire bottom of it. Then I stuck velcro to the bottom of my batteries and fit them into the box. I was very worried that my idea of using andersens connectors in a big block wouldn't work because the wires were too stiff. I'm using 10 guage copper wire. It was difficult to maintaain the blocks while plugging them into each other. The plugs had a tendency to come apart. But I secured them with the little pins made to hold them together, and I got them to work. Once the wires were bent so the plugs were facing eaach other, the stiffness was much less of an issue. If I had to do over again, I would try 12 guage noodle wire instead for the flexibility. On the other hand, 10 guage wire has about 40% more conductivity. I wish they made 10 guage noodle wire. I probibly could get by with 12 guage because I only plan on drawing about 30 amps.

I put a 50A shunt into the negative lead from the battery and hooked-up my dashboard meters.

They said 56.5v. One picture shows the no load amps at 1.9a when I have the throttle fully open (chain not on yet).


Attachments

  • DSCN0785.JPG
    DSCN0785.JPG
    58.2 KB · Views: 2,451
  • DSCN0786.JPG
    DSCN0786.JPG
    46.5 KB · Views: 2,451
  • DSCN0787.JPG
    DSCN0787.JPG
    60.5 KB · Views: 2,451
  • DSCN0788.JPG
    DSCN0788.JPG
    53.8 KB · Views: 2,450
  • DSCN0790.JPG
    DSCN0790.JPG
    39 KB · Views: 2,464
Hi dirty:

I used a 23 tooth freewheel from white industries and bolted a lawnmower sprocket onto it. It wobbles a bit, but seems to work fine.
 
My First Charge!

I finally finished my charging set-up and it works great. I made the second charging plug using andersen's connectors, and linked them together using 10 guage wire. Using this configuration, all 84 of my cells are connected in parallel and connected to a power supply at 4.2v.

I was amazed by how much resistance was in the 10 guage wires. I had to set the power supply at about 4.5v to get the plugs to register 4.15v. There was about 28 amps running through the wires at the time. The wires were heating up when about 38 amps were running through them. I'm going to have to charge at 50 amps when the batteries are empty, I will report those results later.


Attachments

  • DSCN0793.JPG
    DSCN0793.JPG
    36.6 KB · Views: 2,151
  • DSCN0791.JPG
    DSCN0791.JPG
    67.1 KB · Views: 2,147

Hi ort:

I took your advice and shortened the charging wires. It really helped. It cut my voltage drop from about 0.5v to about 0.3v. I tried charging at the full 50 amps, and the voltage drop seemsed better, but the 50 amp current was still heating up the wires. So I took the idea one step further--I connected another 10 guage wire in parallel to double the conductivity. It also made it easier to handle the plugs because they now each have their own lead wires. Now the voltage drop is only about 0.15v at 50 amps!

I'm really glad I resolved this issue because I discovered a huge problem with this charging set-up: The problem is that you get a larger voltage drop at high current levels than at low ones. That means that if I set my power supply to 4.6v @ 50 amps, the voltage at the batteries would read 4.2v which is correct. However, as the batteries get charged, the current drops, and the voltage sag starts to disappear. By the time you get down to 10 amps of current the voltage at the batteries is 4.5 volts. That's much too high.

And if I were to set the power supply at 4.2 volts, then the batteries would be charging at 3.9v which would slow the process.

Right now I plan to set the power supply at 4.25v. This will charge the batteries at about 4.1v @ 50 amps. By the time it gets down to about 10 amps, I think the voltage at the batteries will be about 4.2v. I plan to disconnect the charger at 10 amps. I hope this will charge my batteries to about 90-95% which is my target. I want to slightly undercharge them to preserve them.


Back
Top