You are using an out of date browser. It may not display this or other websites correctly.
You should upgrade or use an alternative browser.
You should upgrade or use an alternative browser.
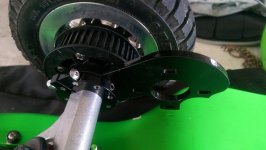
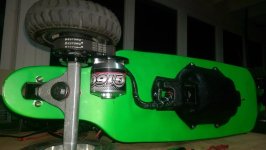
Fully Adjustable motor mount for Caliber
- Thread starter psychotiller
- Start date
psychotiller
10 kW
psychotiller
10 kW
torqueboards
1 MW
Looks nice! Is it anodized or powder coat? Kind of looks like powder coat.
One thing I noticed though because it's only 2 piece bolt on. It's a PITA to adjust the belt tension by removing the wheel every time.
One thing I noticed though because it's only 2 piece bolt on. It's a PITA to adjust the belt tension by removing the wheel every time.
psychotiller
10 kW
torqueboards said:Looks nice! Is it anodized or powder coat? Kind of looks like powder coat.
Powder coat.
777arc
10 W
torqueboards said:One thing I noticed though because it's only 2 piece bolt on. It's a PITA to adjust the belt tension by removing the wheel every time.
So true
psychotiller
10 kW
777arc said:torqueboards said:One thing I noticed though because it's only 2 piece bolt on. It's a PITA to adjust the belt tension by removing the wheel every time.
So true
How many bolts do you have on your wheels? I only have 1..And, not sure about everyone else but I'm not having to adjust my belt tension very often. Maybe you find yourself having to readjust your tension all the time because you have all the extra bolts?
torqueboards
1 MW
For me it's only the initial setup on pneumatics that's difficult to change. You pretty much have to guess since you can't access the bolts with the wheel attached.
psychotiller
10 kW
Or you can use a motor pulley with no flanges.
torqueboards
1 MW
How? You can fit a hex key through the wheel?
bandaro
10 kW
For the image/setup above, couldn't one put all 4 screws in loosely, get belt tension, tighten the outer screw, remove wheel, tighten the rest, replace wheel? Or is that what you do anyway, and removing the wheel one extra time is what you are trying to avoid?
Alternatively, there *might* be enough room to fit a spanner type screw driver on while the wheel is still in place, if you have one... Or buy a cheapie screwdriver and bend it like a can wheel nut wrench? Or use allen head bolt. Allen heads get nice and tight easily.
Alternatively, there *might* be enough room to fit a spanner type screw driver on while the wheel is still in place, if you have one... Or buy a cheapie screwdriver and bend it like a can wheel nut wrench? Or use allen head bolt. Allen heads get nice and tight easily.
psychotiller
10 kW
bandaro said:For the image/setup above, couldn't one put all 4 screws in loosely, get belt tension, tighten the outer screw, remove wheel, tighten the rest, replace wheel? Or is that what you do anyway, and removing the wheel one extra time is what you are trying to avoid?
Alternatively, there *might* be enough room to fit a spanner type screw driver on while the wheel is still in place, if you have one... Or buy a cheapie screwdriver and bend it like a can wheel nut wrench? Or use allen head bolt. Allen heads get nice and tight easily.
Yes, and if you use a flanged wheel pulley and a non flanged motor pulley that way works perfectly because once you set tension you can remove the wheel by working the belt on/off the motor pulley at the same time.
Also you can find or make short allen wrenches. So far, I've never had an issue with this. Not sure why anyone else would either. It's easy.
psychotiller
10 kW
torqueboards
1 MW
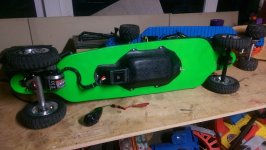
Looks great! How do you charge your packs on that setup?
What PSI are you inflating at on those 6x2? I'll have to get a set and swap it with the rims I got of yours.
What PSI are you inflating at on those 6x2? I'll have to get a set and swap it with the rims I got of yours.
psychotiller
10 kW
torqueboards said:Looks great! How do you charge your packs on that setup?
What PSI are you inflating at on those 6x2? I'll have to get a set and swap it with the rims I got of yours.
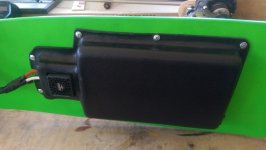
I have to take the cover off to charge batteries for now. I have the wiring set up so that I can just plug in my battery charger and balance cables, but this cover is temporary. I just wired up an oven in my shop this week so I'm going to make a new bat-box this weekend. I've got 45 psi in my tires right now.
psychotiller
10 kW
torqueboards
1 MW
looks awesome 
torqueboards
1 MW
psychotiller - I bought those 6x2 Matco.. Those tires are nice and thick..
I can run over little kids with those things.
I can run over little kids with those things.
psychotiller
10 kW
torqueboards said:psychotiller - I bought those 6x2 Matco.. Those tires are nice and thick..
I can run over little kids with those things.
Nice! yeah, you can probably run them with no air too without having to worry about damage. Get some air pressure in them and check out how smooth your board is!
psychotiller
10 kW
beetbocks said:great idea mate..i like the adjust-ability and ease of manufacture....
Thanks! Working great so far.
sl33py
10 kW
Nicely done!
I've been thinking of using kydex for my battery enclosures for a while now! Easy, cheap materials, somewhat self healing and will take a beating to protect batteries (also slides well if scraped). I've not built a vacuum table yet, but do have the nicer press to form with.
Couple questions - what thickness are you using and can you share your forming setup? Also, in the first pic you have a large toggle switch - how was that wired? I wanted to do the same for my on/off switch, but don't know if it will handle the higher voltages and Amps. Planning on the inline XT-90 w/ anti spark instead, but curious how it worked. Also see it's not on the second version, so did it have issues or not work out?
What ESC is that? CC Mamba or XL2 perhaps?
Thanks. If too off topic maybe a separate thread on those questions? don't mean to hijack your mount thread. (*edit* - i did find your build thread. Impressive progression and skills to do it all yourself. Nice work. Curious on your vacuum setup still.)
psychotiller
10 kW
sl33py said:Nicely done!
I've been thinking of using kydex for my battery enclosures for a while now! Easy, cheap materials, somewhat self healing and will take a beating to protect batteries (also slides well if scraped). I've not built a vacuum table yet, but do have the nicer press to form with.
Couple questions - what thickness are you using and can you share your forming setup? Also, in the first pic you have a large toggle switch - how was that wired? I wanted to do the same for my on/off switch, but don't know if it will handle the higher voltages and Amps. Planning on the inline XT-90 w/ anti spark instead, but curious how it worked. Also see it's not on the second version, so did it have issues or not work out?
What ESC is that? CC Mamba or XL2 perhaps?
Thanks. If too off topic maybe a separate thread on those questions? don't mean to hijack your mount thread. (*edit* - i did find your build thread. Impressive progression and skills to do it all yourself. Nice work. Curious on your vacuum setup still.)
I think the ABS sheet I used for this box was a bit thicker than 3/16". I used the 3 way toggle so that I could run parallel on one side/series on the other side. Off in the middle. It's a heavy duty switch. I never ran more than 8s on it. For the record, it worked great and I'll probably use it on something else. I switched it out on this box for an on/off slider because I've wired it to be 8s (soon to be 12s) and I have charge/balance port wired in as well so I don't have to remove the cover to charge.
I'll take some pictures of my table and oven today and post them up. That's the Castle XL2 esc.
Similar threads
- Replies
- 240
- Views
- 77,718
- Replies
- 13
- Views
- 10,829
- Replies
- 42
- Views
- 58,530


