Ron Paul's Blimp said:
Sorry for asking questions I bet you get asked every few page, but I looked at the past few weeks and didn't see answers:
Is there a specific motor version I want? Something newer? I see some sites selling a "tsdz2b." Does that just mean it has the 52v firmware? I'm going to use casainho's firmware anyway. Are they all the same as far as reliability and noise?
I see there's also 8-wire vs. 6-wire. Do I care other than whether or not I want a throttle? Is the 8-wire thicker or does it have thicker connectors?
Is there a good vendor to buy from in the US? Or should I expect to need to wait for a boat from China? If China, is there a recommended vendor?
I'm not really following the options on the firmware github page for making a cable for connecting the display to the motor. What does it mean when it says get a spare controller? Motor controller? How would that help? Won't it have the same connector as the controller that came with my motor? Or does he mean get a spare tsdz2 display? But then why not just use the one that came with the kit?
What's the problem people are describing with crank offset? Is that just if you have a BB bigger than 68mm?
Thanks!
I will try to answer "from what I know" and if someone sees that i am writing BS, pls. correct me...
You have to decide wether you want 36V or 48/52 Volts. To my understanding, the trend clearly goes in the upper direction. I see people owning 36 V motors who are considering getting a 48 V motor, I have not seen the opposite. If you look a bit higher in this thread you will find a complex discussion about pros and cons of the 2 versions, i was not really able to follow it, for me the bottom line was: there is not really a good reason to go for 36 V. 48 and 52 are the same, hardware wise.
Throttle: it comes with an 8 pin controller, where as the non-throttle version can also have only a 6-pin controller. But they are also selling non-throttle kits with 8 pin controller, but the throttle then is not in the package.
the 8 pin connector is thicker, the wire not really. wether you want a throttle or not is something you have to know yourself...do you want to be able to use your bike without pedalling or not?
the other point with the 8 pin controller: it will allow you to add a temperature sensor instead of the throttle. You do not really have this option with a 6 pin controller. the temperature sensor should prevent your motor from overheating, it would be installed directly on the motor.
There are wiring instructions here for both 8 pin and 6 pin controllers and also so far the latest releases come in throttle/ non throttle versions where throttle version actually is aimed at people with 8 pin connectors AND temperature sensor.
Bottom line: with 8 pin you have 2 options that you do not have with 6 pins, only downside could be the thicker connector in a specific case (inserting the cable into a tube or so....)
The cable issue re. connecting how i see it: you will have to solder no matter what. The cable of the LCD3 will not fit any motor controller. it is different from the displays that come with the motor. So once this is clear, the rest is a matter of perceived options, meaning: if i have connectors i can always exchange things easily if i want to. However these connectors must first being soldered to the cut cable of the LCD3 in order to make the end compatible with the motor controllers cable.
So if you care about being able to simply replace the LCD3 with the old display or a different display, then you can provide it a connector end..this is probably where people say to get a spare controller to use one of the cables from there to get what they need (there are several connectors on a controller, male and female) but yes, you can use the connector from the original display of course or no connector at all:
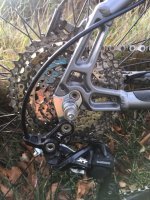
I personally just cut off the cable from the original display and from the LCD3 too and soldered the 2 open ends together and the job was done. (see pics, it includes also the cable from the brake sensor that i added)
View attachment 2View attachment 1
There is also another cable issue: this is the cable that you need to program the motor...here you need to connect the ST-LINK programmer to the motor, using the connector that goes to the speed sensor. So you unplug the speed sensor from the motor and plug in the ST-LINK instead.
The problem now is to get a cable that has a connector that will fit...this is a 6 pin connector...so you either need a spare speed sensor to use the cable from there, but you can be so unlucky to get a sensor that has only 2 wires in the cable although the connector shows 6 pins....you can also try to get an extension cable for the speed sensor in the same hope and you can also find such a cable if you have a spare 6 pin controller...that is the safest bet to get a cable that really contains 6 wires...the 6 pin controller has both a female and a male 6 pin cable, where as you would be out of luck when getting an 8 pin controller as a "spare cable supplier" because the plug that you need would not be available in 6 pins on that one.
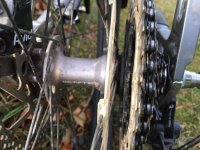
The crank offset is really annoying : the part of the motor where the chain goes on sticks out by an inch or so to the right so that your right pedal will be a good inch more to the right then the left one to the left...so you find yourself with an assymmetry of your feet while pedalling. that has nothing to do with this project here. this is in the nature of this kind of motor.
I understand bafang has a special crank to compensate for this, and this could be used...Maybe there are other options too. I went thru hell and back and adapted my crank...removed almost 1,5" from the right crank and managed to get it fixed to the motor nevertheless....so: this assymmetry calls for a custom crank at least for sensitive people like me...

( my cranks are longer cranks then standard, so therefore i could not use anything available on the market that compensates for the offset. One thing I am almost sure about: if you have someone who knows how to weld aluminum, you can cut a crank at the end of the lever and re-weld it so that the offset is gone.)