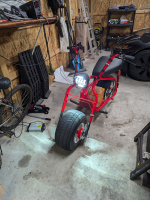
Rusted old minibike converted..

stevenwm

1 mW
Joined
Apr 18, 2023
Messages
13
Location
IN
Started on this in 2023 and got working near the end of summer in 2024. Post below copied from another forum I posted it on.


My father has this old minibike that was given to him sometime in the mid 90s. He never got it to run and lost interest in it, and it has sat rotting behind his shed in the woods since. I thought I would try to restore it and get it working. Initially I thought I could get the original motor working. But quickly realized that wasn't happening. The entire engine and torque converter assembly was nothing but rust. It was not salvageable.

I had always had a interest in electrifying a bike or something similar, and had been lurking on various forums like this one for some time learning about the hobby. So I decided to do that instead!

Shortly after retrieving it from its rusting place:
gh9Z0he.jpg


Tearing it apart to survey the damage:
Xatyu7l.jpg

Uf7t5JX.png

RBLTvy2.png


The frame was in surprisingly good shape. The motor mount plate was the worse part. Some surface rust and pitting. Also a weld had cracked.

Both wheels were rusted through. Tires rotted.
Edm2w81.jpg


One end of the rear axle and its bearing was chewed up
YfRRmSS.png


Brake assembly is on the front axle....
gPhIEZD.png


It also had the remnants of a mechanical speedometer.
NQHFvN2.png


After a bit of sanding... (You can see the cracked weld at the front of the motor mount plate).
bleENZp.jpg


Cracked welds fixed, attempt at filling in the pitting.
heELm23.png


It appears to have been painted brown at some point.
wqdYUyz.png


I actually had a hard time finding parts. This minibike is larger than most modern minibikes. It has several custom parts. 1" tube construction, so most all ebike handlebar controls would need to be modified to fit. I also had a hell of a time finding a wheel that would fit. It requires a wheel with a centered rim, but every replacement wheel I could find with the correct bolt pattern was offset. Eventually figured out some golf cart wheels were a good fit.
3nr7xKs.jpg

ndlgsFf.jpg

ZjYiLIb.jpg


They are smaller and also street tires, instead of the chunky trail tires. Original tires where 21", replacements are 18.5". After weeks of looking it was the closest I could get to original.


Painting!

Primer..
icl3zFY.png


I decided to go with a black on red theme. Apple red frame with black accents.
to0ZGDH.jpg


Axle next to new rear shock.
mBUhGLS.jpg


One fender painted.
y55u7RQ.png


Next post... assembly and electronics.
 
Assembly and electronics!

New bearings installed in the axles.
0hgXUG4.png


Cardboard aided design. Figuring out battery and motor placement.
jkWLNi2.jpg


Motor and it's mount arrived, checking placement and measuring for chain.
ApPScT5.png


The original rear sprocket was 60 tooth and made for what appeared to be bicycle chain. So I had to replace it. "428" chain. 14 tooth front sprocket, 48 tooth rear. Could not find a sprocket with matching bolt pattern, so I had to drill new holes in the axle flange.

Drive train...
Motor is a QS120....

Batteries..
Went with Samsung 30T 21700 batteries. These are 3000mAh cells rated for 35a continuous. 20s10p arrangement. So 72v nominal, 30 amp hours capacity. Ended up getting a touch over 31ah with an actual capacity test.

mIIaCXR.jpg

ZrSstCG.jpg


Found these hybrid copper/nickel bus bars, they worked great! Rated for 200A. (wont be doing that much though). Did 4 pairs of welds on each battery.
dtbMeTp.png


BMS - AntBMS, 240A continuous, 450A peak.
h8bBdyd.jpg


BMS Balance wires installed.
JHobvJZ.png

gxctoJC.jpg


Making the series connections between the pack halves .

vTFxIUR.jpg


Connections done. (I added 2 more later... )
yNWhG4Z.jpg


A literal frock ton of Kapton tape was used
0ywK3jV.jpg


All balance wires and the 4 temp sensors installed.
Bcnx8Vn.png
 
BMS is alivE!
wy8v0cf.png

Cells are brand new, no surprise they are perfectly balanced.

Motor Controller..
There are quite a few choices in motor controllers out there. A common theme with them however is configuration software that is borderline unusable. I discovered VESC and decided that is what I wanted. Went with a VESC based controller from 3Shul Motors. The C350 v4.0.. This controller is rated for 200 battery amps and 400 phase/motor amps.

huJf5qg.png


Wired up for bench testing
zfFgNLw.png


It works!


Initial testing on frame
8SHihPv.png


It lives! Not sketchy at all! Clocked at 62mph unloaded. (Timing of the back to the future scene in the background was entirely coincidental)


My dad had kept the original seat foam and cover. The foam was surprisingly still in good shape, still firm and usable, so I decided to keep it. The wooden seat base was long gone, so I made a new one.
5hlg1CN.png


New seat base and shocks mounted
59cUTLB.png


Seat was pretty dirty and in bad shape. Got better after an aggressive cleaning, but it is pretty stiff and cracked in many places. Ultimately I ended up not using it.
vDO5lCt.png

Tbmequ3.png


Handlebars and controls installed
rFdSCRr.png


On the left is a thumb style throttle for regen braking. On the right is a twist throttle with 3 position button (ended up using this for headlight control) and a "F/R" switch for enabling/disabling cruise control. Also a keyed on/off switch with a voltage display.

fG64XGs.png

(board taped to the front of the battery for "temporary" "protection"... safety first!)
a3jJplD.png


It really skirts the definition of "mini" bike. I am 5' 6" and I can't put my feet fully on the ground while sitting on it.

I went way overboard on the battery/motor situation. I thought it would have a hard time moving all the weight as the frame with wheels alone clocks in at 105lbs. Battery is 35lbs and the motor is 20lbs. 170lbs without a rider. I designed things around 180 amps. But even with the controller set for 80 battery amps, it is very fast and with a boat load of torque. Way more than you would expect for something like this. It hits 30mph in less than 3 seconds. Will easily reach 41mph at 3600 motor rpm. I did experiment with field weaking and got up to 4200rpm which topped out at 52mph.

Going into winter 2024 I covered the seat properly, mounted a headlight, and got the mechanical brake working, barely. I had also put about 180 miles on it by then! A proper range test in late summer on a mostly flat route resulted in 44 miles until the motor controller started to cut power, went another 2.5 miles until BMS cutout. Seeing between 50 and 60wh/mi consumption cruising around 25-30mph.

1740449130984.png

Still need to mount the fenders, build a box for the battery, and get the headlight wired in.

Also need some tweaking on motor settings. It runs much quieter and smoother in sensorless mode, but it won't start in sensorless. It sometimes has rough transition into sensorless mode, particularly if it is under a bit of load at the time it happens. I almost got rid of it by transitioning to sensorless at a very low erpm of like 250, but it still happens every now and then.
 
Last edited:
looks nice and shiny....

too bad you couldn't use soemthing to neutralize the rust and clearcoat it to preserve the "patina"...stuff that looks like that is usually less likely to attract the attention of thieves. ;)


but i'm not sure your tires are wide enough. :p


btw if you want to use a lever for braking you can use a cabled throttle box on a regular brake lever instead of the thumb throttle. might be more "instinctive" and easier to control on bumpy terrain, etc. i use this method on the sb cruiser trike. how to make a proportional / variable regen ebrake brake lever you don't need the relay or cycle analyst i used, just hook the throttle box up to your ocntroller the same way you have the htumb throttle wired.

if you want it to be activated along wiht the mechanical band brake in front, you can use a cable splitter setup on the lever or a lever with two cable connectons (and adjusters) to do this.
 
I originally intended to keep it as original as possible, but too much was is pretty poor shape. Every single bolt and nut broke or had to be cut while taking it apart. I guess at this point you could say I took the frame from an old minibike and built a new one around it. :LOL:

The original tire size is still made, but I could not find any replacement rim the right size that would actually fit on the axles.

As for braking, I use the thumb throttle for variable regen, and it will bring me to a dead stop even going down a hill. I put several tens of miles on it before I even got the brake drum to work. The mechanical brake is an old cable pull drum style. It is terrible, even with new shoes. I suspect it was never great to begin with. I only ever use it for hill holds. But considering this thing originally had a 3HP engine on it and a top speed of probably no more than 15 it was likely sufficient then.
 
Nice work! I remember when I was a kid my friend had a minibike like that we rode all over.
How's the acceleration and hill climbing?
I like your pack design. I did something similar with just nickel sheet. How do you plan on protecting the BMS balance wires?
 
It has absolutely no problems climbing hills at speed. Acceleration is very good, way more than a bike like this should probably have.

I still need to build a box for the battery. Can't find anything premade that fits. I do have a preliminary, but not very good, design for a 3d printed enclosure.
 
What about this case? Was guessing on the dimensions.

 
I originally intended to keep it as original as possible, but too much was is pretty poor shape. Every single bolt and nut broke or had to be cut while taking it apart. I guess at this point you could say I took the frame from an old minibike and built a new one around it. :LOL:
i thought i was going to have to do that with the old 70s scwhinn trike i'm turning into my next cargo hauler experiment over here Amberwolf's Schwinn Trike Rebuild / Conversion to Heavy Cargo Hauler but turned out that there asw only a bit of surface rust here and there, and so far nothing has required more than normal tools and force to remove, not even oil needed to loosen anything yet. So as much as possible i'm giong to leave it as-is, rust, faded paint, and all. wherever i can i'll also just be bolting stuff to the frame instead of welding to it, and try to use ohter parts that "fit" it's general look, style, and age. :)


The original tire size is still made, but I could not find any replacement rim the right size that would actually fit on the axles.
i was just being facetious.... ;)


As for braking, I use the thumb throttle for variable regen, and it will bring me to a dead stop even going down a hill. I put several tens of miles on it before I even got the brake drum to work.
my input was just that if you want to use a noirmal brake lever for the regen instead of a thumb type, for easier / more natural action, you can.


The mechanical brake is an old cable pull drum style. It is terrible, even with new shoes. I suspect it was never great to begin with. I only ever use it for hill holds. But considering this thing originally had a 3HP engine on it and a top speed of probably no more than 15 it was likely sufficient then.

fwiw, drum brake shoes and drums have to wear in before they work well, and it can take a long time (lots of braking). if hte old shoes are not too worn, you might put them back in and see if it improves the braking.

i thought it was a band brake (which often suck) from the bit of design i could see in the final pics of it as rebuilt, as i've seen those on these things around here (a few yeras ago, some kid had their band come off the scooter completely and fall in the raod with part of the cable puller when they had to slam to a stop to keep from hitting a parked car while they were hooning around in intermittent traffic)
 
What about this case? Was guessing on the dimensions.
those kinds of cases are pretty tough. i have two differnet sizes i've used on my stuff, one o fwhich used to carry some radio equipment, and is about 18" cubed, maybe a bit more. the other one is maybe a third that volume and more rectangular and that i used on crazybike2 for tool/etc storage, and also on an early version of the sb cruiser, bolted to the frame under/to the side of the seat. (with an ammocan for the battery on the other side).

i see stuff like that at my local thrifstores now and then, and at yardsales and the like.
 
Give a look around those auction sites, and you might find one that is a better fit, at a comparably ridiculous good deal. Example, the one i mentioned that is around $20, was several hundred new from the manufacture when built. Some of those even carry MIL-SPEC or NEMA ratings for water ingress protection.
 
Nice build all around!
With the right tires, and the power you have on tap, looks like it would be a blast in the snow.
 
Back
Top