The SB Cruiser : Amberwolf's 2WD Heavy Cargo Trike & Dog Carrier

I have a sister and a cousin who are both gluten intolerant. They both had to find it out on their own. Bread is not really a good nutrient anyway, like donuts it just tastes good. I have a friend who is borderline diabetic so he started wrapping his sandwiches in lettuce leafs instead of bread. It helped him a lot.
****These started earlier this year; I've been testing different things in my diet and have found that it's likely to be wheat that is causing my gut pains--if I leave out all wheat products, I don't have problems, but if I eat any, it's like a morningstar being dragged thru my guts, and it takes at least a week to lessen to "discomfort" levels, and two or three to go back to more or less normal. (Doctors are, as usual, useless; have to do everything myself).
 
Sigh... there is always something, isn't there.

Yes, there is *always* something. :/

I did get the trike taken apart enough to get to the areas I had to weld (lots of wood and wiring there so had to get all that out of the way rather than setting it on fire), and then finally in the hottest part of the 105-106F afternoon (thankfully in the shade of one of the trees that hasn't had so much of it die), got to the welding, which took until after sunset.

The actual break is just the outer tube, the original keel. It broke anywhere from a quarter inch to a half inch away from the welds, where you could see it was actually pulled apart from the tension on it. The reinforcement tube inside this remained welded to the rear portion of the keel tube, and remained inside the forward (now loose) portion, and the keel tube could slide back and forth on the reinforcement tube.

None of the edges were shiny so the cracking is not recent. The trike has "felt funny" in an indefinable way for most of the summer, but everytime I checked everything, including this part, I couldn't see a problem. Most likely the keel tube slid back into place, closing up the crack, whenever I checked; not sure why it didn't do this this time, but it's a good thing it didn't.

The "toptube" above it was never welded at it's splice point, because it was in compression rather than tension, and it would've required removing all the wood there (which I did do this time, but didn't the first time (probably didn't have time; don't recall)).


Pics of everything are at the end, rather disordered (sorry), but the last few are of the fixed area. You'll see some "fins" sticking down; these are pieces of old bedframe angle-steel that I shaped at one end to come almost together as a wedge, so tehir edges line up with the main keel tube edges at the front, just behind a piece of perpendicualr square tubing that supports part of the IGH framework. The rear of the angle-steel is shaped to go under and butt up against the lower crossbar of the cargo seatbox that the keel passes just above and joins at that spot. This is the spot at which it has broken, both times, directly over the front face of that bottom cargo seatbox crossbar. (not terribly surprising).

The theory is that it will spread the tension load at that highly-stressed point across more metal surface, and take longer to fail; it should also provide some sideways bending resistance at that point, reducing that form of stress as well.

A test ride around the neighborhood "felt" right, trike is stiff again like it should be.


Also, the Ultramotor worked as expected with the Phaserunner6. Even at the same current limits, regen is much less force, also as expected (no gearing multiplier), but usable. Won't draaaag me to a stop like the GMAC did, but it is SILENT, which is what I really want. Oddly I get a burst of harder braking down around 5mph-ish, not sure why.

I left all the PR settings the same except for the autotune changes, and turning off the wheelspeed sensor checkbox (since this one doesn't have a separate sensor). The thermistor is working; it correctly read 36C before the test (the approximate ambient air temperature of a short time earlier), and went up to 65C after the round-the-block test. It's likely that regen braking is going to make this thing pretty hot if I use it a lot and heavily, so I'll probably avoid using it except gently and for emergencies.

If I wasn't depending on the tiny axle flats for torque resistance, I'd try upping the regen current properties, but since I did have an axle snap on the first UM, I'll avoid this until I can come up with a torque arm / axle solution that does the same job the one on the GMAC does. (which will probably never happen, realistically; I have a bunch of ideas for better hubmotor design in this regard, but no good ways to implement any of them without a lot of money).


Tomorrow we see how well it works on the work commute.
 

Attachments

  • 20231016_132335.jpg
    20231016_132335.jpg
    4 MB · Views: 15
  • 20231016_132343.jpg
    20231016_132343.jpg
    1.3 MB · Views: 15
  • 20231016_132347.jpg
    20231016_132347.jpg
    1.3 MB · Views: 14
  • 20231016_132354.jpg
    20231016_132354.jpg
    1.3 MB · Views: 13
  • 20231016_132402.jpg
    20231016_132402.jpg
    1.1 MB · Views: 12
  • 20231016_132413.jpg
    20231016_132413.jpg
    2 MB · Views: 12
  • 20231016_185218.jpg
    20231016_185218.jpg
    4 MB · Views: 12
  • 20231016_185236.jpg
    20231016_185236.jpg
    3.4 MB · Views: 12
  • 20231016_185300.jpg
    20231016_185300.jpg
    2.4 MB · Views: 12
  • 20231016_185318.jpg
    20231016_185318.jpg
    4 MB · Views: 12
  • 20231016_185335.jpg
    20231016_185335.jpg
    2 MB · Views: 12
  • 20231016_185400.jpg
    20231016_185400.jpg
    1.4 MB · Views: 13
  • 20231016_185424.jpg
    20231016_185424.jpg
    4 MB · Views: 15
Commute was successful, and there were zero Phaserunner errors or problems, not at powerup and not on the ride, like on that bridge expansion joint drop. So whatever is causing those is inside the GMAC or it's cabling, or is some characteristic of the GMAC itself. :(

Temperatures peaked a bit over 60C (can't remember the actual number and forgot to take a pic before I turned it off; I really wish the CA remembered the temperature data).


But the smooth SILENCE....oh goodness..... Finally....:cool: :ninja:
 
.....You'll see some "fins" sticking down; these are pieces of old bedframe angle-steel ....
First, congrats on your Ebike.ca score, can't think of anyone more deserving than you. (y)

Re: Infamous 'bed rails'... They contain excess carbon and an inconsistent variety of undesireable elements. (A.K.A junk steel). Welding the stuff frequently causes embrittlment (cracking) in the HAZ. If you spoil drill bits attempting create a fresh hole in it, then I'd strongly discourage using the stuff on anything your life depended on. As always, it's entirely your call.

Edit: Just remembered.... For quite a while now, I've been snagging exercise treadmills at secondhand retailers. The local secondhand gets littered with'um and begs me to haul'um off. Many/most have decent squarewall tubes in a variety of sizes.
 
Last edited:
Thanks--I knew that it's not very good metal, and the few times I've used it for a few tiny things (like welding a plate for a padlock on the carport fence gate and back fence gate years ago), it was VERY hard to drill holes in (I think I ended up using a grinding bit in the B&D die grinder instead). I didn't try to drill the piece I used for the SBC's reinforcement, but I can try it on the remainder to see if it's the same.

Will this embrittlement or cracking be visible in the HAZ initially? Or is it something that will only happen over time? I tried to google up some images of it but somehow I can't get the right terms to show me anything useful (lots of discussion about it, but no pics).

IN this case, nothing "depends" on the bedrail metal, it's just added reinforcement intended to take some of the tension strain on the problem area off the keel itself. If it fails first, at least I can hopefully see that before the keel itself is affected. ;)


BTW, I have a feeling that hubmotor axles are made of whatever grade of metal is lower than bedrail steel. ;)


I used treadmill side-tubing as the main keel of The Raine Trike for my brother; I think it was 3 or 4" tall and 1.5 or 2" wide? Didn't have that when I built SB Cruiser, or would probably have used it then. If I had more I could rebuild the keel of SBC with it if I have to fix it again. I don't think I do but I will peek thru my stuff; it would only take about four feet of it to completely replace the existing keel from transaxle to "downtube". Would reduce the ground clearance by a couple inches, but I can live with that. I'm not sure if I can live with reducing it by the whole 4"? height of the TM tubing but if I can I'd just add this to the bottom of the existing keel to simplify the rework.

I have a fair amount of 1" square tubing of questionable steel quality; enough of that "paralleled" would probably be strong enough but it would also be large volume. :/

I think I still have the aluminum styling sides off that treadmill, saved because they're strong enough for a small trailer I could bolt together, but not for the trike's keel.

I also still have the front and rear curved steel pieces, because I was going to use them as fenders on the Raine Trike, but my brother hasn't ever used the trike again after the first time (or second?) so I never bothered to do anything further to improve it (not much point).

I have some really heavy square tubing from a van powerchair lift, but it's all aluminum so I can't weld it to the SBC and dont' really want to figure out a bolt-on solution for the main support structure; it'd probably end up being weaker than the rest of the structure and break there, with my luck. ;) If I didn't need to have the chain and IGH and stuff in between the keel and "toptube" I'd put this lift tubing between them and bolt them together with a "wraparound clamp" of some type.

(technically the IGH could go under the trike just forward of the transaxle chain input, but that's another engineering redesign I don't want to have to do on the version I'm using, and I have a better idea for the next trike version if I could ever get that one started...but it needs basically everything custom-made for it, from wheel mounts to hubs to fork and tree clamps, etc., and I just don't have the time and energy to do it yet. Too many other things always coming up....)
 
PIcs of the CA stats for the last two days' commutes:
 

Attachments

  • 20231018_162547.jpg
    20231018_162547.jpg
    2 MB · Views: 1
  • 20231018_162553.jpg
    20231018_162553.jpg
    2 MB · Views: 1
  • 20231018_162604.jpg
    20231018_162604.jpg
    2 MB · Views: 1
  • 20231018_162610.jpg
    20231018_162610.jpg
    2 MB · Views: 1
  • 20231018_162621.jpg
    20231018_162621.jpg
    2 MB · Views: 1
  • 20231018_162627.jpg
    20231018_162627.jpg
    2 MB · Views: 1
  • 20231018_162630.jpg
    20231018_162630.jpg
    2 MB · Views: 1
  • 20231018_162637.jpg
    20231018_162637.jpg
    2 MB · Views: 1
  • 20231018_162642.jpg
    20231018_162642.jpg
    2 MB · Views: 1
  • 20231018_162650.jpg
    20231018_162650.jpg
    2 MB · Views: 0
  • 20231018_162658.jpg
    20231018_162658.jpg
    2 MB · Views: 0
  • 20231018_162703.jpg
    20231018_162703.jpg
    2 MB · Views: 1
Yes...as noted in yesterday's PM: ;)

"Yes, about 12 years or so ago, you sent me a front QR disc brake hub, which has been the core of the front wheel of SB Cruiser for a few years. :)

(that wheel was built from the rim and spokes of a non-disc wheel whose hub bearing cones disintegrated...but the spoke hole flange was almost exactly the same diameter as this QR disc hub, and I needed a disc wheel because I'd just broken my dual-rim-brake fork in the only collision I've ever been in....it's not a 3x lacing, though, IIRC it's just a typical 2x...yet it still works with no spoke failures, etc)"


Any ideas on whether the embrittlement or cracking be visible in the HAZ initially? Or is it something that will only happen over time?
 

cracks.gif

Best advice I can offer, is to avoid bed rails/bed frames altogether, because it's composition is so widely variable and unpredictable. For non-structural uses that don't create a safety hazard, you'll need to use your own judgment. I did use a few sticks of bed rails for ground installed solar panels, but nothing else.

Preheating the joint and surrounding area helps - especially thicker parent metals.
Stitch welding - short 1/4", equally spaced beads, avoiding continuous lengthy passes-
With MIG, I have better luck with ER70S2 (but it's becoming increasing more difficult to source.
With stick, 7018 (low hydrogen) This rod MUST be kept dry, so don't buy any more than what you need.
 
Any ideas on whether the embrittlement or cracking be visible in the HAZ initially? Or is it something that will only happen over time?
Cracking frequently occurs shortly after welding, but may delay cracking for hours after (lots of variables involved).
 
Thanks. I'll get my magnification setup out there tomorrow in full daylight and see what I can see on the outside.

There's also a very loud squeak during riding now, very intermittent, but only happens while I'm pedalling (whether there is torque on the chain or not); I think it is the chain rubbing on the wood and the wood moving (as it's not been reglued plank-to-plank, just screwed back into an inside support on each end at the corners of the front of the cargo seatbox), but I'll have to check this (and everything else).

The actual sound of the squeak is more like that of styrofoam rubbing against styrofoam or wood, and there *is* styrofoam panels inside the box to insulate it, but there shouldn't be any movement (it's glued down with sprayfoam).

Eveyrhting else has been working so well it worries me. ;)
 
Well, today fixed that last problem there. :(

I went over the welds with a magnifier in direct sunlight and can't see any cracks, but I can't record the output of that. I used a phone-based endoscope to get as close as I could to the welds and the HAZ and made a video; it's still uploading to youtube and I'll post a link when it finishes, so those with more experience at seeing these might be able tell. It's not great video quality, so it's likely nothing will be visible even if it's there, though.

Tried to take still images but the phone literally won't focus on the welds, it keeps focusing on the edges of the metal or other things in the image that are far away from the metal instead so everyting else is too blurry to see. :roll: Same reason I had to use the endoscope to record the video instead of the phone. I didn't have time to dig out my actual camera that has manual focus.


Didn't find the source of the squeak but put more screws into the planks to secure them to each other as I don't have time to pull them out and glue and clamp them (takes at least hours). Messes up the neat look of the screwless planks to do this but it is what it is.

Tried to fix the left front handlebar turn signal strip, but it smoked (literally) once I fixed a small break in it's wiring. No time to replace it with a spare (actually intended for the Cloudwalker Cargo Bike build) so I just pulled it off and sealed off the wiring from the system to it. Still have the DOT turn signal on the top of the fork, and the LED strip on the stanchion.

The rest of the day got progressively suckier and worse, as everything I tried to do (thankfully not working more on the trike) went wrong; even had the front of a drawer of tools just come off in my hand as I tried to open it to get something to fix another thing that had just broken....so today was pretty much a complete loss; I'm even more exhausted now than I was yesterday after getting home from the last day of the workweek (usually sunday is my resting day to recover from that), so tomorrow I'm not going to be able to get anything done; i'll end up having to rest most of that to be able to make it thru the workweek, most likely.
 
Guess I need to oil some things now and then; the pedal-drivetrain freewheel on the left rear wheel stopped freewheeling and was stuck pretty good a couple days ago. Turns out the noise I had been hearing was the pedal chain occasionally being backdriven up to the casing of the frame-mounted IGH (which has it's own freewheel, so it doesn't backdrive the chain to the pedals themselves, which goes to the IGH input sprocket).

So on the way to work that day it siezed up completely, and jammed up the tensioner on the intermediate chain from the transfer axle sprocket to the IGH casing because the wheel was driving it faster than I was pedalling, and the bumps in the road probably shifted it around enough while moving to let it derail. (it doesn't happen if I'm pedalling so that's just a guess).

I fixed that and kept going, but it did it again on the way home from work twice. Once home I put a couple drops of oil into the freewheel and let them soak in, and that freed it right up. Didn't have time or energy to take it off and apart and clean/oil it properly, so hopefull that will do.

I put a ilttle oil into a tiny dropper bottle to carry on the trike for potential future occurences of such things, just in case.

But there's no squeak now, so...at least that's good. :)
 
Bed frames were (once) made out of recycled railroad rails and generally not good for welding. As said & IIRC, upon welding it's subject to hydrogen embrittlement. The hydrogen atoms in the weld area migrate to form high pressure gas pockets, which will result in tiny fractures in the weld.
So the weld might look good at first but over time it will fail.
 
I went over the welds with a magnifier in direct sunlight and can't see any cracks,.....
If you happen to have a horseshoe magnet and a half-a-cup (more or less) of iron powder, you can detect cracks in most ferromagnetic metals (cast iron, steel, etc). Just stick the magnet to any suspected joint, and sprinkle a dab of iron powder between the poles. It's typically called magnafluxing. Primarily used for difficult to see surface cracks, but can also detect cracks slightly below the surface 1-2mm.
 
Thanks--I can probably make the iron powder easily enough with the grinder. ;) But I dont' have a horseshoe magnet--as long as I can get the same effect by configuring individual smaller magnets into a horseshoe with a backing iron to control the flux, I can still try it.


My new front tire came in today, but it'll be Sunday at the earliest before I can change it out. Since they don't make the CST City anymore, I had to find a new tire to try out, and after quite a bit of poking around I found the best option to try out was the CST Sensamo Control 26 x 2.0"
I would have tried the Sensamo Master but could only find it in 1.75", and wanted the largest / fattest i could find for more contact patch and more air inside. (keeping in mind I was limited to places with free shipping, as shipping costs could as much as double the tire cost, and I just don't have time to ride around to local places to check what they have; none that would answer the phone when I had time to call could tell me much of anything).

It is very sticky; the surface actually almost feels tacky to my fingers, and the tire is very squishy, so ti should have even better grip than the CST City did. It says it has "Type 1 protection" for punctures, which is basic but more than the City had (I didn't get punctures with that tire however, until it wore down to the threads in places).

It also says it's "ebike rated" whatever that means (there's no explanation) for 25km. I can't imagine what good it does to rate a tire for *anything* for only 25km.... :? :roll: (and no, that's not 25km/h, just 25km).

There were other tires I might have tried, but CST has a wierd way of making their tires--they either have Sc single compound where the whole tire is made of one compound, usually soft, the way I want it, or Dc dual compound where the sidewalls are soft but the tread is hard, which is wierd to me because I would want soft center for stickiness...but they make no DCs that way. :?
 
Only took two weeks to find the time/energy to get the new front tire installed and tested (pics at end). It's about the same as the previous CST City tire for grip, but since it doesn't have the knobbies at the edges it corners more smoothly with the round profile it has, and has the same grip cornering as it does going straight (which the City doesn't because of those knobbies it has terrible cornering grip).

It's also more flexible, when off the wheel, probably because it doesn't have those two rows of much thicker rubber at the "corners" (outer edges) of the tread area. (which don't do me any good and actually harm my cornering grip, making the Sensamo Control a much better tire for me, so far.

We'll see how it holds up over time, and what wear is like. The City takes a long time to wear down to the threads inside the casing (last documented tire change was Nov 2018 in this thread, and I used the used tire off of CrazyBike2. I'm nearly certain I changed it once more since then, but can't find the post for it, and must've bought all of them locally as I have no online receipts for any of the CST City tires--I know I bought the first one locally at a bike shop, but can't recall about the ohters).


I also swapped out the main traction battery for the "spare" I've been using on the lawnmower, to see if the voltage sag / capacity loss is as bad on those as it is getting on the one I've been using on the trike the last several years. Have to wait for my usual commute to work for a real test, but the voltage sag seems worse on this one in a quick test done during the above tire testing. A further stationary test shows that all the cells sag exactly the same and rise back to exactly the same voltage, so it's not a "bad cell" or simple connection issue. Don't know about the capacity yet. (I think the pack I was using gives almost 25Ah if run down to "dead", vs the 38-ish Ah it could give for the voltage I charge to (4v/cell vs 4.15v)).

I started from almost full charge (55.1v vs 56v), and used much less than half an Ah on the test, ending up at 54.9v, and sag was down to 48.3v at peak current of 76.81A. Ambient temperature was 20C, 68f. (CA temp in pics is motor temp after cooldown from 52C on the ride) It shows Rbatt is 0.074ohms on the CA estimate. I forget what it showed for the old battery. But the old one only sagged down to around 52.5v under that load when full, IIRC.

I have a third identical battery to test out, just as old as the others, but it is the original I used on SBC, and is the one that got wet in the flash flood waters the first time around. It doesn't have damage from that, but since it had already been used on the trike, it's seen heavier currents and a lot more charge/discharge cycles than the spare I'm presently testing. I'll still try it if the one under test doesn't work out better than the previous, but I don't expect it to be any better.

The sag isn't much of an issue most of the year, but for the couple of months of cold weather we have (which has started), it can really take the oomph out of the trike and make acceleration take a lot longer than it should.


JellyBeanThePerfectlyNormalSchmoo didn't think much of my testing, and spent the time watching the invisible aliens instead, to make sure they weren't taking over the world without asking her to help.
 

Attachments

  • 20231210_153749.jpg
    20231210_153749.jpg
    1.6 MB · Views: 6
  • 20231210_153733.jpg
    20231210_153733.jpg
    994.2 KB · Views: 8
  • 20231210_153702.jpg
    20231210_153702.jpg
    4 MB · Views: 88
  • 20231210_153813.jpg
    20231210_153813.jpg
    1.1 MB · Views: 8
  • 20231210_153921.jpg
    20231210_153921.jpg
    2 MB · Views: 7
  • 20231210_153945.jpg
    20231210_153945.jpg
    2 MB · Views: 6
  • 20231210_153958.jpg
    20231210_153958.jpg
    2 MB · Views: 6
  • 20231210_154004.jpg
    20231210_154004.jpg
    2 MB · Views: 7
  • 20231210_154139.jpg
    20231210_154139.jpg
    4 MB · Views: 7
  • 20231210_154211.jpg
    20231210_154211.jpg
    2 MB · Views: 7
Been looking for a replacement for the poorly-aging stretchy velcro-attached wiring covers from Grin Tech

20231217_141235.jpg

on the tiller up to the CA for a while, then ran across these zip-up neoprene covers, initially on aliexpress, but found a better deal for a possibly better version on Amazon:
Amazon.com
20231217_141134.jpg 20231217_141139.jpg 20231217_141159.jpg


They come in various lengths, but haven't found (cheap enough) wider than 4" (unzipped, laid flat) which might enclose an inch and a quarter-wide tube or group of wires (I need much wider than that), and being neoprene are not very stretchy (but they are much more water resistant than any of the stretchy materials, and that's one of the main things I want).

So I got a four pack of 19" x 4" and zipped three of them together to make a 12" wide unit that will wrap around most of my wiring, and left open at the CA end a bit can at least make a hood to keep direct rain off of them during the few times a year I have to ride in heavy enough rain to be a worry.

I could get some neoprene sheet and cut it in two wedges, then sew zippers on it's edges (or cut it in a single wider differently-shaped piece for a single zipper at the bottom join), to make a better "permanent" solution, but for now this will work.
20231217_141104.jpg 20231217_141109.jpg 20231217_141117.jpg 20231217_141125.jpg


In ohter news, the CST Sensamo Control tire is definitely an upgrade over the CST City regarding grip, but not by a huge amount. I can still easily skid the front wheel with only part of my available braking force--but it grips significantly better in turns even while braking than the City did.


I'ts likely that Wed and Thursday and possibly Friday I will find out how well both of those things work in the rain on my work commutes--from a quarter-inch to half an inch, up to half an inch to an inch of rain are predicted those days, with "higher amounts possible in local thunderstorms".


As usual, the Schmoo disapproves of my doing something other than paying attention to her in exactly the way she wants (whatever that happens to be at the moment, which must be figured out by the human on their own).

20231217_141325.jpg
 
I could get some neoprene sheet and cut it in two wedges, then sew zippers on it's edges (or cut it in a single wider differently-shaped piece for a single zipper at the bottom join), to make a better "permanent" solution, but for now this will work.
Sewing in velcro might be easier than zippers?
 
Velcro sunrots (even the good stuff by 3M, though more slowly) quite rapidly here, even when not directly exposed to the sunlight.

There are the "mushroom cap" type of fastener strips, but they're hard to pull apart when needed; want something easy to undo for service access.

Zippers generally just keep working, if not stressed by pulling them apart "laterally", and they look much better than partially-attached velcro once that starts to happen ;)

Ideally I'd make an aero-looking cover for the tiller/bars (was originally planned), probably out of plastic sheeting vacuformed to shape, but since I haven't even ever gotten the "dashboard" panel built and wired up to neaten up the bars and add various functions I'd like switches/etc for, I doubt I'll get around to the cover anytime soon either. :oops:

I could theoretically 3D-print sections of such a cover, but it'd be easier to just make fastener-frame sections and still make the actual cover with vacuform (which is easy to do with a shop vac, hand-held wooden or foam mold (hollow with holes drilled for air suction), and a good heat gun).
 
I got a pair of "trunk organizers" on an Aliexpress sale really cheap, and as expected tehy're pretty thin, but will probalby do what I want:

Mount them on the inboard sides of the cargo area above the wheel wells to hold things I frequently carry for easier access while leaving the main cargo area open for whatever else I am going to go get (groceries, etc) or might pickup on the way home, etc. That way I don't have to have boxes/etc in the cargo area to carry those other things (taht will go in the organizers) that then either have to go on top of the cargo deck outside the cargo area, or that make me have to put the cargo up there.

I'm in the process of installing them, got too cold outside for my hands to work so have to continue tomorrow. Got one installed on the right side with partial "boxes" in the compartments to help support the bags' shape and whatever I carry in them. Still cutting out "boxes" from aluminized foam-insulated board to put in the other bag, then mount that on the left side.
 

Attachments

  • 20231224_202552.jpg
    20231224_202552.jpg
    187.6 KB · Views: 5
  • 20231224_202559.jpg
    20231224_202559.jpg
    126.3 KB · Views: 4
  • 20231224_202608.jpg
    20231224_202608.jpg
    111.2 KB · Views: 5
  • 20231224_202623.jpg
    20231224_202623.jpg
    100.5 KB · Views: 5
I have never had a gluten problem, and was tested for celiacs , (negative) (not sure why, but my brain was positive that had an i after the c, I knew it was wrong and correctively re-typed it 3 times... ) I have some serious issues due to advanced Crohns disease. I have had spurs off of my large intestine take out my gall bladder, pancreas and a lobe of my liver. 3 bouts with sepsis and it has not got me I do now however have borderline diabetes due to the death of half of my gall bladder.

Reason for the random commentary, the odds are it is not gluten you are referring to, most gluten sensitivity I have looked at as a scientist (Ms, Biochem, UCLA) has only manifested from specific wheat sources. It seems that the gene modified wheat to make it more resistant to Roundup has lead to a chemical change in the gluten of the plants in question. A good option to test this theory out is find a bakery in your area that does not use large crop (I am SERIOUSLY not saying the name of the company. I already had one lawsuit with them) I have sourced from King Arther Baking (I think that is the new name, used to be King Arthur flour) After talking to them they separately ground a bag of flour from a small plot farm they know, and I had ZERO negative responses to it.

So, turns out, dink with the plants too much and you might turn an unheard of disease into a rampant issue across millions of people. Celiacs is rare, to excessively rare, to the point where some medical professionals think it well, not horses, but past zebras, maybe Unicorns... (From Med school, if you hear hoob beats, look for horses, not zebras) Unless of course some corp is out there assuring everyone that there is no problem, and suing *ANY* researcher whom touches their products.

If you have an issue finding the flour, I have a guy in Cali that buys wheat from a farm in Washington. I am fairly positive I am not the only buyer.
 
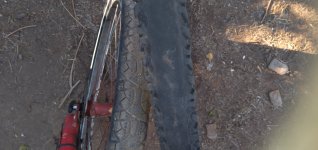
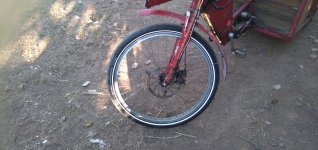
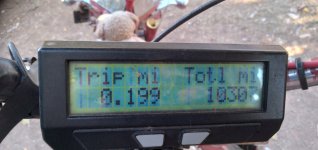
Saturday on the way home from work something large and metal fell off the back of a truck full of junk as it passed me, and went under my left wheel before I could do anything about it, and damaged the tire; I was forced to ride the remaining mile and a half or so on the flat, with four broken spokes. Surprisingly the rim itself wasn't apparently damaged; all previous road-debris/condition encounters have damaged the rim and not the spokes (and sometimes the tire but not like this).

Sorry I'd already taken the tire off to see if I could save it before I took this pic, and I swear I took pics of the tire inside and out but they're not on the phone, so I must've not quite pressed the shutter button (it's wierd, that under some circumstances I haven't identified, if you tap the button it takes a pic, and other times it has to be held down until the screen blinks. Doesnt' matter what mode the camera app is in, flash settings, whether it's already "focused", lighting conditions, etc...just, sometimes happens, sometimes doesn't, but loses pics I intended to take. :( ).

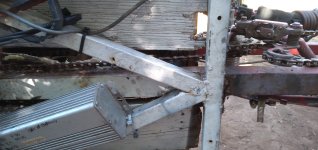
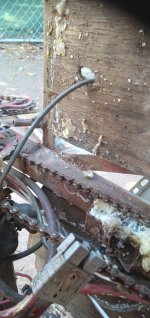
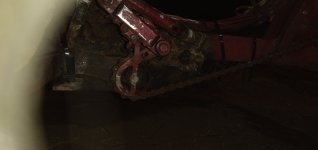
Anyway, here's the motor, off the trike; you can see the places for the missing spokes--one of them is still hanging there. Tapping the other spokes with a wrench, some of them don't "ting", so they're probably broken, too, inside the nipple. I probably don't have enough spares of the right length to fix this wheel with new spokes, but I think I still have the other heavily-modified MXUS 450x in it's badly damaged rim that I might be able to move spokes over from to make this a functional spare wheel.
20240226_122345.jpg


However, I think I'd rather use this rim to lace onto one of my other Ultramotors, after I fix them. One, another ex-A2B version, has scratched up winding insulation (was shipped disassembled and it's cover or something else in the box scraped them up), I think I can fix that with CoronaDope
but I'd have to order more (mine dried out--apparently the lid split open while sitting in the drawer?). The other UM is my original one off a Stromer, that I gutted the dead controller out of and cabled it up for an external, and ran it for a long time on the SB Cruiser, until I finally broke it's axle at the shoulder where the flats meet it. I could just weld that piece back on, and probably keep using this another long while. Or see if it's possible to pull the axles out of both and swap. (probably wouldn't do this).


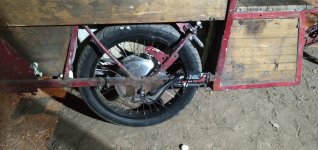
In the meantime, since I already had a new spare rim and new spokes and spare working Ultramotor, and had already planned to do this whenever the time and energy happened simultaneously, I decided to change the entire wheel out now.
20240226_122410.jpg
Actually installing it didn't work out so easily. I had measured everything, I thought, back when I planned this. But I missed the centering of the motor on the axle, so this one is offset differently than the MXUS was, and things don't line up, like the freewheel, and I'd forgotten that the MXUS had had a broken axle and I'd had to weld it on, and in the process shortened the shoulder, narrowing the space between the dropouts, so the unmodified UM doesn't fit, by over 1/4".

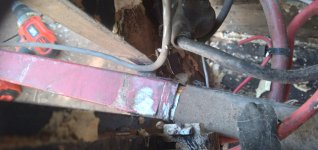
What I wanted to do was cut and modify the frame and outer dropout to match the style / etc of the rightside clamping dropout, but with all the other stuff that didn't work as planned (see below) there just wasn't time or energy to do it. So my options were narrowed to grinding the axle (which didn't want to do, but is "recoverable" in that the clamping dropout will take care of that later) on the outboard (disc) side, so that it will fit between the existing dropouts. Because of the way they made this axle, this means there's no shoulder now to fully support the axle against the dropout's inboard face, so I also used the plastic tube that comes with the UM to help keep the motor away from teh dropout face so the motor cable (taht runs along one of the flats) so it doesn't get damaged by the motor.

The next complication was that I simply can't get the freewheel off the MXUS to move it over. I tried everything except disassembling it; the Park tool I have for the purpose just wont' stay engaged with the very very short lip on this one. I tried filing the notches deeper but the metal is just too hard for my crappy little files, and the big good ones I have cannot get in there because the axle is in the way. I'd have to take the cover off to do it, and this was all getting too complicated and taking way too much time, so I had to go with another singlespeed freewheel I had.

But it's two teeth smaller, so the chainloop that connects it to the output of the trike's pedal drivetrain is too long, and won't tension up with the short distance availble in the dropout slot (this is why the slot is angled, unlike the upright vertical slot on the other side). Like that, it could derail on the bumpy roads and come off the sprockets--even a little bit would be a problem, either jamming the chain, breaking it, or damaging hte sprocket teeth, etc. I don't have any half links, so i had to take two links out, and that makes the chain so short that the wheel cannot go as far up as it should (nearly an inch short of the spot it should be in).

So....every complication just leads to more complications. :( What should have taken a couple of hours, maybe three, including lacing up the wheel, took more than twelve, and left me exhausted, and other stuff (yard work, etc) I needed to get done left undone. And I still wasn't finished, because once it was finally all installed, I had problems with the controllers not doing what they should, etc. See below for a link to a thread for that mess.


The plan had been to just swap the wheel out and run it off the Grinfineon as the MXUS had been, but the Andersons on the cable with the UM were apparently so poorly crimped (from factory?) on the controller-side cable extension that two of the contacts and shells just fell off as I was lacing the motor into the rim. :roll: Since I was going to have to redo the connectors anyway, I thought "hey, why not try out that old PR v1"...but things didn't really go as planned from there, either.

Troubleshooting details and whatnot over here
along with the solution.

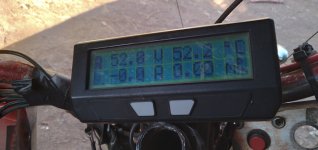
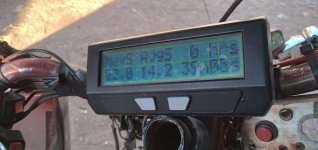
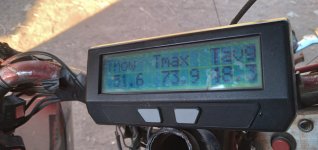
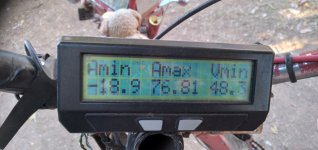
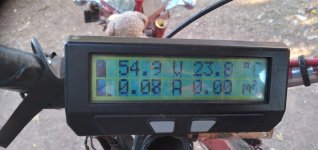
Eventually I got it working, and so now I'm running two similar (but for some reason not identical?) ex-A2B Ultramotors, each run by a Phaserunner. The leftside UM is run by a v1, from LewTwo via FuzzyWuzzy (thank you both), the rightside UM by a v6 (thanks to Grin Tech, ebikes.ca). The two motors are different windings; info below is from the PR suite autotune.
-rightside ultramotor 102.0mohms 571uh 8poles 8.81rpm/v
--this leftside ultramotor 76.0mohms 394uh 9.21rpm/v
I don't know what the info is for the other two UMs (the other A2B and the Stromer), I wonder if either matches either of these? If one does, I'd like to build that one into a wheel and get a matching pair on the trike (thought I was already doing that...but guess not).

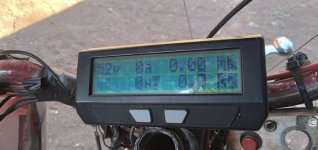
Performance appears to be about the same this way as it was with the GF/MXUS on the leftside, except that regen braking now is only available below around 10mph or so. Before, the GF gave all it could give from any speed, so I always had *some* ebraking, but the PRs (v1 and 6) just don't provide anything at all until the speed drops below this point, and after that it kicks in fine, at whatever strength I'm asking for with the variable lever; it's strong enough then, all the way to zero speed.
As noted in that thread above, there's no settings for any such speed limit or point in the PR that I can find so far, so if anyone knows of one, I'd love to hear about it. :)

There's also still a potential intermittent issue on the rightside PRv6 / UM combo (see that thread for details) but it is working now so not messing with it till it doesn't.


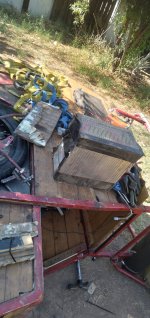
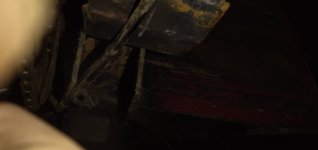
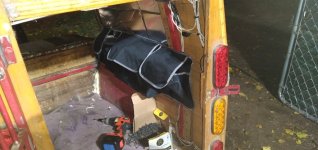
Since I generally only need one spare controller on the trike (just in case), I removed the two generics to clear space to mount the PRv1. I wanted to use the same aluminum L-bracket (rack ear) style mount that I used for the v6, but I didn't have time and energy to dig thru stuff to find the second one I know I have, so instead I used a 1/4"+ thick aluminum plate that I did know where it was easily accessible. If I run across it I may swap it out to put it on the frame the same way as the v6. No idea when that might be.
20240226_122359.jpg20240226_122403.jpg


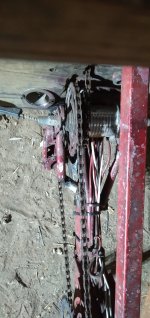
I simplified the wiring a bit by removing all the stuff the other two removed controllers had to the harness, but it's still available to connect to if I need it (like the reverse wires that go up to the horn button on the handlebars, and the brake on/off wiring that goes to the relay activated by the variable lever). Someday I need to really clean up that mess down there; all the experiments and repairs since 2018 or so when I redid that wiring the first time has done in my nice neat wiring job pretty good. :(


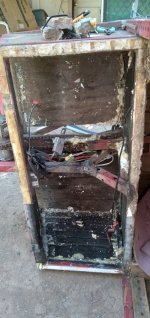
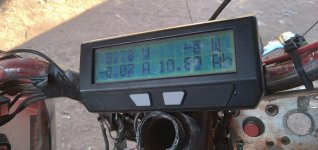
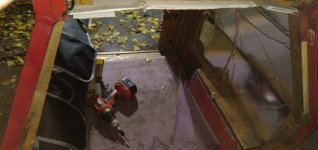
Some of the test wiring during the troubleshooting, showing the one working combo I could get with the GF and the UM:
20240226_131537.jpg


So, after all that, it's working now, but I still have required work to do on it, like making the clamping outboard dropout, etc. That's a few more hours of work I have to do, earliest I can do it is next weekend. :(

Hopefully nothing else will go wrong before then. (did I say that out loud? :roll: )
 
I showed the pictures of you gutting and re-building your bike to all 3 projects on the bench, they quivered a little I think... I also may have threatened them all if they do not cooperate I would bribe you to come punish them...

That is some seriously well planned stuff, and of course the failure is not in the electrics, but in the metal that got banged...

Now I want to put Skirzen (track gaurds) on my rims...
 
Something like these? :lol:
By Bundesarchiv, Bild 101I-219-0595-23 / CC-BY-SA 3.0, CC BY-SA 3.0 de, https://commons.wikimedia.org/w/index.php?curid=5410471

FWIW, none of the planned stuff happened really at all like it was planned...almost everything ended up improvisation, which happens way way too often. It's very very tiring... (used to be fun).
 
it used to be fun because it was a hobby. Now it is your job to do to maintain your commuter vic..

And yes, those are the things I was thinking of. Evidently I remembered the name well enough for it to be googled. :😆:

I have a loose plan in my head about the monster I am gonna build. I figured out a way to get a tilt frame on a rear mounted wheel pair (saw the 3 wheelers that have the duals in the front that can tilt, kind-of-sort-of think I have a way to do that in the back, waiting til my fab guy gets out of jail, beer+angry wife+police means I have to wait 4 weeks before he is back... ::sighs:: they were not fighting, they were having a spirited conversation in the front yard (her words) then the cops showed and arrested him. I have no idea what happened but He has a record and evidently after you do your time, it just means the cops are going to dick you around forever ::mutters::...

Sorry, I hit my own bitch button there.

From what you said you have had a problem with detritus taking out wheels. Maybe something like that would work, I mean it is more weight but bugger all you made the back deck out of lead and anger ::grins:: thems some solid bits on the back..
 
Back
Top