Yamaha YZ250F

Im not really scared to push the bike to its limits, I am rather happy to put it to the test.
I mean, if it cant take a little mud and water it is no real dirtbike.
I just get nervous when it is race time, I dont really know why. I know I am not going to win, and I dont really have anything to prove to anyone.
It was muddy, and it dosent really show on picture as usual. But here is one for now:

IxJwT7k.jpg


I will write up a race rapport for those interested later ;)
 
Friday, first raceday. I compete in the electric class that is 1hour +20min. The start is 10:20, inspection closes 30min before that.
I had to pick up the girlfriend on late evening on Thursday, so I got to bed somewhere about 0:30-1:00, and got up 5:30. I was a bit early, I could have slept 30min-1hour longer.

It was about 100bikes in that start, a little under 20 electric ones. Almost all of them were stark varg.
I was way too tense and got spaghetti arms early and never really recovered. We were the first group out on most of the track, it was soft and difficult. I never got any decent speed, not even on the nicer parts of the track, and after 2,5laps I ran out of battery😥

My meter shoved 32km when that happened. I dont know if I could have had that much wheel spin, or if the track was more than 9km. I got from a stark rider that his meter shoved 38km after he had finished 3laps, but it probably measure on the motor as well.
Of course, all this mud also made it draw a lot of power. Some of the starks also struggled to make three laps and had to push in the end, some had about 10% and one I think had about 30%.

After the race I had to work as staff at the track, so I got home maybe 7-8 in the evening. So starting charging batteries, washing clothes and bike. I also had a little problem with rough starting again, and eliminated the connector for the hall sensors this time and just soldered the wires. Got to bed maybe 10 in the evening.

Saturday, got up at 4 to be ready for the start at 8 🥴
I then notice that cell 1 reads 0,4v lower than the rest, shit 😧
I didnt bring any charger or anything, so I need all 3 batteries. I change battery and save the problematic one for last, at least I wont be stranded on the first lap..

This is a pretty big start, about 300. I start in line 4, so about zero chance to get anywhere when the start explosion goes off.
I am a little too careful in these starts, I often try to keep a little distance to bikes in front of me, but then someone always squeezes in so I loose a position. You really need to touch the bike in front of you if you dont find a way to get past them.

I got pretty tired at first this time too, but after half the first lap I woke up and started riding pretty decent :)
There was parts I could have done better for sure, but overall I think I rode at my skill level.
There was a bit annoying incident near the end of lap tree. I was in a muddy part with deep tracks. I had passed 3 riders I think recently, and were gaining on another group of riders.

There was a rider who had fallen to the side of the track, a little uphill about 90degrees angle away from the track.
Just as I was passing he lifted the bike and rolled back into me. I fell and did a little mud rolling, and the bike fell on the side with his rear wheel halfway up on it. I had to lift my bike, (that is already heavy) with his bike weighting it down even more.
I got so tired I fell again a few 100 meters further, and it sure took a while before I got up to speed again.
I cant help but feel I lost maybe 10 positions there 🙁

The problematic battery did its job too, so it never became a problem during the race.
 
I am pretty sure the low cell 1 is a bms issue, as it has happened twice before on the same battery.
The question is why?
I have modified the bms by moving the shunts to the wiring so I can bypass the mosfets for discharge, and still read the current.

QMUHggc.jpg


Ant 32s 300A bms.

ZHVDSqc.jpg


The shunts on the powerboard of the bms.

OIiT2l2.jpg


The shunts moved to the wiring, notice the small wire on the side connected before the shunt.

TZGYFGX.jpg


Here it is connected to the bms where the shunt should have been. Also a thicker blue wire for charging.

kdXFXEm.jpg


The trace on the pcb on the other side of the shunt is cut and a wire is replacing it just in case there would be a small voltage drop in the blue, thick wire for charging.

I have done the same mod on the other 2 batteries and had no issues with them.
Then I bought 2 more bms:es of the same model, but it was a newer firmware I suppose as it needed another app to set up.
One that needed gps position, I dont know social status and bank account nr maybe for it to work.

One of the bms:es had this problem right away, or very soon after install. I changed wiring, battery module etc. that didnt make any difference. I changed the measurement part of the bms, then it worked.
I contacted the seller and got to send the first bms back to have it repaired or replaced.

After a few mounts or something the second bms got the same issue, reading the wrong voltage on cell 1.
I then changed to the measurement part of the repaired/replaced bms, and it has worked for a year or something until now.

BduhxAk.jpg
 
The idea with the post before this was mostly that people more knowledgeable in electronics than me could give suggestions to why this happens, and can I do something about it? ;)
Can my mod be responsible somehow?
Or just if anyone have had or seen the problem mentioned anywhere else?

I found some pictures online, I payed for them so it should be ok to post them.

450394445_10161881398061228_7640894807919447128_n.jpg

Before the start, I dont love the smell of two stroke in the morning..

450400349_10161881646976228_4217966180371255838_n.jpg

About halfway on the first lap I think.

450543353_10161882233271228_841689618313195387_n.jpg

Somewhere on lap 2

450543375_10161884040386228_917715979521309913_n.jpg

I think this is near the end of lap 3.
I even look fast in this picture 😬
 
I've got one of those bms... I was going to just rip the FET board off.. I'll post back when I've had a poke around in it.
 
Was out riding today, or more like standing in the woods or pushing bike in the woods :rolleyes:
First I hit a pretty big water puddle, almost immediately after the bike started running very rough.
It was so bad I couldent even get it up to speed.
I had already got rid of the connector for the hall sensors, soldered the wires together and sealed it with glue shrink tube.
So I didnt think it could be there, but after a while I poked away some dirt from the wires and spread them a little.. And the bike worked again like nothing happened 🤔
I guess another revisit to those wires..
Anyway, got like 2 more km before I hit something and bent the chain guide so the chain jumped off:

AIcdcv9.jpg

(it was on the inside then)
Was able to bend it back a little with rocks and branches, got the chain on again.
The bike locked up when I tried to push it :oop:
Got the chain off again and pushed..

Opened it up and checked what happened:

piAAK6w.jpg


WgOQ0Zx.jpg


The damn chain snapped right off..
 
Was out riding today, or more like standing in the woods or pushing bike in the woods :rolleyes:
First I hit a pretty big water puddle, almost immediately after the bike started running very rough.
It was so bad I couldent even get it up to speed.
I had already got rid of the connector for the hall sensors, soldered the wires together and sealed it with glue shrink tube.
So I didnt think it could be there, but after a while I poked away some dirt from the wires and spread them a little.. And the bike worked again like nothing happened 🤔
I guess another revisit to those wires..
Anyway, got like 2 more km before I hit something and bent the chain guide so the chain jumped off:

AIcdcv9.jpg

(it was on the inside then)
Was able to bend it back a little with rocks and branches, got the chain on again.
The bike locked up when I tried to push it :oop:
Got the chain off again and pushed..

Opened it up and checked what happened:

piAAK6w.jpg


WgOQ0Zx.jpg


The damn chain snapped right off..
Yikes! sorry to hear that.
 
I saw that there was practice at a track nearby yesterday, and decided I wanted a revenge from the day before.
I fixed the chain issues, but didnt have time to look in to the electrical. Maybe it is not that wet anyway right?

TfDi59d.jpg


The road is on the other side of the flagpoles, the lion statues are on the road..
The track was pretty much the same, not all of it was under water though.

The bike ran fine for two laps until I stopped, but after poking around in the wiring it worked again until I changed battery.
After that I didnt get it to run again until I got home.
I have checked more now, and found a bad solder joint that I hope was the issue.
 
I occasionally help out a couple of motorsport teams. They obsess over wiring harness' because problems with them are hard to resolve quickly. It really is worth just doing the best job you possibly can. I guess the fact that wiring is often the last task before you get to ride it doesn't help.....
Glad you've got it sorted...
 
I rode on Thursday without problems, but didnt ride this weekend. I hope it is alright now.
I changed front wheel and noticed the bearings are starting to go bad again.
I think I have changed them 3 times already, but never changed the rear wheel bearings.
They have these dustcaps:

6tXzmv1.jpg


I have thought about making something like it for the front wheel too, but have never gotten round to actually doing it.
Now it was finally time:

Rh2X2Bp.jpg


Pjrh70Z.jpg


I will still have to change bearings one more time, but I hope it will be the last..
 
I have been running tubes in the practice wheels and saved the expensive mousses for race lately.
But now I think it was time for new mousses and tires, and get rid of my cut up tubes for extended life ;)

0sXsc85.jpg


In the rear the tube was broken :oop:

QrnF3HO.jpg


Interesting to see how the mousse has shaped itself after the tube.

232pNE3.jpg


New all black sidepanels too, I planned to change them before "stångebroslaget" (as I should have black background and white numbers) but didnt get them in time..
Now it is the same thing for "ränneslättsloppet", so I change them now instead.
I didnt plan to participate this year, but was persuaded.
It is like 20km of rocks and whoops, then maybe 2km with just whoops but no rocks.
You sure come out "shaken not stirred" :rolleyes:
It was also this crazy queuing for more than half the first lap, with over 700 starting at the same time.
But this year they have changed it, so it will be more like 250 in my start.
I did some research in the TPU matter. 95A seems to be the most common hardness, and also the stiffest of the more common ones. Therefore also the most likely to succeed on my ender 3 printer.
I got a rather expensive roll locally (the only one I could find locally), but I am having rather limited success.

IxiSA7F.jpg


I have been able to print a calibration cube rather successfully. It is relatively soft, but with a more plastic than rubbery surface.
But when I try to print my discguard it jams after about 2 layers.
WrV0UPf.jpg


I tried changing from 0.4mm to 0.6mm nozzle, but it didnt help.
Maybe I should get one or 2 other brands and see if they print easier?
From what I have seen on youtube it seems like they can vary pretty much even when they are supposed to be the same hardness.
 
I tried changing from 0.4mm to 0.6mm nozzle, but it didnt help.
Maybe I should get one or 2 other brands and see if they print easier?
From what I have seen on youtube it seems like they can vary pretty much even when they are supposed to be the same hardness.
Probably the best tip I could give you about printing TPU is to simply just don't make the extruder gears tight at all.
What you want is the TPU to almost slip between the gears. This way if anything goes wrong is will simply slightly underextrude instead of getting definitely clogged. In this case not tight enough is better than too tight.

This simple trick solved 99% of the issues I had with this material.
A bigger nozzle diameter, slight increase in temperature and slower print speeds help as well. Also don't forget to disable the fan or at least lower its speed, and disable retractions until you find the most reliable settings. Also, usually the filament gets much stiffer when it is cold, so if you really have some terrible problems printing it you can find some way to cool it down before it enters the extruder. Last but not least, TPU is very hygroscopic so be careful how you store it because if you get water in it it will print terribly, with bubbling , horrible surface finish and weird results.

But yeah, start with just making sure the filament can slip between the gears in case of problem and you should be good to go.
 
Thanks for the tips, I dont think I can do much about the extruder.
It is a simple single gear and a roller type, with just a spring keeping tension on the roller.
I could find a different spring maybe, but there is no obvious adjustment of the tension.

I already went to 0,6mm nozzle, I suppose I can go bigger. But I think quality will suffer if I go bigger?
Dui, disable the part cooling fan? Why, I dont think I have seen that before on tpu.
I have started a print again today, I did enable retraction again.. Maybe I should have left it off for now.
I had it off on the print before.
Keeping the filament cool, didnt think of that. I leave the doors open to the cabinet with the printer this time.

However, I thought I printed in 30mm/s but I probably had 50mm/s. I changed that and will see what happens.
I have 240degrees, I left it there for now.
 
Thanks for the tips, I dont think I can do much about the extruder.
It is a simple single gear and a roller type, with just a spring keeping tension on the roller.
I could find a different spring maybe, but there is no obvious adjustment of the tension.
Really?
That's weird, all the printers I worked with had at least some kind of adjustment mechanism.
Could you share a few pics of the extruder, maybe there is some hidden screw or something?

If there is no way from factory then I suggest either finding a new spring a bit of tubing or whatever, or using something to jam the mechanism so it can't apply its full force on the filament. Either way you need to find some kind of workaround to adjust the tension

I already went to 0,6mm nozzle, I suppose I can go bigger. But I think quality will suffer if I go bigger?
Not necessarily, but who cares, it doesn't need to be beautiful, it's just a chain guard ;)
0.6mm should work just fine, I did some enormous TPU prints that took almost 24 hours with 0.4mm nozzles without any problem (I printed the seat for my red motorcycle this way)


Dui, disable the part cooling fan? Why, I dont think I have seen that before on tpu.
Sometimes the cooling fan can make the nozzle clog briefly.
For example, when you don't use the cooling fan for the first few layers and then it turns on, it tends to blow air on the nozzle which cools down suddenly.
The PID control system of the heater doesn't know what's going on and it usually takes a few seconds or minutes to adjust and become stable again. During this time the nozzle can clog.
With stiff filaments this is usually not a problem because the extruder pushes more, it increases the pressure so it still flows a little bit. But TPU will not tolerate that, the filament will be pushed by the extruder gears until it deforms and then clogging becomes unavoidable. Here again, you can see that simply lowering the roller's grip might save you from these kind of situation, which is why I really insist on the fact that you should try and do that first without trying anything else.

However, I thought I printed in 30mm/s but I probably had 50mm/s. I changed that and will see what happens.
I have 240degrees, I left it there for now.
Lowering speed is generally a workaround for many problems and it could work in this case... But do you really want to spend twice or trice the amount of time everytime you'll print TPU?
From my experience TPU can be printed quite fast, you don't need to lower the speed all that much.

Also, 240 degree seem a bit excessive, personnally I print my TPU at about 220 degree or less.
But this might depend from one filament brand to another and sometimes even from one printer to another. I understand the temptation to increase the flow, but don't go too hot because then the cold side of the extruder will also become hotter, which will soften the filament even more.
 
Last edited:
Well, the 30mm/s still failed on layer2. It got a little longer than the previous ones though.
I raised temp to 245degrees, turned off part cooling and turned off retraction.
That print didnt even make first layer, so maybe as you say it can be a problem that it is too hot.
I lowered to 225 and the same thing again, didnt make first layer.

24hours for a seat? Sounds really fast compared to how long my prints usually take.
With these settings this print should take 22hours, I think it was 9hours with 50mm/s.

51hiG1r.jpg


Here is the extruder, there is a screw in each end of the spring. But they are not connected to anything adjusting, they are just securing the spring in place.

M1terU4.jpg


The whole system, I have a ball bearing spool holder with a strait feed line to the extruder.
Might not be worth it for you at this point, but that extruder is a single-gear version. The teeth grab the filament from one side, the other side is just a smooth idler.

If you're interested in TPU, you can install one of these, dual gear, teeth grabbing on both sides.

We can also see now that you're using a bowden tube setup for extrusion. While it's not impossible to print TPU with bowden tube, it's certainly harder. Between the bowden and the single gear extruder, we can see where it would be difficult to print TPU. Sorry! It's understandable if you don't want to bother with 2 different upgrades just to get a chain guard to print.
 
Thanks for the tip, I didnt think dual gear was such a small and cheap upgrade. If the shaft is long enough I will probably get one of those.
I am not sure if I want to change the printer to direct drive, the print head will be very heavy with this heavy stepper motor.
Maybe a kit with another hot end, extruder etc..
Or maybe just getting a second printer, but I am not sure what I want. Something that can do bigger parts, faster, exotic materials etc. I am afraid it is more like 2 or 3 more printers :rolleyes:

Anyway, I put a softer spring in the extruder. So far it has been printing a few layers without problems, never got this far before. Fingers crossed 😬
 
am not sure if I want to change the printer to direct drive, the print head will be very heavy with this heavy stepper motor.
This is a fair point, and you can get a smaller stepper for direct drive. But again, at that point, maybe you just want a second printer. If that's the case, then I encourage you to start a new thread, we can definitely go into detail
 
You're welcome to use this thread
for printer discussions. :)

I'm sure I will learn from it.
 
24hours for a seat? Sounds really fast compared to how long my prints usually take.
With these settings this print should take 22hours, I think it was 9hours with 50mm/s.

Ah yeah, 22 hours is awfully slow for such a small print.
But I just realized your printer uses a bowden system. It's not entirely impossible to print using a bowden tube, but it does make things a whole lot harder.
If this was my printer I would build a second extruder motor just for TPU. As someone suggested earlier, a dual gear extruder is really a huge improvement (I suggest the Bondtech BMG clones, they are cheap and reliable). Then I would make an extension cable for the motor and place it right onto the carriage, so it would essentially become a direct drive printer.
It would be 100% reversible, I'd use this extruder for TPU and simply remove it when using other materials. Actually you could even give it a try right now, it's just a matter of making the motor cables longer.

The only tricky part would be the firmware, because dual gear extruders need much more steps to extrude one mm. But a workaround would be to create a new printer profile for TPU in the slicer, then use the extrusion multiplier to trick the printer into extruding the right amount of plastic.
Hopefully you understand what I mean.

Here is the extruder, there is a screw in each end of the spring. But they are not connected to anything adjusting, they are just securing the spring in place.
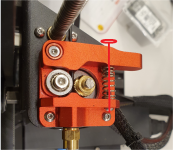
I used to have these extruding systems before I switched to dual gears. They are pretty bad at doing TPU indeed.
maximum tension can be adjusted simply by removing the two screws and replacing them with a longer one, like so:
1722478494086.png

You use this screw to set the maximum travel. The spring will push until this limit is met, so this way you can introduce the necessary amount of slippage you need.

But yeah, it will be tricky to print TPU reliably on this machinein its current configuration. Not impossible, but for sure not easy.
 
Thanks for the advice so far, I made a new thread where we can continue discuss the printer:
 
Back from "Ränneslättsloppet", the same kind of race as "Stångebroslaget" that I did earlier. As many laps as possible in 2hours+ 1hour to finish the last lap, on a track about 22km long.
This time a mostly very dry track, sometimes hard to see where you were going because of the dust.

A very different track though, rocks, rocks, woops and rocks..
The bike performed well, and I am now convinced that tires matter:

2Wtn47Q.jpg


I am sure that helped a lot in a part where it is a little muddy, lots of head sized rocks, roots and uphill slopes.
It just dug in and kept climbing :)
And also on "the mountain". There are a number of tracks up, the right is the steepest but it is strait. The others lean. It was probably not a problem this year, as it was dry. But other years people draw up mud so it gets super slippery.

I always took the right path as you can always get up if you have speed.
On the first lap I didnt recognize it, and came in at way to low speed. But I got up anyway with all that traction ;)
Second lap I were catching up on two riders just before the mountain, when they got there they stopped and looked before going.
I wasent having it and tried to go around them, then coming in a bad angle.

Not only that, as I was about to pass they took off so I had let off the throttle and get behind.
Once again I came in at way to low speed, and once again it just hooked up and wheelied up the mountain :D
 
Last edited:
Back
Top