Dogmans Longtail Beach Cruiser

dogman dan

1 PW
Joined
May 17, 2008
Messages
36,392
Location
Las Cruces New Mexico USA
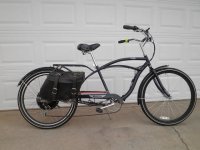
Oh no, there I go again. Here is the donor bike as it rolled out the door of walmart.Schwinn Del Mar Cruiser.jpg

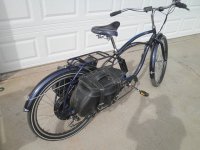
And again, now adjusted so it fits me. Beach Cruisers are the only bike shaped objects that fit me. Other walmart BSO's always too small.
The color is midnight blue, I won't be matching it perfect when I paint, but a dark blue should be close enough for the lengthening iron. Steel frame of course. Crazy stiff with the two tubes along the top tube. This wont' be a tail wagger bike. It weighs about 38 pounds. Adjusted to me.jpg

The best feature of the donor bike is the welded on rear rack. Dutch style. Solid and strong. It will be easy to add another curved tube support from behind the axle to the rack. The curve will try to mirror the curve of the existing top rear stay. Welded on rear rack..jpg

BTW, for once in my life, I'm actually trying to make a passably pretty ebike. Not a stitched up frankenbike.


Motor is the E-bikekit heavy duty model. 28mm 6x9 winding dd motor (9c like) 22 amps controller, 48v 13 ah allcell battery. About 21-22 mph top speed, able to climb to 10% grades with ease if you pedal some, and total weight is under 300 pounds.

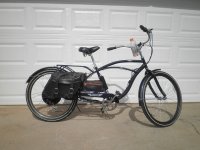
The final touch, a wood deck.Wood deck, the final touch.jpg

Ok, not quite the final touch. Now it's got a front disc brake, so dual disc.View attachment 6
 

Attachments

  • Saddlebag in place.jpg
    Saddlebag in place.jpg
    55.1 KB · Views: 7,680
  • Nearly finished, rear view.jpg
    Nearly finished, rear view.jpg
    63.5 KB · Views: 7,603
  • Tool bag added..jpg
    Tool bag added..jpg
    56.9 KB · Views: 7,566
  • Completed bike, front disc brake added.jpg
    Completed bike, front disc brake added.jpg
    68.5 KB · Views: 7,408
Step one is cutting some steel, About 1/8 " thick Included in the plan, a disc mount, and two tabs sticking out the back for attaching a trailer in the future.Steel rough cut.jpg

Approximately how it will be welded on. Rough steel positioned.jpg

More rough cut, dropouts finished. Same semi horizontal type as the cruiser has. This will allow easy use of a cheap bolt on derailleur. I have lots of them in my bike junkyard. Not shown, a hole to bolt the steel to the frame dropouts for fitting and adjustments.Dropouts cut.jpg

The steel bolts to the bike through the dropouts for fitting and marking before cuts are made.bolting to the bike.jpg

I put some washers on the dropouts, so the steel bolts on straight. Cuts will be made to allow removal of the washers before welding. Washers allow some adjustment before marking cuts.jpg

Wheel bolted back on, for some adjustments. Trying to get the wheel on straight this time. Ajusted and steel marked for cutting.jpg
 
Here's the extension piece with final cuts made. Notches for the rear stays, and some curved cuts to remove excess steel and weight. final cuts on derailleur side.jpg

After some more adjustments, checking with the level, ready to tack weld.
View attachment 3


Tacked in place. notice that most of my shitty looking welds will be on the inside, harder to see. Derailleur side tacked on.jpg


Disc side piece final cuts, and again, adjusting with the level before welding. I'm taking a lot of care this time, don't want another crooked bike.

Disc brake side final cut, and adjusted for welding.jpg

Both pieces now tack welded in place, Regular rear wheel placed to check for straightness. Hooray, so far it's good. Both dropouts the same height for a straight wheel.

Beginning to see a hint of what it will look like later. Wheel in place on rough welded extensions.jpg

Bike weighs 42 pounds right now. Gained about 6 pounds.
 
Likely the controller will go here. controller location.jpg


Thinking about battery box. likely behind the seat tube. Box may have sides that also conceal the controller, but let the wind get at it. Fender will be reinstalled, keeping it dry under the rack.

Rack will be lengthened, but likely just by attaching a wood top to it that is longer than the rack now.

Rack bracing struts installed. I'm very pleased with how it looks now. Got to use my pipe bender 8) . Rack struts installed.jpg

Now with the E-Bikekit motor installed, the 6x9 slow trike and cargo bike motor. 65 pounds now. Fender position and mounts installed. Chain guard roughly in placeWith motor fender and chain guard.jpg

Close up of motor, derailleur, fender etc. Fender detail.jpg
 
I'm going to run out of room reserved for pictures soon.

Battery box supports installed. They used to be the back end of a bmx bike. Less space than I'd hoped for, but I put the supports in a bit high, in case a larger crank later on means the chain guard has to move up an inch.

Battery support.jpg


Supports for the saddlebags.Saddle bag supports in place.jpg

Saddle bag in position. Saddlebag in place.jpg
 
dogman dan said:
It will be easy to add another curved tube support from behind the axle to the rack. The curve will try to mirror the curve of the existing top rear stay.
Keeping with the styling is understandable, but straight support elements are a magnitude stronger if that's important.
 
True, if not strong enough, likely the whole rack will have to be rebuilt, and enough steel added to be back to my usual ugly bike. Hoping if I need more strength, some gussets will suffice.

But in the end, very likely the rack supports will be behind some motorcycle saddlebags anyway. I just got a pipe bender, so for now I'll try a curved support. :D Gotta play with the new tool you know.
 
Nice rack! I like those integrated racks for strength. Sub'd
 
Awesome project! I had thought of something similar a while back (the steel-plate extensions) but shorter than this. I never got around to it, so I'm very glad you are doing this...
 
Likely will lengthen the rack. Might wait on that till my welding gets better. A board 12" longer than the rack is my idea for making it longer right away.

I like the wood top cargo deck. screw shit to it anywhere you like.

Not sure what motor it will get permanently. But once I get another controller for it, I have a 5304 laying in the shed. :twisted: Initially something slower, since it will have only a rear brake. One of the last touches will be a disk mount welded to the front fork. At that point, a trip to the track in Tucson might be mandatory.

Should be able to get the whole project in under $300. Bike $100, controller $75?, disk brakes about $50, deck top $25, and $25 for grinder wheels and welding wire. The steel plate I had found in the desert. Of course the motor may have cost me. For now I'll run an Ebikekit I got free, and continue the ongoing road testing.

Pic of how the wheel turned out on the trashrunner. Wheel crooked some, rack crooked some. Rides amazingly nice anyway. But this time I can't have it. Lots of effort into checking and double checking before I welded. Crooked wheel on the trashrunner.jpg
 
dogman dan said:
Rack will be lengthened, but likely just by attaching a wood top to it that is longer than the rack now.

Skateboard deck. ;)


Bike looks nice. Are you getting sick again? :p
 
Bike looks nice, Something must be seriously wrong with me eh? Finally over the flu I had last week. Spring riding season is here already, and I still wanted something better than the trashrunner to ride.

Skateboard deck, or equivalent is all it will need to lengthen the rack 6-12 inches. It's definitely getting some motorcycle saddlebags, but I'm thinking this time mounted very low. So some ugly crossbar to mount them to will have to be added. The bags will cover the steel dropout plates, which turned out ok, but not exactly beautiful.

Lots of welding yet to be done, but my welds continue to improve even with the toy flux wire welder. Some cross braces that will be rear fender mounts, battery box supports, some stiffeners for the extension plates, and a front disc brake mount.

Right now though, the next step is seeing what surprises I'll have once I put a chain on it. Hopefully no bad rubs to deal with.


The real challenge will be retaining the pretty, while adding stuff like a battery box. I'd prefer something better looking this time than an ammo box. But of course at first, I'll be riding along with something pretty crude keeping the battery aboard. Maybe time to learn to make a fancy fiberglass box for that space behind the seat tube just above the chain.
 
Leather bags would be cool on this bike.
 
Got it up and running last night, took a cruise on it and love the way it rides. Needs no shocks once you get your ass forward of the rear wheel. Longtails rock!

One rear disc brake quite adequate for stopping it using the slow motor. Max speed a bit low, using the 13s allcell battery. About 16 mph. I like that allcell, but it's saggy, so you end up running below 50v a lot. Similar in working voltage under load to a 12s hobby king pack.

The front chain ring only allows pedaling to about 14 mph anyway, without clown pedaling. So it's a good match for pedal speed and motor speed. A new bottom bracket would allow me to put any size front ring on it, so I need that someday. 52t would be nice.

Funny how ugly it suddenly became, with all the excess wire length. Needs some side panels on the frame to conceal all that kind of thing, under the rack.
 
Beautiful bike Dogman. Well done.

I like How you went with the classy cruiser. The pannier bags make the bike look like an e-motorcycle. Who needs a Brammo and Zero right?
 
cool looking bike dan! youve got me thinking about getting building a longtail e bike myself. it is so much more practical for general use/shopping/groceries, etc. as im sure you are well aware :D ive also been looking back at some of the cross country trips people like Justin and Grindz have done and it has been getting me thinking...about doing a trip myself. a longtail seems ideal for something like this.
 
dogman dan said:
Funny how ugly it suddenly became, with all the excess wire length. Needs some side panels on the frame to conceal all that kind of thing, under the rack.
Or cut them all to exact length, if you've got bundles.

If you've got wires that need to run any length on the bike, drill a small hole in the tubes, preferably at the points alread drilled as weld vents where tubes meet, and feed them thru there. Sometimes it's a PITA to get them thru so you might have to use a wire puller (stiff wire with hook on end).
 
Love the look of it, really nice one, but unfortunately I guess it'll break.
I don't see the "new" rear force-fitted to the main frame, all I see now are attachment points that will fold
sooner or later. I hope I'm wrong and just haven't seen your statement about this and wish you a lot of fun transportation with it.
 
It might break, especially with my welding. :roll: We'll see pretty quick if it's really weak, or maybe in six months if it's semi weak. It's definitely designed for looks as the primary thing.

But remember my first frankenbike? People said it would fold too. One bad weld broke right away, but since then two years of hard riding and it's good as new.

It's very true, a hell of a lot is riding on that stock rear rack now. It's getting quite a push up from that rear strut now. But also, bear in mind that the original strength of the frame is still there. So the axle is levering at 9" long, not the length from the pedals on back.

Looking again at things. I could lengthen the supports for the bags back to the seat tube, creating a bit of a truss webbing effect. But it feels solid, no creaks, no wag. There is a lot of built in strength on just the welded on dropout plates. They cover the old dropout, and continue up the stays in gusset effect. The old dropout concealed inside contributes to some torsional reinforcement.

The trashrunner did bend some, and now the wheel is more crooked than it started. So it won't surprise me any if this one starts creeping too. But I did think some about how things would be loaded. This part getting tension, that part getting compression.

Adding the battery box support also strengthened the attachment of the plate, for the plate to rotate up, it now has to put compression force on the box support struts.

Re the ugly wiring, that was a 5 min stuff, zip tie, and go job on running the wires. Lots of places to hide the excess wire length will be there later. Like under the battery box, put a small plastic box to contain some extra wires.
 
I don't see any problems with your welds, they look good.
I think the battery support did a lot to reinforce the backframe.
Now I guess it won't break.


Just bend :mrgreen: (in the rack area, if extremely loaded up)
I would just try welding something to the tube the seatstay goes in, one straight tiny tube on each side from the rack top to the end of this seat tube, or just two little steel triangles...
Or you just try it this way 8)
 
Yep, anything adding triangles will help a lot. Make it a web truss. The more I look at it and analyze it, if it folds it would be in the original top stay of the bike. A few diagonals there would fix that. But it would also block access to a battery box there.

Possibly, when a shaped box is inserted there, it will strengthen it more. At this point I have no plans to carry huge loads with this bike. I have bouncing betty for that. The bike will carry me, and at most 30 pounds of battery.

We'll see how it holds up, and like Amberwolf has done with crazy bike, add steel when faults appear. If the original rack doesn't handle the upward load on it, I'll just cut it off and rebuild with stronger steel and triangulate directly back to the seat tube.

If I want to put a big motor on the bike and haul big loads, part of the design right from the get go is a bitchin trailer hitch. That's what the two tabs behind the axle are for. So any huge loads will be done with a bob trailer.

But it's far from road tested now. I've ridden it about 4 miles so far. And, muahaha, we have weather for riding right now here! I just gloat every year in Feb. Worse than ever for you guys in Canada or Boston this year.
 
Back
Top