• Hello ES! We could use some help to get us past the finish line on building the new knowledgebase for the forum.
    Can you donate? Please see our fundraising page. Thank you!

Ride1Up 700 Series: An upgrade journey (Now with wiring diagram)

because i can't sleep...assumign the pack from this post Ride1Up 700 Series: An upgrade journey then with a 4p pack, 30A / 4 = 7.5A per cell. The chart from the lygte page shows that at 7.5A each cell is going to sag around a third of a volt when full, and around half a volt shortly after that until it gets toward empty. Wouldn't be much less at 25A (6.25A per cell).

1749515064810.png


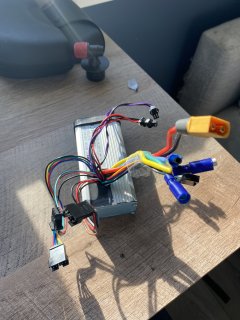
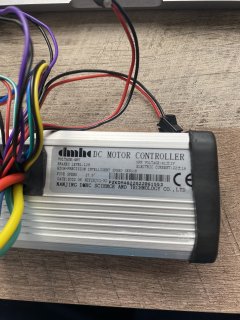
My previous runs, at 30A, were to see how my BMS responds and if it’ll trip,

What is it supposed to trip at? If it is supposed to trip at or below 30A, and you're actually drawing that much and it's not, you should investigate why before you end up with cell damage from overdischarge / overcharge / etc, as that could mean your FETs have failed shorted (the most common failure mode) so the BMS can't actually turn off the output.
 
I don’t know about the BMS. I tried to contact the seller, and of course, they didn’t know. I did contact a seller for this style case, but wasn’t able to find out what the BMS rating is, since they didn’t sell the battery. From looking at other listings for this same case, I see a lot of 25A (with Grade A cells) and some 35A BMS come with them. I’m going off that.

I could open it and check. Maybe that’s what most people do? I didn’t see a fuse door on the battery housing, so must be an internal fuse.
 
I would recommend always verifying any battery hardware / safety devices / etc before using it, just to make sure that they're actually there, and that they actually work and have all the advertised functions, and are really built of the parts you paid for / expect, so you know they should be able to do what you bought them for.

For instance, many cheap BMS don't have balancing functions. Some batteries have no fuses (at least one posted here some time back was wired around the fuse from the manufacturer, probably by accident). Some have crappy fuse holders that don't securely hold hte fuse which can lead to overheating of the connection which cna lead to wiring damage or fires. Some BMS may be damaged or nonfunctional, or wired incorrectly so they can't actually protect the cells. Etc.

I expect most things will be what they were sold as...but there isnt' a guarantee for most of them that this will be true, since QC is sadly lacking in many companies.
 
I’m setting my battery max to 25A. This is sufficient for my area. 30A was also nice, but as voltage gets lower, this 30A might start to tax the cells and I don’t want that.

On my old KT system, I had a 25A controller and that worked well for me. I want my battery to last.

Also, I saw a list, at em3ev, with my cells on there. Seems like good numbers to go by.


IMG_5900.png


I think the longest I’d ever pull max amps is maybe 10-25 seconds. I usually travel at 15-20 mph.
 
Last edited:
I ordered a new dc buck converter. Instead of having a 12v 5a converter, I went with a much smaller (about half the size of my original converter). It's 12v 3a and should be able to handle my lights, horn, and wireless charger. I ended up having lots of spare time and re-installed my 12v horn and wireless charger. This new converter will fit inside my frame much easier that my existing one.

Before installing the horn and wireless charger, the 12v 5a converter has been working very well. I have it receive it's 48v directly from the CA DC power plug.
 
Before installing the horn and wireless charger, the 12v 5a converter has been working very well. I have it receive it's 48v directly from the CA DC power plug.
Probably best to go with 3A anyway. I think the CA output jack is rated at 1A. Looking at specs for a few 3A converter units, they state 45W peak (36W rated). That would be just around 1A input.
 
I’m realizing that the wattage that I see on the CA is showing what the buck converter uses. I’ve zeroed the amps when all lights are off. My lights and accessories are fed by the CA DC port. Now, when everything is on and I lay in the horn (for maximum current!) and I see almost 30W. This is what the buck converter is using. What I’m curious about is, what the wattage the buck converter is emitting to the accessories. If it’s the same 30W, but at 12v then the new 3A converter will be fine. I was going to get one of those clamp on ammeters to check current on the 12v side of the converter. I got to wait a couple of days so I can “borrow” the meter.
 
I’m realizing that the wattage that I see on the CA is showing what the buck converter uses. I’ve zeroed the amps when all lights are off. My lights and accessories are fed by the CA DC port. Now, when everything is on and I lay in the horn (for maximum current!) and I see almost 30W. This is what the buck converter is using. What I’m curious about is, what the wattage the buck converter is emitting to the accessories. If it’s the same 30W, but at 12v then the new 3A converter will be fine. I was going to get one of those clamp on ammeters to check current on the 12v side of the converter. I got to wait a couple of days so I can “borrow” the meter.
The CA is going to measure current/power based on what goes through the shunt. I use an external shunt in line with the battery input conductor, so it will measure anything the battery is outputting. If I had accessories powered directly from the battery, but not going through the shunt, it would affect the CA measurements; so it depends on where in the system you're powering your accessories, before and after the shunt (whether it's an external shunt or using the shunts in the controller).
 
I just googled it and got this.

IMG_5938.png

So, my convert is rated “up to 97% efficiency”. 30x0.97=29.1. My accessories should be using just over 2A when fully loaded.
 
I’m using a BaseRunner and it’s internal shunt. To be sure I’m only reading wattage of the accessories, I zeroed the amps with all accessories off.
 
If the accessories are off, the DC-DC isn't using as much power it would if they were on, so you're still getting some of the DC-DC's actual power usage when reading the accessory draw this way. Probably not much, but some.

The only way to be 'sure" of the acccessory draw is to measure it directly. In this case it's probably unimportant.

Personally, I would normally specify any power provider in a system for at least 25-50% more than the expected load, to allow for spikes in the load (such as at load startup or changes in loading like wiht turn signals, brake lights, etc), and to allow for component degradation over time, and changes in available power output vs environmental conditions (less power as it gets hotter, etc).

When using "cheap" parts, I'd usually specify 100% more (double) available power, in case it's not made well enough to support the advertised capabilities.

It's not always possible, but I'd do it whenever it is.
 
I was going to get one of those clamp on ammeters to check current on the 12v side of the converter. I got to wait a couple of days so I can “borrow” the meter.
Multimeter would suffice to check DC amps, even the cheapest ones normally have an unfused 10A DC port, though accuracy is questionable
 
Probably best to go with 3A anyway. I think the CA output jack is rated at 1A. Looking at specs for a few 3A converter units, they state 45W peak (36W rated). That would be just around 1A input.
Finally got around to installing the much smaller 3A 12v converter. I had all 4 blinkers, headlight, wireless charger all on. Everything worked until I sounded the horn. The horn was very weak and the lights dimmed. My tail light is wired with full pack voltage and is always on when the bike is on. I have it so I can never turn that light off, for safety. This 3A 12v converter would probably work on simpler setups, but I have reinstalled the 5A 12v converter.
 
Finally got around to installing the much smaller 3A 12v converter. I had all 4 blinkers, headlight, wireless charger all on. Everything worked until I sounded the horn. The horn was very weak and the lights dimmed. My tail light is wired with full pack voltage and is always on when the bike is on. I have it so I can never turn that light off, for safety. This 3A 12v converter would probably work on simpler setups, but I have reinstalled the 5A 12v converter.
I wonder if adding a NTC resistor to the output would limit the initial current spike from the horn enough to allow the use of the smaller buck converter?
 
I wonder if adding a NTC resistor to the output would limit the initial current spike from the horn enough to allow the use of the smaller buck converter?
Thanks for the suggestion. I didn't know you can use an NTC resistor like that. I'm reading all about that scenario.

My car radio had a similar issue. When the bass hit, the headlights dimmed. I wasn’t familiar with car stereos at the time and didn’t install the system. The installer called it a "mini cap". I can only imagine it was a capacitor that held voltage to avoid any drastic deviations in voltage.

I’ll leave the 12v 5A on the bike. That unit seems to be more “up to the task” than the 3A version.
 
The horns I have experience with are built to draw a very high initial current. It's also probably inductive, and that can cause problems with DC-DCs too (even damage some of them). Sometimes an inductor in series with the power to the horn can help with that. Soemtimes a large capacitor with enough joule storage to overcome the initial horn current can help (this cap is paralleed with the DC-DC, not the horn).

When I used a pair of car horns on CrazyBike2 as an experiment, they required a battery to operate them. Even the highest current DC-DC I had, that was more than capable of supplying hte current to operate all the lights icnlduing the car headlight, and the car horns, couldn't tolerate the initial turn on of the horn.
 
Thanks for the suggestion. I didn't know you can use an NTC resistor like that. I'm reading all about that scenario.

My car radio had a similar issue. When the bass hit, the headlights dimmed. I wasn’t familiar with car stereos at the time and didn’t install the system. The installer called it a "mini cap". I can only imagine it was a capacitor that held voltage to avoid any drastic deviations in voltage.

I’ll leave the 12v 5A on the bike. That unit seems to be more “up to the task” than the 3A version.
I think there could be a few options on where to place one in the circuit, but if you have the 5A converter, why bother.
 
I think there could be a few options on where to place one in the circuit, but if you have the 5A converter, why bother.
Thanks. I was reading that very article. Great info there. I was hoping to gain more in frame space by using the smaller converter, but my accessories draw too much peak current. The 5A converter fits, but it’s tight. If I shorten some wires, I can also gain more space. I hate having too much slack in wires. Things start to get tangled and it’s harder to trace the wires when trouble isolation is required. I still can’t ride my bike yet (doctors orders) so I’m cleaning up what I can on this bike and working on my other bike (I think the next step for that bike is to get a dual UBOX Alum VESC from Spintend).

I’ve also been thinking of using a VESC on this bike to get more phase current. I’ve only reached 80c with my current setup. I know I’ll have to use thicker gauge phase wire and cut off the existing Z9 motor plug. That motor plug and the 55A limit of the BaseRunner are the obstacles here. Since I have an onboard charger, my phone can be the display. Maybe next year sometime. I’m still learning how VESCs work and how to wire them for a bike. Some settings seem very similar to the BaseRunner. In the meantime, I’ll continue to monitor motor temp throughout the year.
 
This is a fantastic thread thank you for the work and information you put into it and I’m hoping you can help me. I have a Ride1up 700 with the Bafang rear hub. I noticed I fried one of my motor cables as it was vibrating hard on pedaling. I usually ride it at PAS 5 up to 96% so it tops out around 999watts but is around 960 plus. I’ve had such a hard time trying to find a controller that connects the stock lights, PAS cable, motor and hall sensor, KD219 display, hydraulic brakes and throttle. Here is a picture of the current controller that has one of the motor cables destroyed:
Im not looking for anything fancy just a replacement to ride my bike again but the choices are countless and I’ve already ordered a few wrong controllers (one was way to large to fit into the downtube compartment. Can anyone recommend a controller that will work (I already bought another motor wire to replace the damaged one with a new hall sensor I can repin)?

Thanks for your help!
 

Attachments

  • IMG_6614.jpeg
    IMG_6614.jpeg
    1.8 MB · Views: 4
  • IMG_6611.jpeg
    IMG_6611.jpeg
    2.1 MB · Views: 4
To save the existing controller, you can cut the leads at the controller, and motor, and install an MT60 connections. Those stock bullet connectors fail often and the controller is probably good.

Aside from working with Ride1Up and getting a replacement controller, not many options to find one that will work with the existing KD219 display. Even if it all plugs in together, there will likely be firmware restrictions.

You will have better success getting a controller with an included display. Yes, there are many types of controllers. KT controllers are great and many will recommend them. With patience and some wire management, the 25A version one should fit inside the frame just right. It's slightly larger than the stock controller. You should compare the dimensions of the controllers first, but you probably already know that. I don't know what you know so please excuse me if I explain too much. :)

The whole process will (most likely) not be plug and play, and you would have to rewire/splice/solder/crimp some connections. I'd suggest do this over winter, when you may not be riding as much anyway. This way, you won't feel pressure to "get it done and ride". A rush job is (usually) not a good job.

Also, if you go with a KT controller, be sure it states "sinewave". There are 2 versions and the "squarewave" version usually gets complaints about rough/loud start when accelerating.
 
That is amazing thank you I didn’t even think of just replacing the connector that burned out - I have a feeling the controller and motor are all fine it’s just that one connection so I could just cut the wire strip it and solder the mt60 head and socket on the controller and motor cable. Doesn’t seem too laborious and cheaper than getting another controller. I did check with Ride1up and they have stock controller in house albeit it’s not cheap. A new KT controller would probably give me a little more torque then stock because I think the stock controller and KD display stays at 18a but I feel the non plug and play and needing to splice wires isn’t in my wheelhouse so I’ll go with the mt60 head replacement first as it seems simple Enough just to get it running again. Thanks for your recommendation!
 
As a quick test, you could temporarily (wire nut/alligator clips) connect the damaged phase wire and give very light throttle to be sure the controller still works. Give too much throttle and you may burn out your temporary connection.
 
As a quick test, you could temporarily (wire nut/alligator clips) connect the damaged phase wire and give very light throttle to be sure the controller still works. Give too much throttle and you may burn out your temporary connection.
One more silly question as I was doing some reading, is it one mt60 connector to hold all the phase wires on the controller and motor cable end (male/female)?
I assume I would shear off the bullet connections on the controller side and the motor cable and insert the end with the three wires into one end (male for example) solder , the do the same on the cable side with the female so it’s the three phase wires into one mt60?
And of course after soldering just make sure I have the correct colours before plugging them in together lined up.
 
Back
Top