• Hello ES! We could use some help to get us past the finish line on building the new knowledgebase for the forum.
    Can you donate? Please see our fundraising page. Thank you!

Bafang Canable Pro Master - discussion

No problem, i was reading those firsts posts in that thread again regarding the hardcoded settings for M820 (at the time you posted your question) and that they can not be changed. It is not only the case for M820 but for several other different controllers too.
The good news with FT firmware for M820 is that it seems they plan to make changing settings available with canable pro.

Regarding hardcoded settings (for a lot of controllers), i do have a controller for hub motor which can be changed. It not only saves the changes to controller but unlike other controllers, it also responds to the changes done with canable pro.

I changed cut-off voltage to a higher setting and checked with lab power supply. Controller acts to the new set value done with canabale pro. This controller is maybe a rarity or perhaps there are other controllers too which can be really changed but i have not yet seen mentions about such controllers. At least i hope that people will post it if a controller really does accept and acts to the changes done with canable pro.
 
HI Deko, If I flash my M420 43V CAN , with the firmware CRX10VC4313E102006.3(Boot3.0)_201006.bin
Do you know if advanced settings will applied and work ?
They won't be on this firmware. I tried it experimentally on 36v firmware, it worked and was applied.
 
Bafang Canable Pro

Few weeks ago i noticed on Github this program "bafang canable pro" written by bart594 and what can i say, once i had it running it's just a ... Real master!
Link to YT video about bafang canable pro

Link to YT video with some of the updates sinds the first video

One thing to note, if you see not plausible value's for " Undervoltage cutoff (under load)" or "Undervoltage cutoff (idle)" or "recovery voltage" no matter if it is in this program or Open Bafang Tool or even in old Besst... Don't change them!


Canable Device V1.0 ( The hardware needed)

It is mentioned, to be sure you are good to go, use a STM32F072 based canable V1 which has already candlelight firmware in it. This FYSETC UCAN board (picture 5 below) with USB-C even comes shipped in nice plastic box.

Canable PRO V1.1 ISOLATED also based on STM32F072 works also right out of the box. It has a transparant enclosure and some leds showing data traffic. Canable PRO V1.1 ISOLATED make sure you pick the isolated version here. This one (picture 2 and 3 below) has USB-A and you can use a usb extension cable with a length to your needs to keep the can wires with a shorter length.

Windmeile.de now offers a ready to use Bafang programming cable.

Bafang canable pro
mdi-9 is regularly working on the code adding extra features.
Link to github with latest changes.

He now have also ready to use builds for windows, linux and macOS also as arm64.

mdi-9 latest release V1.9 ( CANbus tool for Bafang ).
Windows users just select the win-x64.exe and install.

Picture 1 ready to use module from windmeile. 2 and 3 are the Canable V1.1 Pro isolated which works also right out of the box just like the "normal" v1.0 canable based on STM32F072 chip.


View attachment 375393View attachment 374412View attachment 374413View attachment 377789View attachment 377790


Important: Different canable manufacturers can use different positions for can H and can L and ground connection, so you have to read / follow the text printed on your canable!
Green wire needs to go to connection H (can High).
White wire needs to go to connection L (can Low).


-----------------------------------------------------
For those with a canable V2 or V2 PRO there is good news now, finally a good working candlelight firmware 2.5 from ElmüSoft even supporting CAN FD. Also you can install the correct windows usb driver. You can update your canable V2 with a few clicks without having to deal with the boot pins. Just install the ElmüSoft program "Hud Ecu hacker" and from within that program you can update your canable V2 or V2 PRO firmware to candlelight V2.5 firmware with can FD support.

And then your canable V2 or V2 PRO can work with Bafang Canable Pro too. Starting from release 1.6 which has the support for a canable V2 / PRO now added.

To download Hud Ecu hacker scroll down on that page until you see the bigger text "download and Installation" right below it you see the example and version but the button "download" you can click to download it.

If you don't like to read below, watch the video about it.

When you have Hud Ecu Hacker up and running, go over the icons at the top until it shows "USB driver and update firmware" click that and you are at the right place to upgrade / install firmware on canable V2 / PRO.
Select your adapter (canable). In next screen, if you need the correct winUSB driver for candlelight put a checkmark at " Install winUSB driver for candlelight". At bottom click install driver.

After that, under "update firmware" put checkmark at "Update firmware canable". Then below it click "Update firmware". The firmware updater will now open. Click "Enter DFU mode". In "target ID" Put checkmark at 00 .
At the bottom you can see "STM32G431 candlelight 2.5 Makerbase" already selected.

Click "upload". After the update is ok, you can click "verify". If all is ok click "Leave DFU mode". Now you can use your canable V2 / PRO too in Hud Ecu hacker and also in Bafang Canable Pro starting from release 1.6
----------------------------------------------------------

If you want to test your V2 / PRO when you are still in Hud Ecu Hacker to see your packets from your bike, go to main page screen, click "Control" button. Under connection select your "canable candlelight firmware" and click "Sniff mode". Then select " Snif terminal" and select your canable. Click "Configure". Set Baud rate 250K and ID lenght 29 bit. Command; i left it for wat it was.

Put a checkmark for "Show all packets". Put a checkmark for " Suppress repeating identical canbus frames" and then click the "Save" button.
And finally, click "Open" (next to configure button).
Switch your bike display on and if all good you should see your bike canbus stream. If you are done, click "Close".
Close all "Hud Ecu hacker" windows and open Bafang Canable Pro, You should see the name change for the adapter. Enjoy :)
Hi, with Canable PRO V1.1 ISOLATED on my M420 bafang Canbus 43V, I Can read all pameters , but cant change and write to controler . Only fonctionnality like "calibrate" works . My log is :

21:22:36]SAVE_REQ:Saving Controller Changes...
[21:22:36]INFO:Cannot save P1 - read data first.
[21:22:36]INFO:No controller changes detected to save.
[21:23:11]DEBUG:Raw parameter type selected: None

I've : CRX10VC4313h102075.2 2023-3-8 firmware
And DPC080
any idea ? Do I upgrade firmware ? Wich one ?
 
They won't be on this firmware. I tried it experimentally on 36v firmware, it worked and was applied.
Hi thank you for tips.
With 36v firmware and 43V battery I Would not have any problems ...?
Wich 36V firmware do you fashed ?
 
I've tested the Torquesensor Calibration button for resetting to factory settings now. It works, but the user gets no feedback at all, that something has happend. Maybe we can add a pop up window when receiving an acknowledgement to this command from the controller.
 
Hello to all. I have problem with reading data from M500. I made canable adapter according to tutorial. And I can read only Real-Time Data and read and set speed limit and wheel diameter. All the rest of values I have N/A. I use Canable 1.9. My FW CRX10NC4812i142015.3. Can anyone help me, what to do with it? Many thanks
 
Can anyone help me, what to do with it? Many thanks
The only thing that would help is flashing a firmware, that offers more parameters. There are tons of firmware files available on the internet, see #91 e.g., but I don't know if there is an overview, which bin file offers which features....
 
I tried almost all available fw for M500, but I couldn't change anything in any of them. I have 36 V, but I think it will be the same in 48V.
I tried Besst and Bafang tool.
 
I tried Besst and Bafang tool.
It has nothing to do with the tool, it's only a matter of the firmware on the controller, as far as I know.
You could upgrade to a M510, there is an open source firmware available. With this you can set what ever you want ;)
 
No and I also tried Besst pro. Some time ago it was said that fw M500a M600 are blocked. I use fw which suits me it is strong and the assistance does not decrease and turns off only at 32V.
Well it is 36V
 
Hello everyone,

I am looking for help with my Bafang M510 motor. After an unsuccessful attempt to connect with software (bafang_canable_pro-1.9), the motor stopped working. I would like to restore it using the K1 Flash tool, but maybe just a correct parameter setting could help.Motor: Bafang M510 (MM G522)Hardware version: CR X10N 510 FC 2.1, Current software version: MMG522C3619F802008.1_25Ah (this is the original firmware that was in the motor before the issue). I can still connect to the motor using bafang_canable_pro-1.9. The connection works, I can read some data, but I don't know which values I should set to get the motor running again. Maybe the motor just needs the correct parameter configuration and not a firmware update? If anyone has the correct settings for my FC 2.1 motor (or can share a screenshot of their working configuration), I would be very grateful. Or if someone has the firmware
 

Attachments

  • sc1.png
    sc1.png
    79.6 KB · Views: 31
  • sc2.png
    sc2.png
    59.2 KB · Views: 30
  • sc3.png
    sc3.png
    45.6 KB · Views: 27
  • sc4.png
    sc4.png
    63.9 KB · Views: 31
Maybe someone with a working M510 FC2.1 can compare the settings from your pictures. Specific the "mechanical parameters" and assist "torque table".
You wrote in pm you can still connect but have error 21? On another forum post seems something similar happened with M510.
At the same time, there is Error 07) Overvoltage protection, The motor is new, has 20 km on it, everything happened after connecting the CANable – I probably overwrote something incorrectly. I was also surprised that when reading data with the bafang_canable_pro-master and bafang_canable_pro-1.9 programs, I get different values...
 
At the same time, there is Error 07) Overvoltage protection, The motor is new, has 20 km on it, everything happened after connecting the CANable – I probably overwrote something incorrectly.
Did you uploaded another firmware to your M510 with the program? Can you post a picture from the "info" tab showing the controller information?
 
Did you uploaded another firmware to your M510 with the program? Can you post a picture from the "info" tab showing the controller information?
I didn't upload any different FW, the original one is still there. Now I set these values... the motor doesn't provide any assistance in any PAS mode. Only in walk mode the motor grumbles and jerks, but it doesn't turn the wheel or pedals, it just twitches.
Gear Ratio (Deceleration) 43.3

Max Motor Rotor RPM 4000

Cadence Sensor Signals/Rotation 32

Motor Type 1

Motor Pole Pair Number 8

Speed Sensor Magnets 1

Temperature Sensor Type 1

Start Current 20%

Current Loading Time (Ramp Up) 10 az 30 ms v sekund8ch 0.02

Current Shedding Time (Ramp Down) 50 ms“

Motor Trigger Type Torque Sensor

Speed Limit Enabled 1

Throttle Start Voltage 1,1

Throttle Max Voltage 3,5
 
Last edited:
Sounds like you need to calibrate the motor first, when fitting a new controller the motor will not rotate until the " calibrate " routine has been run. From memory I think the K1 flash tool has the calibrate function.

For the moment use the 48V setting, the display % will be somewhat incorrect but it may allow you to get the motor running.
 
@zdena111
I suppose you have a 36V battery (42 volt fully charged) and according to one of your pictures the overvoltage is set at 43 volt. So this should normally not trigger the overvoltage protection you get. I do not know if for a 36 volt M510 the overvoltage is correct at 43v which seems a little bit low if i look at my 36V motors which have 47V as overvoltage protection.

I don't have a M510 so i can't say what the other value's from your pictures should look like.
if you followed this thread, In post 91, in that zip file, you probably can find your original 36 volt M510 firmware file ......
 
Cela n'a rien à voir avec l'outil, il s'agit uniquement d'un problème de firmware sur la manette, d'après ce que je sais.
Vous pourriez passer à un M510 ; un firmware open source est disponible. Avec celui-ci, vous pouvez configurer tout ce que vous voulez.;)
Hello, is there an open source firmware for the Bafang M420 CANbus?
 
Hello, is there an open source firmware for the Bafang M420 CANbus?
The M420 has a NXP processor. My project only works for the GD32F303 processor, sorry


Bafang CANable Ride Logger Manual​

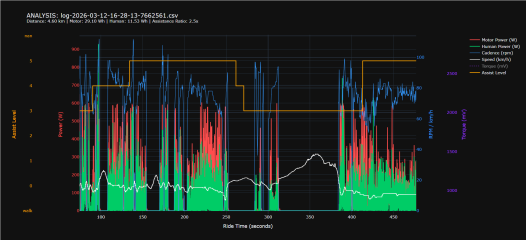
If you are interested in creating ride logs (like below), I’m sharing this quick guide on how to set it up.
Example:
1774554998503.png
What is needed:
  • CANable
  • Small SBC (Single Board Computer) like a Raspberry Pi Zero (W)
Power & Hardware:
  • The Pi can be powered directly from a display's USB port; otherwise, a step-down module is required.
  • The Pi works with CANable hardware out of the box—no additional drivers are needed.
Pi console:
Bash:
# 1. Update system and install Node.js + NPM
sudo apt-get update
sudo apt-get install -y git nodejs npm

# 2. Clone the repository
git clone https://github.com/mdi-9/bafang_canable_pro.git
cd bafang_canable_pro

# 3. Install Node.js dependencies
npm install

# 4. Set executable permissions for the script
chmod +x logger-cli.js

# 5. Set up the systemd service
sudo cp logger.service /etc/systemd/system/logger.service
sudo chmod 644 /etc/systemd/system/logger.service

# 6. Enable and start the service
sudo systemctl daemon-reload
sudo systemctl enable logger.service
sudo systemctl start logger.service

Usage Note​

The logger will now start automatically every time the Pi boots. CSV files are generated in the logs directory and can be imported into various tools to create charts and analyze ride data.
 
Back
Top