Adaptto Mini-E/Max-E Owner's Thread

...and praps just chuck the crappy rice stock bearings and replace with some skf from local bearing shop..cost me about 14aud for the both of them.
it always gives me satisfaction to know that the only mechanical wearing parts that need replacing are the bearings :p

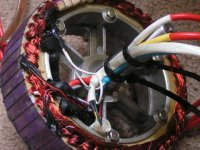
i have to admit, back in the day, i was scared of opening my motor, afraid id break something, but its really a pretty painless affair once you know how.PICT0645.JPG
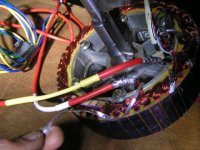
PICT0650.JPG

here is the first time i modded a cro.
white wires have for the 10k, i cut it out and soldered the kty81 in ,glued in with rtv silicone.

note the missing(broken) hall sensor on the spare set where it was badly assembled in production, @white splodge on the stator rim, im using the other set on the other side which were ok
phases i replaced with 8awg silicone wire, but sripped the section wher it goes through the axle and replaced with shrink to fit it in.

currently i use the stock white fibreglass sleeve that comes covering the halls on the phases in the axle section, as its more durable, and fits in flatter.
 
Those pics and tutorial are now a great reference point for me. I have opened up a magic pie in the past to swap out the phases for thicker wire, but almost lost my fingers when putting the stator back in. That was of course without using a gear puller. Next time when opening a motor a gear puller will be used for both pulling and putting back on.
I appreciate the effort you have made to post the pics. Thanks mate.
 
I don't have pictures showing this but how I disassemble my motors is really quite easy. This has always been done with the hub spoked to the rim. Remove the side cover on the wire side or you can just remove the bolts and lay the motor down on its side on a soft piece of carpet on concrete or any hard floor surface to protect the axle. Then I stand on the side of the rim that is on the floor and then carefully place my other foot on the high side of the rim. Slowly I start shifting my weight to the high side of the wheel while rocking the wheel around slowly. The rotor pops right out. Sounds simple because it is. Putting the motor back together is exactly the opposite. I stand on the wheel on its side and carfully set the rotor axle through the bearing again on the same soft carpet over a hard surface. With my hands I keep the motor centered and start letting one side of the wheel come up by shifting my weight very slowly. The magnets pull the rotor in and smooth as silk. I have a puller but getting past the magnet force is sometimes tricky and I'm always worried about chipping a magnet or a finger. This is way easier, more controlled (assuming one can balance ok and is coordinated) and way safer in my opinion.

Super easy way right here that anyone can do.

Tom
 
And you dont even need to remove the stator from the motor shell to change the sensor. Just remove the freewheel cover, swap out the sensor using same cabling for the old one and put it back together a 2h job(at most)
If you dont have the puller you can do it like this:
file.php
 
Allex said:
And you dont even need to remove the stator from the motor shell to change the sensor. Just remove the freewheel cover, swap out the sensor using same cabling for the old one and put it back together a 2h job(at most)
If you dont have the puller you can do it like this:
file.php

Oh, thats cool. I didnt even think about the fact that the sensor wires were on the same side as the cover....dooh!

Cheers Alex.
 
Another question:

Can I connect a multiple socket with my battery by adding a second cable on the battery on + and - and put them on the male plug of the multiple socket? Is it that easy?

=> So theoretically I could install on the multiple socket everything I want.. right? :mrgreen:
 
I'm trying to get regen/active braking to work on my mini-e with a mxus 1000 and it seems like i can't get active braking to give me much back thrust.

I've searched and tried everything i can think of. I messed with the angle corr2 and PWR2 and it didn't seem to make much difference.
It seems below 15mph i only get about 4 amps of regen and the active braking seems very very weak.

Also how do i enable reverse on the controller?

Any help would be appreciated much!
 
My max-e controller has a yellow(shrink wrap) coloured xt150 connector. Can someone confirm that it is for the negative side of the charger coil to plug into?
 
DasDouble - Not 100% on your explanation, but it sounds like your intending to parallel two similar aH battery packs at the controller side connectors instead of at the packs themselves? Perfectly doable, however it'd be easier to 'butcher' the cabling at the packs than on the controller side imo :). Could end up with a monster pack if your running a high ah setup already :lol:.

zopamer - In regen settings, noddy but make sure Regen is ON/Enabled :) , set your Current to the max your battery can handle, ensure Smooth is Off for a harsh response, increase Torque rise in blocks of 10 to suit (manual says 80-150), ensure Min Speed is set to 2. Hopefully this will give you a stronger Regen. If not try ActiveMode or ForcedActive if Autodetect works well with your motor.

brumbrum - Without pic it's hard to work out, however both battery XT150's are Male, 3 phase XT150's are Female, this should leave you with x1 Female XT150 for the - side of coil :).
 
ccmdr said:
brumbrum - Without pic it's hard to work out, however both battery XT150's are Male, 3 phase XT150's are Female, this should leave you with x1 Female XT150 for the - side of coil :).

Thanks, yeah its female, not a phase, so definatley the charger plug.
 
On off switch with LED lights up and works, but causes display to indicate LOW battery showing 53v when it is actually 75v. Switch works fine bypassing the LED of the switch. I'd really like to have a switch that lights up. Is my only solution to use the DC/DC built in converter and run a power wire separate to power the LED switch light? I guess the LED must pull too much power? Mini E btw.
 
In terms of regen and how much a battery can handle being put back into it, is this bestworked out by 'safe' C rating for charging or 'max' C rating for charging?

I think i maybe all over this thread with questions over the next few days as i am getting to the point where i will be firing up my adappto for the first time... I hope everyone is feeling patient :lol:

Andrew.
 
brumbrum - No battery expert by any means, but going on water pipe theory I'd imagine setting Regen to the 'Safe' C rating rather than the 'Max' would be preferential. If you think of a high pressure narrow pipe, instantaneous pulses of pressure (regen) would weaken/stress the joints more (weakening the cell chemistry) :).

rborger73 - Sounds about right, the LED must drawing 22v to get enough W to illuminate due to the low current. Could parallel the LED and the switch, it'd be dimmer for sure, but the display should read correct voltage at least.
 
ccmdr said:
DasDouble - Not 100% on your explanation, but it sounds like your intending to parallel two similar aH battery packs at the controller side connectors instead of at the packs themselves? Perfectly doable, however it'd be easier to 'butcher' the cabling at the packs than on the controller side imo :). Could end up with a monster pack if your running a high ah setup already :lol:.

Haha, no what I have planed is to plug things like an electric grill/barbecue, a heating-mat to warm my battery in winter without having to take it inside with me, etc etc into the multiple socket. Not to install a second battery as I understood you thought :lol:
 
DasDouble - Ohhh I see, yeah twas a little off the mark :lol:.

You'd be able to run a heating mat for the battery with with a simple DC-DC and thermostatic controller but for grills & high current draw stuff are you intending to use a DC-AC Inverter of some kind? Still confused, as far as I'm aware only like for like voltage devices can be used unless your sourcing electrical grills etc that match your battery voltage?

Or do you have your PSU for buck charging with the Adaptto coil mounted in your bike so you plug a mains 'kettle lead' into your bike and your going to put a multi-plug adapter on the end of that?
 
Can i use my c63a curcuit breaker as a precharge switch? This will be located on the battery positive wire.

For instance, turn main power on with a rocker switch (using the two on/off wires coming out of the PAS connector) and then switch on the C63a breaker into the 'armed' position. Is that enough?

Or do i still need to make a precharge bridge on the positive side battery connection?
 
A pre-charge is always good to use to avoid big sparks in c63 and to be gentle on the capacitors inside the controller.
But I never use it, it is not very often I turn the system off with c63 or disconnect the whole battery.
 
Does anyone know for a 2wd setup, if i need to have a on/off switch on each controller.. or sole on the master?

thanks
-steveo
 
steveo said:
Does anyone know for a 2wd setup, if i need to have a on/off switch on each controller.. or sole on the master?

thanks
-steveo

Without warranty: I think you can use one and connect them both on the one... But Better wait for other oppinions..
 
Allex said:
A pre-charge is always good to use to avoid big sparks in c63 and to be gentle on the capacitors inside the controller.
But I never use it, it is not very often I turn the system off with c63 or disconnect the whole battery.

Ok, i think i see. So as long as i do not disconnect and reconnect the main battery to controller plugs then its not a problem? Leaving the the c63 on.
Will there be any battery drain by just using the on/off switch?
 
If there is battery drain it isn't noticeable. Run batt/controller setup (I guess) the same as Allex, battery connected to controller via C63 breaker always on, only using the 'On/Off' wiring Adaptto have put on the 'newer' controllers. Leave it for couple weeks at a time (on holiday) with no noticeable drain. No need to disconnect battery if coil charging as far as I aware :).
 
ccmdr said:
If there is battery drain it isn't noticeable. Run batt/controller setup (I guess) the same as Allex, battery connected to controller via C63 breaker always on, only using the 'On/Off' wiring Adaptto have put on the 'newer' controllers. Leave it for couple weeks at a time (on holiday) with no noticeable drain. No need to disconnect battery if coil charging as far as I aware :).


That is the answer i was hoping to read. Thankyou. :D
 
Jonboy said:
And, fyi i run upto 1c on regen... Nearly there now then ;)

'Nearly' , but still lots more to sort through and still waiting on a couple of bits n pieces in the post to get things done properly :?
I will try and get all my lipo bricks into a state of balance tomorrow and then try a throttle setup and auto detect.

Take it easy Jon, oh, i see you already are 8) . Hurry up home so i can copy in all of your settings into my controller display :mrgreen:
 
Back
Top