Cycle Analyst V3 preview and first beta release

I concur with mrbill's observations about locating the pot close at hand so adjustments are quick and easy. My pot is actually inside the bar with the knob on the bar end.

As far as the 'virtual torque' rpm assist is concerned, this runs in TorqPAS mode and is just a sleaze that uses a constant torque and the true rider cadence instead of both 'real' rider torque and rpm. So, it behaves somewhere in between the simple AutoPAS and true torque-based TorqPAS. If properly set up it can somewhat reduce the amount of pot adjustments necessary since it's a bit 'smart', but it's certainly miles from the automatic assist range of true torque sensing. This took me a while to get set up so that it didn't over-assist with too much gain with increasing rpm. I have it set up now so it pretty much carries the bike on the flat at the same effort at different speeds - just adjusted by cadence - but the speed range is not huge. I look at it entirely as a means to reduce the amount of pot adjustment instead of a universal solution. It's one of those things you need to mess with and even then you may decide that it simply doesn't fit your terrain and riding style.

  • FWIW: If that turns out to be the case, you can use the values in the leftmost column of the table to turn off the rpm-scaling and effectively revert it to AutoPAS. The further to the right you get in the table, the greater the max assist increase with rpm.
irq said:
i have seen the virtual torque solutions etc, but they somehow seemed to me like too much manual action is required. the analog pas sensor as additional one looked like "fire and forget" or better: wire and forget. but probably this is also just a illusion / misunderstanding from my side

anyway, i will try/compare both solutions! currently i am just a rather unregulated setup, autopas + watts up/down. which is more like 0 1 off / on. with the mac 12t its a ride on a rocket (at least until 20mph
Member izeman was good enough to do a clear translation of the Pedelec Forum posts and it does appear that the virtual torque stuff from the Guide is doing the same thing as the hardware unit. I suspect that the explanations in those Guide sections are less than clear which made the poster turn to the extra hardware. That device also did provide the extra PAS assist control which might have made the user interface more desirable. That said, since the hardware unit is still just rpm-based, it's unlikely that it will perform materially differently than the CA alone with AutoTorqPAS and will similarly require adjustments to accomodate noticeable inclines and substantial speed changes - without true torque input it needs twiddling to get the appropriate assist level.

In any case, any feedback or experiences comparing the approaches would be interesting. :D
 
I'm working to put together my ebike and the CA, Grin thumb throttle, Phoenix HV80 and the Astro 3205 don't like each other.
With the throttle off there is a beeping in the controller.

https://www.youtube.com/watch?v=IdCrDbKVmSo

As soon I squeeze the throttle a bit the beeping stops and the motor spins. When I reach about 3/4 of the throttle the red LED on the controller goes off.
This is the setup that I have. Any suggestions ??

SETUP THROT IN
0.87v 0% - 4.27v 99%
Pass-thru
ThrI Min Input 1.00V
ThrI Max Input 4.00 V
ThrI Fault Volt 4.35 V
ThrI Off
ThrI Cruise Hld 0.15V


ThrO
Outpt Mode R/C Pulse
ThrO Min Out 0.90 msec
ThrO Max Out 2.10 msec
ThrO Brake Out 0.50 msec
ThrO Up Rate 4.99 ms/sec
ThrO Down Rate 4.00 ms/sec
ThrO Fast Rate 4.00 ms/sec
ThrO Fast Thrsh 3.00 Amps
ThrO outpt mode R/C Pulse
 
teklektik said:
scrambler said:
Did you ever try the BEAMts torque sensor?
Grin has done some work with this, both in the off-the-shelf form with a throttle-voltage-range output and using a stripped version with just a torque sensor output. Either work well with the V3.

There's not yet official support for the unit, but you shouldn't have issues hooking it up and a post here can get some assist if you get stuck...
So many projects, so little time... :D

Do you know if the V3 allows the Pedal assist torque sensor to be used in other power modes that the Eco mode, and if so if you can set/calibrate the sensor differently for each power mode (Eco, norm and boost), so that depending on the power mode the bike is on, the Pedal assist torque sensor output can be adjusted to a usable level for that power mode?
 
I just got an idea for a CA feature thats 'missing'.

I use two 36V batterys in my trike. Normally the batterys are connected in series to a 72V pack.
The CA is setup with two battery profiles, one profile for 36V battery, the other for 72V battery.

While the CA prevents me from using the 36V battery with the 72V profile due to the undervoltage feature, there is no 'savety net' implemented if I accidently use the 72V battery with the 36V profile. In that case I could overdischarge my 72V battery.

It would be nice to implement a 'maximum voltage' setting in the battery profiles to prevent somebody using a battery with the wrong battery profile.

If I could set a maximum voltage a bit north of 42V in the 36V battery profile, the CA would prevent me from using the 72V battery with the 36V profile.
 
IdleUp said:
Thanks for the reply's guys - one of the guys I bike with told me because the Firmware on the Lectric Cycle 750 watt Bafang is somewhat different, it would not like
what version 3 was doing - you guys are the experts what do you think?

Thanks

Mike
Since there's nothing different about the firmware, except minor settings, yours will work like everyone else. The CA becomes a sophisticated wattmeter. Not much more unless you go after some tedious mods like Kepler did with CA2.

My CA3 works the same on my Lectric firmware, EM3ev, and Luna. They are all slight variations of the Bafang firmware. NO ONE has their own firmware. At least not on the market.

For around $300 there is a conversion kit from the EU.
 
Virtual Torque stopped functioning.

After setting the Torque offset to 0.000V (disconnected the PAS cable and used a temporary jumper between pin 2 and 5) the virtual torque stopped functioning: zero assist. After I switch to autopas, assist is back to normal.

Any ideas what happened and how to solve the problem?

:BBSHD with wiring harness from ebike technologies, standard EM3ev controller settings, standard CA3 settings.
 
I'm a little unclear as to some of the details, so maybe you can fill in some blanks:
  • Was the AutoTorqPAS working previously?
  • If so, had you set it up originally with the default 2.5V offset?
If the answers above are 'yes', then resetting the torque offset to 0V will mess up your original configuration -- which was done using the table on page 55 of the Guide. You just need to use the table on the following page instead and all should be well. (You can see the difference in TrqOffset voltages in the lower right of each table - not super obvious...).

If the answers to the above weren't both 'yes' then we'll need to poke about a little...
 
rowbiker said:
As soon as we finish working our way through that, I will post an update here summarizing what we learned about correctly setting up the TDCM bottom bracket.

I must've missed it, but I looked thru your posts after the one above (a bit over a year ago) and didnt' see that summary.

I don't suppose you could come back and post that?

(I'm in process of setting up a TDCM and CAv3 on a CeMoto, and having someone else's experience as a reference would help a bit; even with the UUG I haven't got it figured out (have reset to defaults once already, and am about to go back thru it again, when I'm sure I can follow the steps in one go rather than a bit at a time between other things I have to do that don't ahve anything to do with bikes).
 
teklektik said:
I'm a little unclear as to some of the details, so maybe you can fill in some blanks:
  • Was the AutoTorqPAS working previously?
  • If so, had you set it up originally with the default 2.5V offset?
If the answers above are 'yes', then resetting the torque offset to 0V will mess up your original configuration -- which was done using the table on page 55 of the Guide. You just need to use the table on the following page instead and all should be well. (You can see the difference in TrqOffset voltages in the lower right of each table - not super obvious...).

If the answers to the above weren't both 'yes' then we'll need to poke about a little...

Yes and yes, and I did change the settings using the table on page 56.
 
I was really really hoping you weren't going to say that... :D

Okay - let's try to replicate your config and observed behavior on my bench unit:
  • What firmware are you running? (see splash screen)
  • Do you have a programming cable?
    • If so, please pull a setup file from your CA and either PM or post it here.
    • Otherwise, please transcribe the ThrO, PAS, and TRQ settings in a post.
  • In either case:
    1. Enter Setup and scroll to the "SETUP TRQ SENSOR" category prefix screen
    2. Record the measured voltage and torque values on the prefix screen:
      • If you are using a pot to dial up the virtual torque:
        • Minimize the virtual torque pot and note the displayed voltage and torque values
        • Maximize the virtual torque pot and note the displayed voltage and torque values
      • if no pot, then just note the displayed voltage and torque values
    3. Post up the readings
That should get us the config and two critical data points to help figure out what's up.
 
A. 3.01
B. No (but ordered one, probably arrives mid next week)
b.
ThrO voltage, min out 1.02, max out 3.65v, brake out 0.00v, up rate 2.00 vlt/sec, down rate 4.00 vlt/sec, fast rate 4.00
vlt/sec, fast thrsh 3.00 a
PAS poles 24, dir polarity 5v=rev, sensor type 2 wire, start thrsh 10 rpm, stop thrsh 14 rpm, pas mode torq pas
TRQ sensor type custom, trq scale +18.2 nm/v, trq offset 0.00v 0.00v (I hooked up two 5k linear potentiometers as described on page 57 of your outstanding guide), asst factor 1.00, asst start +321 w, asst avg 8.

C. With the help of the two linear pots, I tried about every imaginable (for me that is about 10 different offset voltages;) setting, but no assist and no throttle voltages on the diagnostic screen input other than the 0.86 in and 1.02 out.

When I apply the hand throttle, everything works, same goes for autopas.
 
Ok - thanks for the info.
Jackass said:
b.
ThrO voltage, min out 1.02, max out 3.65v, brake out 0.00v, up rate 2.00 vlt/sec, down rate 4.00 vlt/sec, fast rate 4.00
vlt/sec, fast thrsh 3.00 a
PAS poles 24, dir polarity 5v=rev, sensor type 2 wire, start thrsh 10 rpm, stop thrsh 14 rpm, pas mode torq pas
TRQ sensor type custom, trq scale +18.2 nm/v, trq offset 0.00v 0.00v (I hooked up two 5k linear potentiometers as described on page 57 of your outstanding guide), asst factor 1.00, asst start +321 w, asst avg 8.

C. With the help of the two linear pots, I tried about every imaginable (for me that is about 10 different offset voltages;) setting, but no assist and no throttle voltages on the diagnostic screen input other than the 0.86 in and 1.02 out.

One thing we didn't get here was the voltage and torque readings on the TRQ Setup screen when you adjust your pot MIN and MAX. These show the raw input voltage driving the calculation and the associated translation into Nm so we can see what the CA sees before all the magic happens. This was C.2.a above. The values you report on the Diagnostic Screen are sort of the caboose after the train has already passed by and all the processing is complete.

So - a few things:

  1. are you targeting the highlighted cell shown here (150W/3.00X)? If not, which one?
    AutoTrqPAS_issue.png
  2. Please post up the V and Nm readings for the min/max pot settings (C.2.a above)
  3. Do you really have a 24 magnet PAS wheel? If so, where did you get it? (I thought I did well with a 16 pole unit... :D )
  4. I usually set AsstAvg = 1 so the display and assist respond more quickly as I dial in the torque. There is no torque undulation due to pedal stroking so there's really no need for torque averaging.
  5. Did you re-zero and re-calibrate your trim pot when you reconfigured things?
My day is kind of jammed up, but here's some cursory results:
I flashed 3.01 and used your config settings.
Things seemed to work - in principle. I got 200W output @ <55rpm, increasing W as rpm exceeded 55rpm, and about 500W @90rpm. This is generally what is supposed to happen, but it does not match the table exactly, so something is awry.

So - seems there are two things to look at: why my rig doesn't match the table and why yours is dead in the water.

I need to examine this further (table calcs wrong?), but if you can get me the information above, then maybe we can start by figuring out why your rig is not working at all.

(and - Thanks! Glad you liked the Guide. Well - except for this part...)
 
1. yep, that's the one: 450/18.2/321/1.00 (last row third one from the top)
2. "SETUP TRQ SENSOR" category prefix screen minimum values @ minimal pot: 0.00v and 0.0 nm, maximum values @ maximum pot: 0.46 v and 8.3 nm
3. I thought I had a 8 pole PAS (inside the BBSHD) but according to Reinhard @ E-Bike Technologies that should be 24 poles. I tried 8 instead of 24: no luck.
4. Tnx. I set it at 1.
5. yes, I did

One caveat: I connected the pot meters to Torque, +5v and Ground on the CA3, but the PAS, Ground and Directional are connected to the PAS sensor of the BBSHD. This way, I can choose between Autopas and PAS Torque. Before I did this the torque sensor was not connected at all, since I don't have a torque sensor. In both configs the virtual torque doesn't work.

I appreciate your help!

Jack

P.S. and there is the interaction with the BBSHD controller of course. But I can't think of a reason why the controller's settings allow me to use autopas and not PAS torque.....
 
More good info...
Jackass said:
2. "SETUP TRQ SENSOR" category prefix screen minimum values @ minimal pot: 0.00v and 0.0 nm, maximum values @ maximum pot: 0.46 v and 8.3 nm
Hmmm - This is strange. The min values are good, but for the max setting you should be seeing something like 4.95V and 90Nm. I dialed up a 0.46V TRQ voltage on my rig and got no assist. This seems to be the problem - with such low measured torque you cannot get enough assist to overcome the 321W 'Assist Start' baseline requirement so nothing at all happens.

Let's back up a little further: Using a DMM, can you check the actual voltage on the TRQ pin?
(Apologies for asking the obvious, but could your trimpot be dialed to max resistance instead of zero?)

Jackass said:
P.S. and there is the interaction with the BBSHD controller of course. But I can't think of a reason why the controller's settings allow me to use autopas and not PAS torque.....
Ya - agreed. This is not a controller issue - it's all torque-related and in the CA. Somewhere.
Interesting setup. Maybe you could post up some details when you get some free time. BBSHD/CAV3 integration is a topic that gets a fair bit of interest....
 
The plot thickens. Because without the 5k potmeter and the 5k trimpot I was getting much higher voltage readings. Night here in the Lowlands, I'll check the voltage on the TRQ pin tomorrow morning.
BTW, there is always the small chance the hardware is at fault and not the operator;)

P.S. On the diagnosis screen the power is flagged (capital W) constantly.
 
Hmmm - does sound promising...

Jackass said:
P.S. On the diagnosis screen the power is flagged (capital W) constantly.
This is as expected because torque PAS mode 'borrows' the Power PID controller. The effect on the limit flags is the same as if you were using Power Throttle - that is, the Power PID controller is almost always 'limiting' since the commanded power setpoint is less than 100% of the the configured max.
 
Good news: the programming cable arrived. Flashed 3.01, set torque offset to 0.00V and virtual torque (without the potmeter and trimmeter) works again.

But like you, I've found the table way off. For instance, using the top row, third setting from the left (2.4, -37, 1.00) draws 4A@55 rpm and 8A@99 rpm. (battery voltage 49 volt, so about 200 W at 55 rpm and 400 W at 99 rpm)

BTW: I checked torque pin voltage (after flashing and without potmeters), started at 4.85 volts and dropped slowly to 4.60 volts.
 
Jackass said:
Good news: the programming cable arrived. Flashed 3.01, set torque offset to 0.00V and virtual torque (without the potmeter and trimmeter) works again.
Good news, indeed. Have you figured out if the pot or wiring is causing the problem? If it's the pot then you might like to consider flashing the 3.1 beta code so you could replace it with a momentary switch or pushbuttons to change assist levels. With that firmware you would get an extra channel of Aux Input, use your present setup w/o a pot, and configure the (new) digital channel for 'PAS Assist'. Just a thought...


  • FWIW: I had my first 'virtual torque' pot fail before I even finished installing the PAS hookup. I ended up with an o-ring on the shaft for the second try. Normal unsealed pots don't like the outdoors too much and sealed pots are a bit expensive. This is one of the reasons that the DigiAux feature in the beta 3.1 code is appealing - you can get a second Aux Input channel of pot-like variability using cheapie pushbuttons.

Jackass said:
But like you, I've found the table way off. For instance, using the top row, third setting from the left (2.4, -37, 1.00) draws 4A@55 rpm and 8A@99 rpm. (battery voltage 49 volt, so about 200 W at 55 rpm and 400 W at 99 rpm)
Not the best news for me... This is odd, since I use this table on my bike. I spot checked several scattered cells of the original version of this table some years back, but it does look like there may be some problem or inconsistencies. So, reviewing this is on the ToDo List.

In the end it's good you posted up about your issue so this was uncovered and could be addressed. Thanks for getting back with the results. :D

Jackass said:
BTW: I checked torque pin voltage (after flashing and without potmeters), started at 4.85 volts and dropped slowly to 4.60 volts.
4.85V sounds okay - not sure why it drifted downwards though (artifact of the meter?). There's a 4.7K series resistor on the TRQ signal lead, so you can just tie it up to 5V to get a good stiff 5V input instead of the fairly weak pull-up that is otherwise in play. You just need to stay away from that 10V level that normally comes out on the TRQ connector.
 
I still don't know what caused the malfunctioning of the torque assist because it happened after I adjusted the trq offset to 0.00 (using a jumper between torque pin and ground) and before I hooked up the potmeters.
Almost everything performs now like it should, minimum offset is 2.59V, maximum offset is 4.99V and I've found the 250/750W setting very close to the watts and amps pulled with the potentiometer wide open.

Almost, because there is some surge and overshoot especially after the gearsensor kicks in after shifting. Since the gearsensor is connected to the BBSHD, I presume I have to fine tune the settings of the controller. If that fails, I'll probably have to run a cable from the gearsensor to the CA3 and connect parallel to the ebrake.

Question: you think I can hook up the plus/minus pulse switch that came with the BBSHD to the CA3 DigiAux?
 
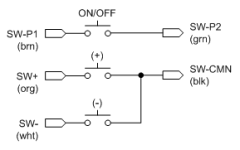
I used one of the BBSx < ON/OFF # + # - > switches on another app(lication):
# The ON/OFF is a wire in / wire out
# + and - go to a common (GND)

Guess you could use it if you use the ON/OFF as one and either the + or - (wire in) with the GND (wire out) as the second switch
 
Jackass said:
I still don't know what caused the malfunctioning of the torque assist because it happened after I adjusted the trq offset to 0.00 (using a jumper between torque pin and ground) and before I hooked up the potmeters.
Almost everything performs now like it should, minimum offset is 2.59V, maximum offset is 4.99V and I've found the 250/750W setting very close to the watts and amps pulled with the potentiometer wide open.
I've sort of lost track of the final configuration - perhaps you can help out.
It sounds like you may have gone back to the 2.5V torque offset, then adjusted the trimpot so the minimum torque voltage matches at about 2.59V which gives the primary virtual torque pot a range of 2.59V to 4.99V. Is this correct?
So - you sort of abandoned the 0V offset strategy - perhaps in part because of the the bogus table - right?
This is good - but as you are, I'm puzzled about the wonky voltages measured with the 0V offset setup... This is a little unsatisfying, but sometimes it's best not to back-pedal a working project into a research effort....

Jackass said:
Almost, because there is some surge and overshoot especially after the gearsensor kicks in after shifting. Since the gearsensor is connected to the BBSHD, I presume I have to fine tune the settings of the controller. If that fails, I'll probably have to run a cable from the gearsensor to the CA3 and connect parallel to the ebrake.
I'm unfamiliar with any of the BBSx stuff. If the gearsensor is the same setup as ebrakes (Normally open = input pulled high to 5V by controller, closed when asserted = ebrake pulls input low) then you could certainly share the sensor with the CA ebrake input. This sounds like it would do what you want. (Actually, depending on what you are doing with your regular ebakes, the CA can take either high or low TRUE ebrake signal so either sex 5V signal from the gearsensor should work.)

You might first try turning the PLim->WGain down to maybe 8-10 to soften the response (this may make the controller unhappy, but easy to try...)

Jackass said:
Question: you think I can hook up the plus/minus pulse switch that came with the BBSHD to the CA3 DigiAux?
The DigiAux input is described in a brief document >>here<<.
Not sure about the BBSHD switch - again, outside my experience. But from what Reinhard described it sounds like it should work okay using the (+)/(-) as DigiAux inputs and the power button for something else. It looks like the C961 switch is pretty compact - I'm guessing the different models are all the same internal wiring, just with different switch bodies.

View attachment 1

electricwheels.de said:
I used one of the BBSx < ON/OFF # + # - > switches on another app(lication):
# The ON/OFF is a wire in / wire out
# + and - go to a common (GND)

Guess you could use it if you use the ON/OFF as one and either the + or - (wire in) with the GND (wire out) as the second switch
Is this the wiring that you are describing?

Bafang_Switch.png
EDIT: updated with wire colors from subsequent post
 
So - you sort of abandoned the 0V offset strategy - perhaps in part because of the the bogus table - right?
What happened is I adjusted the torque offset to 0.00V using the potmeters. Then I selected the 0.00V table. Adjusted (as per the instructions in the guide) the trimpot to where it started to give me assist pedaling and backed up a little.

Now I'm puzzled: is the offset I dialed in purely coincidental or is the 0.00V table exactly off by 2.5 volts?

About the gearsensor: I'll have to look for the wiring diagram for this non-Bafang product and get back to you later on this.

Question for Reinhard: you mentioned (not here, but during an email exchange) you have a handlebar mounted potmeter for the CA3 in the pipeline. Will it have analogue or digital functions or both?
 
teklektik said:
View attachment 3

electricwheels.de said:
I used one of the BBSx < ON/OFF # + # - > switches on another app(lication):
# The ON/OFF is a wire in / wire out
# + and - go to a common (GND)

Guess you could use it if you use the ON/OFF as one and either the + or - (wire in) with the GND (wire out) as the second switch
Is this the wiring that you are describing?

View attachment 4

Correct. Here the wire color code:
# ON/OFF # --> brown & green
# + # --> orange
# - # --> white
# GND # --> black

Jackass said:
Question for Reinhard: you mentioned (not here, but during an email exchange) you have a handlebar mounted potmeter for the CA3 in the pipeline. Will it have analogue or digital functions or both?

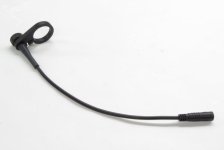
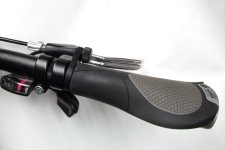
The analog poti holder has been tested and the tooling is currently being made. Made from alloy, it is black anodized and will eventually come in 2 or 3 sizes with different centre distances Handlebar/Poti. The holder is threaded, so the poti can be installed left or right side. Further options: increase = turn forward/backward and choice of no connector/JST/HIGO connector.

pot_01.JPG

pot_02.JPG

The digital poti is still in development, 3-D models and prototypes exist, but can take a while yet.


Another thing that has been tested is the CA centre mount bracket:


Comes with quickfix mount that allows you to mount the bracket without taking any stuff off your handlebars. Comes in diametre size 7/8" (22.2 mm) / 1" (25.4 mm) / 1 1/8" (28.6 mm) and 1 1/4" (31.8 mm). Here too, the tooling is still being made.

My biggest problem: lack of time to do it all at once... :roll:
 
so, still working on the DIY Virtual PAS. The Dual Poti Solution is already definitly an improvement, but will try the v5 Sensor later today.

Another Question which came to my mind is, probably this is a Feature Request:

Is there any possibility to set a individual Sequenz of Buttons which need to be pushed to switch instantly from offroad to legal road Mode? Something like: UP UP Down Down Up on the Digi AUX Buttons (if there are 2 of them). The Docs didnt give much Information about this, or i am blind :)
 
Back
Top