Dogati Electric Superleggera

johnrobholmes said:
Very sound business advice there, and it looks like your life has been pretty interesting up to this point Mr. Chui :mrgreen:


Can't wait to see what you do next, this is quite the clean build. There is elegance in all of it.


thank you john. i find building an ebike more of a challenge than a software only project. it encompasses a lot of different engineering disciplines--mechanical, electrical, software, physics and some chemical. coming from an industrial engineering background, everything is about automation. forces you to see every piece in production terms--low-cost, hi-quality, reproducibility. the challenge is to minimize the materials and actions (processes) from stock to finished product. take for instance the lowly hex cap screw--i will try to use the same screw in many different places just so it can be sourced in higher quantity, use the same tooling, take up less organization space, minimize human error and require less brain cycles to use. i apologize for digressing into a lecture on operations research :roll:
 
I wish I had started earlier in industrial engineering study, or gotten it for my undergraduate. I have managed to sneak a few IMSE classes while getting my MBA, and the solidworks and Design for Manufacture aspects are certainly handy.

Go ahead and keep digressing, I will keep reading and soaking it in :D


Do you have any CAD of the battery cover or completed "box" yet? I am currently trying to design a new style of plug that can be used in conjuction with a low profile terminal block. The space constraints on a light EV design beg for simple but rugged solutions.
 
johnrobholmes said:
Do you have any CAD of the battery cover or completed "box" yet? I am currently trying to design a new style of plug that can be used in conjuction with a low profile terminal block. The space constraints on a light EV design beg for simple but rugged solutions.

i will use carbon fibre panels with spring loaded thumb screws to adjust compression on the cells. cad for the housing is not finished..it changes along with the frame design.

i'm looking at some of the anderson powerpole chassis mount plugs for mine:

http://www.powerwerx.com/anderson-powerpoles/accessories/powerpoles-chassis-mount-2-sets.html
 
j3tch1u said:
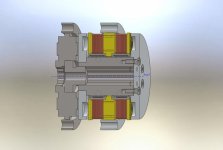
Now modifying my design to use a wet type multi-plate clutch that should be good for 25 Nm.

View attachment 1

j3.. Where did you get this clutch from if you don't mind me asking?
 
frickin sweet dude, any chance you could let loose with the sources on your rims and tires? they look tough as nails. for my next build I want to go with some smaller wheels than the 26" large marge that I have now, and hopefully less expensive as well.
 
gestalt said:
frickin sweet dude, any chance you could let loose with the sources on your rims and tires? they look tough as nails. for my next build I want to go with some smaller wheels than the 26" large marge that I have now, and hopefully less expensive as well.

htttp://www.choppersus.com/

or you could get some custom rims from recumpence
 
j3tch1u said:
johnrobholmes said:
Do you have any CAD of the battery cover or completed "box" yet? I am currently trying to design a new style of plug that can be used in conjuction with a low profile terminal block. The space constraints on a light EV design beg for simple but rugged solutions.

i will use carbon fibre panels with spring loaded thumb screws to adjust compression on the cells. cad for the housing is not finished..it changes along with the frame design.

i'm looking at some of the anderson powerpole chassis mount plugs for mine:

http://www.powerwerx.com/anderson-powerpoles/accessories/powerpoles-chassis-mount-2-sets.html

Hi Ben,

have you seen these dual pole connectors which are very similar to Anderson Power Pole. Can be easily used as a chassis mount as they have a couple of bolt holes to allow easy mounting to a plate.

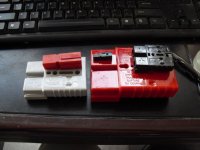
The small black Anderson PP is a 45A, the larger red PP is 120A I think, black double pole is 50A, grey double pole is 175A and the big red monster is 350A.

CIMG0452.JPG

All the double poles have bolt holes for easy mounting onto a panel and they are very reasonably priced.

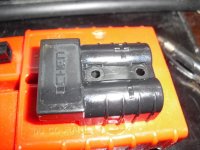
CIMG0453.JPG

I hear what you are saying about the business but I'm still finding my feet and if I'm honest I'd like to do more than just shift boxes but as you rightly say it's not easy to develop and manufacture products. There really is far too much to do right now but hopefully can get on top of things soon. Looking at your build has made me realise a few things and I will try to pay a bit more attention to the finish.
 
cell_man said:
have you seen these dual pole connectors which are very similar to Anderson Power Pole.

like this one sitting on my desk? :D thank you for that suggestion. i think your "electronics district" is supplied by the same vendors as mine :lol:


re. the business model please allow me to be brutally honest. with all due respect, i think you have a window of opportunity with those cells that won't last. more than just moving boxes. just some ideas off the top of my head:

- start designing bullet-proof packaging for those cells
- set up your ebay store and maybe buy an account with good ratings
- make a short-list of battery integrators /w existing client base
- make a short list of online retailers (preferably outside the us) you can "safely" sell to (hobbycity?)
- find a cheap storage space in the us and ship a pallet there
- put together an info kit with test data and comparisons with other batteries
- create an affiliate program and recruit some ES evangelists
- keep your supplier(s) happy--gifts, greenbacks, etc.
- attend a lot of ev trade shows (in stealth mode) and take a lot of notes
- make a backup plan in case your source dries up

after a couple years you have distribution (leverage). you can go to the Company and say "i moved xxx,xxx cells last year and here is my distribution network". now sell me some cells at a decent price! only then, do you start cannibalizing your integrators by offering a slicker competitive package with nice monoblock termination caps ;)

a loose cell doesn't inherently carry the same warranty and liabilities as a complete "energy storage and delivery system". the former is a product that can bite you back in the ass--three scary letters R M A.
 
Ben,

Great idea using the matex coupling as the core of the rotor.
 
12p3phPMDC said:
Ben,

Great idea using the matex coupling as the core of the rotor.

it sure as hell beats broaching my own sob out of solid hardened steel rod. matex gears are meant to be modular and compact..not sure why they make such a long coupling.

the broach is fully through hole so i can stack another twin-rotor/planetary drive a'la matex style on the other side :lol: would be a neat trick to match gearing, windings to synchronize the drives though :!:
 
re: broaching

I hear you...I investigated the idea of having some custom parts broaced to the Matex specs, but it's not worth it
for small volumes. The coupling and shaft parts that they have are easier to modify. Its probably why they make them so large.

Its weird....I don't know about the coupling you have....but they broached it all the way through, and then took a boring bar
and bored out the splines in the middle of the coupling.....

I don't understand why they hit the part with this secondary step. and it's bored out to be greater than 12mm.. not that big
of a deal, just strange. I want to connect it to the turnigy 80100 with a 12mm shaft, so I'll have to do some tricks.
 
12p3phPMDC said:
Its weird....I don't know about the coupling you have....but they broached it all the way through, and then took a boring bar
and bored out the splines in the middle of the coupling.....

I don't understand why they hit the part with this secondary step. and it's bored out to be greater than 12mm.. not that big
of a deal, just strange. I want to connect it to the turnigy 80100 with a 12mm shaft, so I'll have to do some tricks.

that's part of the prep for broaching..drill through, bore clearance, broach. the cutter needs some clearance to displace the material :idea:
 
Ok, that makes sense. But, I think that you can broach something that long no problem, but
it probably saves wear and tear on the broach. You can buy splined bushings from Stock Drive Products that are continuous.
Were the parts you got hardened...? I had no problem cutting it in half and facing it.

Using the D-shaped input was a good idea as well for coupling the first stage of the planetary to the astro.

That's easier than using the coupling, which requires

shaft->coupling->planetary....

yours

shaft->planetary = nice...
 
Ben,

When machining the parts for the MagMax, did you use the rotary table much, or were most of the parts done on the mill?
i.e. bolt circles...and other hole patterns.

I can see using a manual rotary table with indexing plates to do the bolt circles.
Also, a CNC Mill should be able to do this easily enough as well.

I imagine that alot of the boring operations were done on the lathe as well...

I'm in the process of converting an old 1720 XMTC Shop Task 3 in 1 to CNC and appreciate the feedback. :wink:

Any machinists, feel free to chime in...
 
12p3phPMDC said:
Ben,

When machining the parts for the MagMax, did you use the rotary table much, or were most of the parts done on the mill?
i.e. bolt circles...and other hole patterns.

I can see using a manual rotary table with indexing plates to do the bolt circles.
Also, a CNC Mill should be able to do this easily enough as well.

I imagine that alot of the boring operations were done on the lathe as well...

I'm in the process of converting an old 1720 XMTC Shop Task 3 in 1 to CNC and appreciate the feedback. :wink:

Any machinists, feel free to chime in...


12p, sorry i missed this msg and haven't checked up on my own thread.

everything except the finned housing was cnc'd on the mill. the housing was turned on the lathe (fins cut with toolbit i ground for that purpose). i also made a simple jig that does double-duty for faceplate and mounting plate. output shaft keyway and motor shaft d-cut were done manually by jogging the mill. motor shaft had to be turned down a tad as well...

hold motor with both feet, turn tester pot with left hand, place toolbit in mouth and clamp firmly between eye teeth, bend slowly over onto 10,000 rpm spinning motor and turn exactly 3/8" - 8mm off the shaft. pat self on back with right hand. there's your 3 in 1! :lol:
 
J3tch1u,

You have been watching too many James bond movies with JAWS in them ..... :lol:

Although he could have bitten down on them directly!!

I have since come to the conclusion that a rotary table is probably not necessary for the stuff I'm going to do at this point.

Thanks for the update.
 
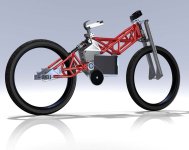
Something I am working on. Inspired by the Bimota DB5 motorcycle.

Twin motor, gearbox in the swing-arm hub, 16S cell-man pack. My JD2 model 3 tube bender and Miller Dynasty 200DX welder is over the Pacific. Will do 2 versions of the trellis frame/swing-arm--18G Reynolds 520 chrome-moly and thin-wall 7005 Al to test the limits :D

So far my compact drive has held up to a beating. However, one night the spokes loosened and i managed to "shudder" my way home. Could be attibuted to: 1. spoke-stretch, 2. one-cross lacing with the nuvinci on my 24 incher or 3. my sub-par wheel lacing skills.

PROTOTYPE4.jpg
 
Miles said:
I like it, Ben (apart from the forks...) :D

I'm not happy with them either. After blue-printing my Girvins and doing some motion analysis I find the J-effect is difficult to overcome. Did however, replace all the bushings with bearings to avoid that notorious slop over time.

Would really welcome your input on an alternative Miles.
 
Back
Top