
You are using an out of date browser. It may not display this or other websites correctly.
You should upgrade or use an alternative browser.
You should upgrade or use an alternative browser.
GCinDC's Giant DH Comp
- Thread starter GCinDC
- Start date
sn0wchyld said:knoxie said:Hi G
Nice work on the bike man! and nice drops however it was funny you know last night I was watching the video thinking that's cool but I wonder how long that thing will stay together with all that power and off road rough stuff? Sensorless would be a good call I reckon for off roading, you of course still have the problem that the magnets can come loose with all the heat and vibration, not to mention the stress on the axle from the jumps (pretty sure with my weight I would pop an axle on one of these) ..........................
yea im starting to get seriously worried about my own HT... after seeing one with a popped axle etc its not really confidence inspiring... time for on-frame motors!
where the heck is that pic from? not exactly subtle but a nice looking bike!
Yes its my main worry when taking my bikes over the rough stuff as I don't have a whole bunch of time to go changing the halls in the motors (neither does Greg!) so I need my bikes to be reliable, the great thing is I have 4 fully working ebikes and 2 normal bikes so I always have a spare ride however I hate having to peddle the bike back when something breaks, you then have to haul your tired ass out to the garage to fix the bike too! I always sail 25% under what I think is acceptable and touch wood I have seen years of super reliability from my X5 and my BMC geared motors you don't have to go much over to start breaking things.
That bike I posted is here, UK guy called Tench, he originally bought a Stealth Bomber which I think he has sold and then built 2 mid motor driven bikes, I love this one though is proper bling, those bikes are neat too and not too expensive, I wonder how the gyroscopic effects affect the handling? must feel more like a motorbike? very nice build he has even made a tidy job of the charger as well, top stuff.
Here is the Build thread
http://endless-sphere.com/forums/viewtopic.php?f=6&t=37489
GCinDC
100 MW
handsome ride there, knoxie.
the GT is more or less reliable now, esp w/ 9C and 20s via 45A infineon and those slime liners. i haven't had a flat in ages, knock, knock.
i shoulda gotten a fighter, no doubt, but i definitely enjoy the tinkering. and it'll take some pain before the DH comp becomes a reliable ride.
and so to the point, i've been chatting with methods today about the hs3540 and have learned:
- worst corrosion he's ever seen
- he hates sensorless controllers (so probably i will too) - might be handy to bring along tho as spare.
- gotta drill hole(s) for vapor to get out
- blown the replaced hall after only 2 miles? check: Either wires shorting (i.e. cut wires) or leads shorting (i.e. new hall was not totally isolated)
- JB weld is fine
- If there is standing water in the hub then orienting it UP will make a big difference.
so i did some quick testing and am pretty sure i confirmed it's the hall.
[youtube]FuN2M7Kl_co[/youtube]
or could there still be shorting?
i'm rubbing the lamp now, hoping a green methods genie will pop out...
methods
1 GW
I am on the run right now, but if you were bored I would try these things:
sand away that epoxy
Get down to the three hall pins
Confirm ground is still connected
Confirm 5V is still connected
Determine the failure: Open or closed. Measure from hall out to ground.
Controller hooks each hall leg to a pull-up resistor. When hall is triggered it "pulls down" the line (open collector output).
Measure each of the three hall lines (at the connector) to the stator assembly to make sure none conduct. Nothing should have any conductivity to the stator housing.
After that... I would look at the hall to make sure it was the part number I thought it was.
Then after we waste 30 minutes dicking around... just pop it out, pop a new one in, test, and re-assemble.
Halls are cheap and easy to find.
I will gladly loan you a 72V 40A sensorless if you want to make your own decision. Everyone should have one for a backup IMHO - but I would not run it as my primary.
-methods
methods
1 GW
Measure conductivity to the three phase wires too.
Each of the 5 hall pins to each of the three stator wires.
Problem is... something could be open when cold and short when hot.
Things that pop after only 2 miles are good things though.... Random things suck much worse.
-methods
Each of the 5 hall pins to each of the three stator wires.
Problem is... something could be open when cold and short when hot.
Things that pop after only 2 miles are good things though.... Random things suck much worse.
-methods
Skippic
100 W
dbaker said:winding insulation is not as dark as some of your 9Cstime for a temperature sensor and a smaller diameter rim & tire
With your setup and riding style a temperature sensor would be nice. Especially since you have one ready to install.
GCinDC
100 MW
thanks, methods. will get to it tonight.methods said:I am on the run right now, but if you were bored I would try these things:
sand away that epoxy
Get down to the three hall pins
Confirm ground is still connected
Confirm 5V is still connected
Determine the failure: Open or closed. Measure from hall out to ground.
Controller hooks each hall leg to a pull-up resistor. When hall is triggered it "pulls down" the line (open collector output).
Measure each of the three hall lines (at the connector) to the stator assembly to make sure none conduct. Nothing should have any conductivity to the stator housing.
After that... I would look at the hall to make sure it was the part number I thought it was.
Then after we waste 30 minutes dicking around... just pop it out, pop a new one in, test, and re-assemble.
Halls are cheap and easy to find.
I will gladly loan you a 72V 40A sensorless if you want to make your own decision. Everyone should have one for a backup IMHO - but I would not run it as my primary.
-methods
meanwhile, i just purchased 20 Honeywells SS41's but those won't arrive for a couple days. (yes, you can have some skippic..
considering the corrosion you saw, would you agree that it's probably a good idea to paint it, since i'll be drilling holes and replacing the rusty bearings?
methods
1 GW
If it ain't broke dont fix it.
I would probably just blast the stator with some alk and compressed air and spray it with some of that juice Justin has on his main page.
This seems like a good point to announce the new toy we will have coming out in a couple of months.
Wireless temperature control for hub motors.
Small black box that goes inline with your throttle
Infrared Temperature sensor that zip-ties to your frame and aims at your hub
Predictive algorithm that monitors the rate of change of temperature on the cover to guesstimate the worst case winding temperature
Retards throttle on an adjustable slope
Two versions: Cheap and simple, expensive and over complicated
Cheap and simple: Black box simply has a potentiometer. Turning it in one direction will lower the throttle retard effect (dangerous direction). Turning it the other way increases the retard effect (safe direction)
Note... this is not about specific temperatures... this is about the rate of change of temperature. You can take your windings from 20C to 200C in only moments. I have seen it and done it.
Expensive and over complicated: This version has a USB interface to a GUI (Graphical User Interface) where geeks can tweak out every aspect of the system including the ability to trigger fans and water injection based on actual hub temperatures.
This is the first I have mentioned it on the forum. It will be based on Arduino and it will be open source to some degree.... folks will be able to upload and run their own firmware.
I believe that everybody could use a black box that protects their hub... from conservative folks who just want to be as safe as possible, to the weekend warrior who likes to get crazy some times, to the guy who is crazy every time he rides his bike - moving our limiting from the controller to the hub is the next level. Why control your system with a fixed current limit? The real limiting factor is HEAT and that is the only thing we should use to limit our performance.
Sorry for the thread jack. I drank a bunch of coffee and this just came pouring out.
-methods
Andje
10 kW
- Joined
- Aug 25, 2010
- Messages
- 779
Amazing news methods; i've been getting into the arduino myself and was wondering why no one had offered such a product. Lots of tuning potential and huge safety potential too. They use gyros on race bikes when they are teaching people to wheelie; when you go past a certain angle it revs down and keeps you from flipping yourself. Once you have the arduino interfaced and connected to your controller adding such a peripheral is really easy and can be made extremely modular. I can't wait to see what you come up with.
This might be the most epic threadjack on the sphere so far haha.
This might be the most epic threadjack on the sphere so far haha.
methods said:This seems like a good point to announce the new toy we will have coming out in a couple of months.
Wireless temperature control for hub motors.
-methods
Sigh...
one more thing to buy.
Skippic
100 W
Arduino rules!!!
Hyena
10 GW
Sweet methods, now that you've derailed this topic post a link here to a dedicated thread when you start one
IR measurement is certainly the easiest, when testing I do it the ghetto way - carrying a small keychain IR thermometer in my pocket and shooting it though the air cooling holes in the motor case to hit the windings. Moving the aim from the case to a clear shot through the hole to hit the windings is a good way to assess the delta T. It'd be cool if you could make a gangsters version for those running cooling holes to get direct measurements from the windings and straight retard the throttle as the temp hits a target. I guess this would be doable through the more advanced version anyway.
IR measurement is certainly the easiest, when testing I do it the ghetto way - carrying a small keychain IR thermometer in my pocket and shooting it though the air cooling holes in the motor case to hit the windings. Moving the aim from the case to a clear shot through the hole to hit the windings is a good way to assess the delta T. It'd be cool if you could make a gangsters version for those running cooling holes to get direct measurements from the windings and straight retard the throttle as the temp hits a target. I guess this would be doable through the more advanced version anyway.
GCinDC
100 MW
threadjack? that's a laugh. methods, you own this forum as far as i'm concerned, the way you led to save it, braveheart style. you can post whatever you want in any of my threads any time!
and to announce such a brilliant idea here, i'm flattered. hell, i'll change the name of the thread if you want... :lol:
i'd start a bromance, but i wouldn't want luke to get jealous.... :lol:
brilliant:
i'll be adding the wired temp sensor soon since i have it in hand and was planning on it - any suggestions on how to do so, anyone?
ok to pop the wire side side cover, gently over those wires?
probably no chance of fitting the temp wires w/in the teflon white tubing, right?
re hall: i checked continuity from for + and GND from connector to hall leg, and all good there, so that points to the hall too. i'm not sure it'll survive the extraction for further testing, but replacing it seems the easiest thing at this point.
and to announce such a brilliant idea here, i'm flattered.
i'd start a bromance, but i wouldn't want luke to get jealous.... :lol:
brilliant:
methods said:...moving our limiting from the controller to the hub is the next level. Why control your system with a fixed current limit? The real limiting factor is HEAT and that is the only thing we should use to limit our performance...
i'll be adding the wired temp sensor soon since i have it in hand and was planning on it - any suggestions on how to do so, anyone?
ok to pop the wire side side cover, gently over those wires?
probably no chance of fitting the temp wires w/in the teflon white tubing, right?
re hall: i checked continuity from for + and GND from connector to hall leg, and all good there, so that points to the hall too. i'm not sure it'll survive the extraction for further testing, but replacing it seems the easiest thing at this point.
GCinDC
100 MW


Hyena
10 GW
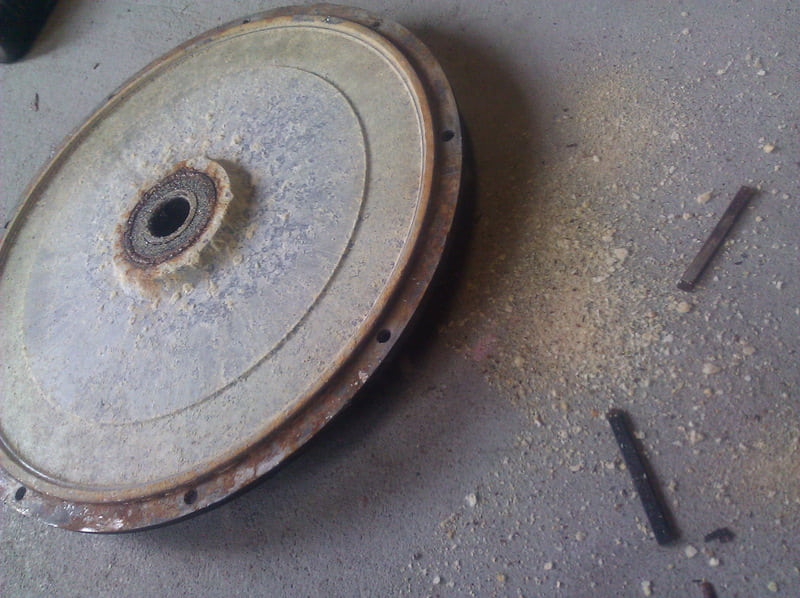
That corrosion is the worst I've seen 
I'd be giving it a spray with the stuff ebikes.ca is spraying their drilled motors with. I haven't been able to find it here locally in Oz but I'm going to him my stator atleast with some engine enamel - should give it a bit of a coating and is rust and high temperature resistant. Actually in your case (considering it's this bad without even being vented) I'd squirt a bit of oil in there cover things - not enough to flood it but just give everything a coating.
Nice FAG bearings
What else would you name something has a tight hole and is designed to have a hard shaft go into it :lol:
methods
1 GW
While you have those wires out give each one of them a good tug and rustle them around a bit. Does not look like a cut-wire issue but best to be sure.
GOod luck getting them back in
My advice is to get every last little bit of RTV out of there.
Trying to make a seal on the axle is a complete and total waste of time. Water will get in there and then the seal does nothing but keep it in there. Drill some holes in that bad boy and let the steam float away. Companies like Electric Rider push Kenny for things like that I suspect (sigh...) Just like pushing for larger and larger spokes when all we need are high quality 14G stainless.
-methods
GCinDC
100 MW
i wondered who would notice... :lol:Hyena said:Nice FAG bearings
tiny pinch. doubt there's a cut.methods said:Does not look like a cut-wire issue but best to be sure.
if it were cut, it'd be my fault for riding two days without the plastic spacers back in there...
RTV?methods said:GOod luck getting them back in. My advice is to get every last little bit of RTV out of there.
thanks, it'll be more fun with temp sensor wires..
next step. just gotta find my penis drill bit.methods said:Drill some holes in that bad boy and let the steam float away.
that may be fine for the spokes, but i'll need bigger nipples (or lots of washersmethods said:Just like pushing for larger and larger spokes when all we need are high quality 14G stainless.
View attachment 7


now for the hall extraction. i guess jb weld is good to use if it never needs to come out. but i might use silicone next time if that's ok ...


GCinDC
100 MW
Doh! what kind of wires are these that they'd crack like that, all the way to the connector!methods said:While you have those wires out give each one of them a good tug and rustle them around a bit. Does not look like a cut-wire issue but best to be sure.
View attachment 1
so phase wire upgrade time, i guess...


got the hall in, but messed up the wiring a couple times, and now, with the help of the ebike tester, all the halls work fine.
i got the temp sensor wire in there too, and gave it a home, and piggy backed the +/GND off the halls (a la skippic) - is this kosher?
pics tomorrow after the jb weld sets...
then drilling, etc..
i was going to paint too, but just order the T9 after reading more about it. i'd like to paint seal in the electrical stuff, but the T9 looks like better treatment for rust/corrosion. anyone done both? also, would ACF50 be a T9 substitute?
Your getting a dab hand at sorting out the motors Greg, need to be a little braver and get involved myself tbh, btw apart from the spacer mod I've left mine well alone, anything else I should do before I run mine?
Also I've been meaning to ask you, you have the pimpled flat mtb pedals as I do but do you find they are useless in the wet?
I ride in normal trainers and I slip off all the time when it's wet, however I don't know whether it's because I need to buy some proper mtb trainers? 5/10's seem to be recommended - I got round this issue by using some old type "bear traps" with the really jagged bigger teeth and although I never slip an accidental blip of the throttle left me with a bloody calf, looking to go back to he flat type of pedal but need to know if I need matching trainers to grip? What do you use for footwear?
D
GCinDC
100 MW
safer not to run it at all. breaks down all the time. :lol: lol. just kidding. advice to new hs3540 owners: drill at least one hole, easy if you remove only side cover w/o wire. spray in anti corrosion stuff, and don't pull more than 3kw until you have a heat sensor... if i'd only done the same!deecanio said:anything else I should do before I run mine?
my old comfort bike had plastic pedals and i nearly killed myself when i hit a bump, the foot slipped off...you have the pimpled flat mtb pedals as I do but do you find they are useless in the wet?
luckily, my GT had good pedals!

but those are for sissy's compared to these bone boring threadlock monsters on the dh comp:

well, you can't wear polka dots and stripes... but true, trainers, or running shoes here, have lousy grip for bike pedals, in my experience. i'm usually commuting and my work shoes have excellent grip since they're just flat rubber - in fact i should check 'em for holes.. but something flat bottomed better for sure.need to know if I need matching trainers to grip? What do you use for footwear?
GCinDC
100 MW


might have already pushed the limit of the axle...

Alan B
100 GW
For optimal grip, Drill matching holes in the shoes.
methods
1 GW
I love to see a man DIY... good job !!!!!
I suspect those wires cracked due to heat soaking - looks like they baked out and gave out. Shame Kenny is using that grade of insulation - surprises me. They may not have cracked until you pulled them out - hard to say after the fact.
When you get past this you will be a new man. What a great project to hone your skills on. I think back to when I looked at things and thought that they were full of scary black magic - but once you start doing it yourself all of the fear and uncertainty floats away and all that is left is mastery over machine.
-methods
Wow I can't believe the insulation is cracking like that. What did you replace it with? THHN building wire or the teflon stuff?
That axle bending is surprising I remember removing and replacing an older 9C axle using the axle threads to pull the axle out of the stator. I used anti-seize to lube the threads and was very close to stripping them using very high torque. That axle steel was top quality. What I see in your pictures does not compare 
That axle bending is surprising
GCinDC
100 MW
teflon.dbaker said:What did you replace it with? THHN building wire or the teflon stuff?
Updates:
- installed 1/2 twist throttle
- installed large screen CA
made an impulse buy of a motorcycle wheel already laced in 9x7, and then had to undish it to fit:
it's a 19x1.85 rim with a 2.75" Golden Boy Trial Tire...
12g spokes with washers at the nipple. the tire was wedged up against the frame, and after 30 min of working the spokes, it still rubs a bit, but rolls... i dropped the pressure down quite a bit but rubs worse, so more work to do...
and i really want to yank the 9x7 out and replace w/ upgraded hs3540. perhaps after more testing...
it certainly adds some weight to the back. i'm even tempted to remove batt from triangle and attach to forks - that move make a lot of sense now...
while working on wheel, the bike leaned against the bench and depressed rear hydraulic brake when not installed, and now i can't separate them...
what's to be done in this situation?Attachments
Similar threads
- Replies
- 13
- Views
- 3,563