geared kona dirt jump frame SOLD

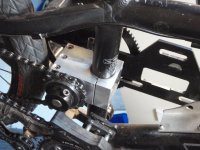
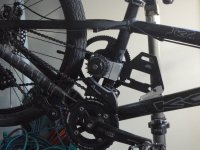
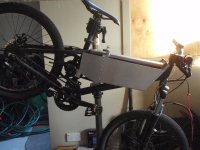
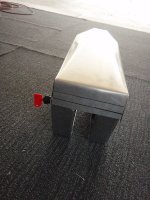
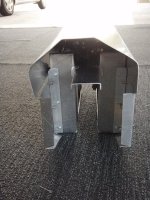
Work has begun again. I have spent a long time thinking about the shape and size of the battery rack covers and I finally came to a conclusion... of sorts. Well enough to start cutting the acrylic. I need to order another piece of acrylic for the top, but I cut out the sides today.

I started by scoring and snapping it, but I wasn't very happy with the result. So I went to the circular saw. That worked pretty good. I need to do a lot of sanding on the edges, but I figured I was going to have to no matter what I did.

If work isn't too busy tomorrow, I'll get to making my bus bar holder. That means my first shot at bending acrylic without melting it. It will be practice before I make my the top. I am going to make a mold for that, so I might start on that as well.

Here are the pics of what I have done so far. They aren't very exciting yet.

Clay
 
Work continues, but I had to take a break for dinner. I have cut out the bus bar bracket and started drilling the holes for the bus bars to poke through. I need to finish the holes and bend the acrylic. Then cut out the back panels to hold the bus bars in. I'll get some pics as I progress.

Clay
 
Hi Clay,
I made up at battbox the other week, just a quick simple thing with some odds n' ends I had laying around - Wood n' ABS type plastic shop sign. I cut the abs with a stanley knife or box cutter as some call them...

tTRIMMING%20KNIFE%202.jpg


Cutting the straight edges were fine using a piece of angle iron, but as my triangle is and odd shape on my chopper I had to trim the top sloping angle. I see from your pics your making a template out of hardboard (it looks like hardboard) thats how I got my shape. The SK cuts through the abs no problem you just have to keep going over and over your lines. Dont try snapping it as this may work but it sometimes snaps an odd nick out of your line. As to shaping/heating your sheet. I used a heat gun and an old tobbaco tin to smooth out my abs lid, sadly I held the gun a bit to close and my lid buckeld inward slightly. So if your heating your sheet to bend just dont hold the gun to close. Take your time with it, you'll get there in the end.

Regards
Tom
 
Thanks Tom,

I am using acrylic, which is harder and more glass like than ABS. What you see is the acrylic. It just has the protective paper on it to prevent scratching it. A circular saw works if you are careful, but a hack saw seems to to the best. I have found you have to let the tools do the work and don't force anything.

I will be making a mold to bend up my lid, so it shouldn't be to bad. It is all straight lines, but it isn't a rectangle.

Clay
 
I have done a fair whack of plexi work over the years, the best way to cut it IMHO is with a jig saw fitted with a coarse tooth blade. I also had a band saw I used whenever possible.

Best of luck following with interest.

KiM
 
Thanks Kim,

That's interesting, as everything I've read online suggests the finer toothed the better. As I don't have either a jig saw or a band saw at my disposal (sad I know, I miss having a shop of my own, or one at my disposal), I will stick with either the hack saw or the circular saw. I really don't have that much to cut, so it will have to do.

Now, if I could just get around this work stuff I could finish the bike in a couple of days. Until then it will be slow progress. As I said I need to order some more acrylic and I need to get a few other parts. Fortunately, I have found them locally. By locally, I mean in NZ. That is as local as it gets here in Wanaka.

I also have a SA CS-RK3 on the way from Herrsprocket. The SA version of the sram dual drive. He only has silver left, so it will have to do. I will take it easy on it to start with and not do any power shifts. I am thinking a slipper clutch in the system to make it easier on it and keep the amp spikes down.

I like my dérailleur set up, but it doesn't shift into and out of 3rd nicely. The chain run isn't so nice for the dérailleur.

Keep watching, even if it is like watching paint dry.

Clay
 
flyinmonkie said:
Thanks Kim,

That's interesting, as everything I've read online suggests the finer toothed the better.

Usable obviously but i found they clogged up very easily and didnt cut nearly as well.. Depending
on the type of plexi your using some is very brittle and others is oober flexi and when you cut it
it doesn't flake like the brittle plexi does, it melts as you cut it, horrible stuff but very strong doesn't
shatter.

KiM
 
That makes sense Kim. The stuff I have is super brittle. Not like what I have worked with before. The stuff I have worked in with in the past is more like what you described, more flexible and melts easy. I can see how a course blade would be better. I only had to drill holes in what I worked with before and it was super easy. This stuff flakes out if you push to hard on the drill.

Clay
 
A little progress made today. I have almost finished the bus bar mount. It is all drilled and the bus bars fit nicely. I have to bend it into a U shape with the connectors pointing out. So far it has come out pretty nice. I could clean up the edges a lot more, but I get bored of that sort of thing pretty quick. It will also be inside the battery rack out of sight, so function is number one.

Clay
 
Looking very nice Clay mate :wink: I see that Byte is using the same kind a stuff for his batt box...

img3208k.jpg


it looks good. I may make my next batt box outta this stuff. Be sure to post pics of your wiring hookups when you come to wire up your busbars, i'd like to see how this is done.

Regards
Tom
 
Yup same stuff as byte. I think what I have is thinner though.

Wiring should be super simple with the bus bars. Wire them in series, then take the outputs to the controller through the watt meter as you normally would. Then just plug the batteries in. I'll definitely take pics to show it though.

Clay
 
A little progress made today. I have done the final shaping on the acrylic side panels and bent the bus bar holder. After bending the bus bar holder I'm not sure I will continue with the acrylic. I don't really have the tools to do a nice job of bending a complex piece. I may cover the outside in aluminum sheet instead. I have a lot more experience working with it. I would like to pursue forming acrylic in the future with a vacuum former. But it won't be before I have this bike back together. We will see. Anyway, here are pics of the progress.

Clay
 
im planning a very similar casing system to yours. yours looks great btw. the metal fab on yours looks very clean. I see the the cardboard template you have clamped to the batt holder comes to the top of the frame. have you considered extending that part to cover the connectors and the controller above the frame? this is what I plan to do with my build. Also, you said you dont want to use acrylic, im planning to use some ABS for my outercase. maybe that will work for you too.

good luck and keep the pics coming! :mrgreen:
 
Thanks doc,

The cardboard is actually the acrylic with the protective paper still on it. That is just the side piece. I am going to make a top that covers everything up. That way you can easily access the inside if you need to by just removing the top cover.

As far as materials, I just don't really have the tools to deal with plastic at the moment, so I think I will go to aluminum for now. It will have the same, or nearly the same shape. I want to build a vacuum former and have another go at making the whole battery rack mostly out of acrylic or abs. I guess that might be the next project after I get the bike back together.

Clay
 
I decided to go with aluminum for the sides of the battery rack. I picked it up yesterday and have cut out the side panels. I am changing the shape of them though so I don't have sharp edges hanging off everywhere. I'll get some pics as I start to fold up the top and attach the sides.

Clay
 
flyinmonkie said:
I decided to go with aluminum for the sides of the battery rack. I picked it up yesterday and have cut out the side panels. I am changing the shape of them though so I don't have sharp edges hanging off everywhere. I'll get some pics as I start to fold up the top and attach the sides.

Clay

Be careful where you host your up-comming pictures Clay, as you may have seen a lot of ES pictures have dissapeared :( even those recent ones you posted.

Regards
Tom
 
Hey Tom,

Yup, most of the pics are still MIA, but I have faith in Justin and the new team to restore what they can. I have copies of all my pics saved on my computer and if it comes to it, I'll post them elsewhere. But for now, it is too much work and I will see what happens as they finalize the server transfer.

Clay
 
Some progress made over the weekend. I have the sides and the top cut out and have bent the bottom edge of the side panels. I will be drilling and attaching them soon. Then I can bend the top and cut it to size. I'll get the front of the top welded after I bend it. I'm still working out exactly how to keep the batteries in place inside the box and how to attach the watt meter. Just details, I'll get it sorted.

Pics of the side panels.

Clay
 

Attachments

  • P9090329.JPG
    P9090329.JPG
    80 KB · Views: 1,746
  • P9090330.JPG
    P9090330.JPG
    74.2 KB · Views: 1,746
  • P9090332.JPG
    P9090332.JPG
    104.2 KB · Views: 1,746
Quite a bit of progress today. I am really itching to get this back up and running. Especially as the weather is getting nicer.

Sides are attached to the to battery rack. I got my new motor and reduction mount. I have installed the new mount and just fiddling with the alignment. I'll be attaching the components to the rack tomorrow, bus bars, controller, switch. Then I can bend up the top and make a mount for the watt meter. I can also start to wire it up again. I have to to make up a one plug charging harness for the bike and the charger.

I have a little more bending to do on the side panels before they are finished, but the pictures give you a good idea. They cover the motor output and a bit of the first stage of the reduction. They also make it hard to get at the final output. I'm pretty happy with how it is all turning out. I will do it differently when I make the next one. It'll be a lot easier and cleaner. I am learning a lot from this prototype though.

There are still a lot of little details I need to sort out before it is a finished product though. Enough waffle, here are the pics.

Clay
 

Attachments

  • P9160336.JPG
    P9160336.JPG
    68.5 KB · Views: 1,709
  • P9160338.JPG
    P9160338.JPG
    81.5 KB · Views: 1,709
  • P9160341.JPG
    P9160341.JPG
    75.1 KB · Views: 1,709
  • P9160343.JPG
    P9160343.JPG
    75.5 KB · Views: 1,709
  • P9160344.JPG
    P9160344.JPG
    83.1 KB · Views: 1,709
Looking very clean!

Also looks like you need to talk to aussie jester about some lightening holes in that mount, to me it looks much more heavy duty than it needs to be, it will never break... It certainly shouldn't crack.
 
Thanks bandaro,

It is a pretty beefy chunk of aluminium. I figure over build and then you can forget about it. I would have used a standard steam, but none of them fit my seat post nor could they be bored out to fit it.

Clay
 
Had to double check i wasn't in Rodgahs thread that battery housing looks remarkably similar hehehe
As always mate great work, this bike keeps improving in leaps and bounds... great stuff buddy ;)

KiM

p.s LoL @ lightning holes, looks like im stuck with that one now hahahaa
 
AussieJester said:
Had to double check i wasn't in Rodgahs thread that battery housing looks remarkably similar hehehe
As always mate great work, this bike keeps improving in leaps and bounds... great stuff buddy ;)

KiM

p.s LoL @ lightning holes, looks like im stuck with that one now hahahaa

Thanks Kim. Your right, the battery housing does look similar.

Stuck with that one NOW, ha ha. I think you've been stuck with that one for the last... oh... 2 years.

Clay
 
Got some work done the other day. Most component attached to the rack and batteries temporarily in. I need sort a way of holding the bats in place. I also have to make a mount for the watt meter. I'll be ordering a fuse soon and will have to put that in. The top needs a little work yet to get the shape right and placement right. I think I'll space the key switch back into the box more, as it sticks out a long ways.

Wiring will be coming soon. It should be fairly easy as most of the components can just plug into each other directly now. The hard part will be wiring the charging plug. I'm going to go with a db25 like a few others have done. I have to make the matting plug and wire to go to the charger as well. Other than that, it is a positive from the bus bar to the fuse and switch and then the meter. And, a negative to the meter. Much easier than the parallel harnesses I made up last time.

Clay
 

Attachments

  • P9230348.JPG
    P9230348.JPG
    53.6 KB · Views: 1,616
  • P9230349.JPG
    P9230349.JPG
    55.2 KB · Views: 1,616
  • P9230350.JPG
    P9230350.JPG
    130.9 KB · Views: 1,616
Back
Top