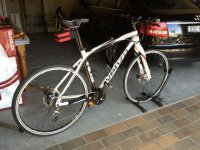
New build. Full carbon 29er weight weenie Super Commuter.

Yes I am pretty sure Adrian was just kidding around. No way will I drill any holes in the frame that is for sure. Underneath the bottom bracket might have been OK but BB is full of Schlumpf. Not even 0.5mm of room to spare there.

So hard to get the full stealth experience with this build. I win a bit in one area and loose out in the next. 3 x 12 gauge cables down the outside of the seat tube is going to suck.

Still deciding on the best ESC postion. The current position has its advantages but just as many negatives. Needs further thought. :?
 
pendragon8000 said:
thats prety awsome, nice stealth spot under the seat, hope nothing goes wrong or you might pop a cap(asitor) in your own ass lol.
what did your mates say about the bike/build? do you think you'll be accepted amoungst other lyrcra crew packing a motor?

These guys know all about my electric projects and find it all quite amusing. Accepted amoungst the other lycra crew packing a motor? not a chance :lol:
 
speedmd said:
Looks great!. What is the weight.

As it stands with the batteries on board, I am up to 10.5kg (23lb). Probably hit 11kg fully wired and ready to roll.

The goal was 10kg ready roll so close but not quite. I could actually get it back down to the 10kg mark with lightweight tires but at this stage I have gone for a really heavy duty commuter tire to handle the friction drive better.
 
Kepler said:
Yes I am pretty sure Adrian was just kidding around. No way will I drill any holes in the frame that is for sure. Underneath the bottom bracket might have been OK but BB is full of Schlumpf. Not even 0.5mm of room to spare there.

So hard to get the full stealth experience with this build. I win a bit in one area and loose out in the next. 3 x 12 gauge cables down the outside of the seat tube is going to suck.

Still deciding on the best ESC postion. The current position has its advantages but just as many negatives. Needs further thought. :?

Yeah I was joking, but you have to admit it would make for a clean install.

I would be tempted to get the battery down close to the BB. So my ideas are:
1) Make your BB ESC enclosure big enough to house a battery.
2) Water bottle battery.
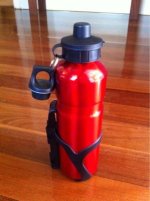
3) Water bottle battery/ESC. The square battery inside a round aluminium watter bottle would leave enough room to slide the ESC in the gap. You could even heat sink it to the bottle. Then just have three phase wire connections on the bottom. Clean, close, stealth, easy removal for charging.....

Ooooo. Really liking option 3. In fact I have some cheap Aldi aluminium water bottles and cages I bought a while ago I'll donate to the cause. Available in red, blue or black.... :D
fr_470_size400.jpg
 
Well, I think with a little strengthening you may just be able to drill a little slot for those wires to come out... If you did it 100mm up from the bracket, where the force is more distributed, it would possibly be alright...

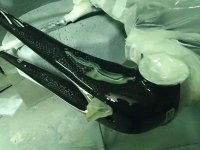
What I'm suggesting is a similar method used for repairing the cracked frames, if a tube is cracked or broken then a guy I know repairs them; he sands it back, lays some down, thicker over the effected area and tapering off, and some twill on the outside. If you wrap the layers tightly you get an awesome seal, then some peel ply over the top, locked off with several more tight layers of tape. Let it set, sand it back smooth, give it a clear coat of 2 pac to get the same surface gloss, and the only way to tell it is different is to look close enough to see the fibers don't line up perfectly or that the area is slightly thicker than the other side/further along. Just giving some options...

The attached image is of a frame that had been hit by a car, both tubes were damaged in several places pretty severely. He then gave a light sand to get a matt finish and viola! I'm in dublin not australia for the next few months, but I can try to get hold of him for opinions if you like.

Otherwise I would opt for a custom bottle, square shaped about the same size as the square tube you got, make it a nice shaped designer bottle, and incorporate the cooling fins of the controller as features in the cap so it is nice and exposed. I just don't want to see a weak aspect like wires running down the frame on a built like this... It could be the cleanest build I've seen yet.
 

Attachments

  • PA260024 - Copy.JPG
    PA260024 - Copy.JPG
    319.4 KB · Views: 3,105
Kep, I have an idea that might be worth kicking around. Cut out a block of HDPE so it fits your chosen brick of LiPo (6S?) with just enough airspace above it inside the block for the wires and connectors. Mounted in front of the seat tube just above the BB.

Then, get a large aluminum water bottle (as suggested by Adrian above), but slice it in half lengthwise and remove the bottom 3/4ths of its back, using the water bottle as a mask for the ESC/LiPo. Round on front, square on back?...just a thought.
 
Thanks for all the suggestions. Given me more to think about. I definitely don't want this build to be spoilt by exposed wiring which means if i leave the ESC and battery where it is, it will need to go through the frame. I am getting in contact with professional carbon frame repair companies at the moment and seeing what they can do for me.

Alternately, if this proves not to be possible or is just to cost prohibitive then I will go back to mounting everything around the bottom bracket.
 
pendragon8000 said:
thats prety awsome, nice stealth spot under the seat, hope nothing goes wrong or you might pop a cap(asitor) in your own ass
haha :lol:

Kepler said:
I win a bit in one area and loose out in the next. 3 x 12 gauge cables down the outside of the seat tube is going to suck.
Yeah, but if it was the battery you'd still have 2x 12ga (or 2x10ga?) so it's fairly trivial in the grand scheme of things. I still reckon an extra piece of CF tube epoxied to the back of the seat post will be the neatest option - or even a half tube piece ( C shaped) if available (else cut)
Or you could use 3x black silicon phase wires with black braided sheath over it - that'd fit in well with the CF look and also look pretty neat. Then you could just have a few ties or clips or some sort to hold the wire tight against the seat tube. Maybe some of those cable routing clips/clamps glued to the back of the seat tube ?
I do like the controller under the seat though, you certainly can't top that for stealth! And those 3D modelled renderings are great 8)
I'm curious about your battery bag though, would you carry a spare tube or puncture kit for this build ?
 
Nah ! Grow some big steely balls and drill that carbon frame. Surely we can find a low stressed zone just above the BB in the seat tube. Drill it. Clean it up with a bit of epoxy to get rid of the stress risers. Hey presto.

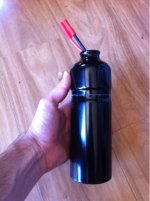
Or, here is a little mock-up I prepared earlier.

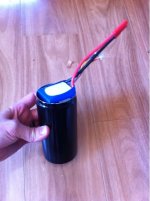
6s5Ah Turnigy 25c pack in a water bottle.
fr_471_size640.jpgView attachment 3fr_474_size640.jpgfr_472_size640.jpg
 
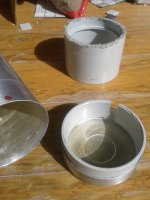
I just used a couple of laps of black electrical tape. but for the pro finish I would machine up a couple of plastic clips that assemble inside the top half and clip it to two holes in the wall if the bottom half.

Or even better just cut off the bottom to start with, and machine up a new base out of your new best friend black HDPE.
 
Looks like the same bottle I used.
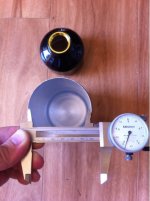
I cut a slightly oversize piece of piping that sprang back into the ID of the bottle. I cut it too short of course. ..
If doing it again, I'd put the battery in the bottle rather than the controller. My controller was already pretty stealthy under the seat.


2012-08-03 12.15.33.jpg


Looks like the weight weenie build will come out well, keep up the good work.
 
There have been recent articles about taking empty milk containers and making your own plastic feed stock for the 3-D printer, fun stuff.
"world domination, I just got myself a 3D printer"
http://endless-sphere.com/forums/viewtopic.php?f=1&t=42259

Kepler, a while back when I was researching 2-speed transmission, I read a lot of old moped stuff from just after WWII, and in Holland/Netherlands, a moped was quite a serious mode of transport, since cars and gasoline were prohibitively expensive. There were quite a few friction drives, and some of the more mature designs had the roller right where you have this new one.

The mopeds didn't need to hide the roller, and the engineers had found that when passing over a puddle at high speed, locating the roller there gave the water a chance for most of it to fling off before reaching the roller.
 
Hi Kepler

I would not put holes much up from the bottom on the seat tube as the lower left side of the seat tube is a very high stress area on the frame. Lots of FEA pictures of the stresses on the BB areas are public for reference so you.
animation-1.gif
Most carbon BB shells have a solid aluminum core so there is no significant fiber stress other than the areas supporting the bb bearings. It you go internal, you could use a thinly coated magnet wire and would need a few holes much like the size of what is used on standard shifter cable.

I know, it is a bit nerve racking to drill a frame but should not at all be a issue in the bottom rear-center. Another possible external wire option for you is to use flat speaker cable. Good stuff has Kapton coating and can be had with sticky tape on one side.
flat-speaker-wire.jpg
12 gauge is a common size also.
 
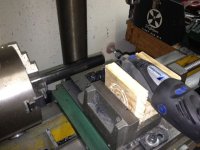
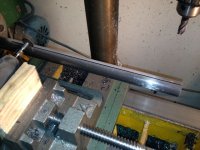
More progress today. Experimented with with making some cable covers made from from carbon fibre tube. The tube is a 20mm thin walled tube that was originally a tail boom for an RC helicopter. I needed cut a full length section out of the tube to bend into the bike down tubes. These cuts needed to be nice and straight so this is what I came up with.

IMG_1900.jpg

IMG_1901.jpg

Once the section was cut out, the cover was then shaped to match the bike. The next photos so the bike basically fully wired including the Cycle Analyst.

View attachment 3

IMG_1906.jpg

I am still trying to decide if this will be the final layout before I connect everything and get the electrics up and running. For now though I think its ticking most of the boxes I set out to cover.

View attachment 1

IMG_1913.jpg
 
Looking good. I would be tempted to re-anodize the motor ends from orange to black.
 
look perfect, it would be seamless if the frame was black.

Select a bike, get wholesale prices with a low MOQ then sell them complete with the kit fitted 8)

Watch the pesos roll in (considering 1 peso is 0.08 AUD my statement holds validity)
 
Thanks for the replies. Sounds like the cable covers are working then in relation to the bike's stealth appearance.

I will give the sale of complete bikes a bit of thought. A bike identical to this one might be a hard sell as there is about $3,000 invested just in parts but I am sure I could find a suitable reasonable priced bike for conversion.
 
Nice work with the dremel jig Kepler, that came out very neat indeed.
Impressive work all round, VERY stealth. I agree with blackening the motor too, the orange is a little eye catching.
As for holding the bike above your head, you did that with your stealth fighter too so that don't impress me, Hulk-ler :mrgreen:
 
Kepler said:
Thanks for the replies. Sounds like the cable covers are working then in relation to the bike's stealth appearance.

I will give the sale of complete bikes a bit of thought. A bike identical to this one might be a hard sell as there is about $3,000 invested just in parts but I am sure I could find a suitable reasonable priced bike for conversion.
Of that $3k, what is E parts and what is bike?

Personally, I'd love to see a Felt F5 with this setup. The bike comes in at under 8Kg in some configurations.
http://www.feltbicycles.com/USA/2013/Road/F-Series/F5.aspx
Felt_bicycles_F5_lrg.jpg

Previous years models can be had for between $1.5-$2K.
Felt F5 Road Bikes for Sale in Australia

Cheers
 
Back
Top