new eZip motor

Status
Not open for further replies.
Received Forward \ Reverse switch.
For Trike Mobility conversion.
Switching is done through 5 contacts on right side.

Gold colored bars are removable contacts.
file.php

"Shifting" action is smooth and easy.
Contacts are substantial copper discs.
Reasonably weather-resistant
Quality is surprisingly good!

Re-rigged a Forward reverse switch as a 24V to 48V shifter.
2 - 24V packs, "shifted" from parallel to serial .
Switch does disengage all power in "neutral" center position.

* Important to remove bus bar on left side between #2 and #5 for Serial Parallel
file.php


Available at - EBike Toolbox - Bargains! $

Be Aware!
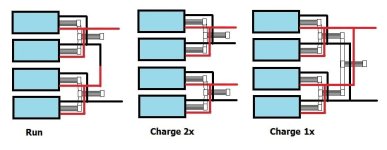
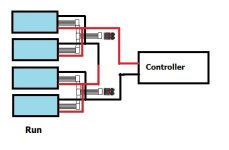
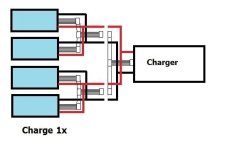
Does not switch the balance plugs-connectors.
They must be manually repositioned 2 times every cycle.

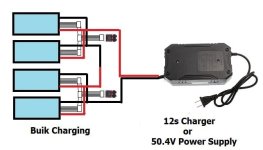
After rating and confirming cells ...
I might try a cell level monitored bulk charge.
If all cells charge evenly and to safe voltages ...
I would likely use bulk charging as my typical method and balance charge at scheduled intervals.
Important to use the battery meter-alarms!!!
 
Lipo switch..jpg
 
Thank you Dan. That charger is awesome!!

I found my second mistake and fixed it. Check it out. Switches are gone and bullet plugs will work. Then I made a third mistake. I tried to put the other Lipo pack in between the controller and the Lipo pack in the box. It would not fit so I tried to make it fit.

I got a spark out of the pack I was trying to force as it sparked on the side that was against the metal controller. It was a small spark. Just a little pop. I don’t think I punctured the pack or damaged it but don’t know where the spark came from. Nothing seemed to be leaking out but I put a plastic bag around it and tossed it into the snow about three feet from the side of the house. I don’t want a Lipo fire and don’t know if it’s safe to use it now. I will have already taken it out of the snow and inspected it in the daylight tomorrow before posting this.

Dan must have had to unhook everything. Each battery every time he needed to charge them.
There has to be an easier way. That’s a lot of plugging and unplugging and handling and shock risk. No wonder he has been zapped. Also there is only one balance plug on the controller. I got two balance plugs each has 2 plugs going to one. I need a third one like the other two to plug into the charger.

Also the series cable has the wrong connectors. Bullet connectors for the batteries are ok but the wrong connectors going to the controller. Dan must have had a different controller. They need to be bullet also. I could cut the bullet connectors off of something else and use wire nuts but really don’t want too. Also there is no cables for charging. I did not want to have to unhook each battery take them out of the cash box and hook each one up to the parallel board. It’s a lot to go thru every day or each time they need to be charged. Much easier to unplug one plug and plug in two plugs.

I dreamed about the batteries outside all night. Or morning in my case because I sleep until about 3. I finally dug them out for real. They were not wet I had enough sense to wrap them up good in plastic bags. I took pictures of possible damage but if they were actually punctured there would have been a fire. They are gorilla taped up and put them in the bathtub on the toilet cover for the back of the toilet turned upside down. They will be in the cash box later next to the other pack.

Also I got the 400 watt charger Dan sent me. I have two chargers now. A 400 watt one which I can use at home with the big 550 watt power supply Dan sent. I will hook up a charging station. For all that. I will use the 200 watt Sky charger for a portable power supply to carry with me as it won’t require a large power supply. I will be getting a second cash box for that but should only need it for long trips. And where I know I can plug it in somewhere. Normally I will only need one cash box. Where can I get a small 300 watt or at least 250 watt supply that will fit in a cash box? I will measure it tonight. Also I need to order all the plugs to make it work. The way I have it in the new diagram. Today’s post. Yesterday’s diagrams may be deleted. There were fatal mistakes that would have been fatal if attempted. LOL.
 
WIN_20141213_150849.JPGWIN_20141213_150802.JPGWIN_20141213_151749.JPGWIN_20141213_151821.JPG
 
All I know is the cash box should control a Lipo fire and I am better off without the controller in the box as it would not get damaged. I really don't know where I am going to put it now though. Its something I need to try and figure out today. Also I will spread everything out both chargers, The controller and all the plugs and wires I have. First though I would like some feedback on the diagram posted today so I know if I am finally on the right track when it comes to charging and unchanging. That will greatly be appreciated. Thanks Latecurtis.
 
http://www.ebay.com/itm/300Watt-LED-Driver-Power-Supply-AC-DC-Converter-Transformer-12V-25A-High-Quality-/361079743354?pt=US_Lighting_Parts_and_Accessories&hash=item541207a37a
good for the skycharger portable charging on the road. It looks like it will fit.
 
With two chargers and two e bikes I will be ordering a lot of these in the next few months

http://www.hobbyking.com/hobbyking/store/__15521__Turnigy_5000mAh_4S1P_14_8v_20C_hardcase_pack.html

Where are those $19 4s packs that were posted awhile ago. 0.13 conversion now. I guess there US store must have closed. How much are they going to cost to ship? I will be needing 2 - 4s packs. A total of 6 cells. I just wonder If I will need a different size metal box to hold 6 cells. No more cramming them into tight spots. I learned my lesson last night. I am getting kicked out of this library as they are closing. I will try to pop up online somewhere later for feed back on my diagram and possible charging method and anything else. Thanks again Dan. Latecurtis out.
 
WIN_20141213_183122.JPGWIN_20141213_183147.JPGWIN_20141213_185031.JPG
 
Both battery packs are safe and secure in the box. I made sure to twist tie each balance plug to the brick it belongs too. I have a lot of plugs and charging options now. However when changing connectors the only thing that seems to work are wire nuts. There has to be a better way. I am open to suggestions on how to charge these packs as long as I don't ever have to open that box and remove the packs until the day they need to be replaced. If there is a way to use the parallel board without opening that box I am all for it. I am not installing the front kit until I have everything up and ready to go. Please let me know. And check out the diagram I posted today. It can easily be modified if it needs to. Please give me some feedback on this.

Latecurtis.
 
Also When I get a new controller for the Currie I want a variable one if they make it. Something that will work from 24. To 48 volts. I will put bullet connectors on the two good SLAs and run them until I notice a power decrease and then switch over to 44.4 Lipo. I may even get 2 new ones later on as it will dramatically increase my total range on the road and can bring my 24 volt SLA charger as well as the Sky charger and charge all batteries at once. I would not bother but already have the mounting brackets in the frame for 2 - 22Ah SLAs. And 2 Lipo packs and a couple chargers and a small power supply wont weigh any more than the third SLA I was hauling around. Think of the range :wink:
 
Please let me know about charging options. Thanks.
 
Simple 44.4V Run and Charging wiring methods

Charge 2x 6s charger
Charging in 2 steps is a 1 connector change, (22.2V half pack per charge)
Requires 4 power splitters and 2 balance splitters

Charge 1x 6s charger
Use charge 2x but leave 3 splitters connected to charger (2 power 1 balance)
Requires 6 power splitters and 3 balance splitters

file.php
 

Attachments

  • 44.4V.jpg
    44.4V.jpg
    34.3 KB · Views: 775
44.4V Bulk charging
Monitor all voltages during charges ... discharges too.
Absolutely necessary during initial cycles!!!
Some form of Voltage Meter Alarm highly recommended!

file.php


If all cells remain nearly equal and within safe ranges ...
You might determine it safe to use bulk charging as your normal method and use balance charging only at specific intervals ... ?

Cells will naturally recharge to their same starting voltage.
Unless:
They suffer from self-discharge ... or ...
Subjected to excessive discharge rate or depth
 

Attachments

  • 44.4V Bulk.jpg
    44.4V Bulk.jpg
    36.8 KB · Views: 775
I changed my mind again as you can tell. Switches are in where ever possible.. I decided that after realizing that a second box is not optional and would house the controller, a 300 watt power supply and the Skycharger So I might as well throw in the switch.

Notice in figure 1. the bullet plug on the wire going to the charger. Thats how easy it will be to switch chargers. When Im home I can use the 400 watt charger. the currie will be hooked up the same way only with the 4s packs. That and I will keep 2 SLAs if I can find a 24 to 48 volt variable controller.

I decided that with the 4s packs to use the parallell board as it charges 6. bricks. see figure 3.
That will have to be a custom switch. Hope its even possible, but think, how many times it would save the plugging and unplugging. several hours in a year I would bet. I will pay $50 for a switch like that or more if I have to. I really hope I can get one or have one made. A three way with a middle setting sounds good as for when I am hookong everything up and plugging in all those Y connectors to each battery.

I think it is not only easier but safer as every time you move those wires going into the batteries there is a chance of a short or a fire. It wont work for me without them. Let me know if the ones posted will work. If not i need the right switches that will work.

Figure 2 shows placement of components in both boxes. The only thing that will be different in the 4s top box is the parallel board. The Lipo box for the 4s may be a different box than the boxes I have been using. I need something that can hold six bricks.

Also in figure 3 I left the bottom right hand corner I was not sure how the balance plugs go into the parallell board. It is Sunday I just completed figure 4 so everybody can see the switch up close. I am trying to imagine the internal mechanics of such a switch. Notice I have decided to go with a parallel board also for the 6s bricks as I have a feeling I will only need to hook and unhook the balance cables once for each charge.

As I said I will see what cables will be needed today. 4 - Y bullet connectors for the 6s switch
If the 4 wires comming from the Y connectors are long enough they can be run directly to the switches I wont need the other 8 bullet connectors. Y connectors need to be long enough to reach the switch mounted in the top box though.I have hooked up many speakers and stereos but nothing like this.

I never liked the little round connectors where you stick the bare wire in each end and crimp down on it. They always seem to pull out and provide a loose connection. I have to tape them up and hope for the best. I like wire nuts better but dont want to use them. What other options are there?

I rememeber what was said about plugging the balance plugs in twice. If the 6s bricks will be better with a parallel board also than I will need one for 4 batteries so I can use the one Dan sent for 4s bricks. and a switch that will do that. Like I said I will pay $50 for that kind of a switch. It is worth it to me. I dont want to have to deal with all those plugs every time I want to charge and balance these packs.

I am scared of electricity. When I extend everything comming up thru from the Lipos to the top box I will be gorilla taping all the wires securly to the top and bottom box where ever I can so there is little or no movement of the wires where they connect to the LIPOs. Even without a switch that will avoid a possible short or broken wire and protect against vibration.

I will need the Y bullet plugs at least 10 inches long and 10 or 12 inch extenders for each balance plug. It will be awhile as I need another cash box. besides the switch. I should be able to utilize some of my other wires and connectors to make this work. This way may take longer but I feel it will be well worth it.

Thanks Latecurtis out.
 
I glanced at your diagrams but the right side of it is not all there for some reason. DarkAngel it looks like you use paint also
.
Please feel free to edit my diagrams to eliminate plugs or change something to make it better or easier. 6 inches will probably work for the Y connectors and balance plug extenders. I am sure togeather we can come up with something. I have a friend Bill who is familiar with all the early 80s servers and worked in rooms back then full of servers and complex switches were common back then. I gave him the link to this forum and am confident that togeather we can come up with something really good here. i will be repeating the setup not only for the Currie but the prototype fork motor build . I may need 3s bricks for that though as it will require 36 volt power as it will most likley be a 500 watt 24 volt deal overvolted to 36 volts running one of those DC fans I have via a single 14.4 volt brick. i am really excited over this and am getting into the Christmas spirit. My brother cory also may be looking at this monster post. We are up to 30 pages now.

Looking forward to your feedback tommorow. Thanks everybody. I hope to hear from Sunder Dan and Mark tommorow and hope DrkAngel can edit my diagrams to make it even better with his expert knowledge.

Thanks Latecurtis out.
 
Basic Power Out

file.php


Bulk Charge - Read notes in original post!

file.php
 

Attachments

  • 44.4V_01.jpg
    44.4V_01.jpg
    15.1 KB · Views: 1,940
  • 44.4V Bulk Charge.jpg
    44.4V Bulk Charge.jpg
    25.3 KB · Views: 1,934
2 x 6s charger method

file.php
 
2 power Y's and 1 Balance Y left connected to charger

file.php
 

Attachments

  • 44.4V_Single.jpg
    44.4V_Single.jpg
    16.1 KB · Views: 1,915
Consolidated for comparison

Power out with 2 6s cell level Volt meter alarm modules
file.php


2 6s balance chargers or charge 2 segments separately
file.php


Single 6s 22.2V charger charging all 6s segments at once
Same as previous except additional balance and power Y's left attached to 6s balance charger
file.php


12s bulk charger with 2 6s cell level Volt meter alarm modules
file.php

44.4V Bulk charging
Monitor all voltages during charges ... discharges too.
Absolutely necessary during initial cycles!!!
Some form of Voltage Meter Alarm highly recommended!

If all cells remain nearly equal and within safe ranges ...
You might determine it safe to use bulk charging as your normal method and use balance charging only at specific intervals ... ?

Cells will naturally recharge to their same starting voltage.
Unless:
They suffer from self-discharge ... or ...
Subjected to excessive discharge rate or depth
 
Electric cars computer interface does all the balancing and battery monitoring. I know nothing about them but can imagine. If every battery were hooked up to a capacitor of equal voltage and every capacitor and balance wire were connected to the computer interface then all cells would be balanced during discharge. one extra battery of equal voltage could be used to send a little extra voltage to capacitors that are hooked up to weak batteries with cells going bad so that the voltage in each capacitor would be exactly the same. A small monitor hooked up to the computer would show the health of each battery. green would be perfect. yellow would be less than perfect and red would indicate replacement A.S.A.P.
Charging would be as simple as plugging the charger in. I am surprised there already is not something like this for e bikes and electric motorcycles. or is there.
 
Did not see that switch on that tool box thing. So I wont need the parallel board? I think my chargers are not 12s. Not sure but 22.2 volt output is max I think. Dan would know if the 400 watt one will charge 44.4 volts. So DrkAngel. What's the deal with the parallel boards. I wont need them. Also your diagrams don't have a switch. I am confused.
 
Charge 1x. Looks a lot like my figure 1 diagram . That type of a switch will be easy and not complicated. If it requires me to switch the balance plugs zI can live with that. Please look at figure 1 I did to make sure it is like your 1x diagram. I could get rid of the Y plugs but would rather have them so everything is wired to the switch on center or 0 volt position and then plug the Y plugs into the Lipo plugs also in center position. If I try to save money splicing the wires commong out of the Lipos I will have to pay somebody else to do it as I am scared of electricity.
 
Regular 6 inch bullet connectors could work with the male plugging into the female plugs coming from the lipos just wite the switch in center position and when done wiring plug in to lipos. Still will need 6 inch balance plugs as I can't leave the y balance plugs plugged in in controller mode can I?
 
Don't need a switch!
Just disconnect center Pos-Neg connector in center as shown for 6s 22.2V charging.
Compare diagram Run & Charge 2
Just make 1 disconnect and straighten leads for charge.

Your chargers are 6s = 22.2V ... I believe.
Looks like you already have Anderson powerpoles which work much better than bullets.
 
Status
Not open for further replies.
Back
Top