Rear All-Axle, Fst HG Grin Hubmotor with Phaserunner, CAv3, and 52V in FS 29inch MTB

hjns

100 kW
Joined
Aug 20, 2011
Messages
1,294
Location
Basel, Switzerland
Hi all,

I will document here my experiences with building a kit from Grin into a FS MTB over the next month or two.
Main user requirements are:
  1. Relatively stealthy build (I know, this is highly subjective ;)).
  2. Top-speed 40mph / 60kmh.
  3. Range at 45km/h >30km.
  4. Removable and easy-to-charge battery for charging inside.
  5. Full suspension frame with large triangle for the battery.
  6. Budget: USD 6'000.00
So, no. This is not a cheap project. The e-bike will be used to commute on a daily basis over a distance of 15km. My point of reference is a car. The financial aspect (only a part of my consideration) means costs of the new e-bike + charging should break even with the costs of gasoline (not selling the car...., just not driving it) within one year.

This e-bike build will compete against the myriad of off-the-shelf e-bikes currently available. For most people, this budget would be really better spent on exactly such an off-the-shelf e-bike. The main differentiators of my e-bike will of course be the top-speed (15kmh faster than any off-the-shelf version) and overall power (crazy higher acceleration), i.e., all the things that make e-bikes fun! :cool:
 
I'll be following your build.

Assuming you'll ride 6,000 miles / year, how did you calculate payoff within one year ($6,000 build + $ charging) of not driving the car?
 
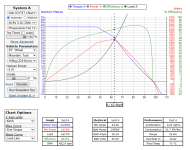
Did you try modeling these components in the Grin simulator? I’m not seeing 40mph from this system.
Fast wind v3 all axle, Phaserunner, 52v battery, 29" wheels, MTB tuck position, and 100w of human power seems to be able to get to 60kph (surprised me too). Motor Simulator - Tools

I'll bet it will take a bit to get up to that top speed but with Statorade it appears to be able to run there for a while. However at 28wh/km it will suck even a large battery down pretty quickly (but much better at the OPs suggested 45kph).
 
What's 1.4mph between friends? :)

It always amazes me the amount of additional power required to achieve even small speed gains when running flat out.
 
Did you try modeling these components in the Grin simulator? I’m not seeing 40mph from this system.
1746001967431.png
The batterypack HoC is at 58.8V, hence gets me above 60kph. Sorry about the rounding error when calculating mph, indeed it is only 39mph... ;)
 
edited to allow for re-calculations...
 
Last edited:
I'll be following your build.

Assuming you'll ride 6,000 miles / year, how did you calculate payoff within one year ($6,000 build + $ charging) of not driving the car?
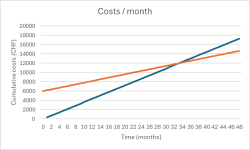
You are correct. It is impossible. I had made a calculation error. Here are the assumptions:

Itemvalueunit
Workable days/month
24​
days
distance/day
30​
km
Distance/month
720​
km/month
Gasoline price/Liter
2​
CHF
Car efficiency (AMG V8 biturbo)
25​
Liter/100km
Costs per 100km
50​
CHF/100km
Gasoline costs per month
360​
CHF/month
Electricity price per charge
5​
CHF
Km per charge
20​
km
Electricity costs per km
0.25​
CHF
Electricity costs per month
180​
CHF
E-bike build
6000​
CHF

And here are the results:

1746005337114.png

Break-even point is only after 3 years, not within one year.
Thanks for challenging me on this! I stand corrected and will continue with the build with a more realistic forecast :)
 

Attachments

  • 1746005313381.png
    1746005313381.png
    9.7 KB · Views: 0
1746007419055.png

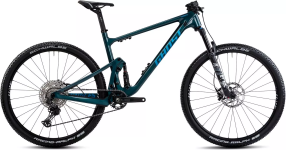
I had ordered this FS MTB for EUR 1'999.00 and it came in earlier this week.
Key specs:
  • 29inch/700c (ETRTO 622) wheels.
  • Formula Cura X brakes.
  • Rear axis 148x12mm.
  • Fox 34 front suspension fork.
  • RockShox SIDLuxe Select+ rear suspension.
  • Large triangle.
  • Carbon frame.
I am aware that the carbon frame is the "weak link". I will use the Triple Bob with Hose Clamps to securely mount the battery onto the downtube of the frame, so as not to rely on the eyelets only. The battery is 5.38 kg according to Grin, therefore I believe that when it is well mounted, it should not be a problem for the carbon frame.

The tires will be replaced by Schwalbe marathon plus MTB performance 29"x2.1 tires rated for E-bikes up to 50kph.
 
View attachment 369510
The batterypack HoC is at 58.8V, hence gets me above 60kph. Sorry about the rounding error when calculating mph, indeed it is only 39mph... ;)
If you ride 5 days/week commuting 15km each way for 30km/day you will be buying a new large battery each year. Approximately. That is 100% charge usage every day.

If you size the battery to keep the usage within the 20% (minimum) to 80% (maximum) then you would require a 33Ah battery. This could extend the battery life to 3 years or more, and thus reduce your cost, albeit costing more now.

If you have a charger at each end and time to recharge, you can probably manage this with your currently specified 20Ah battery by using only 50% charge for each leg of the trip, thus remaining above 20% minimum and recharging to 80% at each end of the commute.

You would also need a charger that can maintain this, or just pay attention while charging to stop when 80% is reached. As you are using Grin tech, the Satiator charger will do this for you.
Completely agree. I did not mention it, but I do indeed want to charge both at home and in the office. Given the price of two Satiator chargers versus a new battery every year or two, I agree that this makes sense on the long term.
 
View attachment 369510
The batterypack HoC is at 58.8V, hence gets me above 60kph. Sorry about the rounding error when calculating mph, indeed it is only 39mph... ;)
So 40 fully charged, but a topped off fully charged pack will drop a volt or two in the first mile, which is why the simulator uses the nominal pack voltage for the real world speed. It’s easier than saying my bike goes 40 when I’m near my house.
 
View attachment 369513

I had ordered this FS MTB for EUR 1'999.00 and it came in earlier this week.
Key specs:
  • 29inch/700c (ETRTO 622) wheels.
  • Formula Cura X brakes.
  • Rear axis 148x12mm.
  • Fox 34 front suspension fork.
  • RockShox SIDLuxe Select+ rear suspension.
  • Large triangle.
  • Carbon frame.
I am aware that the carbon frame is the "weak link". I will use the Triple Bob with Hose Clamps to securely mount the battery onto the downtube of the frame, so as not to rely on the eyelets only. The battery is 5.38 kg according to Grin, therefore I believe that when it is well mounted, it should not be a problem for the carbon frame.

The tires will be replaced by Schwalbe marathon plus MTB performance 29"x2.1 tires rated for E-bikes up to 50kph.
Looks nice but what was your rationale for choosing a carbon frame?
 
Hi all,

I will document here my experiences with building a kit from Grin into a FS MTB over the next month or two.
Main user requirements are:
  1. Relatively stealthy build (I know, this is highly subjective ;)).
  2. Top-speed 40mph / 60kmh.
  3. Range at 45km/h >30km.
  4. Removable and easy-to-charge battery for charging inside.
  5. Full suspension frame with large triangle for the battery.
  6. Budget: USD 6'000.00
So, no. This is not a cheap project. The e-bike will be used to commute on a daily basis over a distance of 15km. My point of reference is a car. The financial aspect (only a part of my consideration) means costs of the new e-bike + charging should break even with the costs of gasoline (not selling the car...., just not driving it) within one year.

This e-bike build will compete against the myriad of off-the-shelf e-bikes currently available. For most people, this budget would be really better spent on exactly such an off-the-shelf e-bike. The main differentiators of my e-bike will of course be the top-speed (15kmh faster than any off-the-shelf version) and overall power (crazy higher acceleration), i.e., all the things that make e-bikes fun! :cool:
Think it is a great idea to replace the car. The cost of insurance alone will pay for all the batteries. Would think about going 72V, would give you the extra speed.
 
Looks nice but what was your rationale for choosing a carbon frame?
Mostly weight. But it was also part of the package for the most cost-effective FS MTB with good groups and good brakes.
 
Think it is a great idea to replace the car. The cost of insurance alone will pay for all the batteries. Would think about going 72V, would give you the extra speed.
Yes, I thought about that, too. But of all the requirements, the top-speed is the least important. It is just a very nice to have from fun perspective.
 
Yes, I thought about that, too. But of all the requirements, the top-speed is the least important. It is just a very nice to have from fun perspective.
I run 72V but it was not for the speed, have a 7T leafmotor. It was for pulling a steep hill. But was over kill. This year or next going to quit driving cars. Still have my 2013 Leaf, but going to get my E-trike back out and sell the car. Good luck, Note: I keep it under 30 with out full suspension.
 
1746092025293.jpeg

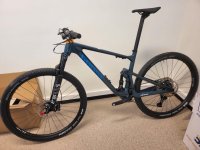
The project has started..... :D .... now waiting for the Grin kit to come in.

.... however, I am traveling for the next two weeks. I.e., you will only see the next updates in the second half of May.
 
Ok, I had time to assemble my bike. It took five hours, not including cleaning up afterwards. I started at 18.00h.l, directly after work.

Removing the rear wheel
I started with the motor. I put my bike upside down. I removed the rear wheel from the frame. I removed the outer and inner tires from the wheel. I removed the brake disc from the wheel.

Preparing the motorized rear wheel
I put the inner and outer tube onto the rim and inflated to 2.5 bar. I added the two disc brake spacers and added the original brake onto the motor, taking care of the motor wires. Then I assembled the torque arm onto the motor, ensuring gentle fit with those delicate screws. On the other side of the motor, I added the rear gearset. I added the two extension pieces that allows the motor to be fit within a 148mm rear through axle frame.
20250526_193250-X3.jpg


Fitting the motorized wheel in the frame
I loosened the disc brake screws, so the brake calipers could move freely. With the bike still upside down, I gently put the wheel inside the frame, taking care that the brake disc was not pulled to one direction. I ensured that the torque arm was positioned close to the horizontal frame tube. I then inserted the through axle pin and fixated the rear wheel appropriately. Then I fixated the torque arm to the frame. It is important to note that there is very little room left between my 160 mm brake disc and the fixation plate of the torque arm. I then turned the bike and put it back on its wheels again.
20250526_194426-X3.jpg

20250526_194433-X3.jpg


Fitting the battery pack to the frame.
Ok, I made an important mistake here. I had measured the space within the triangle, and the very large 52V battery pack should fit exactly. Well, when I put the pack inside the triangle, it did fit, but I would never be able to remove the battery pack from the bike to charge it. I had not counted for the fact that you need at least two cm up front and another 2 cm on top in order to remove the battery from its saddle. Fortunately, the battery pack fits on top of the upper tube, but it doesn't look as beautiful as I had planned for. In the near future, I will order a smaller 52V battery pack, because that will fit within the triangle, and probably rearrange the wires so I can bring the large pack in a saddle bag too, for super extended range when I feel like it and have the time.

Alternatively, I buy a rear metal basket to fixate onto the Thule rack, and hide the battery pack in the metal basket. Probably the cheaper alternative. However, it will be unspring weight, instead of having the pack in/on the triangle. Or I move to a 72V triangle pack..... choices...

20250527_081556-X3.jpg

This experimentation while finding out the best place for the batterypack in an empirical way (i.e. trial and error) cost me an hour. In the end, I fixated the TripleBob to the top tube using the metal zip ties. It is very important to cover these metal zip ties with the accompanying shrink tube, to protect the paint of your frame. The three metal zip ties are extremely strong and make a really trustworthy fixation of your heavy battery pack to the frame. As this is a carbon frame, I really would not want ro rely on only the two screws that thread directly onto the frame to keep your heavy pack in place.

Fitting the Phaserunner controller to the frame
The Phaserunner fit very nicely between my saddle tube and the rear wheel The two provided zip ties are sufficient, but the close proximity of the base of the battery pack and the Phaserunner means you have to take care how to position your wiring.
20250527_081612-X3.jpg


Fitting the CA
I really like my CA as central piece in my cockpit. While reassembling the head, I also fitted the front light. As I wanted to connect not only the front and rear lights, but also my phone charger to the CA, I had also ordered the three way splitter. Saves time soldering...
20250527_081627-X3.jpg


Fitting the gas handle
I had ordered the right half turn gas handle. It is important to position it in such a way that during rain, water can drip out of it via the hole, as you probably do not want full power all the time.... Taking care that switching gears and braking is not affected by the place of the gas handle is of course obligatory.

Connecting the circuit
I first connected the motor to the CA. Then I connected the gashandle to the CA, and the battery-pack to the CA. I put the bike on a stand so the rear wheel could turn freely. Ensure that the pedals can move freely as well, which might mean that you may need to temporarily fixate some of the dangling wires, too. Then I turned on the battery power.

Testing the motor
This was really easy. Ensure the rear wheel could turn freely. Then turn on battery power. Check what the CA tells you. It told me that the battery was charged for about 50%. I gently turned the gas handle, and the wheel started spinning in the right direction. The brake disc was touching the brake shoes, so I had to adjust the brake slightly. And that was it.

Tidying the bike
Attaching the rear light, and guiding all the wires was time consuming but easy. I did not yet use the cable guides that I also had ordered, because I want to ride the bike first for some time and see if it needs any changes (like the smaller battery).
20250527_081605-X3.jpg


Testing the bike
It was 23.00h when I took the bike for a ride. Acceleration was mediocre, in the current settings I can get maximally 1600W. This is something I still need to figure out, how to get maximum power out of it. Topspeed was 53 km/h, not too bad considering i just put it together.

Conclusion & next steps
Loved building it! Loved riding it!

The next month will consist of testing and tweaking. Grin put together a motor/controller/battery package that, with some experience, can be put together in one evening. Hats off for them!

Let me know any questions or comments.....
 
Last edited:
Ok, I had time to assemble my bike. It took five hours, not including cleaning up afterwards. I started at 18.00h.l, directly after work.

Removing the rear wheel
I started with the motor. I put my bike upside down. I removed the rear wheel from the frame. I removed the outer and inner tires from the wheel. I removed the brake disc from the wheel.

Preparing the motorized rear wheel
I put the inner and outer tube onto the rim and inflated to 2.5 bar. I added the two disc brake spacers and added the original brake onto the motor, taking care of the motor wires. Then I assembled the torque arm onto the motor, ensuring gentle fit with those delicate screws. On the other side of the motor, I added the rear gearset. I added the two extension pieces that allows the motor to be fit within a 148mm rear through axle frame.
20250526_193250-X3.jpg


Fitting the motorized wheel in the frame
I loosened the disc brake screws, so the brake calipers could move freely. With the bike still upside down, I gently put the wheel inside the frame, taking care that the brake disc was not pulled to one direction. I ensured that the torque arm was positioned close to the horizontal frame tube. I then inserted the through axle pin and fixated the rear wheel appropriately. Then I fixated the torque arm to the frame. It is important to note that there is very little room left between my 160 mm brake disc and the fixation plate of the torque arm. I then turned the bike and put it back on its wheels again.
20250526_194426-X3.jpg

20250526_194433-X3.jpg


Fitting the battery pack to the frame.
Ok, I made an important mistake here. I had measured the space within the triangle, and the very large 52V battery pack should fit exactly. Well, when I put the pack inside the triangle, it did fit, but I would never be able to remove the battery pack from the bike to charge it. I had not counted for the fact that you need at least two cm up front and another 2 cm on top in order to remove the battery from its saddle. Fortunately, the battery pack fits on top of the upper tube, but it doesn't look as beautiful as I had planned for. In the near future, I will order a smaller 52V battery pack, because that will fit within the triangle, and probably rearrange the wires so I can bring the large pack in a saddle bag too, for super extended range when I feel like it and have the time.
20250527_081556-X3.jpg

This experimentation while finding out the best place for the batterypack in an empirical way (i.e. trial and error) cost me an hour. In the end, I fixated the TripleBob to the top tube using the metal zip ties. It is very important to cover these metal zip ties with the accompanying shrink tube, to protect the paint of your frame. The three metal zip ties are extremely strong and make a really trustworthy fixation of your heavy battery pack to the frame. As this is a carbon frame, I really would not want ro rely on only the two screws that thread directly onto the frame to keep your heavy pack in place.

Fitting the Phaserunner controller to the frame
The Phaserunner fit very nicely between my saddle tube and the rear wheel The two provided zip ties are sufficient, but the close proximity of the base of the battery pack and the Phaserunner means you have to take care how to position your wiring.
20250527_081612-X3.jpg


Fitting the CA
I really like my CA as central piece in my cockpit. While reassembling the head, I also fitted the front light. As I wanted to connect not only the front and rear lights, but also my phone charger to the CA, I had also ordered the three way splitter. Saves time soldering...
20250527_081627-X3.jpg


Fitting the gas handle
I had ordered the right half turn gas handle. It is important to position it in such a way that during rain, water can drip out of it via the hole, as you probably do not want full power all the time.... Taking care that switching gears and braking is not affected by the place of the gas handle is of course obligatory.

Connecting the circuit
I first connected the motor to the CA. Then I connected the gashandle to the CA, and the battery-pack to the CA. I put the bike on a stand so the rear wheel could turn freely. Ensure that the pedals can move freely as well, which might mean that you may need to temporarily fixate some of the dangling wires, too. Then I turned on the battery power.

Testing the motor
This was really easy. Ensure the rear wheel could turn freely. Then turn on battery power. Check what the CA tells you. It told me that the battery was charged for about 50%. I gently turned the gas handle, and the wheel started spinning in the right direction. The brake disc was touching the brake shoes, so I had to adjust the brake slightly. And that was it.

Tidying the bike
Attaching the rear light, and guiding all the wires was time consuming but easy. I did not yet use the cable guides that I also had ordered, because I want to ride the bike first for some time and see if it needs any changes (like the smaller battery).
20250527_081605-X3.jpg


Testing the bike
It was 23.00h when I took the bike for a ride. Acceleration was mediocre, in the current settings I can get maximally 1600W. This is something I still need to figure out, how to get maximum power out of it. Topspeed was 53 km/h, not too bad considering i just put it together.

Conclusion & next steps
Loved building it! Loved riding it!

The next month will consist of testing and tweaking. Grin put together a motor/controller/battery package that, with some experience, can be put together in one evening. Hats off for them!

Let me know any questions or comments.....
Nice build. The hose clamps on that torque arm maybe don't look tight enough? Be sure to give them a check after you have done a few kms. Mine slipped and thr torque arm rotated and I damaged the main motor cable $$$$.
 
Testing the bike
It was 23.00h when I took the bike for a ride. Acceleration was mediocre, in the current settings I can get maximally 1600W. This is something I still need to figure out, how to get maximum power out of it. Topspeed was 53 km/h, not too bad considering i just put it together.

Conclusion & next steps
Loved building it! Loved riding it!

The next month will consist of testing and tweaking. Grin put together a motor/controller/battery package that, with some experience, can be put together in one evening. Hats off for them!

Let me know any questions or comments.....
Nice!
Note that the phaserunner is nice and compact, but won’t support a lot of torque from a hub motor due to very low phase amps. If you try the 40A controller in the simulator (IRFB4110 FET version), you double the torque off the line (85Nm). But the phaserunner is much tidier for your build though, and sounds like it’s delivering enough to have lots of fun with, and meets all of your requirements.
 
Nice work finishing the build!
-What's the weight before and after?
-Will you add fenders/ will you ride in the rain?
-I suppose bike is not legal in Switzerland as is? Are you worried you may get stopped?
 
Nice build. The hose clamps on that torque arm maybe don't look tight enough? Be sure to give them a check after you have done a few kms. Mine slipped and thr torque arm rotated and I damaged the main motor cable $$$$.
Good catch!

After the first test drive the brake disc was touching the torque arm fixator. Still needs to be adjusted.
 
Back
Top