You are using an out of date browser. It may not display this or other websites correctly.
You should upgrade or use an alternative browser.
You should upgrade or use an alternative browser.
Street legal Cafe Racer build.
- Thread starter PK2000
- Start date
Houston, we have a problem!
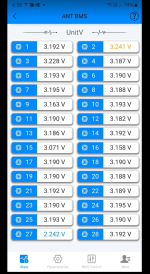
I carefully inspected the spot welds (pro tip, you can get a sharp probe in the little slit in the nickel tab and measure the difference between the bus plate and the cell), and spent a day or so in denial, fantasizing about easy fixes.... Then had at it.
I used a rotary bur to trim the tabs where they were welded to the copper. A trim removal tool and a hammer actually did a good job of splitting the pack.
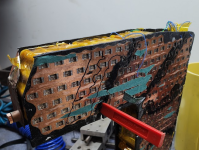
In one way this was a good thing, it gave me confidence in the mechanical strength of the assembly. It was mostly the kapton tape that let go.. +1 for the Sikaflex..
Eventually got to this point
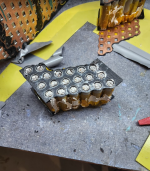
All the spot welds are good. Another little confidence booster.. The cells (unsurprisingly) measure the same at this point. So I'll test them individually and find the dud....
Gotta say, those big LFP cells look pretty bloody good at this point..... :-(

I carefully inspected the spot welds (pro tip, you can get a sharp probe in the little slit in the nickel tab and measure the difference between the bus plate and the cell), and spent a day or so in denial, fantasizing about easy fixes.... Then had at it.
I used a rotary bur to trim the tabs where they were welded to the copper. A trim removal tool and a hammer actually did a good job of splitting the pack.

In one way this was a good thing, it gave me confidence in the mechanical strength of the assembly. It was mostly the kapton tape that let go.. +1 for the Sikaflex..
Eventually got to this point

All the spot welds are good. Another little confidence booster.. The cells (unsurprisingly) measure the same at this point. So I'll test them individually and find the dud....
Gotta say, those big LFP cells look pretty bloody good at this point..... :-(
I'm so sorry about that, it must be really frustrating. Did you get the cells brand new?Houston, we have a problem!
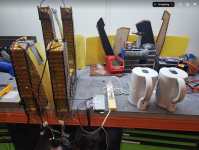
View attachment 360170
I carefully inspected the spot welds (pro tip, you can get a sharp probe in the little slit in the nickel tab and measure the difference between the bus plate and the cell), and spent a day or so in denial, fantasizing about easy fixes.... Then had at it.
I used a rotary bur to trim the tabs where they were welded to the copper. A trim removal tool and a hammer actually did a good job of splitting the pack.
View attachment 360171
In one way this was a good thing, it gave me confidence in the mechanical strength of the assembly. It was mostly the kapton tape that let go.. +1 for the Sikaflex..
Eventually got to this point
View attachment 360172
All the spot welds are good. Another little confidence booster.. The cells (unsurprisingly) measure the same at this point. So I'll test them individually and find the dud....
Gotta say, those big LFP cells look pretty bloody good at this point..... :-(
Yep, they were new.. I have enogh spare cells to rebuild that group, but I'd like to find proof that we have a bad one first.I'm so sorry about that, it must be really frustrating. Did you get the cells brand new?
Disassembly wasn't actually that bad, I'll probably solder them back in.....
j bjork
1 MW
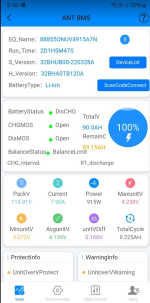
Ouch, that didnt look too encouraging 
I mean, there are a few that are worse than the others. But a lot of them are all over the place.
Is this after a balance charge, discharge and charge? Or is it several cycles?
Do you think you punctured any cells when welding?
I mean, there are a few that are worse than the others. But a lot of them are all over the place.
Is this after a balance charge, discharge and charge? Or is it several cycles?
Do you think you punctured any cells when welding?
The other groups are fine. Charge it up and they all come back up to ÷- 0.025V. But 27 is definitely not fine! I'm working through it cell by cell. Unfortunately, I have another week away.. gonna get one of my guys to keep the testing going. Should have it back together by next weekend...
That turned out great!I got a good weekend in on the project. More later, but a sneak preview for now:
View attachment 360694
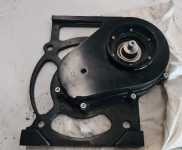
Some more pics. I got the oil seals installed and the last step is pressing the output drive flange onto the output shaft.
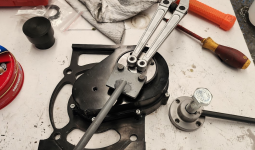
Its an 8 degree taper, so:
A little bit of heat.
A little bit of MDS grease on the threads.
A tiny drop of green Loctite
Some custom tooling (the thing on the right is a puller that I made up front expecting the worst),
And all the torque she'll take....
Done:
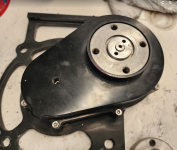
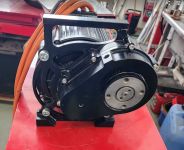
OK, not quite. I still have to do the fill and drain plugs...
I put the first part through the blue dye. It's the motor baseplate, so it's not very visible.
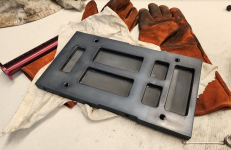
I'm going for that BMW grey/blue. The colour depth is very dependent on surface finish, and time in the bath... Hmm..
I've got one of the battery box sections in the tank now, I'll see how it comes out and make a call..
But what about the battery you say?
After about 10 days of testing each cell there was only one that exhibited some self discharge. It's hard to imagine that it was soely responsible for the results we saw in the whole pack test.
What I decided to do is build a new P group (I had spare cells).
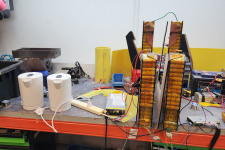
I had some nickel strip, but there was no way known my battery setup was going to spot weld that onto the 2mm copper. So I soldered them in with braided copper:
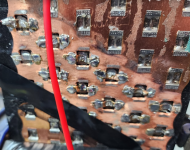
Not pretty but it went well, a bit of preheat on the copper and <1 second per cell.
I'm waiting for some glue to dry and manually balancing the pack, then I'll repeat the discharge test...

Its an 8 degree taper, so:
A little bit of heat.
A little bit of MDS grease on the threads.
A tiny drop of green Loctite
Some custom tooling (the thing on the right is a puller that I made up front expecting the worst),
And all the torque she'll take....
Done:


OK, not quite. I still have to do the fill and drain plugs...
I put the first part through the blue dye. It's the motor baseplate, so it's not very visible.

I'm going for that BMW grey/blue. The colour depth is very dependent on surface finish, and time in the bath... Hmm..
I've got one of the battery box sections in the tank now, I'll see how it comes out and make a call..
But what about the battery you say?
After about 10 days of testing each cell there was only one that exhibited some self discharge. It's hard to imagine that it was soely responsible for the results we saw in the whole pack test.
What I decided to do is build a new P group (I had spare cells).
I had some nickel strip, but there was no way known my battery setup was going to spot weld that onto the 2mm copper. So I soldered them in with braided copper:

Not pretty but it went well, a bit of preheat on the copper and <1 second per cell.
I'm waiting for some glue to dry and manually balancing the pack, then I'll repeat the discharge test...
j bjork
1 MW
Cool, I havent got around to try anodizing. It would be interesting if you described the steps a little more, and maybe some pictures of the equipment you are using 
I've held off posting pics of the anodising tanks because... well.. I've been anodising small parts with some success for many years. I'm confident enough to just lash up what I need for these bigger pieces. That lash up is not something I'm gonna post pics off. Many 30+L tanks of chemicals squeezed into too small an area, with all sorts of nastiness going on.Cool, I havent got around to try anodizing. It would be interesting if you described the steps a little more, and maybe some pictures of the equipment you are using
The internet has many good how to's on anoidzing, go find one.
My tips.
- In the same way that painting should just be called sanding, because that's what you spend most of your time doing, anodising should just be called cleaning. Getting the part ABSOLUTEY SPOTLESS is the single most important step. I have anodised may parts over the years that ended up with one of my fingerprints imortalised in the finish...
- It's easy to get a good result. For most colours, it's hard to get a consistent result. You need to be meticulous for the Blues/reds/yellows.
The exception here is black. Too much black is still black.
- Acid from the pool shop. Use lead flashing for cathodes. Nothing but Aluminium or Titanium in the tank.
- Keep everything cool. I freeze 2L milk jugs and drop them in the tank before I start. Adding 5g/L Oxallic acid makes a big difference, you can get a good result up to a tank temp of 25C.
- Seal in Nickel Acetate, it does a good job.
- Lastly. The alloy you use is important. 6061 anodises nice, 2000 series is hard to get a good result with. You can fix this with a nitric/phosphoric acid dip to dissolve the surface copper/magnesium away, but it's not as good as just using the right grades of Al to start with.
OK, it's been a while.....
Long story short. The anodising was a long, expensive, fail.
Totally my own stupid fault. I cut about half of the parts for the battery box out of some Al sheet that I just had, without even thinking of checking what grade of Al it was. Turns out that it was just about impossible to get a good finish on those parts. I spent many weeks trying and re trying before rage quitting....
Then, as you do, I stepped back from the project for a while and got on with some other things.
Plan B was always to powder coat, the problem being that our little powder coating oven whilst really good, just wasn't big enough for the job. We'd been talking for some time about building a bigger one, we REALLY like powder coating...
So more procrastination was had and then, finally, I set about to build a bigger oven.
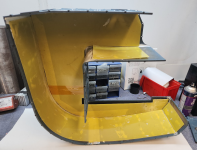
The day I decided to do that, a mate sent me a link to a FB Marketplace listing, and, shortly afterwards, this little beasty was mine:
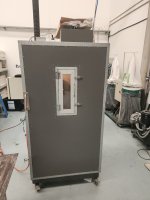


The guy had done such a good job on it I couldn't say no.. He's a bike builder too and the oven was constructed to be big enough to take a frame.
A VERY short amount of time later (did I mention that we LOVE powder coating):
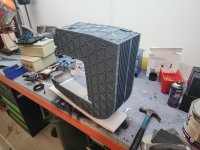
I'm pumped to move forward now. Aaaaand I'm in Canada and the US for two weeks......
Soon though.
Long story short. The anodising was a long, expensive, fail.
Totally my own stupid fault. I cut about half of the parts for the battery box out of some Al sheet that I just had, without even thinking of checking what grade of Al it was. Turns out that it was just about impossible to get a good finish on those parts. I spent many weeks trying and re trying before rage quitting....
Then, as you do, I stepped back from the project for a while and got on with some other things.
Plan B was always to powder coat, the problem being that our little powder coating oven whilst really good, just wasn't big enough for the job. We'd been talking for some time about building a bigger one, we REALLY like powder coating...
So more procrastination was had and then, finally, I set about to build a bigger oven.
The day I decided to do that, a mate sent me a link to a FB Marketplace listing, and, shortly afterwards, this little beasty was mine:


The guy had done such a good job on it I couldn't say no.. He's a bike builder too and the oven was constructed to be big enough to take a frame.
A VERY short amount of time later (did I mention that we LOVE powder coating):

I'm pumped to move forward now. Aaaaand I'm in Canada and the US for two weeks......
Soon though.
j bjork
1 MW
Nice to see you back 
Be careful with the step back from the project for a while, I have one of those that has been left for about 6 years I think
How hot does it get in the powder coat oven?
Be careful with the step back from the project for a while, I have one of those that has been left for about 6 years I think
How hot does it get in the powder coat oven?
Yeah, im pretty keen to get this one done.Nice to see you back
Be careful with the step back from the project for a while, I have one of those that has been left for about 6 years I think
How hot does it get in the powder coat oven?
That powder needed 200 deg C
I haven't tried, but I'd bet it could hit 300+ in a reasonable time. It pulls 24A three phase (415V)
j bjork
1 MW
Ouch, that is a lot of power.. I have 25A fuses (We have three phase 400V here) so I suppose I could run one of those if I turn everything else off 
I suppose you only need that much if you want it to heat up so quickly. If it was made smaller and/or given more time, even a 2kW heater unit would be able to heat the air inside to 200C. After all, that's how all kitchen ovens work.
Surface area really matters. For a given thermal conductivity (insulation level). Thermal loss increases with volume.I suppose you only need that much if you want it to heat up so quickly. If it was made smaller and/or given more time, even a 2kW heater unit would be able to heat the air inside to 200C. After all, that's how all kitchen ovens work.
Or, for a given levels of power and insulation, and volume, there is a maximum temperature reachable .
Dui ni shuo de dui
100 kW
You don't need that much power if you have a good insulation and aren't in a hurry.Ouch, that is a lot of power.. I have 25A fuses (We have three phase 400V here) so I suppose I could run one of those if I turn everything else off
I've built a small electric furnace that gets up to 850 Degree celsius in 25 minutes using only 1600W of power. I did a few aluminum castings with it and it worked great.
Of course the volume is a lot smaller than this monster oven, but it was a lot more than 200 degree. If you go this route, I suggest you use silica aerogel insulating sheets, it's an incredible material for this application.
@OP great job, but now I wonder what's your opinion about powder coating.
OK, back from sunny Canada I've managed to squeeze some work in on the bike.
I lined the inside of the battery box.
And she slipped right in there:

Got the side plate on, just need to do a little bit of fettling to get the top plate to seat. Dear lord this thing is heavy!
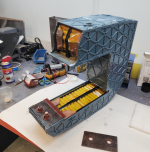
It's 2pm which feels like midnight thanks to the jetlag... So that'll do for today.
I lined the inside of the battery box.

And she slipped right in there:

Got the side plate on, just need to do a little bit of fettling to get the top plate to seat. Dear lord this thing is heavy!

It's 2pm which feels like midnight thanks to the jetlag... So that'll do for today.
I've been plugging away at this without taking too many pictures I'm afraid.
I'd dug myself a bit of a hole with the assembly order for the motor->battery pack-> frame to the point where it wasn't possible to put the thing together. After a bit of head scratching, I changed the motor mounts to allow the battery to go in first and the motor to slide in from the side.
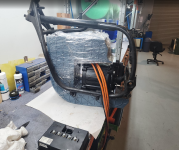
That worked. Although I put the forward bracket on backwards, so the motor is sitting about 40mm rearward of where it will end up.
I tried some swatches of a few different colours and settled on a bronze for the wheels.

And this morning, I finished the drive mounts and cut enough out of the tank to fit it and see how much space I have for on board chargers and electronics (lots).
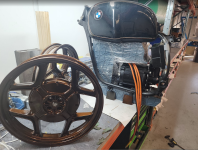
Overall, I'm really happy with the packaging. The heavy gauge wiring is going to be a bit of a pain, but the runs will be super short. Doing it this way keeps the "visual center of mass" forward which is one of the style criteria for a cafe racer.
I'd dug myself a bit of a hole with the assembly order for the motor->battery pack-> frame to the point where it wasn't possible to put the thing together. After a bit of head scratching, I changed the motor mounts to allow the battery to go in first and the motor to slide in from the side.

That worked. Although I put the forward bracket on backwards, so the motor is sitting about 40mm rearward of where it will end up.
I tried some swatches of a few different colours and settled on a bronze for the wheels.

And this morning, I finished the drive mounts and cut enough out of the tank to fit it and see how much space I have for on board chargers and electronics (lots).

Overall, I'm really happy with the packaging. The heavy gauge wiring is going to be a bit of a pain, but the runs will be super short. Doing it this way keeps the "visual center of mass" forward which is one of the style criteria for a cafe racer.
Similar threads
- Replies
- 100
- Views
- 11,560
- Replies
- 19
- Views
- 2,652
- Replies
- 25
- Views
- 2,132
- Replies
- 103
- Views
- 11,387
- Replies
- 12
- Views
- 515


