
IIRC, you've been puzzling over the QR (multiple?) inexplicably loosening up on this fork several times. If the dropout has been opening up over this time period (propagating crack) couldn't that be the cause of the QR slipping loose? Trying to maintain its clamping force over a non-intact nonuniform shifting surface?BTW, the thing had been failing for some time, as there is obvious oxidation on the broken surface between the safetywasher tab hole and the dropout itself. avbove the tab hole it was shiny and torn, so that all hapepend pretty quick.

-
Hello ES! We could use some help to get us past the finish line on building the new knowledgebase for the forum.
Can you donate? Please see our fundraising page. Thank you!
You are using an out of date browser. It may not display this or other websites correctly.
You should upgrade or use an alternative browser.
You should upgrade or use an alternative browser.
The SB Cruiser : Amberwolf's 2WD Heavy Cargo Trike & Dog Carrier
- Thread starter amberwolf
- Start date

If the dropout has been opening up over this time period (propagating crack) couldn't that be the cause of the QR slipping loose?
Sounds very probable. I'm not sure if I'd trust those welds tbh, glad that you're okay but it could've been way worse.

Yeah, that was the point of this statement  although that might not have been clear.
No problems with it today, other than that i forgot to realign the speed sensor so i didn't get any speed readings as i started out to work, and had to stop to fix that (a few seconds).
I'd forgot to mention in the previous post about the fix that it left the rotor alighned differently with the caliper,a nd I dind't have time to deal with that; was exhausted last night by the time I"d gotten it welded and reassembled with the solid axle. All i h ad time for was to make sure hte brake would grab, but it rubbed the disc quite a bit (would stop the instant i stopped moving it with my hand, but didn't feel draggy, with the lever unsqueezed). But it didn't have much brfaking power unless i adjusted the pads in enough to be kinda grabby when the lever wasn't pulled.
So i need to realign the caliper but today was exhausting (as usual). I came home to find the giant trash barrel that normally sits int he alley has been thrown by someone (probably several someones) along with pieces of a couch into my backyard. It was not windblown, someone pushed it up over the fence and bent the fence in, and they aslo threw more pieces of the same couch into the back neighbor's yard, bending their fence too. I'tll jsut have to sit there, unusable by anyone, until i hear back from the city on what they want to do about the problem, in case they need to investigate it or whatever.
So all i had energy for was parking the trike, and going inside and laying down for a while. Woke from anohter nightmare so i'm typing this post up, then will proably try to write some more story and see if i can fall asleep doing that.
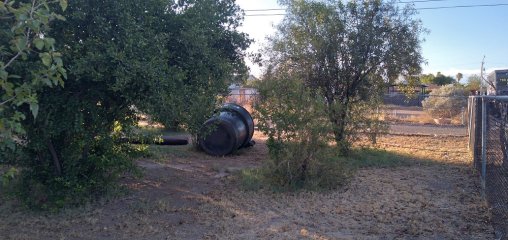
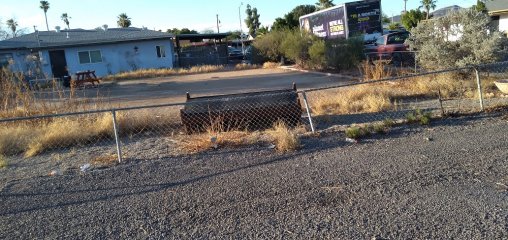
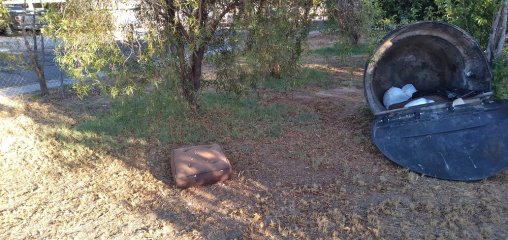
although that might not have been clear.Well, turns out it wasn't actually the qr itself this time. (and might not have been before, to startt with a anyway).
No problems with it today, other than that i forgot to realign the speed sensor so i didn't get any speed readings as i started out to work, and had to stop to fix that (a few seconds).
I'd forgot to mention in the previous post about the fix that it left the rotor alighned differently with the caliper,a nd I dind't have time to deal with that; was exhausted last night by the time I"d gotten it welded and reassembled with the solid axle. All i h ad time for was to make sure hte brake would grab, but it rubbed the disc quite a bit (would stop the instant i stopped moving it with my hand, but didn't feel draggy, with the lever unsqueezed). But it didn't have much brfaking power unless i adjusted the pads in enough to be kinda grabby when the lever wasn't pulled.
So i need to realign the caliper but today was exhausting (as usual). I came home to find the giant trash barrel that normally sits int he alley has been thrown by someone (probably several someones) along with pieces of a couch into my backyard. It was not windblown, someone pushed it up over the fence and bent the fence in, and they aslo threw more pieces of the same couch into the back neighbor's yard, bending their fence too. I'tll jsut have to sit there, unusable by anyone, until i hear back from the city on what they want to do about the problem, in case they need to investigate it or whatever.
So all i had energy for was parking the trike, and going inside and laying down for a while. Woke from anohter nightmare so i'm typing this post up, then will proably try to write some more story and see if i can fall asleep doing that.

The Toecutter
🚴♂️ Mega poster
- Joined
- Feb 8, 2015
- Messages
- 1,694
Probably homeless people. Be glad you're not one of them. Most have jobs and are still priced out of rent. These could have been junkies doing whatever. They're everywhere in my hood.It was not windblown, someone pushed it up over the fence and bent the fence in, and they aslo threw more pieces of the same couch into the back neighbor's yard, bending their fence too.
Last edited:
No, the homeless are usualy nice people. The assholes that live in the neighborhood are, however, potential suspects. There are quite a few of those.
The Toecutter
🚴♂️ Mega poster
- Joined
- Feb 8, 2015
- Messages
- 1,694
Assholes and good people are in all populations. Whoever did that to you and your neighbor are definitely assholes though. Hope it gets sorted out without costing you any more time and/or money.

TPEHAK
🚴♂️ Mega poster
Call the police and ask them to take fingerprints from the fence and the container.
So I finally have some days off in a row to do the fork build.
Of course, it is more complicated than it has to be, naturally.
The monstrous dropout plates from Chalo are built to have the disc caliper in front, instead of behind, the stanchion/fork leg, so the caliper spacing adapters can't work on the left side.
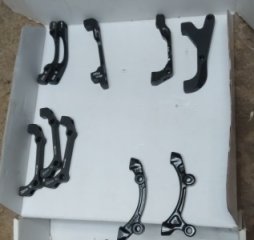
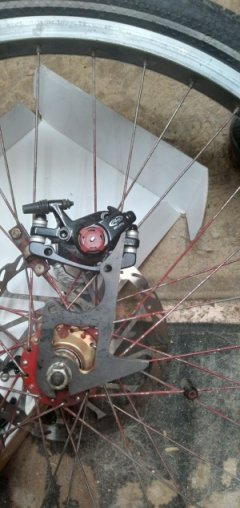
This means flipping the wheel over, and mounting the caliper and rotor on the right. No problem. Both the dropout plates have the tabs on them so even if I'd already built the fork it would still work--but I haven't got that far yet.
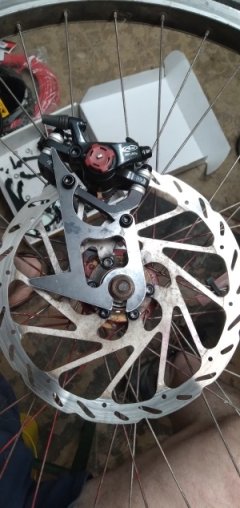
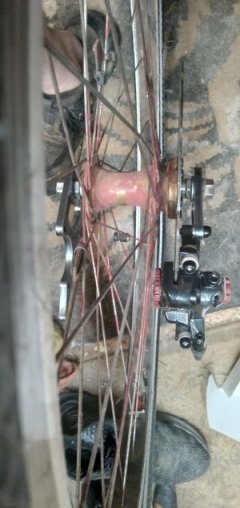
Because first I needed to deal with the wheel.
The cheap wheel I'd been "temporarily" using is not built for the way the trike stresses it, nor is it built well or of good parts; it's an oem front wheel off some bike I forget which. So the spokes loosen up, becuse it probably has cracks in teh nipple holes that i can't see (has hapepnd with hubmotors and I see no reason it wouldn't happen on normal wheels too if you stress them enough--the trike places sideloads on the hweels much muich higher than on a bicycle).
So I went to do my plan of pulling hte bearing cups out of my old tried and true wheel buitl around the old Sun Mammoth Fat rim--the one I'd determined had a problem with the cups migrating inward from the clamping forces of the QR.
Well, it turns out that can't be true, becuase under the cups are perfectly cup-shaped machinings of the hub that keep the cups right where they started out. :/
So the whole problme the whole time was actualy that spreading crack in the dropout itself, on the crappy junk fork lowers I had used when I built that fork. Oh, well.
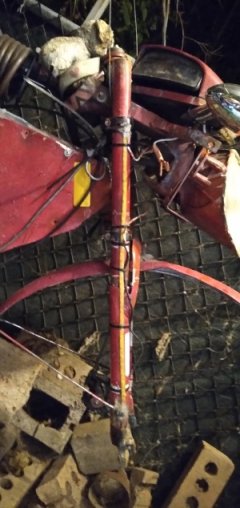
Anyway, I put the cups back (sorry didn't get a pic of the insides of the hub, I was tired and frustrated by then, and I hadn't even started the real job). I pulled the solid axle I'd installed in place of the QR axle in that temporary wheel, and moved it into my good wheel.
For that purpose, I bought some decent thin wrenches--two that are intended as cone wrenches but which i expected to be garbage (and aren't, quite), and a set of SAE and Metric "thin" regular wrenches, that are MUCH better--they are almost as good as some of my better regular wrenches, although I don't intend to push them hard--they're only for places I can't put a thick wrench.
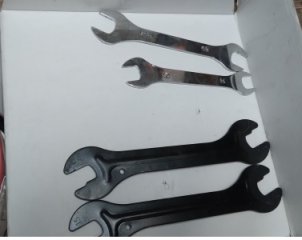
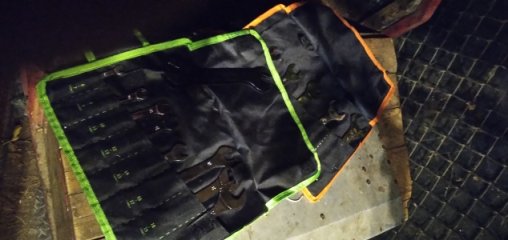
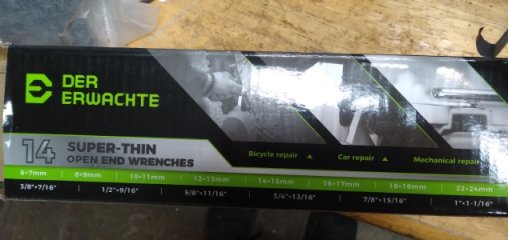
I bought those because all the actual cone wrenches I have are really shitty, and very old and worn and have been hammered back into the right shape and size numerous times after they bent just adjusting the cones on various wheels.
Tired of screwing around with the junk--if i could afford it i'd buy good new tools for all sorts of things, cuz i am mighty tired of fixing the things I need to use to fix the other thing that I have to fix to fix something else with, every friggin' time I have to do anything. :/
Anwyay, I also bought a cheap chainwhip cuz while i don't need it yet I will at some point need one *right now* and am not going to make one out of a board and old chain again.... It comes with two probalby really crappy freewheel removal spline tools, but I alreayd have good ones if I have to do that, so they're spares.
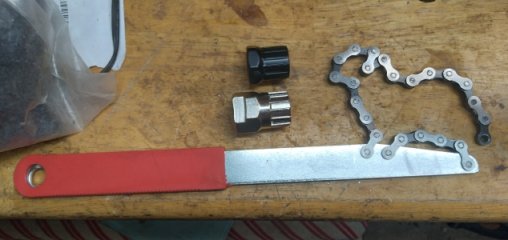
So, anyway, I got all the wheel hub finished, and setup the dropouts on the axle, and then worked out the adapter/caliper stuff, on the right side of the wheel, flipped the tire and rotor over to the new direction, and...now I"m exhausted.
It's too hot to do this stuff in the daytime now (113-115F in the shade) and even with the misting cooling and fans and stuff I just can't take that and work out there long enough to do what's needed. So I have to do it when it's dark out, and it's only 100-105F (of course I couldn't get time off last week when it was cloudy and cool and rainy, and this particular set of problems really shoudln't wait to get fixed.)
Secondarily, a few weeks ago I rebuilt that tire pump, replaced the hoses and all, and just needed to find the chuck I wanted. Well, it doesnt' exist. :lol: Not all in one piece, anyway, for a price worth paying. So I found the bits I need, but not *quite* as advertised, of course. Very cheap, though, a few bucks for all of the pieces. However, naturally, the parts dont all quite fit--the 1/4" barb adapter that is supposed to be 1/8"M NPT thread is not--its probably metric. It won't quite start to thread into the 1/8"F to 1/4"M adapter that goes into the chuck itself. So, am now waiting on a "correct" 1/4"M threaded 1/4" barb that fits inside the 1/4" hose I have on the pump. (there weren't any cheap ones except multipacks of half a dozen or more when i first looked, from where i was already ordering, of course, today, there are)
If all those fractions and stuff didn't glaze your eyes over like they do mine, well....


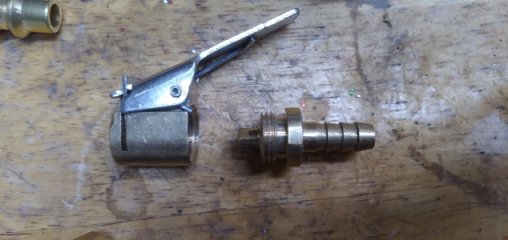
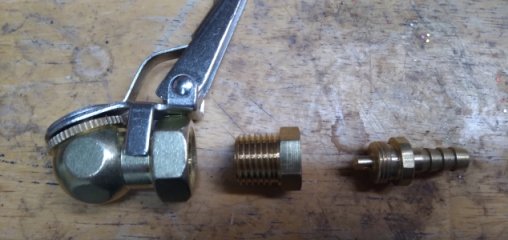
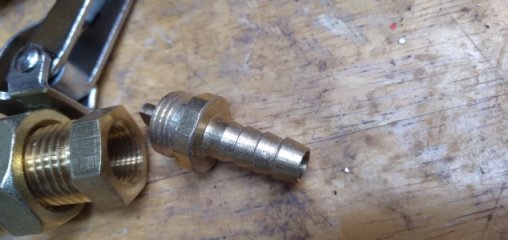
Of course, it is more complicated than it has to be, naturally.
The monstrous dropout plates from Chalo are built to have the disc caliper in front, instead of behind, the stanchion/fork leg, so the caliper spacing adapters can't work on the left side.
This means flipping the wheel over, and mounting the caliper and rotor on the right. No problem. Both the dropout plates have the tabs on them so even if I'd already built the fork it would still work--but I haven't got that far yet.
Because first I needed to deal with the wheel.
The cheap wheel I'd been "temporarily" using is not built for the way the trike stresses it, nor is it built well or of good parts; it's an oem front wheel off some bike I forget which. So the spokes loosen up, becuse it probably has cracks in teh nipple holes that i can't see (has hapepnd with hubmotors and I see no reason it wouldn't happen on normal wheels too if you stress them enough--the trike places sideloads on the hweels much muich higher than on a bicycle).
So I went to do my plan of pulling hte bearing cups out of my old tried and true wheel buitl around the old Sun Mammoth Fat rim--the one I'd determined had a problem with the cups migrating inward from the clamping forces of the QR.
Well, it turns out that can't be true, becuase under the cups are perfectly cup-shaped machinings of the hub that keep the cups right where they started out. :/
So the whole problme the whole time was actualy that spreading crack in the dropout itself, on the crappy junk fork lowers I had used when I built that fork. Oh, well.
Anyway, I put the cups back (sorry didn't get a pic of the insides of the hub, I was tired and frustrated by then, and I hadn't even started the real job). I pulled the solid axle I'd installed in place of the QR axle in that temporary wheel, and moved it into my good wheel.
For that purpose, I bought some decent thin wrenches--two that are intended as cone wrenches but which i expected to be garbage (and aren't, quite), and a set of SAE and Metric "thin" regular wrenches, that are MUCH better--they are almost as good as some of my better regular wrenches, although I don't intend to push them hard--they're only for places I can't put a thick wrench.
I bought those because all the actual cone wrenches I have are really shitty, and very old and worn and have been hammered back into the right shape and size numerous times after they bent just adjusting the cones on various wheels.
Tired of screwing around with the junk--if i could afford it i'd buy good new tools for all sorts of things, cuz i am mighty tired of fixing the things I need to use to fix the other thing that I have to fix to fix something else with, every friggin' time I have to do anything. :/
Anwyay, I also bought a cheap chainwhip cuz while i don't need it yet I will at some point need one *right now* and am not going to make one out of a board and old chain again....
It comes with two probalby really crappy freewheel removal spline tools, but I alreayd have good ones if I have to do that, so they're spares.So, anyway, I got all the wheel hub finished, and setup the dropouts on the axle, and then worked out the adapter/caliper stuff, on the right side of the wheel, flipped the tire and rotor over to the new direction, and...now I"m exhausted.
It's too hot to do this stuff in the daytime now (113-115F in the shade) and even with the misting cooling and fans and stuff I just can't take that and work out there long enough to do what's needed. So I have to do it when it's dark out, and it's only 100-105F
(of course I couldn't get time off last week when it was cloudy and cool and rainy, and this particular set of problems really shoudln't wait to get fixed.)Secondarily, a few weeks ago I rebuilt that tire pump, replaced the hoses and all, and just needed to find the chuck I wanted. Well, it doesnt' exist. :lol: Not all in one piece, anyway, for a price worth paying. So I found the bits I need, but not *quite* as advertised, of course. Very cheap, though, a few bucks for all of the pieces. However, naturally, the parts dont all quite fit--the 1/4" barb adapter that is supposed to be 1/8"M NPT thread is not--its probably metric. It won't quite start to thread into the 1/8"F to 1/4"M adapter that goes into the chuck itself. So, am now waiting on a "correct" 1/4"M threaded 1/4" barb that fits inside the 1/4" hose I have on the pump. (there weren't any cheap ones except multipacks of half a dozen or more when i first looked, from where i was already ordering, of course, today, there are)
If all those fractions and stuff didn't glaze your eyes over like they do mine, well....

OlderGiantFan
🚴♂️ Mega poster
Yeah, never seen anything like it? All it tells me is that their calipers are too weak. Or perhaps it's just a marketing thing? Double them up for a Bling factor. That might wash with a Lycra boi, but not serious builders.
Mostly I meant that the bending forces vs the places where that thing has mass and doesn't feel like it would not take that kind of loading well, especially if the main-mounted calipers dont' grab as hard as the "flying" ones.
I'm no structural engineer, but I've seen a lot of broken things....
I'm no structural engineer, but I've seen a lot of broken things....
Ok, I finally, after numerous typical problems (measrue and align multiple times, and still install/build/etc it wrong, cuz my brain and hands just don't work like normal people's), have the new dropouts installed, brake fitted.
I still have to tie down all the cabling and lights again, repaint that section of the fork, and get used to the geometry change--small, but there, since the dropout slots fo these plates is around an inch forward of the old slot spot, and a few mm higher up.
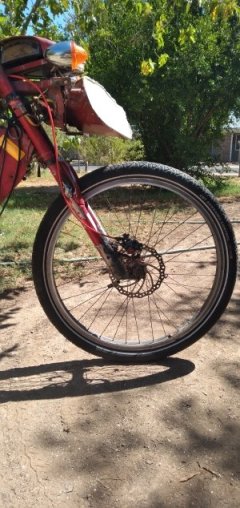

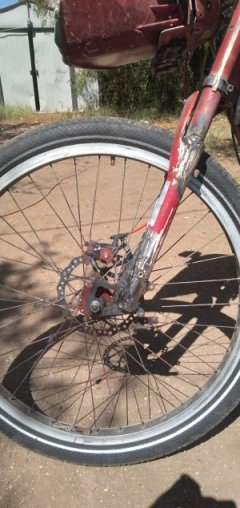
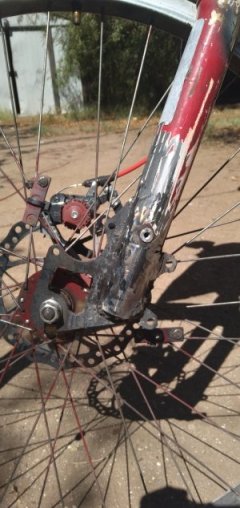
Now, I have two main problems still to solve:
--I had to go down to a 180mm tektro rotor I had in hte spares box, in place of the 203mm Avid rotor. This is a SEVERE decrease in braking power--I can't, with my hurty hands, squeeze the Avid single-digit lever hard enough regardless of adjustments to cause the wheel to skid. I can get braking, but not nearly as hard as before.
That was because I had no adapter that could be safely made to work for the brake caliper except the Avid 20mm offset that came with the calipers, for a 180mm rotor. The 40mm offset for a 200m rotor simply can't fit without the rear end of the adapter and caliper mount being *inside* the fork. I probably can grind out part of the fork leg and replace it witn an incurving portion of tubing to make space, but I thought I might give a go on modifying hte adapter that *almost* worked if it weren't for that, to see if enough could com eoff to clear the fork.
Nope.


Even with so much material removed that the caliper mounting screw at the rear will not even have a place to go, it still intersects the fork too much to allow the rear adapter mounting bolt to go in. (flipping the adpater end for end prevents fork intersection, but then the caliper intersects the actual rotor--don't have a pic of that).
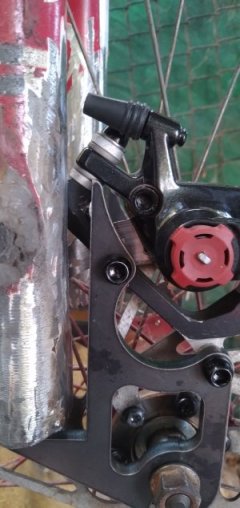
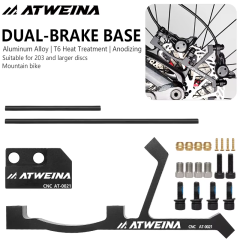
I can't tell for sure all the measurements of the stuff online, most don't ahve complete dimensions, but I found one for about two bucks on aliexpress and ordered taht to see if it will help, based on pixle-to-mm conversion. We'll see in a week or two when it gets here.
In the meantime, had to do that downgrade on the rotor, using this adapter oand th 180mm rotor.
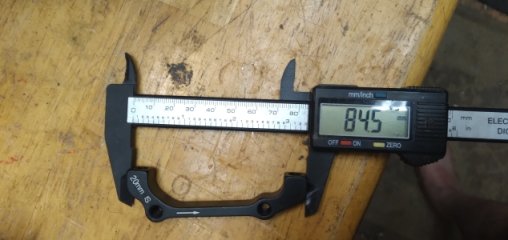
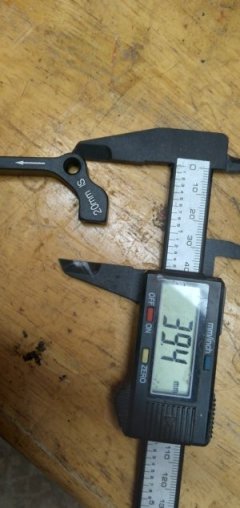
One of the problems I had, that was wierd and I had never noticed, was that when they built the lowers I've been using, they screwed up and welded the U bridge with the righthand tube about 3.5mm too high. (or the left that mcuh too low). So then they just installed the droput plates offset to make up for that and still ahve a straight axle.
I dind't even notice that when I cut them off to install these new ones, but as soon as I setup my alignment procedure, it was obvious.

I used two sockets that were each half the empty space from teh rim to the inboard side of the fork, to help center the wheel.

Then I used the axle nuts to secure the droputs to the wheel's axle. I used 5mm of washers, half on each side, to give me a little "slop" for axle shoulder vairation on wheels I might have to use in the future, for 105mm, becuse these massive dropouts are not "realignable" once installed.
(That turned out to be a good thing, becuse due to the thickness of these plates, I had to have those washers on the right where the caliper goes anyway to help the stuff all clear the fork and dropout plate and fit the place the caliper actually ends up, etc).
Then I hose clamped the dropout plates to the fork legs, and measured distances to maek sure they were all the same between the plates, so they'd be parallel. (the trike itself was jacked up in front so I could keep the load off teh setup but still have the tire touching the ground to be sure it all still 'worked" the way I needed it to).
I thought about fixing their screwup, but that was a lot more work than just creating a filler plate to go in the gap and weld thru it to the original endcap....

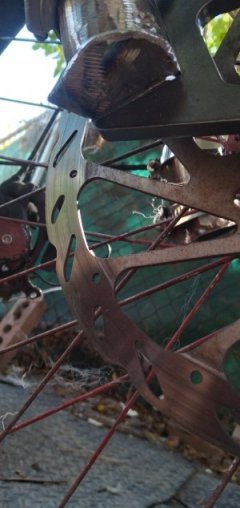
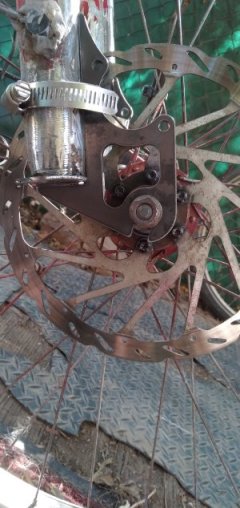
Then I tack welded it, and rode around the yard slowly to test it. In the pics is my "test rig" brake where i just hose clamped the rear end of the caliper to the fork, which I would never trust while riding. (if it failed, it owuld happen during hard braking when I need it most, of course).

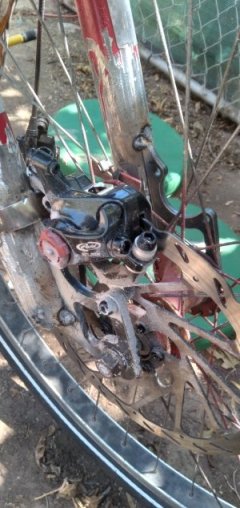
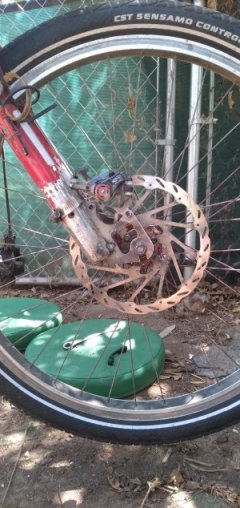
Using a 0mm mount adapter, I *can* still use the rear left mount like i used to, but it only grabs the outer 2-3mm of a 203mm rotor, which gives almost no braking.

If I had a 210mm or larger rotor that mount would still work...but, I don't. I'm not sure exactly what size would be needed, but my guess is it would be a wierd size to get the real true fit.
To use a caliper on the left side of the new dropout plates, I would need a really wierd looking adapter that I've never seen, with some reall ylong front bar and a short rear one.
I might be able to *make* such an adapter, if I had a thick enough piece of aluminum (I don't think I could drill and thread a steel plate like that, not accurately enough to work for this). But I doubt my skill is sufficeint to do it.
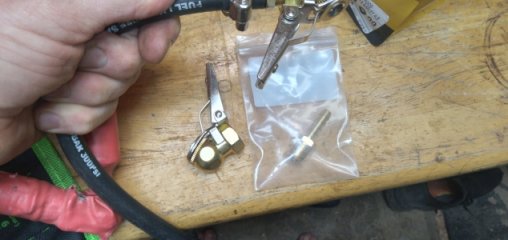
The air pump adapter piece arrived, so I installed that, but it was too hot to go back out and test it. That has to wait till later this evening. (Most of the above was done yesterday and the day before, when a storm blew the heat out of the valley for a while, though I had to stop overnight for the really high winds and rain and resume in the morning after that stopped).
I still have to tie down all the cabling and lights again, repaint that section of the fork, and get used to the geometry change--small, but there, since the dropout slots fo these plates is around an inch forward of the old slot spot, and a few mm higher up.
Now, I have two main problems still to solve:
--I had to go down to a 180mm tektro rotor I had in hte spares box, in place of the 203mm Avid rotor. This is a SEVERE decrease in braking power--I can't, with my hurty hands, squeeze the Avid single-digit lever hard enough regardless of adjustments to cause the wheel to skid. I can get braking, but not nearly as hard as before.
That was because I had no adapter that could be safely made to work for the brake caliper except the Avid 20mm offset that came with the calipers, for a 180mm rotor. The 40mm offset for a 200m rotor simply can't fit without the rear end of the adapter and caliper mount being *inside* the fork. I probably can grind out part of the fork leg and replace it witn an incurving portion of tubing to make space, but I thought I might give a go on modifying hte adapter that *almost* worked if it weren't for that, to see if enough could com eoff to clear the fork.
Nope.
Even with so much material removed that the caliper mounting screw at the rear will not even have a place to go, it still intersects the fork too much to allow the rear adapter mounting bolt to go in. (flipping the adpater end for end prevents fork intersection, but then the caliper intersects the actual rotor--don't have a pic of that).
I can't tell for sure all the measurements of the stuff online, most don't ahve complete dimensions, but I found one for about two bucks on aliexpress and ordered taht to see if it will help, based on pixle-to-mm conversion. We'll see in a week or two when it gets here.
In the meantime, had to do that downgrade on the rotor, using this adapter oand th 180mm rotor.
One of the problems I had, that was wierd and I had never noticed, was that when they built the lowers I've been using, they screwed up and welded the U bridge with the righthand tube about 3.5mm too high. (or the left that mcuh too low). So then they just installed the droput plates offset to make up for that and still ahve a straight axle.
I dind't even notice that when I cut them off to install these new ones, but as soon as I setup my alignment procedure, it was obvious.
I used two sockets that were each half the empty space from teh rim to the inboard side of the fork, to help center the wheel.
Then I used the axle nuts to secure the droputs to the wheel's axle. I used 5mm of washers, half on each side, to give me a little "slop" for axle shoulder vairation on wheels I might have to use in the future, for 105mm, becuse these massive dropouts are not "realignable" once installed.
(That turned out to be a good thing, becuse due to the thickness of these plates, I had to have those washers on the right where the caliper goes anyway to help the stuff all clear the fork and dropout plate and fit the place the caliper actually ends up, etc).
Then I hose clamped the dropout plates to the fork legs, and measured distances to maek sure they were all the same between the plates, so they'd be parallel. (the trike itself was jacked up in front so I could keep the load off teh setup but still have the tire touching the ground to be sure it all still 'worked" the way I needed it to).
I thought about fixing their screwup, but that was a lot more work than just creating a filler plate to go in the gap and weld thru it to the original endcap....
Then I tack welded it, and rode around the yard slowly to test it. In the pics is my "test rig" brake where i just hose clamped the rear end of the caliper to the fork, which I would never trust while riding. (if it failed, it owuld happen during hard braking when I need it most, of course).
Using a 0mm mount adapter, I *can* still use the rear left mount like i used to, but it only grabs the outer 2-3mm of a 203mm rotor, which gives almost no braking.
If I had a 210mm or larger rotor that mount would still work...but, I don't. I'm not sure exactly what size would be needed, but my guess is it would be a wierd size to get the real true fit.
To use a caliper on the left side of the new dropout plates, I would need a really wierd looking adapter that I've never seen, with some reall ylong front bar and a short rear one.
I might be able to *make* such an adapter, if I had a thick enough piece of aluminum (I don't think I could drill and thread a steel plate like that, not accurately enough to work for this). But I doubt my skill is sufficeint to do it.
The air pump adapter piece arrived, so I installed that, but it was too hot to go back out and test it. That has to wait till later this evening. (Most of the above was done yesterday and the day before, when a storm blew the heat out of the valley for a while, though I had to stop overnight for the really high winds and rain and resume in the morning after that stopped).
Done.
Well, as done as I can be, until I can find a caliper adapter to let me use the 203mm rotor again.
Painted, cabled, wired, tied down.
Installed the new fork marker/turnsignal bars, replacing the old janky LED strips.
Reinstalled the speedo sensor, and glued new magnets to the spokes, replacing the ziptied-on badge-holders.
Installed one fo the old janky LED strips as a wrap around the headlight, mostly as amber downlighting on the wheel itself.
Fixed some of the side marker lights that have had a wiring break for a long time; at the rear edge of the seatbox.
Touched up paint here and there all over the trike.
Removed the trailer hitch; I haven't used the trailer in years, and it stick out far enough in back to cause problems parking in the new wierdly-rearranged "breakroom" at work. If I need it it only takes three bolts...
Verified the new air chuck works exactly like I wanted it to. Clip it on--easily!--and turn the air pump on, watch the gauge, squeeze the lever to release it and it pops right off, no arguing with it, no fussiness, no minutes of frustration trying to get my fingers to the right angle to be able to hold the lever-action-type onto the stem and force the lever down at the same time.
Finally, I don't have to dread simply airing a tire up.


********
Like most of my repairs and builds, it was an unnecessarily complicated adventure. Most of the complications arise when the tool I need at the moment doesn't work or breaks, and to fix it I need to fix yet another tool so I can repair the first one that then lets me fix what I really needed to fix. Of course, everything always works perfectly when I put it away, it only fails when I am actually trying to use it. :lol:
Case in point: The box fan was a nearly new Lasko, actually storebought. Worked perfectly when I last used it months ago. But when i needed to use it this week, of course it seemed...slow--even on high, it didn't move enough air. Figured it was just me being too hot and wishing for more.
Then, a couple days back, it began to do that thing flashlights do with their lights when their batteries are low--the motor slowed dramatically, then sped back up, like a loose plug-in. But, no, and it was not a loose connection.
Unplugging it, turning the blade thru the grill with my finger, it had serious resistance.
Great.
That means it is yet another of those fans they built the motor without oiling the wick pads in the swivel bushings on the shaft. (almost none of the fans I ever have to deal with have ever had any oil on those, so it's just dry metal contact, from the factory.)
So, apart the *entire* fan comes, just to get to those.
Well, I learned a long time ago that the oil is really never long enough lasting, so I started using the red automotive bearing grease I use on all the bike parts on those--packing the entire bushing space with it. I have never had to re-service a box fan that I've done that to. :lol: Well, not for *that* problem--the capacitors fail, and sometimes the switches.
But they spin really well.
********
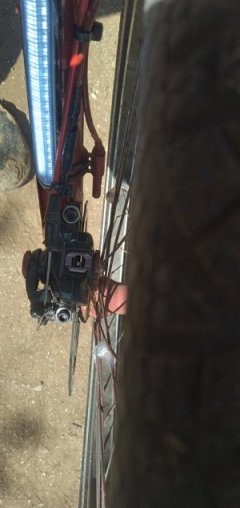
The brake light switch is a microswitch ziptied and siliconed (to prevent shifting around) to the caliper adapter. It has a roller arm that presses against the tip of the caliper arm, so when hte lever is pulled and the caliper rotates away from the switch, it changes the state of the microswitch. I used the NC contact set, so the light is on if the swithc is not held open by the caliper. Even a light pull of the lever, barely at all, will activate the brake light.
Someday, I tell myself I will make a little bent piece of metal with some holes in it to bolt the thing to it.
********
The new lights, those black-outlined white bars on the front of each fork leg, are from aliexpress or ebay several years back. I'd bought them for the rebuild of CrazyBike2 into the Cloudwalker Cargo Bike, but then Kirin and Yogi died, and I had a hard time caring about much of anything for half a year after that. I've never gone back to build that bike, and if I ever do I'll just buy new ones for it.
They are pretty bright; lots of bike headlights are way dimmer than these, and no better focused. I may install some diodes in the main white marker light portion to dim that part; it won't affect hte amber turn signal brightness.
They must use the same chip in these as they do on the strips I use on the canopy frame for the upper markers and turn signals, because when I power up the trike, those are synchronized in their "sweep" with these new strips, and the turn signals are also sync'd. Looks neat.
********
The caliper adapter problem:
The holes on the new dropouts *appear* to be positioned the same relative to the *axle* as if theyw ere a front-fork-mount version of the IS type for the *right* side of the fork.
However, they are rotated back toward the fork in such a way as to cause any normal adapter (for larger than 160mm rotors, at least) to intersect the fork itself at the top/rear--if they were on normal dropouts, those wouldn't do that, because they'd be much mroe vertical, much less horizontal/diagonal.
So any adapter I can use has to basically shift the whole caliper side forward by around a centimeter, be taller than a normal adapter by at leasat that much too, *and* potentially rotate the forward end of it *up* sufficiently to match the rotor curve at that point, or the back end down, depnding on the height.
There doens't appear to be an adapter database anywhere, so I am simply having to look at every adapter I can find, and see if any of them have a side-on view, that I can then pixel-measure to find out if it has the clearance for what I need.
Of course, I don't need to do *that* step until i find one that is even remotely the right shape, and so far none of them seem to be.
Still looking....
Well, as done as I can be, until I can find a caliper adapter to let me use the 203mm rotor again.
Painted, cabled, wired, tied down.
Installed the new fork marker/turnsignal bars, replacing the old janky LED strips.
Reinstalled the speedo sensor, and glued new magnets to the spokes, replacing the ziptied-on badge-holders.
Installed one fo the old janky LED strips as a wrap around the headlight, mostly as amber downlighting on the wheel itself.
Fixed some of the side marker lights that have had a wiring break for a long time; at the rear edge of the seatbox.
Touched up paint here and there all over the trike.
Removed the trailer hitch; I haven't used the trailer in years, and it stick out far enough in back to cause problems parking in the new wierdly-rearranged "breakroom" at work. If I need it it only takes three bolts...
Verified the new air chuck works exactly like I wanted it to. Clip it on--easily!--and turn the air pump on, watch the gauge, squeeze the lever to release it and it pops right off, no arguing with it, no fussiness, no minutes of frustration trying to get my fingers to the right angle to be able to hold the lever-action-type onto the stem and force the lever down at the same time.
Finally, I don't have to dread simply airing a tire up.
********
Like most of my repairs and builds, it was an unnecessarily complicated adventure. Most of the complications arise when the tool I need at the moment doesn't work or breaks, and to fix it I need to fix yet another tool so I can repair the first one that then lets me fix what I really needed to fix. Of course, everything always works perfectly when I put it away, it only fails when I am actually trying to use it. :lol:
Case in point: The box fan was a nearly new Lasko, actually storebought. Worked perfectly when I last used it months ago. But when i needed to use it this week, of course it seemed...slow--even on high, it didn't move enough air. Figured it was just me being too hot and wishing for more.
Then, a couple days back, it began to do that thing flashlights do with their lights when their batteries are low--the motor slowed dramatically, then sped back up, like a loose plug-in. But, no, and it was not a loose connection.
Unplugging it, turning the blade thru the grill with my finger, it had serious resistance.
Great.
That means it is yet another of those fans they built the motor without oiling the wick pads in the swivel bushings on the shaft. (almost none of the fans I ever have to deal with have ever had any oil on those, so it's just dry metal contact, from the factory.)
So, apart the *entire* fan comes, just to get to those.
Well, I learned a long time ago that the oil is really never long enough lasting, so I started using the red automotive bearing grease I use on all the bike parts on those--packing the entire bushing space with it. I have never had to re-service a box fan that I've done that to. :lol: Well, not for *that* problem--the capacitors fail, and sometimes the switches.
But they spin really well.
********
The brake light switch is a microswitch ziptied and siliconed (to prevent shifting around) to the caliper adapter. It has a roller arm that presses against the tip of the caliper arm, so when hte lever is pulled and the caliper rotates away from the switch, it changes the state of the microswitch. I used the NC contact set, so the light is on if the swithc is not held open by the caliper. Even a light pull of the lever, barely at all, will activate the brake light.
Someday, I tell myself I will make a little bent piece of metal with some holes in it to bolt the thing to it.
********
The new lights, those black-outlined white bars on the front of each fork leg, are from aliexpress or ebay several years back. I'd bought them for the rebuild of CrazyBike2 into the Cloudwalker Cargo Bike, but then Kirin and Yogi died, and I had a hard time caring about much of anything for half a year after that. I've never gone back to build that bike, and if I ever do I'll just buy new ones for it.
They are pretty bright; lots of bike headlights are way dimmer than these, and no better focused. I may install some diodes in the main white marker light portion to dim that part; it won't affect hte amber turn signal brightness.
They must use the same chip in these as they do on the strips I use on the canopy frame for the upper markers and turn signals, because when I power up the trike, those are synchronized in their "sweep" with these new strips, and the turn signals are also sync'd. Looks neat.
********
The caliper adapter problem:
The holes on the new dropouts *appear* to be positioned the same relative to the *axle* as if theyw ere a front-fork-mount version of the IS type for the *right* side of the fork.
However, they are rotated back toward the fork in such a way as to cause any normal adapter (for larger than 160mm rotors, at least) to intersect the fork itself at the top/rear--if they were on normal dropouts, those wouldn't do that, because they'd be much mroe vertical, much less horizontal/diagonal.
So any adapter I can use has to basically shift the whole caliper side forward by around a centimeter, be taller than a normal adapter by at leasat that much too, *and* potentially rotate the forward end of it *up* sufficiently to match the rotor curve at that point, or the back end down, depnding on the height.
There doens't appear to be an adapter database anywhere, so I am simply having to look at every adapter I can find, and see if any of them have a side-on view, that I can then pixel-measure to find out if it has the clearance for what I need.
Of course, I don't need to do *that* step until i find one that is even remotely the right shape, and so far none of them seem to be.
Still looking....
Today, just before I reached home, the lefthand wuxing ebrake handle, which has never been used for pulling a mechanical brake cable, snapped just outside the pivot point.
it only ever has the tesnion from it's own spring, and the *tiny* tension of the ebrake switch, and the barely larger tension of the cable-operated throttle that controls the variable ebraking of the phaserunners.
So...i don't konw what cuased it to snap--i had just barely begun to pull it to slow gently for the last stop before home when it came off in my hand.
Best guess-casting defect. The entire exposed surface is rougth and shiny, like something that experienced a sudden excessive shock, but...it didn't.

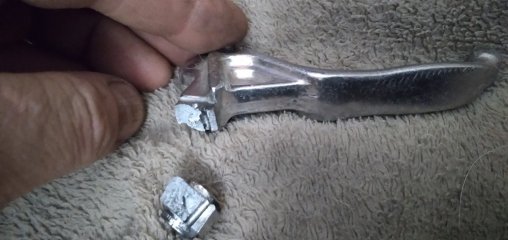
Took at least 10-15 minutes to locate my spare identicla lever, so i could just swap out the handle and not have ot take anyting apart on hte handlebars or wiring. easy fix, but...annoying.
In other news, the handling of the trike with the new dropouts is...solid. Different, but good. Better? Maybe. Have to get used to it first.
it does now track straight without my hands on the bars...for a crowned road when i'm on the right. On a flat road it tracks just slighly left.
Braking is good enough--once the pads bedded into the rotor, it grabs well eough, though skidding the wheel requires my full hard grip, which hurts.
The caliper and rotor get VERY VERY hot. The rotor is blued. The caliper, the two times I have had to hard brake because of idiots in traffic, smelled like hot paint. Not with my nose down there. From my seat a few feet away behind it. I thought it was car fumes or something, but i retested the hard braking at home, trying to measure temps with an IR gun (no useful results) , and teh smell definitely came from there. I
t might be the calpier being so hot that it is heating the paint on the fork itself, such as where it all bolts onto teh dropout. Might be the actual caliper anodizing or paint, or something else. Either way, it's VERY VERY hot--I could not even touch the caliper after braking--I did not try the rotor.
The caliper and rotor got hot before, with the 203 rotor, but not *this* hot.
Still works, though.
it only ever has the tesnion from it's own spring, and the *tiny* tension of the ebrake switch, and the barely larger tension of the cable-operated throttle that controls the variable ebraking of the phaserunners.
So...i don't konw what cuased it to snap--i had just barely begun to pull it to slow gently for the last stop before home when it came off in my hand.
Best guess-casting defect. The entire exposed surface is rougth and shiny, like something that experienced a sudden excessive shock, but...it didn't.
Took at least 10-15 minutes to locate my spare identicla lever, so i could just swap out the handle and not have ot take anyting apart on hte handlebars or wiring. easy fix, but...annoying.
In other news, the handling of the trike with the new dropouts is...solid. Different, but good. Better? Maybe. Have to get used to it first.
it does now track straight without my hands on the bars...for a crowned road when i'm on the right. On a flat road it tracks just slighly left.
Braking is good enough--once the pads bedded into the rotor, it grabs well eough, though skidding the wheel requires my full hard grip, which hurts.
The caliper and rotor get VERY VERY hot. The rotor is blued. The caliper, the two times I have had to hard brake because of idiots in traffic, smelled like hot paint. Not with my nose down there. From my seat a few feet away behind it. I thought it was car fumes or something, but i retested the hard braking at home, trying to measure temps with an IR gun (no useful results) , and teh smell definitely came from there. I
t might be the calpier being so hot that it is heating the paint on the fork itself, such as where it all bolts onto teh dropout. Might be the actual caliper anodizing or paint, or something else. Either way, it's VERY VERY hot--I could not even touch the caliper after braking--I did not try the rotor.
The caliper and rotor got hot before, with the 203 rotor, but not *this* hot.
Still works, though.

lnanek
🚴♂️ Mega poster
Yeah, I got a pair of Wuxing ebrake handles with a third party kit off AliExpress once. I think that's the only time I've never ridden a part because it felt too cheap and plastic-like. I've replaced stuff for being broken or too heavy or underpowered before plenty of times, ha.
I think I looked them up separately after and they were selling for like $5. No idea how they get them that cheap. Melting trash cans off the street to get the metal?
I think I looked them up separately after and they were selling for like $5. No idea how they get them that cheap. Melting trash cans off the street to get the metal?
I agree. Possibly combined with flawed design.Best guess-casting defect.

The caliper and rotor get VERY VERY hot. The rotor is blued.
The color of heated mild steel can be used to estimate its temperature. Light blue is approaching around 600F. Stainless resist oxidation so its surface temperature will be higher before it begins turning blue.
Similar threads

- Replies
- 44
- Views
- 9,921
- Replies
- 15
- Views
- 4,743
- Replies
- 20
- Views
- 4,514
- Replies
- 12
- Views
- 5,004
- Replies
- 0
- Views
- 1,562