Custom_CHRoMo_CRuiSER

As always, gorgeous build!

Can't wait to see it up and rolling!

I really like that two piece complex double bend in the down-tube, always wondered how those were made. 8)

Just curious why you used Alu for the saddle pan, extra "cooling" for the ahem caboose? :lol:

I would have thought you would use steel, or maybe it was just easier and something you had laying around?
 
liveforphysics said:
If you want it strong mate, dont have him TIG the bend, each weld reduces the temper of the alloy in the HAZ dropping it to T-0 or T-1, and I bet its likely at T5 or T6 right now.

Great to hear from you buddy!


Its actually only added support, the original seat pan is like 3mm+ thick steel concaved
and likely alone enough to mount plates to and its as heavy as hell, its madefor a bobber or chopper

i actually cut the plate before bending too Luke, like half way through it without a
metl brake i couldnt get the sharp angle without doing this ;) lil TiG
wont be an issue along with the steel seat pan bolted too it even your ample
self would have trouble bending it i think teehehe :mrgreen: the side plates will have 6x high tensile steel bolts per plate
when finished should be ample strong enough... I could if you thought it would help whack the lot in the
oven turn it up high and let it all cook for 8 hours or so after welding?


LI-ghtcycle said:
Just curious why you used Alu for the saddle pan, extra "cooling" for the ahem caboose? :lol:

I would have thought you would use steel, or maybe it was just easier and something you had laying around?

Really a weight/looks thing buddy, eventually will have all the ali anodised to fit
in with the planned colour scheme ;) Saves a tad of weight too i guess, its also
much easier to work with than chromo or even plain ol steel...

cheers fellas

KiM
 
*BuMP*

Shit has it been that long since an update dear me soz fellas..
I have been working away slowly on the bike, shes now assembled in rolling
state minus electrics. I had been taking snaps as i went along i think
though i have lost alot of these pics due to an error on my part formatting
a drive on the gurlfriends daughters pc, i accidentally formated the small
USB external drive i had been transfering pics too in the workshop...anywayz
here's what i have thus far-->

First a step back to the Turnigy CA120...having heard from Thud few
days ago he has advised he has a box ready for assembly for this motor
so i shall be pressing forward with it rather than running the original
2 speed THuDSTeR box and V1 rewound Turnigy...
I bought some motor winding varnish to smother over this
baby, cost more in postage IIRC got it off ebay from UK

View attachment 9

IMG_20121217_184507.jpg

If i ever run out of the "green stuff" as if haha but if i do a quick sniff
of this varnish will put me in lala land no doubt, she has an odour!
I hope it will penertrate in and help 'seal' any wires that might have
been chipped in the winding process, bit of extra protection anywayz
the motor runs fine sensor-less on the bench using the CC120 controller
i think i posted video few pages back of that now i have the go
ahead on a box from da MaN i shall fit halls and see how she runs sensor-ed...fingers crossed.

The frame/bike, i think we left off with the suspension seat mocked up
well i went ahead and purchased sealed bearings, used a wood work router
to recess these aforementioned bearings in the ali plate heres how it went-->

IMG_20121218_130255.jpg

IMG_20121218_131635.jpg

Super technical stuff, few nails and a left over piece of MDF to secure the ali to
then have at it freestyle like with the router worked a freakin treat bearings are nice snug fit...

IMG_20130109_142634.jpg

IMG_20130109_142658.jpg
YES! i know the shock is round the wrong way its mock up shot
will be reversed in finally assembly, suspension seat is a
WiNNaGH
very cushy so much so i ordered a slightly heavier sprin
the missus on it its perfect with my fat ass its a lil soft and bottoms out
...


Need a few custom spacers made, i will use polyethene board i have here for those no probs
a other than that its ready to rock!

Frame..i have added some additional bracing which will also double as mounting points
for the center panel the 18s custom jonescg LiPO pack will be mounted in/on..

IMG_20130114_112854.jpg

As per usual, CAD was used :mrgreen: Cardboard Aided Design
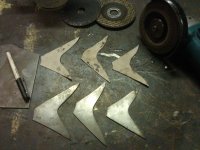
Brackets cut from CHRoMO 4130 using angle grinder and cut off disk, shaped
with linisher and sandpaper prior to welding.

View attachment 2

IMG_20130118_141426.jpg

Apologies among the photos lost appear to be close ups of the
brackets and frame, ah well, you get the picture...might
notice a beefy 3inch rim/Maxxis tire fitted now too-->

How she sat as of yesterday-->

IMG_20130204_122850.jpg

I took a heap of shots this is the only bloody one that worked out, had light coming left
of photo made for fuzzy shots on the ol HTC phone...

Plans now, move to fabricating the battery mounting panel, for now i'm
and going with aluminium as per the original bike (prior to CF replication of panel)
The panel will mount at 4 points as per the old bike, the battery however takes
up far less rel-estate... Hoping to get something more to show
motor wise and battery mounting before the end of the week...

ciao for now lads...

KiM
 
Looking good! I think our bikes are just about even progress wise, although your probably ahead, mine still needs the motor mounted. :(
 
Nice Kim, nice. 8)
 
This is a very nice build! I like that you fabricate so much with just sheetmetal/tubing.
One thing I am curious about is the layout of the frame. The look of it is appealing, but how did you decide positioning of handlebars, seat and pedals with regard to each other and the wheels?
Did you decide on a prefered seatingposition for your own body, and then make a layout from that? Did you make any changes from the first chopperframe?
 
Looking good Kim as always. Liking the progress. I'm down to body filler and paint, but ridding too much to do it.

Clay
 
Farfle said:
Looking good! I think our bikes are just about even progress wise, although your probably ahead, mine still needs the motor mounted.

Thanks Farfle, I have been following your thread closely (as i always
do your work is top notch kudos
) This new build of yours is yet
another bar raiser! Looking forward to seeing the finished product
will look like something off a showroom floor im thinking, Best of
luck with the rest of the fab work mate...

Spicerack said:
Nice Kim, nice.

Thanks Andy, should be killer fast to ~90km/hr catch me if you can ex-fuzz maaan teehehe :mrgreen:

Wheazel said:
This is a very nice build! I like that you fabricate so much with just sheetmetal/tubing.

Thanks matey appreciate it, not all that hard though just a lil time consuming...

Wheazel said:
One thing I am curious about is the layout of the frame.
The look of it is appealing, but how did you decide positioning of handlebars
seat and pedals with regard to each other and the wheels?

I worked out the distances for the first frame, the seat distance from the
frame was the only real measurement i used IIRC 600mm from center
of seat to bottom bracket... YPedalMaN gave
me the measurement waaaay back on another build i continued using
this as it suited my leg length.. :wink:

Wheazel said:
Did you decide on a preferred seating position
for your own body, and then make a layout from that? Did you make any
changes from the first chopperframe?

Being a paraplegic, i required a laid back seating position, with a not to high seat height
so i can transfer from wheelchair to bike reasonably easily. This seating position is
just the average crank forward though, you see it on other cruisers nothing ground breaking.
I did make changes actually, what i did before selling the old frame was do a CAD drawing
i.e Card Board Aided Design LoL i did a full scale trace of the frame extending the new frame by approximately an inch. I have kept the CAD drawing
for future use if ever needed to...FYI:- (1000w) Matt.P :p

flyinmonkie said:
Looking good Kim as always. Liking the progress. I'm down to body filler and paint, but ridding too much to do it.
Clay

Thankyou Clay, should come together a little faster now, im dividing my
time between my Garage and the missus, taking some time out so it gives
me heap more time to work on the bike ;) Handful of 'booty calls'
the only distraction LoL :p 8)

UPDate!

I got to work on the panel that will 'house' the 72v 15ah LiPO pack yesterday
unfortunately i left my cuttoff disks at the workshop at my place
so was stuck with a half used disk to completely cut the panel
i got most of the outside done, obviously still requiring the center to
be cut out, right angle ali bolted to the surrounding cut out, this will form both
a flat base for the LiPO pack to sit on and provide 'stiffening' to the panel.
I also will surround the opening with some CF (carbon fiber) ill use the old
battery panel for this, its otherwise useless as i no longer have the old frame...
waist not want not i always say or as Amberwolf would put it
're-purposing' hehe.. I will make a plexi housing for the
pack also...but for now this is where i am at with it-->

IMG_20130206_124222.jpg

^^ Again some 'CAD' to get the profile of the frame/panel within some sort of similarity :oops:

Took me an hour or so of faffing about getting a shape i was happy with, still some 'shaping'
required, this wont be the final product by a long shot im thinking LoL...Its cut from 3mm T5 ali FYi..

IMG_20130206_150253.jpg

IMG_20130206_150637.jpg

I picked up some beffy right angle ali for the battery support, shall cut the opening and begin fitting
out the panel today.

To hold the panel in place ill use some nice CF brackets/tabs-->

View attachment 4

IMG_20130206_150413.jpg

Third time right! i hope LoL.. frock have i ballsed up the fitting of halls on the Turnigy CA120 motor or more
so the slots in the stator where the halls were to be placed aaaargh anywayz, with some guidence from
guru ThuDSTeR i think i have it set right now, i will run wires and connectors today and try and
spin the motor slowly with an old non programable 36v controller i got from Hyena a few years ago.
No idea if it will work but its all i have at this precise moment in time until the 18Fet Infineon Thud has offered
to build for this bike arrives...

IMG_20130208_065540.jpg

I did the slots previously before i wound the motor as its rather
difficult/fiddly to do ounce wound, i used the good ol dremel and a diamond bit to hack away a recess
to fit halls in, they actually better than the first ones i did so bit of a blessing. The concave area
allows the halls to seat nicely, little industrial grade epoxy and wholla!!

I also have an issue (Rodgah had same problem on his stainless steel cuiser IIRC?) I'm not
using the old extra wide sturmey archer three speed as i did in the previous build, i have an extra
wide steel hub from choppersUS unfortunatey though, the disk brake sprocket adapter from Mr Recumpence SiR
has a slight tapper on it and thus fouls on the hub before its fully seated SO i am making a
spacer from 3mm ali plate hopfully this will work if not Matt.P (1000w) said he can pop it on the lathe at a friends
workshop and rectify the problem at hand-->

IMG_20130206_160728.jpg

Thats all i have for now chaps, thanks for the kind words and encouragement, should have some more
to offer up later this arvo for those following the build..

happy trails y'all.. 8)

KiM
 
rodgah said:
the spacer will work kim but it will offset the brake disc even more, if you got access I would just run matts adapter on a lathe, doesnt take much. Lookin good, cant wait to see that 120 go.


True and space is tight over the left side ...i might just take to it with the air die grinder and remove a bit of
ali so she seats properly.. shall check it out tomorrow.

I played around with the CA120 this arvo, i finally wired the halls up

IMG_20130211_132847.jpg

IMG_20130211_132858.jpg

checked with the Lyen Tester that they all worked, then tried using the
old 36v no name controller unfortunately nothing happened
shall have to wait for new controller before trying her sensored again
for the hell of it i hooked up the CC HV120 i have lying about, spun the
motor up and let it run for a 5-10 minutes, as this motor has
never been used other than my testing it after rewinding it
I thought the bearings could do with a 'run in', i guess the newly applied varnish on the
windings could deal with some warmth too, i piled a whole bottle on the motor
had a slight odor when she got warm, very slight... anyhoot i also
cut the panel and fastend right angle to it so as the 72V lipo pack can sit in it, i havent got pics
i shall grab some tomorrow when i finish the fitting of swith and
cambuckle straps...

Night peeps

KiM
 
EvoBikeShop said:
Love the suspended seat! Nice job on the build. Cant wait to see in finished.

Cheers mate, works well also reminds me, im still waiting am order
from Chain Reaction been ~10 days :shock: bit longer than usual
for them, have a 800 pound spring for the seat the 600lb one on it is a tad 'soft'
for me.

More progress to report!

I have the battery mounted in the panel! I have used right angle to support and
hold the battery in place-->

View attachment 7

IMG_20130212_114101.jpg

I have elongated the mounting holes on the ali, once i have
neoprene rubber mounted on the angles i can then push them in to
help hold the battery in place

IMG_20130212_155104.jpg

I have decided cambuckle straps will be used to keep the battery
from moving, it also allows for reasonably quick removal
of the said battery if anything should go wrong and or for
maintenance i.e swamping cells if/when needed

IMG_20130212_163242.jpg

IMG_20130212_163301.jpg

I didn't have a new sheet of plexi on hand its at the garage at the missus place :(
all i had was some old scratched kerbside found plexi, cut it and put it in
place for time being, new plexi will completely cover the side of the battery
this is only the secondary protection, bere in mind i will have a carbon fiber
housing over the entire panel/battery... ;) The plexi still allows visual checks for swollen
packs..

For those a lil curious to the size of this 72v 15ah LiPO pack-->

IMG_20130212_163454.jpg

IMG_20130212_163343.jpg

IMG_20130212_163409.jpg

This pack comes in smaller all up than my old 50v 20ah setup!
Not sure on the weight apologies no working scales...

I'm off to the girlfriends tomorrow, i shall likely bring the bike back up to the garage as
i'm at the stage i need to start fixing the panel to it
i also need to drill motor mount holes, weld some tabs on
the seat stays to mount the wheelchair tow assembly
AND of course mount the stabilizers aaargh...dramas there :shock: now i have
upped to 72v i dont have a dc-dc converter that will handle the higher
voltage, any ideas peoples? need 12-15v ~2-3amp for my linear actuator and lights...

Shall be back with an update likely Thursday, be a lil 'preoccupied' tomorrow
night
smiley-sex016.gif
for an update... :mrgreen:

back soon trendsetters...

KiM
 
http://www.amazon.com/gp/aw/d/B0057KIHAI/ref=mp_s_a_1?qid=1360687016&sr=8-1&pi=SL75

Have been using these guys unmodified on half a dozen bikes including mine for a year now. Handles 54w of leds and other miscellania just fine. They work well on everything from 12s-30s and probably higher, but have not strung together more cells than that.
 
Hey Kim,
Just to confirm, I am looking at an 18s3p pack there correct? 66.6 nominal voltage....74v hot off the charger.... :twisted:
 
Thud said:
Hey Kim,
Just to confirm, I am looking at an 18s3p pack there correct? 66.6 nominal voltage....74v hot off the charger.... :twisted:

You are indeed ThudSTeR... jonescg custom LiPO pack FTW :)

SamTexas said:
Amazing skill, planning, patience and execution. Subscribed.

Cheers Sam, after using nothing but a drill and hand files yesterday it suuure made me miss my
compressor and air die grinder grinder aargh... sore arms this morning!

KiM
 
The 8 amp one I linked is about 7"x 2.25" by 1.25",

I have used this guy before, but they get unstable around 60v. Should be fine with a 66v nom pack as you shouldnt run under 62v anywho.

http://www.amazon.com/gp/aw/d/B005EK5SNA/ref=mp_s_a_1?qid=1360714072&sr=8-1&pi=SL75

Edit* this guy is about 5"x1"x1.5", sorry for the us measurements
 
Thanks again Farfle... i might even have an old lappy psu in my box of psu shall have a look later this arvo.

Failing that, Greentime unit is about same size as the 48v dc dc converter i have now! so that will be the winnagh if i have nothing at hand...cheers fellas :) my wobbly legs thank you lol

KiM
 
Cheers for the kind words people :)

I Got a lil more done yesterday...

IMG_20130213_163928.jpg

IMG_20130213_163941.jpg

IMG_20130213_163956.jpg

IMG_20130213_164107.jpg
^^^Also re-shaped the ali bottom bracket, everything is more 'rounded'
this time round...

The heavy rear spring just happened to be delivered when i was at the missus place -->

IMG_20130213_175501.jpg

Its still a little on the soft side for my liking looks like ill have to mod the
setup, drop the shock mounting point lil lower should do it..without any 10mm ali on hand ill have
to resort to cutting and bolting a new longer piece of 8mm thick ali on and make it look like it was meant to
be like that :shock: shall sleep on that one... It will have to invole lightning holes
and stainless steel cap screws no doubt... maybe some carbon fiber :shock: can
never have enough CF LoL

IMG_20130213_164024.jpg

It was near 40C in the workshop yesterday, that and carbon fiber dust made for a
very grubby KiM..girlfriend wouldnt give me hugs when she got home, unsure why :-|


I have moved the bike up to my place now, shall continue the few small things i have left to do
so its all ready and waiting for the two speed and controller...

More soon folks

KiM
 
jonescg said:
MY EYES! THESE GOGGLES THEY DO NOTHING! :shock:

HAHAHA funny man ... Jays got half a chub on, i really should pull the pic
to stop Jay pulling his prick teehehe...

LiPO Protected!

Mr Jonescg aka CHRiS funny man in post above :p called by to grab some 6mm bullets
off me, he also bought me up some rubbery material i fitted to the
end of the battery pack, shes now solid in the panel no movement
up down or side ways, i couldn't be happier with the cambuckles!...

I also grabbed the clear sheet of plexi from the girlfriends yestrday, so this morning
i broke out the ole' electric fry pan (soz no pics) Turned it up to full
cut some plexi and layed the bend line on the endge of the lecky fry pan this
is the result-->

IMG_20130215_114803.jpg

Its hard to see but i have bent the ends over, its a 'press fit'
jagged that a beauty not once but, TWICE! LoL some shots front and back-->

IMG_20130215_114700.jpg


This is obviously not a water tight solution, this is a 'fun machine' not a commuter
i dont and wont ever ride in the wet with my dodge balance, when the carbon fiber fairing
is over the top though, it will be 'splash proof' In the event of a fall
i am confident the LiPOs will remain in one piece, in the result of a lipo fire, click two
cambuckles and kick the battery onto the ground!

More soon peoplez...

KiM
 
Back
Top