Idiots guide to rewinding Revolt 120 pro

Thanks Danny, nice to hear that the tinkering is appreciated.
I hope that the timing board will make it easy to find the perfect hall position, if it can be improved in the first test then i will open motor and readjust the positions - i don't plan to use the motor on my bike with the timing board connected.

I have received wire today! I will add a coat of epoxy on the stator tonight and then..
 
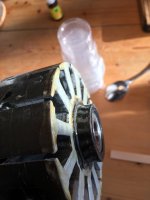
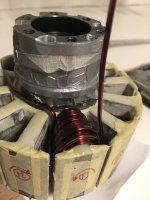
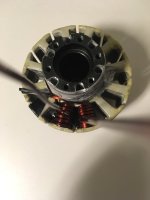
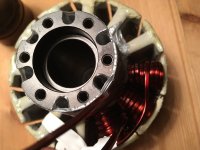
Final stator coating:
I mixed some epoxy and filler to a thick glue and coated the stator with an extra layer. I tried to build thickness to be able to support a good wire bending radius.
image.jpeg
image.jpeg
It's not easy to see in the picture but the surface tension pulls the epoxy off the slot edges so the coat is not good without fixing that somehow.
After 6 hours of curing the epoxy had turned soft like putty and was only slightly tacky and could be nudged back to cover the slot edges with just fingers (thin nitrile gloves are needed). I am really happy with the result (sorry, didn't take a pic)

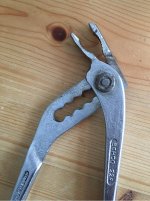
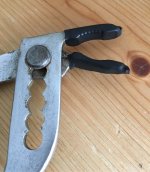
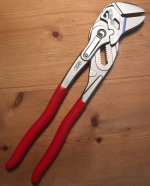
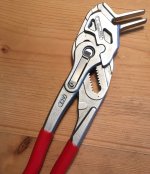
I modified the jaws on a pair of standard polygrip pliers to get a set of winding pliers. Ten minutes of cutting and smoothing with an angle grinder and this is the result:
image.jpeg
Plier jaws are covered with shrink tube to protect the copper wire from getting nicked/scruffed
 
Nice job on the pliers. Love it.

I hope that the timing board will make it easy to find the perfect hall position, if it can be improved in the first test then i will open motor and readjust the positions - i don't plan to use the motor on my bike with the timing board connected.
Do you have an oscilloscope? The reason I ask is with a 2 channel scope you can compare the sine wave of your coils to the square wave of your halls. Its a neat way of getting your halls dialled in.

i don't plan to use the motor on my bike with the timing board connected.
Ahw damn, thats the best spot for it! :lol:


Enjoying the updates

D
 
Final preparation ready (i think):
I made a wire clamping fixture to be able to tension wire by pulling on the stator (@drewjet: thanks for the tip) I used a quick release lever from a bike hub so that the clamp can be opened easily. A narrow cut with a mitre saw on the upper board is meant to route the wire and lower the pressure a little.
 
Marked the slots and cut two test wires, i think the winders at RCgroups start from the middle with one continuous length for the two opposing slots. But what to do with the loose wire piece?
image.jpeg
I cut 3320mm for one slot only. 1.5h later i had the wire all done. I am not sure how many turns, it's really easy to lose track of the counting but it should be 23 or 24.
image.jpeg
It was tough to route the wires from middle of layer 2 and onwards and result is not as exact as the trial.. I hope the wire on the adjacent teeth still fits (first coil extends past the middle of the slot but is not solidly packed)
 
Emoto said:
I wound a large rc motor once satisfying in the end ... you need a system to keep track of winds.. just a idea if you video record yourself winding , you cant loose count :D

Completely agree with that. At the same time more images/video footage of the process
 
That's a good tip, only problem is you have to watch a looot of nothing to finally get the answer..
It's really hard to get more turns than on this first coil so i have 11 chances left to learn what number of turns i actually got :wink:

Right now I am on vacation so i will pause the wind for a few days, I think i'll buy a clicker to assist with the counting when i get back home!
 
I couldn't resist doing another coil. It was twice as tough as doing the first one as it was so tight. The pliers are too thick to pass into the slot after the second layer which hindered a lot. I will probably buy one of the knipex pliers with smooth jaws and modify - having the right tools simplify the job, eh?

Looking at the finished coils there might be room for 1-2 more turns!
(And i still don't know how many turns i got on the stator now :D )
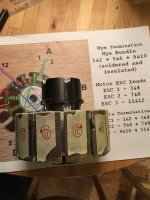
image.jpeg
 
This winding will work for all the teeth on the stator. Copper mass will be slightly above 1kg, and i think if you aim for the gold then it's possible to fit 1-2 turns extra from where i'm at. I would try 350cm for each coil if i did another stator.


The slots are slightly larger than i have sketched after the last sanding. I might correct the 3D-model and see what theoretical fill is now.
 
larsb said:
This winding will work for all the teeth on the stator. Copper mass will be slightly above 1kg, and i think if you aim for the gold then it's possible to fit 1-2 turns extra from where i'm at. I would try 350cm for each coil if i did another stator.


The slots are slightly larger than i have sketched after the last sanding. I might correct the 3D-model and see what theoretical fill is now.

any idea yet on how much the copper fill should improve by?
 
That should make a big improvement. Looking good so far. Did you ever figure out how many turns per tooth you are getting ?
 
I have done 24 turns.
I actually thought that i had too much space left after the winding, the slot openings are bigger when measured after the final sanding. It removed a lot of excess coating material that closed the slots.

I have to correct again:

Corrected slot area 290mm2
Original fill factor is lowered to 21%
Copper area with 24 turns: 24*2.5*1.25*2 = 150mm2
Fill factor 52% with 24 turns

Bummer!
I cut the wires too short to be able to wind more turns and there IS space left.
Now i can get max 25 turns winded with the wire i have left outside the slots.
 
Damn that's a real shame. Any chance you have enough wire to re-do the three teeth you've already done with longer lengths? Or more like, can you bring yourself to remove and re-do haha.

Still quite incredible that you're still able to more than double copper content with a suboptimal wind, amazing work. Very interested to see a re-characterisation of the motor when you're done, no load amps, KV and phase to phase resistance and a weigh in. That should allow for some apples to apples comparisons (and extrapolation of power potential)
 
That is amazing work larsb. Close to 150% increase in copper fill. Nice. Look forward to see how this motor turns out.
Really too bad Revolt didn't do their job right in production. I guess not too many folks will take on such a big rewinding job after spending cash on a motor that does not work properly. I am sure your LarsB edition will be a serious motor once completed.
 
larsb said:
I have enough wire but i don't have the stomach to rewind the finished coils.. Each coil is a LOT of work to do..
Can fully understand that, I had the same feelings for much less demanding winds on smaller rc motors.
I am however very willing to go through with my own rewind with the experience and knowledge documented in this thread.
I will hear your conclusions and then order the wire that is needed.
Did you have any problems with shorts during winding so far? Are you using a multimeter with "beep function" attached to the wire end and stator?
 
Another idea for the stator prep phase, do you think 3d printing end isolators with a more rounded shape would help the rewinding?
Would be an easy printjob, and fewer trial and error iterations with a stator model already done.

Otherwise it would be quite quick to trace the stator shape on a paper with a dirty glove,
and then just scan the paper and import it to a 3d software and trace the shape.

I could print in nylon for heat tolerance, or even glass fiber (non magnetic) reinforced nylon in my markforged printer.
Maybe even Abs would work. Pla would be too sensitive to heat as it goes soft long before it melts.

What is the name of the flat beak pliers?
 
I have thought about 3d printing som end plates, that would be perfect for the job and save some time. Only objection is that the heat conduction won't be good through them which is why i don't try it.

As for the fixation by gluing the coils in place during winding: i don't believe in it. If a glued coil is pushed on then the insulation might be ripped off. The wire is so stiff that this risk is a reality, there's a lot of pushing involved.

I don't know about the shorts, really should try. Since i wind separate coils then it won't make a big difference, if i get a short in one coil then i have to rewind only that coil.
 
Back
Top