
You are using an out of date browser. It may not display this or other websites correctly.
You should upgrade or use an alternative browser.
You should upgrade or use an alternative browser.
TSDZ2 EBike wireless standard (like Specialized Turbo Levo) - OpenSource
- Thread starter casainho
- Start date
casainho
10 GW
- Joined
- Feb 14, 2011
- Messages
- 6,047
You were right!! I had to change the board type on the Makefile. Then, If I press the buttons to enter the bootloader, the firmware works as I see the debugger stop and then I see the bootloader active.rananna said:how about GPIO pin assignments?
Are you using the MDK board?
But if I long press the PLUS button, I always see a reset because I have a breakpoint at begin of main(). So, what can be the reason?????
rananna
1 kW
- Joined
- Jul 7, 2018
- Messages
- 349
Yes, a long press of the plus button will write a flag to start Bluetooth in flash and then resets the board to load Bluetooth. A reset was the easiest way to clear ant and Bluetooth mem usage.casainho said:rananna said:how about GPIO pin assignments?
Are you using the MDK board?
But if I long press the PLUS button, I always see a reset because I have a breakpoint at begin of main(). So, what can be the reason?????
Try the compiled version now without debugging to see if it works.
casainho
10 GW
- Joined
- Feb 14, 2011
- Messages
- 6,047
Ok, it works at least when I force ebike = 0 and garmin = 1.rananna said:Yes, a long press of the plus button will write a flag to start Bluetooth in flash and then resets the board to load Bluetooth. A reset was the easiest way to clear ant and Bluetooth mem usage.casainho said:rananna said:how about GPIO pin assignments?
Are you using the MDK board?
But if I long press the PLUS button, I always see a reset because I have a breakpoint at begin of main(). So, what can be the reason?????
Try the compiled version now without debugging to see if it works.
Previous I saw the reset because it effectively resets after long press on PLUS!!
Tomorrow I will test more.
rananna
1 kW
- Joined
- Jul 7, 2018
- Messages
- 349
Good news - we got there!casainho said:Ok, it works at least when I force ebike = 0 and garmin = 1.
Previous I saw the reset because it effectively resets after long press on PLUS!!
Tomorrow I will test more.
I will also compile the latest version of TSDZ2 wireless to confirm it still works fine with your firmware.
However, I have previously tested all 3 user case scenarios using an edge computer and Simulant+ (ANT simulator from Garmin) set up as a ANT LEV device, and it seems to be working fine.
Let me know how you make out.
casainho
10 GW
- Joined
- Feb 14, 2011
- Messages
- 6,047
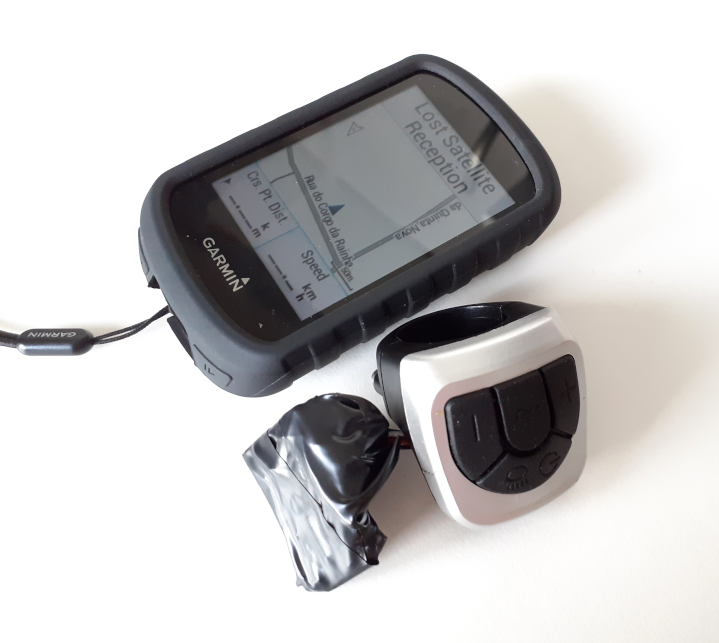
So, the assist level changing on the wireless remote works very well, no missing clicks even if on the mobile app or on the Garmin Edge there is a delay showing the value:
[youtube]KHbebZZT29E[/youtube]
@rananna,
When we say that we would like the system to be easy to install, then we must consider and recommend to users buy instead a commercial remote and that means we need to develop the system thinking on that (this is part of advantages as also need to use standards) - our remote must behave similarly:
But our remote can have some extras that will make it better but will not invalidate the usage of commercial ones:
- connection for the brake sensors
- we can show some information to users using the RGB LED
I think the wireless board should have a big press button and the RGB LED, for things like:
- turn on/off the system with long press
- change the assist level with 2 quick press
- see assist level with quick press (will blink the LED xx times for assist level from 0 to 7)
- some way to select show the battery state using the LED blinking xx times
- RGB LED blink every time assist level is changed, brake is active, etc.
This would mean that only the wireless board is the necessary part, no even the remove, so, no afraid of battery fail because of being discharged.
Next step is to validate current wireless board (it is raining a lot on this days, is hard to go outside to experiment all this) and then start to document as also design the smallest 3D printed box for it, keeping the RGB LED accessible to be seen but also block the power LED (the RGB LED can also be used as power state, like with small PWM value so small light and increase the brightness for the other states like show assist level changing or brakes). The only extra thing to add to current schematic is a big press button.
Also there is the 3D printing design, that must be done, for the box case for the wireless remote, that must be small as possible and show the RGB LED. Do you know if on your wireless board, the power LED can be eliminated, to save the power?
rananna
1 kW
- Joined
- Jul 7, 2018
- Messages
- 349
I'm glad that you got everything working.casainho said:So, the assist level changing on the wireless remote works very well, no missing clicks even if on the mobile app or on the Garmin Edge there is a delay showing the value:
As we discussed previously, the slight ANT_LEV display delay is due to the polling in the ANT protocol.
However, please note that the assist command is sent to the motor in about 25ms, so there will be no delay in the motor in changing assist level.
When I implemented the remote, I had this compatibility in mind.casainho said:When we say that we would like the system to be easy to install, then we must consider and recommend to users buy instead a commercial remote and that means we need to develop the system thinking on that (this is part of advantages as also need to use standards) - our remote must behave similarly:
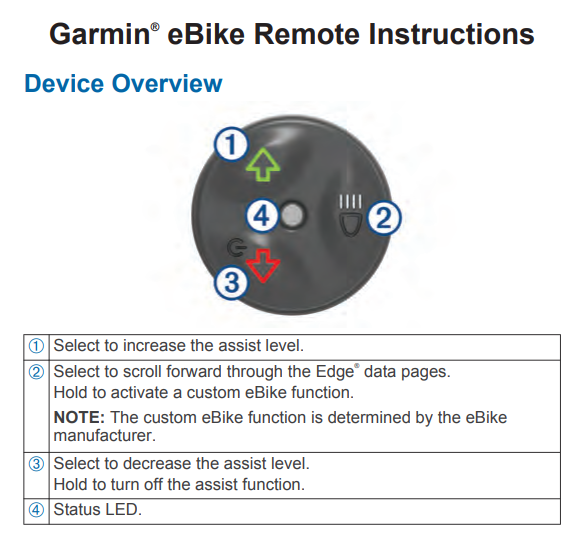
The current functionality of our remote duplicates buttons 1-3 of the garmin remote exactly.
see: (I accidently reversed labels 1 and 3, but you get the idea)

I would also like to see pwr on/off implemented.casainho said:But our remote can have some extras that will make it better but will not invalidate the usage of commercial ones:
- connection for the brake sensors
- we can show some information to users using the RGB LED
This would be very convenient
I agree, the system should be able to function without the android app or the remote.casainho said:I think the wireless board should have a big press button and the RGB LED, for things like:
- turn on/off the system with long press
- change the assist level with 2 quick press
- see assist level with quick press (will blink the LED xx times for assist level from 0 to 7)
- some way to select show the battery state using the LED blinking xx times
- RGB LED blink every time assist level is changed, brake is active, etc.
This would mean that only the wireless board is the necessary part, no even the remove, so, no afraid of battery fail because of being discharged.
Well that is a lot better than the -13C I woke up to in Canada today!casainho said:Next step is to validate current wireless board (it is raining a lot on this days, is hard to go outside to experiment all this
This will be tricky. Perhaps use transparent/translucent plastic box covers so that the LED is visible and the boards are protected from weather? Can you 3d print in transparent plastic?casainho said:and then start to document as also design the smallest 3D printed box for it, keeping the RGB LED accessible to be seen but also block the power LED (the RGB LED can also be used as power state, like with small PWM value so small light and increase the brightness for the other states like show assist level changing or brakes). The only extra thing to add to current schematic is a big press button.
Also there is the 3D printing design, that must be done, for the box case for the wireless remote, that must be small as possible and show the RGB LED.
The good news is that this is another advantage of the Nordic dongle.casainho said:Do you know if on your wireless board, the power LED can be eliminated, to save the power?
There are actually FOUR controllable LEDs on the nordic board!
LED_0 is a green power LED on one side of the board.
LED_1(red), LED_2(green), and LED_3(blue) are on the other side of the board
All LEDs can be controlled in code, including LED_0, eliminating any power draw.
I have done this for the remote control.
casainho
10 GW
- Joined
- Feb 14, 2011
- Messages
- 6,047
So, looking at the Garmin, there are 3 buttons with click on each one and long click on 2 of them:rananna said:When I implemented the remote, I had this compatibility in mind.
The current functionality of our remote duplicates buttons 1-3 of the garmin remote exactly.
- UP click: + assist level
- DOWN click: - assist level
- LIGHTS click: (not for TSDZ2) Edge data page forward
- UP long click: not defined (maybe we can use to walk assist or lights on/off - will not be available on Garmin remote)
- DOWN long click: turn on/off the TSDZ2 motor
- LIGHTS long click: (custom EBike function) maybe we can use to walk assist or lights on/off
So, I think we will need to have a configuration for user to say what wants on LIGHTS long click: walk assist or lights on/off.
And I would put motor on/off on the LIGHTS button and walk assist or lights on the DOWN button, as it works on 860C/SW102 display.
When using the VLCD5 remote, we have 4 buttons and I think we can use the extra button to be the Edge data page backward.
The idea of using a small box for the wireless board on the remote, means users can chose any remote, like I think the 860C display remote is the best one I ever used.
Sure, seems the Garmin remote supports that also.rananna said:I would also like to see pwr on/off implemented.
This would be very convenient
Maybe just a hole for the LED and then user put a bit of white silicone or other white glue. In fact, this glue can be important to seal the box against the water.rananna said:This will be tricky. Perhaps use transparent/translucent plastic box covers so that the LED is visible and the boards are protected from weather? Can you 3d print in transparent plastic?casainho said:Also there is the 3D printing design, that must be done, for the box case for the wireless remote, that must be small as possible and show the RGB LED.
Good!!rananna said:The good news is that this is another advantage of the Nordic dongle.casainho said:Do you know if on your wireless board, the power LED can be eliminated, to save the power?
There are actually FOUR controllable LEDs on the nordic board!
LED_0 is a green power LED on one side of the board.
LED_1(red), LED_2(green), and LED_3(blue) are on the other side of the board
All LEDs can be controlled in code, including LED_0, eliminating any power draw.
I have done this for the remote control.
Unfortunately, I am in Europe and buying that board from USA, that costs only 8€, I have to pay extra 20€ in shipping and most probably extra 50€ of taxes and work at the customs!!
Buying the board I have from China is much cheaper, about 12€ including shipping!!
Note: I am reviewing the remote firmware to see If I can do some simplification and possible power usage improvement.
casainho said:Unfortunately, I am in Europe and buying that board from USA, that costs only 8€, I have to pay extra 20€ in shipping and most probably extra 50€ of taxes and work at the customs!!
Buying the board I have from China is much cheaper, about 12€ including shipping!!
This is only partially correct. There are also some some other details on the website that we need to need to look at www.digikey.be:
1. The price of the board is 8.44 Euro
2. The delivery terms are DDP. This means Duty Delivery Paid. This means customs clearance, duties and VAT are covered by the seller.
3. The delivery at least to Belgium is 18 Euro. However if you place an order for 50 Euro the delivery if free.
A bulk order of 6 boards costs exactly 50.64 Euro and qualifies for free delivery.
The MDK board on Amazon.DE is 19.99 Euro and to avoid paying for delivery you need to order two or to have a Prime subscription.
MDK board from China is 12.99 USD + 7.00 USD shipping or 19.99 USD in total. One board is under the legal limit in order to avoid VAT and custom clearance. For more, at least here you are charged VAT + min 20 Euro custom clearance by the local post.
After writing this, I found the same board all available at www.rs-online.com, eu.mouser.com and also other similar web shops.
casainho
10 GW
- Joined
- Feb 14, 2011
- Messages
- 6,047
Ok, did not know about DDP, I am used to pay a lot for customs when receiving from USA.plpetrov said:casainho said:Unfortunately, I am in Europe and buying that board from USA, that costs only 8€, I have to pay extra 20€ in shipping and most probably extra 50€ of taxes and work at the customs!!
Buying the board I have from China is much cheaper, about 12€ including shipping!!
This is only partially correct. There are also some some other details on the website that we need to need to look at www.digikey.be:
1. The price of the board is 8.44 Euro
2. The delivery terms are DDP. This means Duty Delivery Paid. This means customs clearance, duties and VAT are covered by the seller.
3. The delivery at least to Belgium is 18 Euro. However if you place an order for 50 Euro the delivery if free.
A bulk order of 6 boards costs exactly 50.64 Euro and qualifies for free delivery.
The MDK board on Amazon.DE is 19.99 Euro and to avoid paying for delivery you need to order two or to have a Prime subscription.
MDK board from China is 12.99 USD + 7.00 USD shipping or 19.99 USD in total. One board is under the legal limit in order to avoid VAT and custom clearance. For more, at least here you are charged VAT + min 20 Euro custom clearance by the local post.
After writing this, I found the same board all available at www.rs-online.com, eu.mouser.com and also other similar web shops.
- www.Mouser.pt: shipping costs 20,00 € and DDP
- https://pt.rs-online.com/: I can only register if I am a company, so, seems they do not sell to individuals like me
- www.pt.Farnel.com: out of stock
The lowest price of MakerDiary board, is 13.5€ per unit, shipping included (found on Ebay and Aliexpress).
The Nordic board at www.Mouser.pt: 28.5€ -- more than twice the price.
beemac
1 kW
casainho said:As you say, will be need more software developments. Who would want more work to do?? And seems you are duplicating, since the wireless board will connect to the TSDZ2 display connector, if you want to exchange for the 860C display, you just unconnected one and connect then connect the other.beemac said:Another thing I liked about the ESP32 is the tx/rx passthrough so you could use the usual physical display too. That to me seems useful e.g. if your phone broke for whatever reason you could plug in an 860c and carry on...
I was picturing the box being installed nearer the motor - so wouldn't necessarily still be a cable up to the handlebars and since the TSDZ2-ESP32 project already does tx/rx passthrough I presumed the code was already mostly written but I do agree that it's probably a corner case and unless lots of people ask for it not worth doing up front.
casainho said:Ok, did not know about DDP, I am used to pay a lot for customs when receiving from USA.plpetrov said:casainho said:Unfortunately, I am in Europe and buying that board from USA, that costs only 8€, I have to pay extra 20€ in shipping and most probably extra 50€ of taxes and work at the customs!!
Buying the board I have from China is much cheaper, about 12€ including shipping!!
This is only partially correct. There are also some some other details on the website that we need to need to look at www.digikey.be:
1. The price of the board is 8.44 Euro
2. The delivery terms are DDP. This means Duty Delivery Paid. This means customs clearance, duties and VAT are covered by the seller.
3. The delivery at least to Belgium is 18 Euro. However if you place an order for 50 Euro the delivery if free.
A bulk order of 6 boards costs exactly 50.64 Euro and qualifies for free delivery.
The MDK board on Amazon.DE is 19.99 Euro and to avoid paying for delivery you need to order two or to have a Prime subscription.
MDK board from China is 12.99 USD + 7.00 USD shipping or 19.99 USD in total. One board is under the legal limit in order to avoid VAT and custom clearance. For more, at least here you are charged VAT + min 20 Euro custom clearance by the local post.
After writing this, I found the same board all available at www.rs-online.com, eu.mouser.com and also other similar web shops.
- www.Mouser.pt: shipping costs 20,00 € and DDP
- https://pt.rs-online.com/: I can only register if I am a company, so, seems they do not sell to individuals like me
- www.pt.Farnel.com: out of stock
The lowest price of MakerDiary board, is 13.5€ per unit, shipping included (found on Ebay and Aliexpress).
The Nordic board at www.Mouser.pt: 28.5€ -- more than twice the price.
I was thinking to order some more in order to benefit from the free delivery. If you are interested I can also share some with you.
beemac
1 kW
raw said:AZUR said:Casainho,
I hope it works with a 63V battery.
I invested a lot in 2 battery and 2 charger with 63V (15S).
Thanks
Thanks
sure, as long as you get a proper step-down converter that is able to handle 63v as input and output 2 - 5,5v.
I don't know if there is any headroom over the published specs - but the BTS4140N max voltage is 60v. So I think 52v bikes are the max with the circuit as designed (58.8v charged).
I have put the DC converter circuit from TSDZ2-ESP32 on our board - not published the version yet as I haven't routed it - and that's 3-65v but I can't find a drop-in replacement mosfet that would do more than 60v in spec.
beemac
1 kW
casainho said:- https://pt.rs-online.com/: I can only register if I am a company, so, seems they do not sell to individuals like me
RS will sell to individuals no problem - I buy from them all the time. £10/11EUR at the moment in stock. https://uk.rs-online.com/web/p/wireless-adapters-wifi-dongles/1769054
beemac
1 kW
beemac said:casainho said:- https://pt.rs-online.com/: I can only register if I am a company, so, seems they do not sell to individuals like me
RS will sell to individuals no problem - I buy from them all the time. £10/11EUR at the moment in stock. https://uk.rs-online.com/web/p/wireless-adapters-wifi-dongles/1769054
Oh maybe it's different since i'm in the UK... I just tried to see what their EU shipping costs are - but they don't let me add non-UK addresses for shipping... :?
casainho said:I think the wireless board should have a big press button and the RGB LED, for things like:
- turn on/off the system with long press
- change the assist level with 2 quick press
- see assist level with quick press (will blink the LED xx times for assist level from 0 to 7)
- some way to select show the battery state using the LED blinking xx times
- RGB LED blink every time assist level is changed, brake is active, etc.
This would mean that only the wireless board is the necessary part, no even the remove, so, no afraid of battery fail because of being discharged.
Next step is to validate current wireless board (it is raining a lot on this days, is hard to go outside to experiment all this) and then start to document as also design the smallest 3D printed box for it, keeping the RGB LED accessible to be seen but also block the power LED (the RGB LED can also be used as power state, like with small PWM value so small light and increase the brightness for the other states like show assist level changing or brakes). The only extra thing to add to current schematic is a big press button.
Also there is the 3D printing design, that must be done, for the box case for the wireless remote, that must be small as possible and show the RGB LED. Do you know if on your wireless board, the power LED can be eliminated, to save the power?
That is already a big step in the right direction. A nice opportunity will be to reuse the code for the buttons form the 850/860 display. This will give the user the option with no change on the existing wiring to remove the existing display and to connect the wireless board box to the buttons and to the motor. The buttons can have exactly the same functions.
+ short press - change up the assist level; long press - switch on/off the headlight;
- short press - change down the assist level; long press or hold - walk assist mode
Power is power like you suggested above.
For the RGB led a nice option is ws2812b. It costs peanuts and exit in both RGB and RGBW versions. It is widely used in many hobby projects, so you can easily find and reuse the code. Requires only one pin.
If you do that I will immediately start testing. I have the required cables and will design and print the required 3D printed box.
casainho
10 GW
- Joined
- Feb 14, 2011
- Messages
- 6,047
I am not sure you are thinking the same about the 860C buttons...plpetrov said:That is already a big step in the right direction. A nice opportunity will be to reuse the code for the buttons form the 850/860 display. This will give the user the option with no change on the existing wiring to remove the existing display and to connect the wireless board box to the buttons and to the motor. The buttons can have exactly the same functions.
+ short press - change up the assist level; long press - switch on/off the headlight;
- short press - change down the assist level; long press or hold - walk assist mode
Power is power like you suggested above.
For the RGB led a nice option is ws2812b. It costs peanuts and exit in both RGB and RGBW versions. It is widely used in many hobby projects, so you can easily find and reuse the code. Requires only one pin.
If you do that I will immediately start testing. I have the required cables and will design and print the required 3D printed box.
Well, it is early to design the box for the TSDZ2 wireless board, maybe in 2 weeks I will get it tested and final. For now, only the wireless remote hardware is finished, so please go ahead and design and 3D print the for for it:
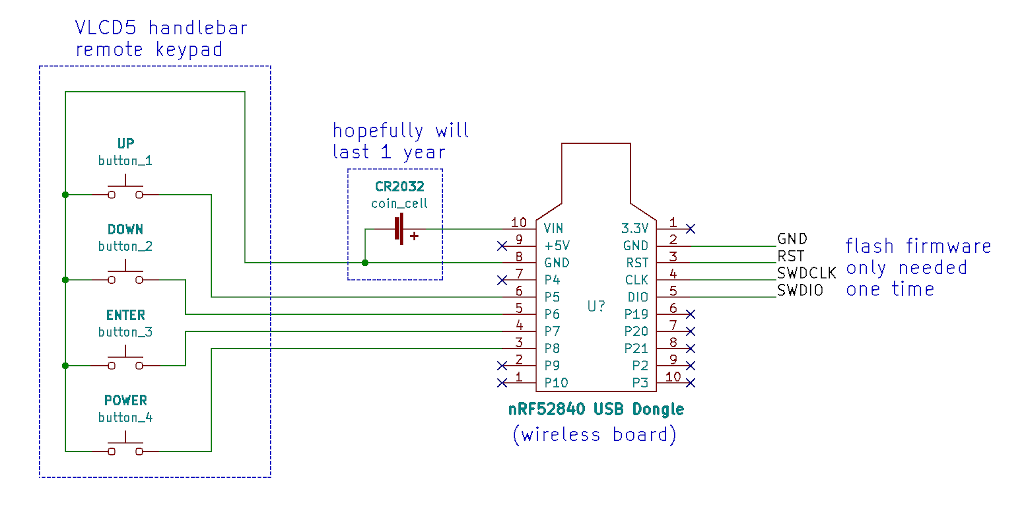
The final schematic:
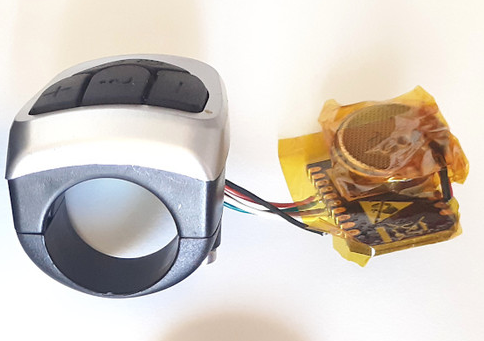
The idea is to have a black box instead of that black tape:
Waynemarlow
10 kW
Casainho, if you need any parts from RS just ask, we can always post them out to you in Portugal as presents and avoid customs duties. RS is not always the cheapest but one of the most reliable of suppliers. Farnell is also really good.
casainho
10 GW
- Joined
- Feb 14, 2011
- Messages
- 6,047
Thanks!! For now I already bought the board, should arrive on MondayWaynemarlow said:Casainho, if you need any parts from RS just ask, we can always post them out to you in Portugal as presents and avoid customs duties. RS is not always the cheapest but one of the most reliable of suppliers. Farnell is also really good.
")
But the thing is that I want to think on the final user, because the idea is that the hardware is easy accessible worldwide and not expensive (I think this is one of the keys to the success of TSDZ2 motor).
If users complain, maybe we need to rethink to suggest the MakerDiary as it is the cheapest on Ebay sent to worldwide. But yes, if users can access to the Nordic board, that will be much easier for them, at least for the remote.
rananna
1 kW
- Joined
- Jul 7, 2018
- Messages
- 349
As we discussed previously, we agreed to standardize on the Nordic board for both performance and user adoption reasons.casainho said:If LH006453446HK complain, maybe we need to rethink to suggest the MakerDiary as it is the cheapest on Ebay sent to worldwide. But yes, if users can access to the Nordic board, that will be much easier for them, at least for the remote.
The price difference is at best a few dollars worldwide; ie: Currently both boards are priced within $2 on Ali Express for delivery worldwide from China.
For North American users, the Nordic board can be bought for as little as $13usd with shipping, almost 1/2 the price of the maker diary board.
The Nordic board has easier reset options, (2 buttons), better power performance, and led control options.
The two boards also have different form factors, which would affect 3d design for packaging
Overall, the cost this wireless ebike implementation for both the remote and the wireless controller is a tiny fraction of buying a comparable wireless ebike. I don't thing we want to complicate adoption and ongoing support by recommending multiple boards.
rananna
1 kW
- Joined
- Jul 7, 2018
- Messages
- 349
rananna said:As we discussed previously, we agreed to standardize on the Nordic board for both performance and user adoption reasons.casainho said:If users complain, maybe we need to rethink to suggest the MakerDiary as it is the cheapest on Ebay sent to worldwide. But yes, if users can access to the Nordic board, that will be much easier for them, at least for the remote.
The price difference is at best a few dollars worldwide; ie: Currently both boards are priced within $2 on Ali Express for delivery worldwide from China.
For North American users, the Nordic board can be bought for as little as $13usd with shipping, almost 1/2 the price of the maker diary board.
The Nordic board has easier reset options, (2 buttons), better power performance, and led control options.
The two boards also have different form factors, which would affect 3d design for packaging
Overall, the cost this wireless ebike implementation for both the remote and the wireless controller is a tiny fraction of buying a comparable wireless ebike. I don't thing we want to complicate adoption and ongoing support by recommending multiple boards.
rananna
1 kW
- Joined
- Jul 7, 2018
- Messages
- 349
As we discussed previously, we agreed to standardize on the Nordic board for both performance and user adoption reasons.casainho said:If users complain, maybe we need to rethink to suggest the MakerDiary as it is the cheapest on Ebay sent to worldwide. But yes, if users can access to the Nordic board, that will be much easier for them, at least for the remote.
The price difference is at best a few dollars worldwide; ie: Currently both boards are priced within $2 on Ali Express for delivery worldwide from China.
For North American users, the Nordic board can be bought for as little as $13usd with shipping, almost 1/2 the price of the maker diary board.
The Nordic board has easier reset options, (2 buttons), better power performance, and led control options.
The two boards also have different form factors, which would affect 3d design for packaging
Overall, the cost this wireless ebike implementation for both the remote and the wireless controller is a tiny fraction of buying a comparable wireless ebike. I don't thing we want to complicate adoption and ongoing support by recommending multiple boards.
casainho
10 GW
- Joined
- Feb 14, 2011
- Messages
- 6,047
Yesterday I just found the Nordic board for more than twice the price on EBay. Yes, I just verified on Aliexpress, that is correct, the price of both boards there are mostly similar - this information needs to go to the wiki!!rananna said:As we discussed previously, we agreed to standardize on the Nordic board for both performance and user adoption reasons.
The price difference is at best a few dollars worldwide; ie: Currently both boards are priced within $2 on Ali Express for delivery worldwide from China.
Overall, the cost this wireless ebike implementation for both the remote and the wireless controller is a tiny fraction of buying a comparable wireless ebike. I don't thing we want to complicate adoption and ongoing support by recommending multiple boards.
The users will probably need to buy 2 boards, and I found at 17€ on Aliexpress, so 34€ for a EBike. If the price would be double than would be 68€, which for me makes a big difference.
The low price is important so this option may be favorable as the first option for TSDZ2 and second the displays.
If user opts for no remote and change assist level on the phone or on the TSDZ2 wiireless board, then I think the final price can be:
- 17€ wireless board
- 2€ 60V to 5V converter
- 9€ for the switches and other materials
30€ total.
The price of SW102 is very low, similar price: 35€.
The SW102 is hard to flash the bootloader and can not implement ANT, otherwise would be a similar option. The wireless board on the other side has the disadvantages that to include a remote (like SW102) will cost about 60€, components must be sourced from different shops, solder them, 3D print a box and assembly.
I wish this project have the most success possible (every users using it and not only the ones that have a Garmin GPS) and so I hope the prices are low to be able to convince the new users: they will have to pay at least twice the price of the display SW102 and have a fair amount of work.
Waynemarlow
10 kW
Sometimes to save a few bucks can cost hours of time and labour. Keep it as simple as possible with minimum input from the user and for an extra 10 - 20 dollars, most would shake your hands and give you the big thumbs up and spend the hours saved, enjoying their bikes.
casainho said:I am not sure you are thinking the same about the 860C buttons...plpetrov said:That is already a big step in the right direction. A nice opportunity will be to reuse the code for the buttons form the 850/860 display. This will give the user the option with no change on the existing wiring to remove the existing display and to connect the wireless board box to the buttons and to the motor. The buttons can have exactly the same functions.
+ short press - change up the assist level; long press - switch on/off the headlight;
- short press - change down the assist level; long press or hold - walk assist mode
Power is power like you suggested above.
For the RGB led a nice option is ws2812b. It costs peanuts and exit in both RGB and RGBW versions. It is widely used in many hobby projects, so you can easily find and reuse the code. Requires only one pin.
If you do that I will immediately start testing. I have the required cables and will design and print the required 3D printed box.
Well, it is early to design the box for the TSDZ2 wireless board, maybe in 2 weeks I will get it tested and final. For now, only the wireless remote hardware is finished, so please go ahead and design and 3D print the for for it:
I really appreciate your efforts for this development. Like you said, the beautify of the open source is that everybody has the option either to use the project as it is or to adapt it to his own need.
As for the moment the wireless remote is of no use for me. I do not have and do not plan to use any Garmin devices. I have brake sensors that are already cabled and also, as the brakes use either wire connections or hydraulic tubes, running the cable for the brake sensor or an extension cable for the motor in parallel is the same.
My use case is/will be the following:
- No wireless remote.
- The wireless controller will be installed on the handlebar, connected and powered from the motor. The brake sensors are also connected there.
- As for the buttons there are several options:
a. Design a case similar to the SW102 with embedded buttons.
b. Use the buttons you suggest or the ones from 850 or 860 display.
c. Use any buttons.
They are simple three to four buttons and how they are installed and connected does not make any difference.
As minimum we need:
1. + (plus); short press - change up the assist level; long press - switch on/off the headlight;
2. - (minus); short press - change down the assist level; long press or hold - walk assist mode
3. Power
- The motor for me will be controlled from the wired buttons. The use of the phone is optional.
As far as the development we need to define the pins and port the code part for the buttons from the previous project for the three supported displays. Checking your implementation I see you have kept the same code structure and the part for the buttons is there, almost empty and not used.
Adding a multicolor LED or a small display ( overkill in my opinion ) will be nice to have.
Similar threads
- Replies
- 9
- Views
- 490
- Replies
- 3
- Views
- 2,033
- Replies
- 207
- Views
- 28,211
- Replies
- 198
- Views
- 21,792