Custom Build... 2 Speed H.O.B.O Powered e-Cruiser

Hyena said:
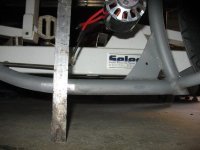
Even with the tyres pumped right up it looks like you've got SFA ground clearance there! I guess you're not going to be out jumping gutters and what not on it though.

It has just shy of 4in with flat tires how much more you want?

IMG_6309.jpg

Being a road bike i think we are good to go, the pedal comes level with the lower tube also
so pedal strike ain't an issue, not that they will be spinning ;-P

Hyena said:
Does that low clearance make the actuator job easier ? It probably wouldn't have to travel as far ?


Well yes logic would dictate if the bike is lower to the ground the actuator mounted on said bike would have
less to travel, good work there HiGHSiDE .. :mrgreen:

KiM

p.s have fun at work today won't you buddy... going to watch me some Mythbusters...::yawn:: then i think a lil lay down for an hour :p
 
AussieJester said:
It has just shy of 4in with flat tires how much more you want?
Well mine has 3x that, but yeah I guess your BB isn't mounted there and its only on the road, ridden by a guy with ornamental legs so it's no issue :lol:

p.s have fun at work today won't you buddy... going to watch me some Mythbusters...::yawn:: then i think a lil lay down for an hour :p
I hope you get deep vein thrombosis :p :lol:
 
Nice work Kim, watch those deadlines though. We expect results when promised. lol

Looks amazing Kim. Love the work. Looking forward to seeing some ghetto milling. Only more of a testament to your skills, the tools you use.

Clay
 
AJ said:
gtadmin said:
Hi KiM, looking really good as usual mate, ya making it a bit hard for a guy to keep up though :lol: That etch primer looks a bit glossy to what I normally use, what type is it?

Cheers,
GT

GTadman...its just AutoOne Etch Primer buddy, bere in mind alot of those above pics were taken using the flash on the camera
the first pics were done at night the remainder late in the afternoon/early evening...It is also a very very light coat, the
shine on the metal is likely contributing to the 'shine' Here's a pic of the can i used anywayz-->

View attachment 1

As luck would have it, last night a mate popped in with a box of a dozen or more cans of paint and primer upholstery
paint a friend of his has had sitting in the corner of his shed for the last 6 months since he did a small repair job on his sons car
when asked if he knew anyone that could use it Berin couldn't grab it quick enough for me, he's a good lad haha...
The paint is even gloss black, all AutoOne gear the brand i like to use when painting from aerosol cans! AND theres also tins of paint for
spry gun including 4 liter unopened can of clear LoL... Also got an full can of BelRay chain lube some tins of axle grease and
polish and buffing compound !!! got it all babeee' haha...was well pleased with the score, most cans have at least half in them
some are even 'un-opened' Obviously bought more than he needed...better than not enough i suppose haha
KiM
Thanks mate, and good score. Lacquer, enamel, 2pack?
 
No more progress to report, well, not anything actually made other than a pattern for the pivot
mount aluminum side plates...I did line the old cruiser and new bike up for a side by side comparison thought
it would be interesting to see the differences in length and height...-->

Side_by_side_series_pics_1.jpg

The new ride is alot shorter, will have a lil more nimble handling as a result of reduced wheelbase and
less radical head angle... Still unsure of the weight i can still easiiily lift it i am guessing in the vicinity of ~20kilo
Mate Mick is picking me up to head to Drags tomorrow evening, i will have him pick the bike up and hop
onto the scales before we head out for exact weight as she is now...

@GTAdmin...the paints are mainly the AutoOne brand acrylics both in spray and tins...

I shall get onto the stabilizer mount first thing in the a.m now i have something on paper planned...

KiM
 
G'day AJ, I noticed earlier in this thread that you don't use a cad program, but if you get some spare time ( I doubt it ) have a look at Google SketchUp which is a free download, looks pretty easy to use.
Cheers
Robbo
 
Looking Aces there Kim,

I get a kick out how BIG them bikes look in the pictures....then I remeber how the tranny fits in one hand & look at my 24" wheels here & realize its just about perfect. little more reach to the bars but that may be a good thing.

looking foward to the next update. & +1 for having the strenght of charicter to resist slapping that tranny onto the cruizer....not sure I could have resisted the urdge :twisted:

looking foward to the final roll out..
T
 
Dammit AJ, you need to put those mates of yours to work building frames so the rest of us can ride too! This build is going soo fast, and the electronics stage should come along a little quicker seeing as how you ironed out the lipo setup on the previous chopper.

She's a roller :twisted:
 
drifter said:
G'day AJ, I noticed earlier in this thread that you don't use a cad program, but if you get some spare time ( I doubt it ) have a look at Google SketchUp which is a free download, looks pretty easy to use.
Cheers
Robbo
Correct...i don't use them...i have near every CAD program on my pc (not installed) including a copy of Sketch Up Pro.
i find a 5-10minute sketch on a piece of paper sufficient for the stuff i do rather than sitting on a pc (which i hate) for a
weeek designing the ins and outs of something when i can be in my workshop making it.

Thud said:
Looking Aces there Kim,
I get a kick out how BIG them bikes look in the pictures....then I remember how the tranny fits in one hand & look at my 24" wheels here & realize its just about perfect. little more reach to the bars but that may be a good thing.


hehe so true...was very apparent on a build recently on RatRod Bikes...we had been given all the pics the bicycle looks motorcycle size then the
builder front sup a pic with him on it-->

the bike...very nice custom build IMO...

picsay-1287853839.jpg

Hoehas' full worklog of above bike viewable here for those interested...it is a decent effort too well worth a read...

Looks like a fair size bike right...well have a look at the owner taking it for a spin Definitely takes you back
well it did me, you get the feel the bikes are alot bigger with just workshop pics... i will try to get a pic of me near the bike
soon and/OR a mate straddled it with arms out, the reach is spot on, bearing in mind ThudSTaR 8) the seat will be slightly
more forward on this build than the blue cruiser ;) This we need as much weight as possible forward don't we
A.J don't wanna be flipped on his broken behind too much...will practice wheelies on the soft grass at the oval me thinks hehe...

etard said:
Dammit AJ, you need to put those mates of yours to work building frames so the rest of us can ride too! This build is going so fast, and the electronics stage should come along a little quicker seeing as how you ironed out the lipo setup on the previous chopper.

She's a roller :twisted:

haha well...i have one autobody builder mate 'Snapper' with 20 years experience and another boilermaker welder 'Flavio' with the same ...neither are really into bikes but are happy to help when i ask, although Flavio has been tinkering with the idea of buying a mid to high end second hand mountain bike to lose some weight, he's getting quite the 'roof over the tool shed' if you follow hehe... I have another friend Mick, that is very keen and loves riding the bike but isn't a fabricator, hehe although... he is building a mickey mouse replica Ford XY GTHO Phase III which is nearing completion DAMN its fine, me looking forward to riding in that come the Nostalgic Drag Meet early next year.. 600hp of tire burning Australian Muscle Car...the GTHO was the fastest 4 door car in the World in its day, Today, Red Book price is near 300k...i have seen them go for 400k though for a mickey mouse original...Good replicas get 60k plus..

Shall be doing some work on the aluminum plates for the stabilizers this morning, possibly of for a ride too haven't heard from Timma as yet ... Official Opening at the MotorPlex tonight me gets to see/hear/smeel REAL cars and REAL bikes burning REAL fuel... :: squirts some WD-40 on ::
to smell more manly... ":p

Back with an update soon...

KiM

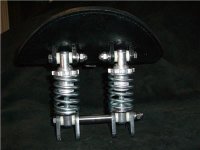
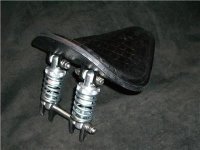
p.s Forgot to show a couple of pics to clarify how the seating willbe on this bike, i came across these in an add for the shocks ill be using, these twin shocks ar 100 bucks (69 for shocks 40ish for freight) i know i know COMPLETE rip as they aren't even shockies just springs, but thats the price for 4in shocks that are used on bobber seats, Larosa sells them and the bobber seats...They have assorted spring tensions too choose from depending on your beefcakeness..
80684745_tp.jpg

80685056_tp.jpg


FYI:-Seat in pic IS NOT the one i will be using


Thought this might help those wondering how the seat will be... The gap between seat stays is ~7 inches, just so hapens
this is the gap between the shock mounting on the seat i will be buying, coincidence? :p
 
beautifull bike, like always I would say :)
Will need to make a cruiser sometime, your builds are inspiring and brings the sphere to an awesome level of quality, makes me wish I could be meticulous like you sometimes !
 
8)

Looking good AJ but are you gonna drive this through that geared hub? :? hmm methinks thats a lot more power than it can take buddy? DC shredded a hub gear in no time with a less powerful setup and you have a geared box now dont ya?

Anyways its looking brilliant you can always weld it if it breaks! keep up the hard slog :twisted:

Knoxie
 
knoxie said:
8)

Looking good AJ but are you gonna drive this through that geared hub? :? hmm methinks thats a lot more power than it can take buddy? DC shredded a hub gear in no time with a less powerful setup and you have a geared box now dont ya?

Anyways its looking brilliant you can always weld it if it breaks! keep up the hard slog :twisted:

Knoxie

Honestly Knoxie ... ...How you could still not know whats going on after all the pictures and all the posts is beyond me it really is...

Thanks bzhwindtalker appreciate the kind words, i wouldn't underestimate your own abilities, your leaps and bounds ahead of most here
your velomobile is fantastic young fella, just think how good your next bike will be and the one after, you pick up things each build, well i know
i have...and i am sure you will too.

I wasn't going to bother upping these pics until i had more work done seeing i am posting here.... in 2
hours i 'milled' out bearing recesses s using my cheapo wood work router on Saturday before i headed to
the drags, was an AWESOME night to, saw a couple of 5 second passes
blows me away every time, the ground shakes and the noise (even with my ear plugs in) is mind blowing ;)

Anywayz...here are the side plates that will be part of the stabilizer setup-->

IMG_6315.jpg


Slabilizer_side_plate_pic_1.jpg


And with the bearings in place...they actually fit really good despite "going over the line" a tiny bit, a few
drops of Loctite Bearing Mount 620 and they will be good to go, not as if they is spinning,
they wont even do a full revolution, they will hold
a steel shaft the stabilizer legs will attach to, total movement is less than a revolution ;)

Stablizer_side_plate.jpg


Hopefully, stabilizing legs aside, the entire pivot assembly will be made from 10mm alloy...tiz the mission today to finish this.
I have decided on the 180lb 1.96" travel Thrust Linear Actuator from Servo City...I can't afford it yet, so will make a 'dumby'
version to bolt in so i get all the mounting positions correct. The actuator in question is 7.68' in retracted state and 9.64 extended, i have
detailed diagram of all dimensions so i should be able to get everything spot on and ready to simply bolt in the actuator when i get it...

Back with more soonz...

KiM
 
^^ thats me speechless.

wish id been following this the last few months as its brought a smile to my face repeately over the last 24 pages tonight :)

spectacular work from more than one person .

bravo


ps: AJ before i dropped off the face of the planet you told me you were taking a break from building . buildjunkie liar.
 
enoob said:
^^ thats me speechless.

wish id been following this the last few months as its brought a smile to my face repeately over the last 24 pages tonight :)

spectacular work from more than one person .

bravo


ps: AJ before i dropped off the face of the planet you told me you were taking a break from building . buildjunkie liar.


Heeeey Chad!!! ... Yeah well i would of taken a break, you can blame Thudmiester for this build all his fault :mrgreen: :p
i had to make a 'home' for the 2 speed as it wouldn't 'fit' the cruiser :lol: Good to see your back anywayz mate, drop onto msn so we can catch up fill me in on whats been a happening... :)

I didn't get alot done today, much procrastination not alot of porgress, i also had to do a small repair on the Canoe we painted few
weeks back one of the foot plates for the rudder pulled out of the hull, lil fiberglassing required... Anyhoot...below are some pics seen above
(for benefit of other forums this worklogs on) and a couple of new ones

stabilizer_pivot_series_pic_1.jpg


I didn't have any 15mm bar-stock, so i used some 16mm rod and went over it with a flap disk till she fit neatly
in the bearings, i will eventually get a hardened steel shaft, this will do temporarily to get it all working... I only have 1.96in
of movement to play with, last two pics shows the range of movement from lowered to raised position, i only
just have the room to fit this and it may require altering the lower seat tube/bottom tube corner gusset...either
way, it will go so we iz good for stabilizers on this ride :D the movement will be 'snap' quick too, i will
adjust the range so on full extension the wheels hit the ground so there will be no 'over extension' like in the cruiser...
The last two pics, the front cardboard template will be made from 10mm ali, actually... two of them, the actuator
end will bolt between these two 10mm plates, the steel stabilizer legs will bolt to the opposing end...the plates will
pivot on the 15mm steel rod...thats the plan anywayz i will bore holes in the frame and add plates to it in the exact
same fashion the motor/2speed mount was done. I hope his will be a nice sturdy minimal 'slop' solution that will require
minimal maintenance, thus far on track.. need to make a dumby actuator and cut the two plates and mock it up
properly before boring any holes anywhere to ensure we get the mounting of the pivot correct, if we dont. the actuator simply
wont fit...

More tomorrow...

KiM

EDIT: OH...Matt .P picked up the bars for me today NOT the same as on the cruiser.. :: wink:: :: wink :: gone
for sufin a liiiil risque ... Matt.P grabbed em local, still need to be powdercoated satin black as they is chrome
but we have ourselves some Bullhorn
bars :p
 
AussieJester said:
I wasn't going to bother upping these pics until i had more work done seeing i am posting here.... in 2
hours i 'milled' out bearing recesses s using my cheapo wood work router

.....

And with the bearings in place...they actually fit really good despite "going over the line" a tiny bit, a few
drops of Loctite Bearing Mount 620 and they will be good to go....

Hey Kim.

Did you do these "freehand" with the router. I need to mount a bearing in a bit of ally for my current build, but wasn't game to use my router for it.

Any tips?

Cheers. Keep up the great work.

Adrian
 
adrian_sm said:
Did you do these "freehand" with the router.

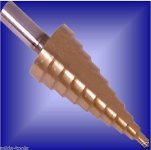
Yes mate all free hand, clamped the sheet of ali to the bench with two g-clamps and went at it...used the bit in piture
doesn't work the best glogs up immediately so alot of physical effort is needed...Tips...hrmz..don't try and
do the depth required in one go, i did two takes for this both about 4mm or so deep...the ali will build up so you cant see the lines,
clear it away periodically, i used a chisel and hammer to tap it and break it off... Best of luck...

KiM
 
I have cut bearing holes like this in the past but have always found it to be hit and miss, so I bought myself one of these:
stepper bit.jpg
the last step size on the one I have is 28mm so it enables you to cut down to the desired depth.
It takes a bit of the guess work out of it and speeds the whole proccess up.
 
gtadmin said:
AussieJester said:
Yes mate all free hand, clamped the sheet of ali to the bench with two g-clamps and went at it...used the bit in piture
doesn't work the best glogs up immediately so alot of physical effort is needed...Tips...
Use kero to lubricate, won't glog(?) :wink:

Cheers,
GT


And with what hand do y ou intend us to apply his 'kero' if you spray it on it will soon fling off and be useless, you need a flowing stream, bit difficult on a workbench holding a woodwork router i think...but for sure give it a go...

KiM
 
Day Job...Girlfriend...Baby Son..= not the same amount of time as some folks to read through forum posts fully hence the polite question which you havent bothered to answer so I wont ask again :roll:


AussieJester said:
knoxie said:
8)

Looking good AJ but are you gonna drive this through that geared hub? :? hmm methinks thats a lot more power than it can take buddy? DC shredded a hub gear in no time with a less powerful setup and you have a geared box now dont ya?

Anyways its looking brilliant you can always weld it if it breaks! keep up the hard slog :twisted:

Knoxie
Honestly Knoxie ... ...How you could still not know whats going on after all the pictures and all the posts is beyond me it really is...
 
Whenever I'm doing anything with metal, aluminum in particular, whether its drilling, cutting, grinding, or sanding, I hit the cutting medium with a shot of WD40 every twenty seconds or so. Drill bits, cutting wheels, grinder stones, sandpaper, jig saw blades....everything lasts indefinitely with this method. I know it all seems like it slings off but if your blade is hot and you give it a shot of WD, the oil cools the blade and pulls some of the lubricant into it. WD probably isn't the best thing but it's worked flawlessly for me so far, doesn't stink too bad and is really cheap. I've noticed that also keeps the blades from sticking, greatly reducing the effort. It doesn't have to be a constant stream, just when you notice whatever you're cutting with is turning aluminum colored, give it a shot. Also, the WD40 apparently doesn't need to be cleaned off before welding. I was cleaning each piece with alcohol and forgot on a few and the welds came out exactly the same in destructive testing.

You're the fab guru and I'm definitely not trying to tell you what to do or anything, I'd just hate to think of one of your projects being delayed because you're spending money on sandpaper and router bits instead of lipo of something. Give it a try. Can't hurt.

Really stoked to see the new cruiser on the road. It looks very sporty and serious all at once.
 
Back
Top