• Hello ES! We could use some help to get us past the finish line on building the new knowledgebase for the forum.
    Can you donate? Please see our fundraising page. Thank you!

Hardware temperature control tsdz2

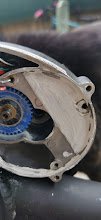
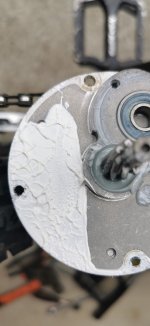
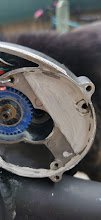
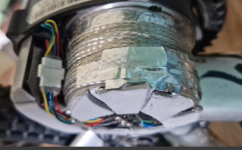
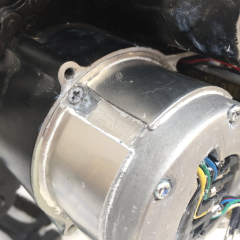
this is how I did to my tsdz2 using aluminum insert:

1. Buy a 1mx25mmx1m aluminum bar from Bunnings.
2. Cut to shape using paper template.
3. Appy thermal paste on both side.IMG_20231103_125144.jpg
4. install temporarily and remove, make sure the motor top surface touches the housing. I would say 1mm might not be thick enough, but 1.2mm is hard to be found, so I live with it. Better than the empty gap.

IMG_20231103_125624.jpg
 
Last edited:
With summer here in Australia and high ambient temperatures I decided to do some of the heat dissipation mods in this thread. Ambient varying between 30-35 deg C. Motor would head reasonably quickly above 70 deg C stock.

I bought 1 x 80x40x2mm piece and 1 x 80x40x3mm piece of Gelid GP-Extreme thermal pads, and a 10g tube of GP-Extreme thermal paste. From https://gelidstore.com/
Also needed a length of 25mm x 1mm aluminium flat bar which was only a couple of dollars, and a reasonably chunky stainless steel hose clamp that would tighten to 65mm and that was probably 15mm wide, also a couple of dollars.

I followed the wiki guide for thermal compound inside the motor ends, and used about half the 2mm pad to fill the under motor gap. I used half the 3mm pad cut into 5 pieces to fill the gaps between the motor screws apart from the one closest to the controller. Roughly cut the flat bar to get two lengths that would wrap around the motor, and bent them around a tube of similar size. Installed them over the motor, with some thermal paste between the two layers. Slipped the pipe clamp over the top, also with some thermal compound between it and the aluminium. The screw mechanism of the clamp sits nicely between the motor and controller. Aligned it all so it sat low on the motor, and that gap between the almost full circle of the aluminium strips was over the single non-padded area of the stator and then tightened up the clamp. Stretched the rest of the 2mm thermal pad around the non controller side of the motor to fill in the gap to the outer case after checking the clearance. Used the rest of the 3mm pads as per the wiki on the top of the motor. The GP-extreme thermal paste is very thick, so had to use some cheap slippery thermal compound I had on hand to help slide the cover on. Tight fit but got it on.

Even with ambient temperatures in the low 30’s (C), after the mods haven’t been able to get the temp reading beyond 42 degrees. Super happy with the mods. All up around AUD$60. No special tools required. The aluminium flat bar will break if a sharp bend is bent back and forth.

Thanks to all in this thread for the great ideas!


Any pictures mate?
I bought the same flat 25mmx1m aluminum bar from Bunnings and made an insert to use between the top of motor and the housing:IMG_20231103_125144.jpg

But not sure what is the best way to wrap it around the motor body.

Thanks in advance.
 
Hi Everybody,
Noob here but I have learned a lot scanning/reading through this thread, thank you.
I’m hoping someone can recommend an online seller for decent quality and value thermal pads please? Bonus points if the seller is in Australia 🇦🇺.
Thanks 😊
 
Hi Everybody,
Noob here but I have learned a lot scanning/reading through this thread, thank you.
I’m hoping someone can recommend an online seller for decent quality and value thermal pads please? Bonus points if the seller is in Australia 🇦🇺.
Thanks 😊
All Australian sold TSDZ2s (ebay and etc), if I am not wrong, are new version with new controllers due to legal restrictions, not ST chips anymore. So there is no way to use OSF.
I bought an old version controller from China (old stock) and swapped it in. Now I am running OSF with VLCD5, which is so much more fun than before.
They told me that they still have 50 of those, but I am not very interested in this, unless a lot of people want them I might be able to help.
 
Last edited:
All Australian sold TSDZ2s (ebay and etc), if I am not wrong, are new version with new controllers due to legal restrictions, not ST chips anymore.....
I bought an old version controller from China (old stock) and swapped it in. ....
This is new information for me. Till now only a German webshop sold another controller version.
In that case you must have seen the difference between these controllers.
 
The thermal conductivity of rubber is about 0,15 W/mk, so that is more than air (0,02 W/mk) but less than the cheap sticky silicon thermal pads (2 á 6 W/mk).
The metal BBs are between 2 layers of rubber, so I can't predict what the influence will be on the motor cooling.

FYI:
Copper 380W/mk, Aluminium 205W/mk, Steel 50W/mk, iron 80w/mk
So you understand the experiments with copper and aluminium
 
Elinx, I'd like to use a thermo switch such as Pepi N Series Thermal Battery Pack Switch +65C 5% 2.6 Amps @ 120 VAC USA Seller | eBay inside the motor, wired to the controller to cut out the motor. I want to keep the throttle thus cannot install the LM35 but still would like a cutout for the motor when it gets too hot. Is this possible and if so do you know where on the controller is the best place to connect this switch and whether I need a normally closed or normally open?

Edit: If not possible, I can connect it to one of the two brake cutout 3 pin connectors from the KT-LCD3. I would need to use a normally open thermal switch 5Pcs KSD9700 Temperature Switch Metal Thermostat Thermal Protector NO/NC 5A 250V | eBay
 
Last edited:
Continuing with my personal experiments...I bought this from Amazon: https://www.amazon.com/dp/B01F47W86C?psc=1&ref=ppx_yo2_dt_b_product_details. This stuff is pretty dense but just a very little compressible and about 1.5mm thick.

Then cut it in strips just long enough to wrap the motor and terminate at the controller. Taped the ends to keep pieces of wire from potentially going adrift and getting into the electronics. Then wrapped the motor center with one full piece and one that was ripped in half, then 2 more full wraps of the entire motor, taping the layers down with HVAC metal tape. I ended up using almost all of the 5' roll.

Tested on the same route as above, pushing the power even higher. The max temp reached was 155F (68C), a full 10 degrees F cooler than with the silicone. And the transition to cooling when the power was removed was notably faster as was the temperature drop with time. VERY noticeable. At the end of the ride that includes some downhill the motor was 12 degrees F cooler than the other day with the silicone. And the delta T between the case and motor was 12 degrees F whilst with the silicone it was 33 degrees F.

All in all, a very positive result and a fairly easy install. It would be easier still if we had this sort of material in a mat. I had a small issue with the last wrap bunching up a bit at one spot of the case so it didn't close flush. Not that I ride in the rain but I will open it up again and fix that. I may even try to weave or tape these sleeves together into a mat of sorts to make the whole process easier.

View attachment 298365

View attachment 298366

View attachment 298367
I remember from school physics lessons that copper is almost the best heat conductor. Therefore, I also consider such a solution to be the best, especially considering the price of such an upgrade.
p.s. with a perforated cases, inserting NASAspace tubes, or water cooling (from a PC?), etc. - I laughed more... but with respect (because, after all, everyone has their own hobby)
 
CopperWrapFinal.jpg
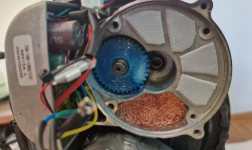
So, to continue - in fact, this is a very cool modification, because copper has the highest thermal conductivity(except for silver, but let's not exaggerate) - about 400 W/(m-K),
compared to the thermal pads -16-20 W/(m-K), that everyone sticks in their motors...

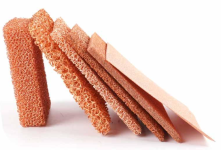
I am also very interested in copper "foam"
1745064274626.png
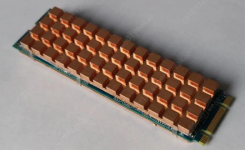
By the way, copper radiators/heatsink can also be glued/screwed on the outside:
1745065116563.png

Now I'm thinking about whether to try to make the mod with these "sponges" or wrap it with wicker...

P.S.
TZDZ2 Air Cooling
1745064098958.png1745064133220.png

And this is a bit of a strange modification(for me)... unless you never drive in/after the rain...
 
The actual thermal conductivity of copper braid or foam will be a small fraction of copper's conductivity. If it will be more or less than pads depends on how much it is crushed and how dense it is but probably better if you fill it right up. Ideally you would replace all the air in them with something more conductive like thermal grease and you may get somewhere pretty decent without solid machined shims.
 
Ideally you would replace all the air in them with something more conductive like thermal grease
In general, with a power of 450-500 watts and weather temperatures of 20-25C( on 2-3 lvl of assist), I wouldn't say that the motor is that hot... slightly warm..
I understand that the motor core is hotter due to poor heat dissipation to the case, but if this heat dissipation is improved by at least 30-40% (for which even a couple of pieces of thermopads (and a small radiator from SD NVMe will suffice)), the power can be safely increased to 600-700 watts.
I think that it will be possible to burn it out only if you give the maximum 18A that the controller allows and go on a long climb at +30C on max lvl of assist... - but this must be done specifically on purpose.
 
Forgive me for not reading the whole thread. But I purchased a complete heat cooling kit from eBikestuff.eu. They are great to deal with. The shipping from Poland to the US has been reliable and the cooling kit is precisely made. They have two levels, one with only internal and one with the internal and additionally external cooling fins to move heat all the way out. Includes the info on installing the heat sensing chip to transfer internal temp to the 860c display.
Good install video on youtube for anyone interesting in modifying your Tongsheng.
 
Forgive me for not reading the whole thread. But I purchased a complete heat cooling kit from eBikestuff.eu.
The one posted here in 2023?
 
Last edited:
I haven't seen this thermal putty mentioned here. I find it easier to work with than thermal pads, which have a tendency to shred in my experience. Oh, and it's reusable too !

I got very good results on my TSDZ2 with aluminium strips glued with heatsink paste on the laminations (so that the strips are flush or barely higher than the motor flanges), then thermal putty around and on top of the motor, and around the controller. Spraying the inside of the motor cover with silicone lubricant helps with the tight fit (remember : if the motor case is not a bit of a pain to reinstall, it means the gap is not fully closed and the mod will not be effective).

I've tried various solutions for filling the air gap, and this is by far the easiest and most effective I've found.
 
... aluminium strips glued with heatsink paste on the laminations (so that the strips are flush or barely higher than the motor flanges), then thermal putty around and on top of the motor, and around the controller. ...

Thanks for sharing.
What size have these alu strips?
How much putty did you need?
It would be nice to see some pictures of this method?
 
Last edited:
What size have these alu strips?
What I did is very similar to this picture I copied from earlier in this thread : a first layer against the motor laminations, between the flanges and between the long screws of the motor. The thickness is so that the strips are flush with the motor flanges (and not barely higher as I mistakenly said previously). On top of that, there is a second layer, this time cut so that there is access to the screws that hold the motor in place.

1752699470223.png
How much putty did you need?
It would be nice to see some pictures of this method?
I bought a 70 g pot first, and I had to buy a little more after. It sounds like a lot but that stuff is very dense so that doesn't represent much volume.
I'll take pictures next time I do a maintainance, but it's not much different than what has been shown already in this thread. It's just that I found the putty very convenient to use in our case compared to other heat conductive materials.
 
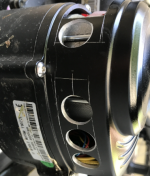
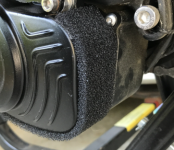
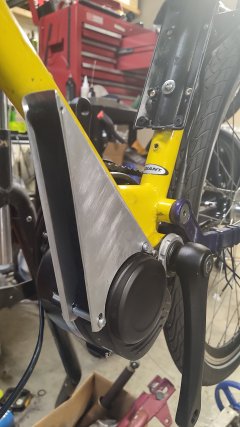
Here's my variation on the air cooling idea, a scoop and plenum with an oiled open cell foam filter. The motor cover has holes similar to other air cooling setups, but carefully radiused inside and out.

I'm still working on shrouds for the outlet holes,to make sure that's a low pressure zone for them to feed into. The motor cover is structural, part of the load path to the motor mount, so I don't want to weaken it with too many holes.

The foam is secured by the spacer bushings on the attachment bolts. and runs down the back inside of the scoop, hoping to capture any dust that makes it thorough the front foam.

Next one will be a bit thicker aluminum sheet, and will function as an anti rotation bracket for the motor, as well.

Also, this will have a digital aquarium thermometer probe in the case, between the back of the motor and the ESC.
 

Attachments

  • IMG_20250731_130408.jpg
    IMG_20250731_130408.jpg
    954.1 KB · Views: 31
Last edited:
Back
Top