Huguenot said:izeman said:This is a discussion I'd like to have as well. As I heard of broken axles, bad fits, loose bearings, and stuff like that I guess making a new axle would be the best way to do it. Using proper steel would help a lot. But I haven't opened the motor or removed the axle so I have no idea how hard it would be. Lathe and mill are ready and waitingHuguenot said:Back to the loose and or wobbling crank axle problems, and thanks to safeaschuck for posting the detailed pics (way) above.
I have TSDZ2 on my wife's cargo bike, and other than some initialization problems seemingly fixed, if not totally eliminated, by a firmware upgrade (stellar customer service from EcoCycles, BTW) -she loves it. ....
So I would like to discuss some alternatives.
.....")
Hello izeman and others.
Regarding the broken shafts, I believe the steel used is less of a problem than the snap ring groves, and the fact that the crank mounting bolt holes are deeper than they need to be, at least on some of them. I am most concerned about the wobble/clunk and the wear it is causing on other parts, like the disc portion of the sensor. I was quite surprised at how soon this problem showed up on our bike, as some people report far more miles/km before looseness.
Given the design of the torque sensor there does not appear to be much that can be done from a redesign standpoint, but I am open to ideas.
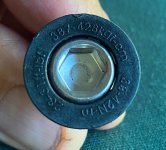
The hardest thing to duplicate would be the splines, but they are short, few in number and stand proud of the shaft itself so should be less difficult than they might be. IMO, just controlling the seat diameters so the result is closer to a press fit would suffice for many people.
I just ordered a replacement axle from Eco Cycles ($25) to experiment with. Once I figure out just what parts of the shaft are hardened I may try building up the bearing seats somehow, likely with just solder, or perhaps by turning the shaft down a bit and pressing on a thin bushing, then turning down to correct diameter.
Again, the loose fit is probably done for assembly purposes as it saves the manufacturer exactly nothing to make it too small at the piece part level.
While the axle is no doubt made on CNC equipment, final assembly is no doubt done by hand.
According to the link below it must be a functional play.
https://www.emtbforums.com/community/threads/e8000-bottom-bracket-bearing-play-after-1400km.643/
This can't be right since it's a completely different motor.