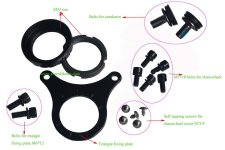
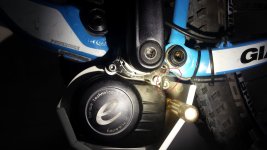
• Howdy! we're looking for donations to finish custom knowledgebase software for this forum. Please see our Funding drive thread

New "TSDZ2 Torque Sensor Central Motor"

shaddi said:
I have the same problem with rotating motor and no place to get a fixture because of my "fully" bike.
Yesterday i had an idea and wanted to share with you. It replaces the factory-provided piece of metal and locks down
with the screw of the rear swing...

Any comments on this?
WhatsApp Image 2018-07-24 at 21.40.57.jpeg

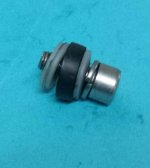
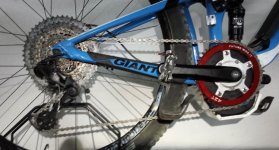
This is a great concept but that plate is only bolted to the motor with thin screws that usually go through spacers. Those bolts can wobble back and forth. Still way better than any zip ties or hose clamps for sure.

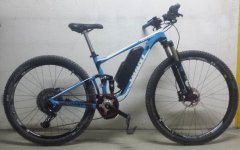
The blue bike with link between the pivot bolt and motor boss is better. Mine uses a similar link up to a split shaft collar around the seat tube. The torque arm should be as far way from the spindle center as possible.
 
casainho said:
Finally I uploaded the LCD3 and motor controller original improved firmware as hex files -- get them here, you want the v5:
https://github.com/OpenSource-EBike-firmware/TongSheng_TSDZ2_motor_controller_firmware/tree/master/TSDZ2_original_improved_and_KT_LCD3_firmwares
I just uploaded HEX files for the OpenSource firmware for both TSDZ2 and LCD3: https://github.com/OpenSource-EBike-firmware/TongSheng_TSDZ2_motor_controller_firmware/tree/master/TSDZ2_flexible_opensource_and_KT_LCD3_firmwares

This version works well for me, that is the one I am being using lately on my own ebike.
 
Guys, I'm not sure what the problem is with the motor moving, if its fully located on the crank side of the BB and the non crank side plate is correctly installed ( yes you may well have to shim it with spacers to get the bolts correctly torqued ) and the large nut is correctly torqued, then I would doubt it should move.

But to beef things up then simply follow the example of Bafang and put small serrations into the side plate.

I was running nearly 1250W on my Bafang with it simply mounted and torqued up through the bottom bracket using the dimpled triangle fixing plate and never had it move. On the TDSZ2 mounting plate I used a series of centre punch marks to create those same high spots which put a point loading onto the bottom bracket, as yet it hasn't moved.
 

Attachments

  • bafang bracket.jpg
    bafang bracket.jpg
    72.6 KB · Views: 1,958
Waynemarlow said:
Guys, I'm not sure what the problem is with the motor moving, if its fully located on the crank side of the BB and the non crank side plate is correctly installed ( yes you may well have to shim it with spacers to get the bolts correctly torqued ) and the large nut is correctly torqued,
Its hard with full suspension bikes because you are only relying on friction to hold it. If you do off road then the locking nut can come loose. Having a torque arm makes sense.

casainho said:
by casainho » Thu Jul 26, 2018 2:00 am
Finally I uploaded the LCD3 and motor controller original improved firmware as hex files -- get them here, you want the v5:
https://github.com/OpenSource-EBike-fir ... _firmwares
Thanks Casainho you da man ! Will see if I can flash the LCD tonight. Fingers crossed :D

UPDATE
All good I think. Hex flashed well, display is lit up again but all icons are active and buttons not working. Do I need to flash any option bytes or will it start working when I connect it to the motor ?
 
Hi,

I use a 36V TSDZ2 with a 11s battery and I read this thread since several pages and I'very keen on your activities.
I would try and test the open source firmware for the motor controller with KT3 display.
Can I flash the both hex codes for the controller and the display?

Regards
troebi
 
troebi said:
I use a 36V TSDZ2 with a 11s battery and I read this thread since several pages and I'very keen on your activities.
I would try and test the open source firmware for the motor controller with KT3 display.
Can I flash the both hex codes for the controller and the display?
The hex files there are for 48V battery pack, for 36V you would need to edit config.h file to change the voltage and build the firmware. But wait, I am just implementing changing on LCD3 that voltage so you should wait and then you can flash the new version and change to your voltage on LCD!!!!
 
jbalat said:
UPDATE
All good I think. Hex flashed well, display is lit up again but all icons are active and buttons not working. Do I need to flash any option bytes or will it start working when I connect it to the motor ?
You need to flash the firmware on TSDZ2 and connect to LCD3 to get it working.
 
"I am just implementing changing on LCD3 that voltage so you should wait and then you can flash the new version and change to your voltage on LCD!!!!"

That means, the battery voltage can be set in the display and I can use 24V or 36V or 40V?
40V with the 36V motor admits a higher cadence.
 
troebi said:
"I am just implementing changing on LCD3 that voltage so you should wait and then you can flash the new version and change to your voltage on LCD!!!!"

That means, the battery voltage can be set in the display and I can use 24V or 36V or 40V?
40V with the 36V motor admits a higher cadence.
2 vales to be setup on LCD3:
1. battery number of cells (this value is used to calc battery state of charge to indicate on LCD battery bars symbols)
2. battery LVC (low voltage cut-off)

So for your 36V battery can be like this:
1. 10 (because 36V battery pack usually are 10 cells)
2. 30.5 (because you may want to discharge each cell up to 3.05V, motor controller will reduce assist power so the battery voltage don't go lower than this value)
 
Here you have my FSB with TSZ2, Parte 1
 

Attachments

  • bike 1.jpg
    bike 1.jpg
    161.2 KB · Views: 1,889
TSDZ installation Parte 2
 

Attachments

  • Stop Screw.jpg
    Stop Screw.jpg
    21.5 KB · Views: 1,888
  • stop motor  screwed.jpg
    stop motor screwed.jpg
    69.3 KB · Views: 1,888
  • stop screw parts.jpg
    stop screw parts.jpg
    20.6 KB · Views: 1,888
TSDZ2 Installation part 3

The main problem of the motor rotation, is in my opinion, the torque with which the M33.5 nut is tightened.
 

Attachments

  • BB Instalation.png
    BB Instalation.png
    70 KB · Views: 1,886
  • tool.jpg
    tool.jpg
    146.1 KB · Views: 1,886
  • tool2.jpg
    tool2.jpg
    79.3 KB · Views: 1,886
casainho said:
2 vales to be setup on LCD3:
1. battery number of cells (this value is used to calc battery state of charge to indicate on LCD battery bars symbols)
2. battery LVC (low voltage cut-off)

So we can operate whis any battery voltage, that can hardware (capaсitors, FET) eat? You the best!
 
TSDZ2 Installation part 4
 

Attachments

  • motor stoper.jpg
    motor stoper.jpg
    208.2 KB · Views: 1,882
  • motor protection.jpg
    motor protection.jpg
    143.8 KB · Views: 1,882
  • drive train.jpg
    drive train.jpg
    226.8 KB · Views: 1,882
I implemented a new configuration menu where now user can:
1. define on LCD the battery numbers of cells (used only to calculate battery state of charge to indicate on LCD battery bars)
2. define on LCD the battery low cut-off voltage

Configuration menu:
1: battery
__0: battery cells number: this value is used only to calculate battery state of charge to indicate on LCD battery bars symbols. For 48V battery, use value of 13.
__1: battery max current: in amps. Motor controller will use no more than this value. Motor controller firmware limits this value to a safe one, like 18 amps (but this can be configured on motor controller firmware, like for use 24 amps).
__2: battery low cut-off voltage: in volts. The motor controller firmware will limit battery discharge when the battery discharge down to this value. For a 48V battery, if each cells low cut-off voltage is 3.0V, you can use the value of 39.0 (3.0 * 13 = 39.0).

Full documentation here: https://github.com/OpenSource-EBike-firmware/TSDZ2_wiki/wiki/TSDZ2-and-KT-LCD3-advanced-features-with-Flexible-OpenSource-firmwares

See the video for exemplification:
[youtube]9AfBNpng6c4[/youtube]

Frankenshtain said:
casainho said:
2 vales to be setup on LCD3:
1. battery number of cells (this value is used to calc battery state of charge to indicate on LCD battery bars symbols)
2. battery LVC (low voltage cut-off)

So we can operate whis any battery voltage, that can hardware (capaсitors, FET) eat? You the best!
YES!! :)
 
TSDZ2 installation, part 5

To conclude, at my installation, my engine has so far not rotated. I mainly do MTB.

I hope you have enjoyed this sharing.
 
I love all the neat designs for motor brackets but you know they do make 250lb tensile strength cable ties. Truckers and air freight shippers use them to secure heavy loads during transport. This motor puts out nowhere near those kind of forces. I am using a 150lb tensile strength one now and it will never budge it. I don't see the necessity for anything like that, but if you enjoy the manufacturing process and style then go for it. :)
 
casainho said:
I implemented a new configuration menu where now user can:
1. define on LCD the battery numbers of cells (used only to calculate battery state of charge to indicate on LCD battery bars)
2. define on LCD the battery low cut-off voltage

Nice dude, I am sure a lot of people are going to like this feature. :) Hopefully the rest of my supplies arrive soon so I can try a 15s battery!
 
AZUR said:
I hope you have enjoyed this sharing.
Thanks!! I also have a full suspension bike that is without use but with this ideas maybe I will install TSDZ2 on it.
 
casainho said:
AZUR said:
I hope you have enjoyed this sharing.
Thanks!! I also have a full suspension bike that is without use but with this ideas maybe I will install TSDZ2 on it.

Casainho,

View attachment 2

In recent years the main mechanical discomforts I have had were those related to the crankset.

I blew a crankset because I did not tighten the crank to the torque specified by the manufacturer. 40Nm.

In another situation I had the same problem but I solved the situation by tightening the crank with the specified torque. This time I did not break the crankset.

Due to this accumulated experience, and also to have seen in this forum that another member damaged a bicycle frame with the rotation of the motor, is that from the beginning I took the precautions I described in an earlier post.


Luckily so far everything went without any problem.

But if a problem comes up I think I'll use a similar solution like the other element of the forum, Hillharter.

In my case I would try to put a link between the TSDZ2 and a clamp on the bike frame.

On the other hand, as the movement of the motor will be towards the back of the bike, it would put the connection towards the front of the bike.

braçadeira.jpg

Like this:

braçadeira 2.jpg
 
TSDZ2 motor controller max temperature protection

While I was riding at max power/battery current 18A possible, to discharge my battery and know his real watts/hour value, at about 80% discharging the TSDZ2 motor started to stop working and at begin I thought that could be some bad implementation I did on the firmware due to battery low voltage cut-off. And I could understand that motor would start again after like 2 or 3 minutes. Finally I touched with my hand at motor controller side on the TSDZ2 and verified it was very hot to touch!!
After waiting 10 minutes for motor controller cool down, I could discharge up to the 100% the battery.
I think it is the mosfet driver IC that measures the temperature and turn off the mosfets signals. At least the most expensive ones does that, although there is no mention to that on the datasheet of the one used by the motor controller.

Also, when motor controller is very hot at shutdown, the torque sensor starts to working incorrectly, like if I was pressing the pedals a bit while I wasn't and that way the motor started to run slowly. I hope this is something I can improved on the firmware.

My battery pack of 5S should have 5*2.5Amps = 12.5 amps. 48v * 12.5 = 600 watts/hour. Turn out that at about 520 watts/hour it was fully discharged..... (I configured in the LCD3 battery low cut-off voltage of 38 volts).


Looking at the motor from the left side,... the motor will want to torque clockwise under load.

Azur appears to put his stopper bolt on the wrong side and even if it did rotate the opposite way it would hit the swingarm which is a moving part. He is still relying entirely on locknut torque.
 
AZUR said:
But if a problem comes up I think I'll use a similar solution like the other element of the forum, Hillharter.

In my case I would try to put a link between the TSDZ2 and a clamp on the bike frame.
On the other hand, as the movement of the motor will be towards the back of the bike, it would put the connection towards the front of the bike.
The torque reaction from motor load on the chain tends to pull the motor forwards..hence the link to the rear.
However, a strike force from the motor hitting an obsticle (log or rock) would tend to move the motor rearwards.
 
The normal amount of clearances on the bolts together with the very small radius from the centre of the BB would allow quite a few degrees of rotation, if you're making a stabilizer arm then do allow those tolerances otherwise you will be still reliant on that big nut at the right torque.
 
Back
Top