TSDZ2 mid drive with 860C, 850C or SW102 displays only -- Flexible OpenSource firmware (Casainho code only)

Hello and special thanks for everyone's contribution to this amazing firmware and work!
Im currently running the vlcd5 version of OSF with the temperature sensor installed,and planning to upgrade to a better display!
However Im really short on cash and Im really considering if the 860c display is really worth it comparing the price of it(around 50€) to that of the kt-lcd3(23€ on pswpower) .
Will the 860c display bring so much more to the operation and features of the motor and hence the higher price is justified,or does it just mainly bring better looks?I've looked at the changelogs and I dont see much,compared to versions that the kt-lcd3 is compatible with.
I just want something that is more functional than what I have now and I dont pay attentions to looks.
Any help/suggestions are greatly appreciated!
Lastly as I mentioned above I think that the latest version that is compatible with kt-lcd3 is v0.20,correct me if Im wrong!
 
SakisMx said:
Hello and special thanks for everyone's contribution to this amazing firmware and work!
Im currently running the vlcd5 version of OSF with the temperature sensor installed,and planning to upgrade to a better display!
However Im really short on cash and Im really considering if the 860c display is really worth it comparing the price of it(around 50€) to that of the kt-lcd3(23€ on pswpower) .
Will the 860c display bring so much more to the operation and features of the motor and hence the higher price is justified,or does it just mainly bring better looks?I've looked at the changelogs and I dont see much,compared to versions that the kt-lcd3 is compatible with.
I just want something that is more functional than what I have now and I dont pay attentions to looks.
Any help/suggestions are greatly appreciated!
Lastly as I mentioned above I think that the latest version that is compatible with kt-lcd3 is v0.20,correct me if Im wrong!

The LCD3 is much better than the VLCD5. But it has finished evolving, there is not much room for improvement to the current firmware. The 860C has lots of room to evolve further with the firmware. So if you're happy with the way things work on the VLCD5 then buying LCD3 will work great. You can see a lot more things and it's much easier to set up and change your settings then the VLCD5.
 
SakisMx said:
Hello and special thanks for everyone's contribution to this amazing firmware and work!
Im currently running the vlcd5 version of OSF with the temperature sensor installed,and planning to upgrade to a better display!
However Im really short on cash and Im really considering if the 860c display is really worth it comparing the price of it(around 50€) to that of the kt-lcd3(23€ on pswpower) .
Will the 860c display bring so much more to the operation and features of the motor and hence the higher price is justified,or does it just mainly bring better looks?I've looked at the changelogs and I dont see much,compared to versions that the kt-lcd3 is compatible with.
I just want something that is more functional than what I have now and I dont pay attentions to looks.
Any help/suggestions are greatly appreciated!
Lastly as I mentioned above I think that the latest version that is compatible with kt-lcd3 is v0.20,correct me if Im wrong!
The last version brings more power at high cadence 90 rpm but other than that it's not that much of a difference. 860c is more waterproof. If you short on cash keep your original display and spend money on something else!
 
ilu said:
Aquakitty said:
Does anyone here use their TSDZ2 for real mountain biking? With the new firmware I am having a problem where the motor cuts out when you need it most. Like for instance I was doing an uphill switchback, and right on the power stroke on the corner the motor doesn't engage and I fell over down the hill. Then a second time in a ditch, the motor did not engage on a hard pedal and I scraped the hell out of my elbow.

I thought I fixed the problem by disabling the field weakening but that doesn't seem to be the case. I cannot figure out what it might be. BTW both our bikes were doing this. I tried switching from torque to power under motor settings as well but doesn't seem to matter.

I am using the SW102 with 1.0.0 of the firmware.

Are you using brake sensors? With those there's always a slight delay before the motor starts to work again. Because of this I only have the sensor on the rear brake and use only front brake when instant motor engage is needed.

Oh my God, if that's really what it is I'm gonna scream at a tree. Yes, when I did the SW102 conversions, I added brake sensors to both bikes. That would explain it for sure if that's the case.

The reason I assumed it was the SW102 firmware is previously we used the same bikes with KT-LCD3 and never had this problem. But I didn't think about the added brake sensors. I also agree turning down the assist does help on slow climbs. I'll also make sure the cadence stop is off and check out the other settings mentioned.

Thanks a lot for all the advice.
 
HughF said:
Nfer said:
cavi said:
For the best hill start performance I would setup as the following:

Motor current control = torque
Assist w/o pedal = enable
Startup BOOST = disable
Startup BOOST duration = 5
Startup BOOST fade = 6.5
Motor current ramp = 10a (maximum)
Calibrate your torque sensor then enable calibrations
Motor current max = 20a

I used these settings and it solved the lack of the boost function. The assist w/o pedal rotation enable helps to deliver the power quicker.
I prefer to use the control power instead of torque. I am using high cadence and low gears.

I am glad that the settings worked well for you. Many miles of riding and testing on hills around here during lockdown helped me find those settings.

Hi, is this supposed to be startup BOOST enable? Otherwise what is the point of the other startup BOOST settings?
I am giving these settings a go now along with calibration, after exhausting all other settings and possibilities.

Unfortunately it's definitely not the brake. I have now tried every setting possible and nothing seems to help. For some reason as soon as cadence drops (like doing a hard section uphill) the motor completely cuts out. Does this on both bikes. Would calibrating the sensors help if we didn't have a problem with them before? I'm also a little nervous about setting max amps to 20 amps as even at 16 amps it's easy to overheat the motor.
 
Aquakitty said:
HughF said:
Nfer said:
cavi said:
For the best hill start performance I would setup as the following:

Motor current control = torque
Assist w/o pedal = enable
Startup BOOST = disable
Startup BOOST duration = 5
Startup BOOST fade = 6.5
Motor current ramp = 10a (maximum)
Calibrate your torque sensor then enable calibrations
Motor current max = 20a

I used these settings and it solved the lack of the boost function. The assist w/o pedal rotation enable helps to deliver the power quicker.
I prefer to use the control power instead of torque. I am using high cadence and low gears.

I am glad that the settings worked well for you. Many miles of riding and testing on hills around here during lockdown helped me find those settings.

Hi, is this supposed to be startup BOOST enable? Otherwise what is the point of the other startup BOOST settings?
I am giving these settings a go now along with calibration, after exhausting all other settings and possibilities.

Unfortunately it's definitely not the brake. I have now tried every setting possible and nothing seems to help. For some reason as soon as cadence drops (like doing a hard section uphill) the motor completely cuts out. Does this on both bikes. Would calibrating the sensors help if we didn't have a problem with them before? I'm also a little nervous about setting max amps to 20 amps as even at 16 amps it's easy to overheat the motor.
From my testing, it seems that the logic behind the ENABLE/DISABLE on startup boost is backwards. I had a tunable startup boost when I set it to DISABLED and when I set it to ENABLED, no boost at startup.. weird I know, but that is what worked for me.

I ran this motor for close to 600km during lockdown on a single speed frame, so had plenty of experience with cycling when the cadence drops - those settings, along with the latest 1.0.0beta gave me the best low cadence performace. Yes, the motor can get hot, yes, the blue gear may fail - but if you want the performance from this small motor you will need to push it hard. The current ramp is not responsible for motor heat, that is caused by extended periods at >600w, especially with low RPM.

You need to try torque mode too, the cadence sensor will not resolve low cadence, and in power mode the input from pedal RPM is used as part of the motor current calculation. If rotation is low, current will be zero. Torque mode solves this problem.
 
HughF said:
Aquakitty said:
HughF said:
Nfer said:
I used these settings and it solved the lack of the boost function. The assist w/o pedal rotation enable helps to deliver the power quicker.
I prefer to use the control power instead of torque. I am using high cadence and low gears.

I am glad that the settings worked well for you. Many miles of riding and testing on hills around here during lockdown helped me find those settings.

Hi, is this supposed to be startup BOOST enable? Otherwise what is the point of the other startup BOOST settings?
I am giving these settings a go now along with calibration, after exhausting all other settings and possibilities.

Unfortunately it's definitely not the brake. I have now tried every setting possible and nothing seems to help. For some reason as soon as cadence drops (like doing a hard section uphill) the motor completely cuts out. Does this on both bikes. Would calibrating the sensors help if we didn't have a problem with them before? I'm also a little nervous about setting max amps to 20 amps as even at 16 amps it's easy to overheat the motor.
From my testing, it seems that the logic behind the ENABLE/DISABLE on startup boost is backwards. I had a tunable startup boost when I set it to DISABLED and when I set it to ENABLED, no boost at startup.. weird I know, but that is what worked for me.

I ran this motor for close to 600km during lockdown on a single speed frame, so had plenty of experience with cycling when the cadence drops - those settings, along with the latest 1.0.0beta gave me the best low cadence performace. Yes, the motor can get hot, yes, the blue gear may fail - but if you want the performance from this small motor you will need to push it hard. The current ramp is not responsible for motor heat, that is caused by extended periods at >600w, especially with low RPM.

You need to try torque mode too, the cadence sensor will not resolve low cadence, and in power mode the input from pedal RPM is used as part of the motor current calculation. If rotation is low, current will be zero. Torque mode solves this problem.

Oh interesting, I thought I was nuts in that I could not get startup boost to work, but that would explain it. For the record we had these issues when the bikes were set to torque. I only tried power later. I just attempted to calibrate the torque sensor with a luggage scale but that did not go well. Getting really strange readings that form more of a line than a curve. But need some patience to figure that out. Also, every time I try to go into the torque settings, the system freezes, so it seems I can't set the values anyway.

Another issue I forgot to mention is both of the bikes try to move while not under load. I now notice the ADC reading hits 3 sometimes while nothing is touching the pedals, I am guessing I should set 0 to 3 in the torque calibration to fix this (when it stops freezing)?

I wish I had time, in full time school for computer science while trying to do all this so I really appreciate your help. Was getting pretty frustrated. :thumb:

I think after all this I will just roll back to when it was working fine, or try the other fork. I am really interested in the ANT+ potential of this system. I actually programmed an ANT+ DIY indoor trainer for Zwift over the winter.
 
Aquakitty said:
HughF said:
Aquakitty said:
HughF said:
I am glad that the settings worked well for you. Many miles of riding and testing on hills around here during lockdown helped me find those settings.

Hi, is this supposed to be startup BOOST enable? Otherwise what is the point of the other startup BOOST settings?
I am giving these settings a go now along with calibration, after exhausting all other settings and possibilities.

Unfortunately it's definitely not the brake. I have now tried every setting possible and nothing seems to help. For some reason as soon as cadence drops (like doing a hard section uphill) the motor completely cuts out. Does this on both bikes. Would calibrating the sensors help if we didn't have a problem with them before? I'm also a little nervous about setting max amps to 20 amps as even at 16 amps it's easy to overheat the motor.
From my testing, it seems that the logic behind the ENABLE/DISABLE on startup boost is backwards. I had a tunable startup boost when I set it to DISABLED and when I set it to ENABLED, no boost at startup.. weird I know, but that is what worked for me.

I ran this motor for close to 600km during lockdown on a single speed frame, so had plenty of experience with cycling when the cadence drops - those settings, along with the latest 1.0.0beta gave me the best low cadence performace. Yes, the motor can get hot, yes, the blue gear may fail - but if you want the performance from this small motor you will need to push it hard. The current ramp is not responsible for motor heat, that is caused by extended periods at >600w, especially with low RPM.

You need to try torque mode too, the cadence sensor will not resolve low cadence, and in power mode the input from pedal RPM is used as part of the motor current calculation. If rotation is low, current will be zero. Torque mode solves this problem.

Oh interesting, I thought I was nuts in that I could not get startup boost to work, but that would explain it. For the record we had these issues when the bikes were set to torque. I only tried power later. I just attempted to calibrate the torque sensor with a luggage scale but that did not go well. Getting really strange readings that form more of a line than a curve. But need some patience to figure that out. Also, every time I try to go into the torque settings, the system freezes, so it seems I can't set the values anyway.

Another issue I forgot to mention is both of the bikes try to move while not under load. I now notice the ADC reading hits 3 sometimes while nothing is touching the pedals, I am guessing I should set 0 to 3 in the torque calibration to fix this (when it stops freezing)?

I wish I had time, in full time school for computer science while trying to do all this so I really appreciate your help. Was getting pretty frustrated. :thumb:

I think after all this I will just roll back to when it was working fine, or try the other fork. I am really interested in the ANT+ potential of this system. I actually programmed an ANT+ DIY indoor trainer for Zwift over the winter.
CompSci is an interesting course - I did it for my undergraduate course back in 2001-2004.

Your bikes will move without load if you enable 'assistance without pedal rotation', this is fixed with the threshold value for 'assistance without pedal rotation'
 
Update! Whoo hoo fixed the issues with our bikes! I realised I was somehow using the 1.0.0b version of the firmware. No idea how that happened. I installed the 1.0.0 and along with HughF's settings, it's all good again. And yes I can confirm, to get the startup boost, the boost has to be set to "disabled". Heh.

The freezing problem isn't fixed but that I can live with. :bigthumb:
 
Aquakitty said:
Update! Whoo hoo fixed the issues with our bikes! I realised I was somehow using the 1.0.0b version of the firmware. No idea how that happened. I installed the 1.0.0 and along with HughF's settings, it's all good again. And yes I can confirm, to get the startup boost, the boost has to be set to "disabled". Heh.

The freezing problem isn't fixed but that I can live with. :bigthumb:

Is this with sw102? Which submenues are freezing?
My controller arrived finally after 4 months. Which version of firmware is most stable with sw102?
 
hefest said:
Aquakitty said:
Update! Whoo hoo fixed the issues with our bikes! I realised I was somehow using the 1.0.0b version of the firmware. No idea how that happened. I installed the 1.0.0 and along with HughF's settings, it's all good again. And yes I can confirm, to get the startup boost, the boost has to be set to "disabled". Heh.

The freezing problem isn't fixed but that I can live with. :bigthumb:

Is this with sw102? Which submenues are freezing?
My controller arrived finally after 4 months. Which version of firmware is most stable with sw102?
Yep, sw102 submenus do lockup on the latest firmware. I imagine with Casainho focusing on his full time work and his ant+ project, this be down to the community to find and fix.
 
Sw102 size and stealthiness is great, problem is it's hardly visible under bright sunlight. That and the fact that there is no Android app for it. I've researched possibility to write android app in golang but bluetooth support looks questionable.
 
hefest said:
Sw102 size and stealthiness is great, problem is it's hardly visible under bright sunlight. That and the fact that there is no Android app for it. I've researched possibility to write android app in golang but bluetooth support looks questionable.

Soon you will have more display options, much more robust and wireless, and a mobile app also:

ANT+ LEV is working - my GPS cycling computer now detects and connects to the TSDZ2 wireless board!!

Very first testing firmware that works: the wireless board nRF52840 is implementing the ANT+ LEV Ebike profile and the Garmin Edge cycling computer is detecting and connection to the EBike wireless board. Also, when starting an EBike activity, there is available a screen specifically to see EBike data and, is possible to select the assist level.

[youtube]YYaG6Zjt1xo[/youtube]

I did follow the Nordic structure for other example codes of ANT+ sensors like the HR sensor. Next step is to add merge this code with the 860C and SW102

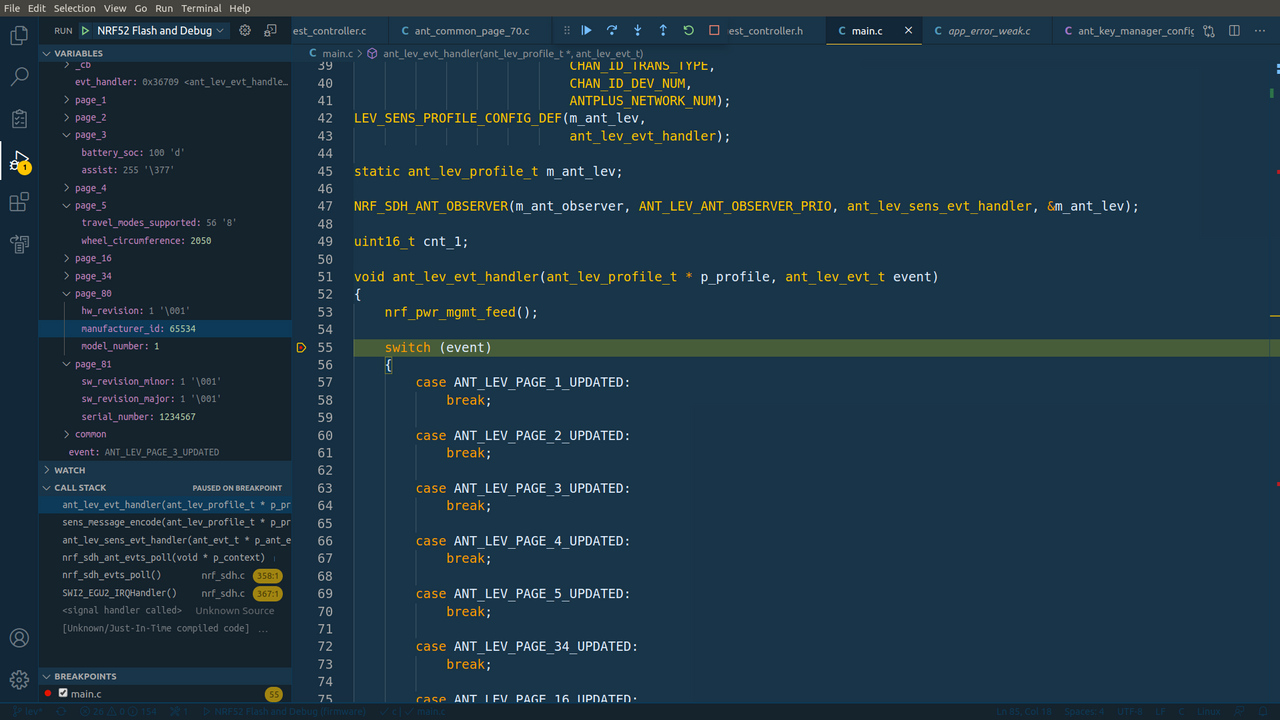
And here is the a break point while debugging:

Screenshot-from-2020-07-05-03-13-54.png
 
hefest said:
Aquakitty said:
Update! Whoo hoo fixed the issues with our bikes! I realised I was somehow using the 1.0.0b version of the firmware. No idea how that happened. I installed the 1.0.0 and along with HughF's settings, it's all good again. And yes I can confirm, to get the startup boost, the boost has to be set to "disabled". Heh.

The freezing problem isn't fixed but that I can live with. :bigthumb:

Is this with sw102? Which submenues are freezing?
My controller arrived finally after 4 months. Which version of firmware is most stable with sw102?

It's not that it isn't stable when in use, it's that the menu freezes every few mins and you have to do a hard reset. If you are making any changes, exit to the main screen every time. Otherwise, when you make a change and it freezes and you reset the data isn't saved. I discovered that the hard way, wondering why my changes made no difference :?
 
New controller arrived after almost 4 months. In the mean time I was riding dahon folding 20" regular bike. After several hours of replacing old controller, routing wires, soldering and flashing finally went for a test ride. My god how good this bike rides I totally forgot after months on folder.

Power delivery is still strange with v1.0.0 default setup. It doesn't come straight away when I start pedalling. Should I increase ramp-up to more than 8?
 
Try the settings I posted a few pages back...
 
Does anyone know if the tsdz3 integrated motor is identical internally to the tsdz2?

I'm getting tired of creaking and tightening my tsdz2 on my mtb, might look at modifying a frame to take the integration plate.
 
casainho said:
gatorsean said:
I would be happy to try and fix this and do a pull request, but I just ask for a little high level theory of how the throttle works in the code.

casainho, if you read, this, can you take a look at the problem or maybe leave a note here about how the throttle is intended to work in the code?
Looking at the code, I can´t understand why throttle does work as you guys are saying.

Please look at the code, mainly on:

Code:
  // throttle
  apply_throttle(&ui16_m_adc_target_current, ui8_assist_enable);

And put the questions here that you may have when trying to understand the code.

Hi Casainho!

I looked over this section like you advised. I can't see where this variable "ui16_target_current" is used? Can you tell me how the controller is using ui16_target_current and perhaps it is being confused with "ui16_m_adc_target_current?" It is much easier to see how ui16_m_adc_target_current is being used.
 
HughF said:
I'm getting tired of creaking and tightening my tsdz2 on my mtb, might look at modifying a frame to take the integration plate.
Hugh there has to be another cause for your problems, we now have 6 TSDZ2's mounted on Mtbs, riding in hilly and hard terrain, without any form of restraints and without a single one coming loose.

We do two things though which helps.
1/ when you fit the engine through the bottom bracket turn the bike on its side slightly and let the engine gravity feed / drop onto the crank side from 30- 50mm. Listen to the sound it makes when it meets the face of the bottom bracket. If its a good match it will sound as a crisp clunk. We have found several of the bikes need a very small shim in there to prevent the side case of the motor pulling up tight to the swing arm and or the bearing mount for the full suspension bikes. Its subtle but it does effect the way the motor is pulled up against the BB.
2/ We dimple the small non chain side bracket with a centre punch right around the area where it mates onto the BB, dot it every 2mm or so. When the big nut is tightened that roughness bites into the face of the BB. Bafung do this from the factory.

The other tip is that side bracket ( its probably one of the most important pieces in the puzzle ), Fit it losely without spacers but location bolts in place but not tight, fit the nut, put the spanner on the castellated nut and then whack it lightly with a hammer to pinch things up. Now measure the gap between the bracket and motor. Make up the correct width spacer, all bikes are different and the factory spacers are never correct, by fitting a spacer and X number of thin washers. if you can't fit a washer then go with that as the bracket will deform 0.10 mm or so.

Finally loosely fit the correct spacers, bracket and through bolts, slowly begin to tighten the main nut, bolts in turn, slowly tightening them up to the correct torque. The bolts are standard but you cannot get the correct torque with just the spanner on the main nut. We used to use the supplied spanner and then whack it with a engineers hammer, laterly we have made a socket which goes on the nut and we use a lever about 750mm long. The torque on the nut is not huge but its still larger than what the standard supplied spanner can achieve.
 
Waynemarlow said:
we now have 6 TSDZ2's mounted on Mtbs, riding in hilly and hard terrain, without any form of restraints and without a single one coming loose.
Can you please give a bit more details of your usage? are all for your family? or do you run a business of renting MTB ebikes? - I am asking this because it is very important to understand how owners are using their ebikes with TSDZ2. Thanks.
 
Waynemarlow said:
HughF said:
I'm getting tired of creaking and tightening my tsdz2 on my mtb, might look at modifying a frame to take the integration plate.
Hugh there has to be another cause for your problems, we now have 6 TSDZ2's mounted on Mtbs, riding in hilly and hard terrain, without any form of restraints and without a single one coming loose.

We do two things though which helps.
1/ when you fit the engine through the bottom bracket turn the bike on its side slightly and let the engine gravity feed / drop onto the crank side from 30- 50mm. Listen to the sound it makes when it meets the face of the bottom bracket. If its a good match it will sound as a crisp clunk. We have found several of the bikes need a very small shim in there to prevent the side case of the motor pulling up tight to the swing arm and or the bearing mount for the full suspension bikes. Its subtle but it does effect the way the motor is pulled up against the BB.
2/ We dimple the small non chain side bracket with a centre punch right around the area where it mates onto the BB, dot it every 2mm or so. When the big nut is tightened that roughness bites into the face of the BB. Bafung do this from the factory.

The other tip is that side bracket ( its probably one of the most important pieces in the puzzle ), Fit it losely without spacers but location bolts in place but not tight, fit the nut, put the spanner on the castellated nut and then whack it lightly with a hammer to pinch things up. Now measure the gap between the bracket and motor. Make up the correct width spacer, all bikes are different and the factory spacers are never correct, by fitting a spacer and X number of thin washers. if you can't fit a washer then go with that as the bracket will deform 0.10 mm or so.

Finally loosely fit the correct spacers, bracket and through bolts, slowly begin to tighten the main nut, bolts in turn, slowly tightening them up to the correct torque. The bolts are standard but you cannot get the correct torque with just the spanner on the main nut. We used to use the supplied spanner and then whack it with a engineers hammer, laterly we have made a socket which goes on the nut and we use a lever about 750mm long. The torque on the nut is not huge but its still larger than what the standard supplied spanner can achieve.
Hi Wayne, I think my problems have been related to the 2x spacers I have on the drive side to get the final drive casing to clear the chain-side chainstay. I used the aluminium ones and they have crushed slightly. I feel the latest round of tightening has brought things closer together now.

As for the other side, I machined up some correct length spacers in the lathe, so I think that side is good. I have been using the supplied 'spanner' as a slugging spanner, a few blows from my dead-blow hammer have really bought things tighter together. Actually - as I have a steel framed hardtail, there is nothing stopping me welding the left-hand-side plate onto my bottom bracket shell, then using the lower too M5 socket caps to remove and replace the motor... I'm an ace tig welder :)

I also think the problems came from the anti-rotation plate/system. By default it comes supplied with an m8 socket button for fixing the clamp plate down. Socket buttons are total junk for getting any sort of decent torque on, without them rounding out. I've changed this now for a high tensile socket cap and I think I've done a better job of tightening the anti-rotation system up.

I'd still like to know more about the tsdz3 though - I really like the tsdz2 motor, and having the same thing but with the possibility of integration.
 
HughF said:
I also think the problems came from the anti-rotation plate/system. By default it comes supplied with an m8 socket button for fixing the clamp plate down. Socket buttons are total junk for getting any sort of decent torque on, without them rounding out. I've changed this now for a high tensile socket cap and I think I've done a better job of tightening the anti-rotation system up.
Same here. When I first read your original post I thought that it was about time I did what I’ve been threatening to for some time - buy a Bafang side bracket as Wayne describes it so I did. I think it will hold better than Wayne’s pot marks but otherwise his instructions are very, very good. I might be lucky and get one of the M5 bolts to hold .....!

Agreed, the M8 are very difficult; the seat tube obstructs you getting a clear shot at tightening it and I’ve shortened a few Allen keys to fit it in but it’s a little hit and miss.
 
James Broadhurst said:
HughF said:
I also think the problems came from the anti-rotation plate/system. By default it comes supplied with an m8 socket button for fixing the clamp plate down. Socket buttons are total junk for getting any sort of decent torque on, without them rounding out. I've changed this now for a high tensile socket cap and I think I've done a better job of tightening the anti-rotation system up.
Same here. When I first read your original post I thought that it was about time I did what I’ve been threatening to for some time - buy a Bafang side bracket as Wayne describes it so I did. I think it will hold better than Wayne’s pot marks but otherwise his instructions are very, very good. I might be lucky and get one of the M5 bolts to hold .....!

Agreed, the M8 are very difficult; the seat tube obstructs you getting a clear shot at tightening it and I’ve shortened a few Allen keys to fit it in but it’s a little hit and miss.

Yes, seat tube access certainly makes tightening this fastener difficult.
 
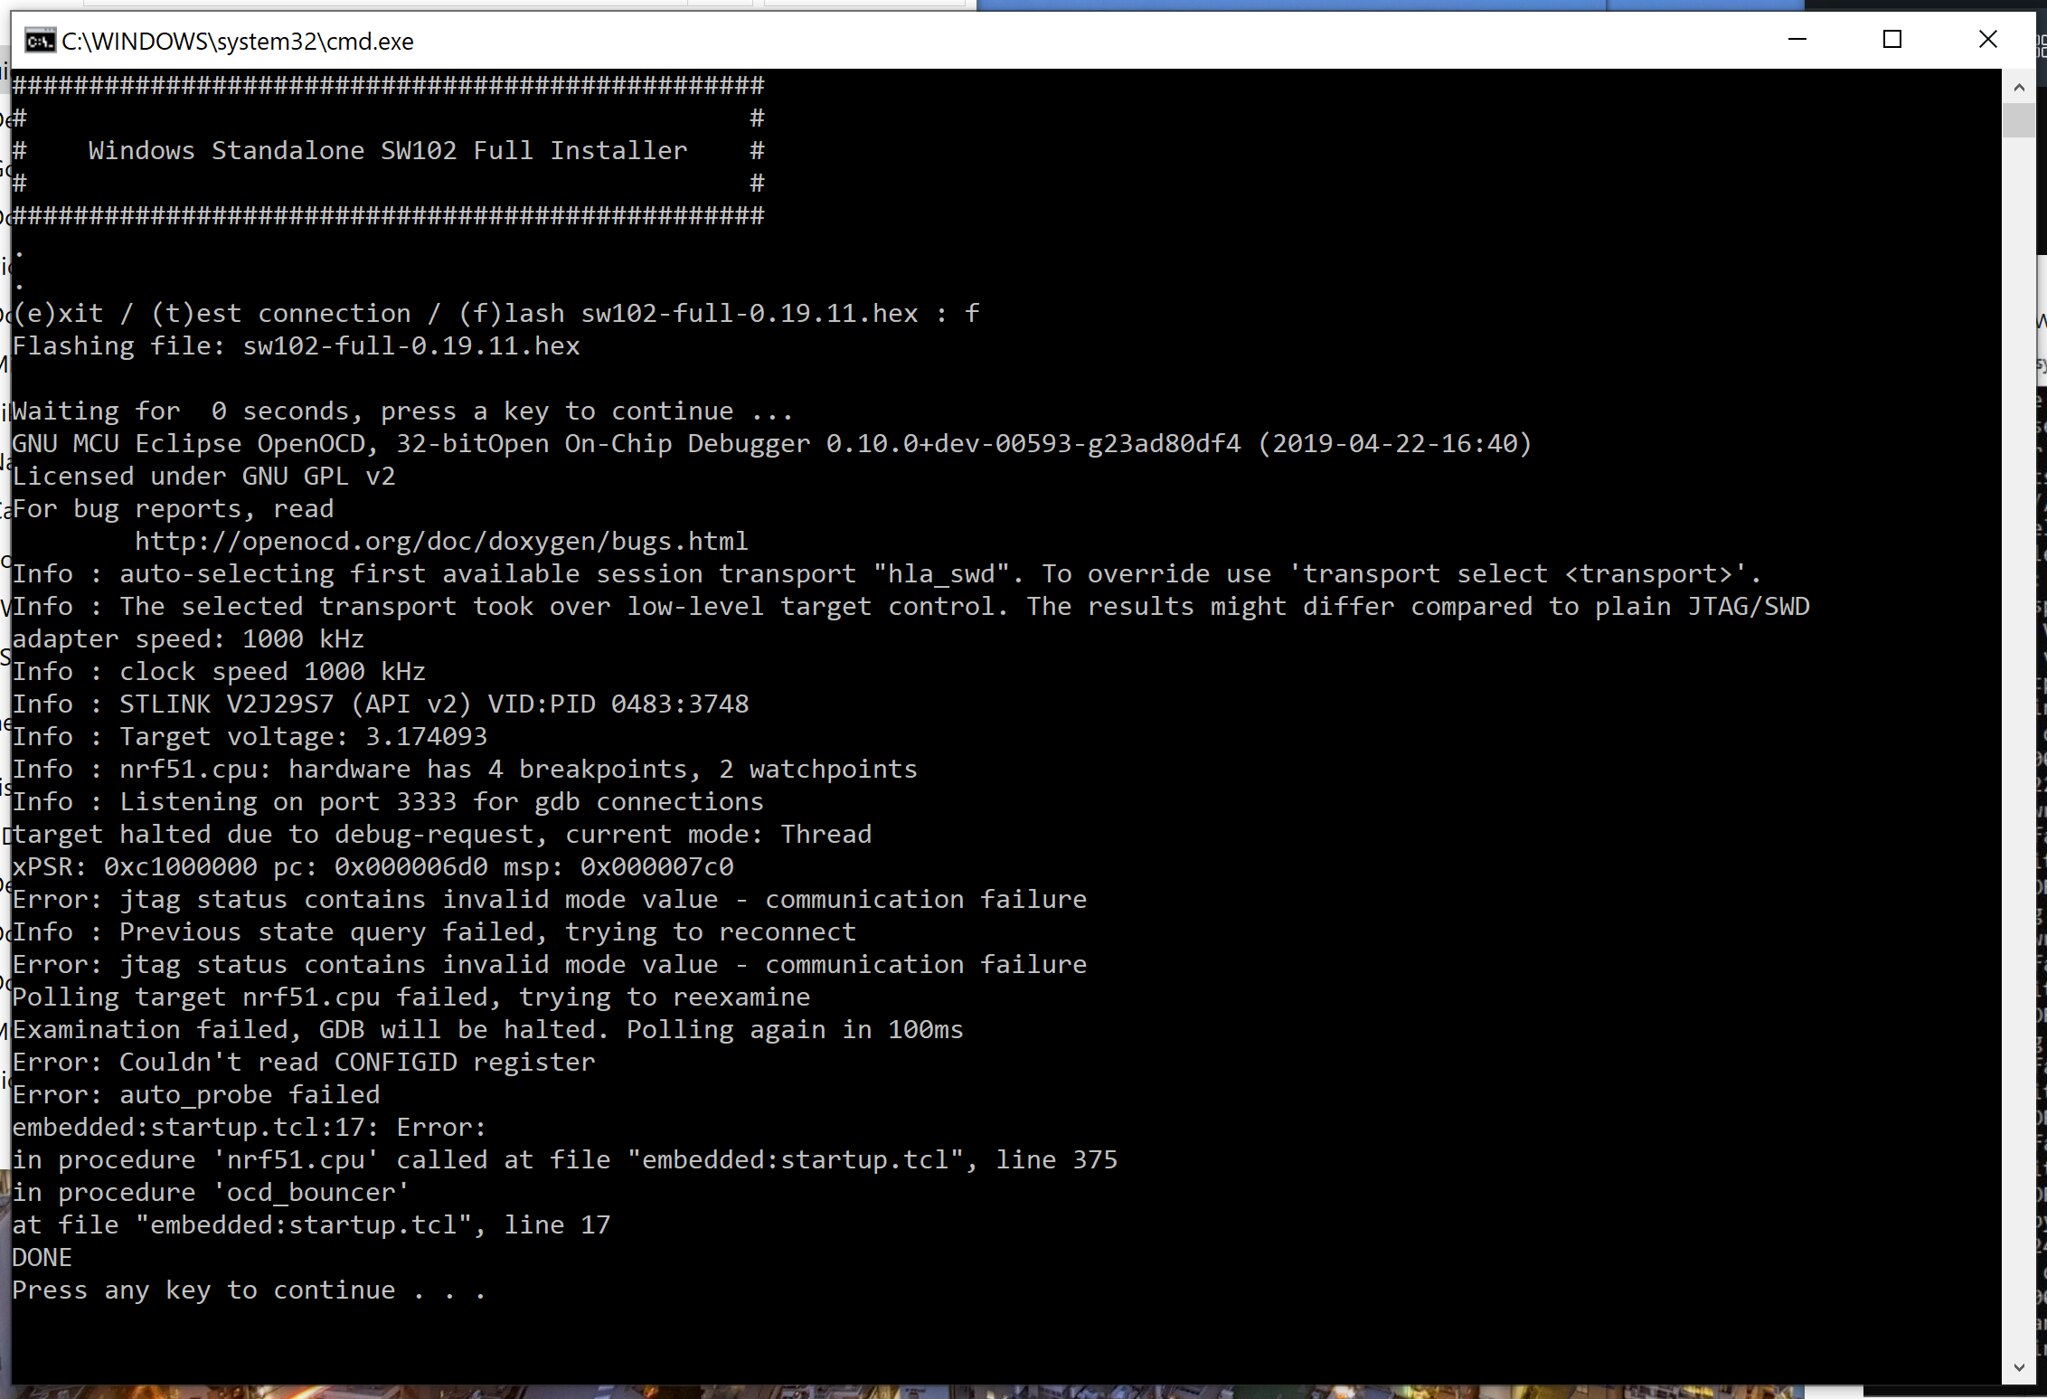
Hi, I am sinning by double posting, the SW102 thread looks like it has been idle for a couple of weeks and I am suoer keen to crack on!

Any idea what i might be doing wrong?
Wires are soldered through the side entry method and connected as illustrated in the wiki, unit is powered when attempting to flash.
The display is receiving power from the TSDZ2 which has already been flashed with firmware version 1 beta 4.

Other info that may be of use:
A couple of seconds after powering up the display it shows error 30 then displays the speed, allows you to access menu's etc, the battery icon is flashing empty even though the battery is charged.
I cannot detect a bluetooth signal from the unit on the phone app either, it is picking up other bluetooth devices nearby so the phone seems to be functioning O.K.

I did read some of the technical discussions about units shipping with and without bluetooth enabled but it quickly got too technical for me!

Thank you, and thanks for everyone's hard work that is contributing to this. I blew up my 860C before I got it working with the motor so keen to get it right second time! :lol:

50084260138_9f752fd428_k.jpg
 
safeaschuck said:
Hi, I am sinning by double posting, the SW102 thread looks like it has been idle for a couple of weeks and I am suoer keen to crack on!

Any idea what i might be doing wrong?
Wires are soldered through the side entry method and connected as illustrated in the wiki, unit is powered when attempting to flash.
The display is receiving power from the TSDZ2 which has already been flashed with firmware version 1 beta 4.

Other info that may be of use:
A couple of seconds after powering up the display it shows error 30 then displays the speed, allows you to access menu's etc, the battery icon is flashing empty even though the battery is charged.
I cannot detect a bluetooth signal from the unit on the phone app either, it is picking up other bluetooth devices nearby so the phone seems to be functioning O.K.

I did read some of the technical discussions about units shipping with and without bluetooth enabled but it quickly got too technical for me!

Thank you, and thanks for everyone's hard work that is contributing to this. I blew up my 860C before I got it working with the motor so keen to get it right second time! :lol:

50084260138_9f752fd428_k.jpg
So you've flashed the bootloader using the physical connection, and you have then put the sw102 into Bluetooth bootloader flash mode and used nrf toolbox to put the osf onto the display?
 
Back
Top