APL's DIY axial-flux motor

Did you just gave up on the previous motor version you just made?
I think it was close to running fine, won't you give a try to a metallic stator plate?
 
Dui said:
Did you just gave up on the previous motor version you just made?
I think it was close to running fine, won't you give a try to a metallic stator plate?

He's not done with it, just waiting on me to finish the machining on the Ti plate and get it sent out to him. I just finished a job that was in the mill, so it should be soon!
 
No definitely not giving up! Glad you mentioned it,.. the Titanium plate has been ordered, and is awaiting machining.
Machine shops are busy places with big runs that are in a time slot. Coleasterling has graciously offered to help out
the cause, and donate some of his personal time to the plate project. :thumb:

I gave him a jingle last week, and was told that it is coming up next. So it's all good, and the build will continue in the
near future. Since it's winter here, and I can't do any riding anyway, theres no point in getting too anxious about it.

Sorry if I haven't been talking about it too much, but I don't want to put any more pressure on our friend Coleasterling
than he already has, we all work hard at our jobs.

I'm also getting ready to do another frame build this winter, for the new e-bike, so my time will be stretched a little more,
but I will still be doing the motor build as time permits.

Sorry if anyone might be getting annoyed at my excursions into other motor possibilities, it's true, I'm kind of back
pedaling a bit in the interest of keeping the thread alive for the moment, but it may lead to an even more interesting
motor build in the future.
 
Back peddle as you like sometimes a step backwards is required you have made more progress than I ever have at a scratch build so keep it up Rome was not one day it's the continual grind and enthusiasm most stay tuned into the thread for I'm sure you will get a good prototype in order soon with your ti plate 🤞
 
Haha, sorry for giving you so much pressure guys, that was really not intended.
I was just wondering if there was some change of plan I missed is all, but really glad to hear it's still on tracks!
 
No problem,.. like I say, I'm glad you brought it up, I'm sure that some folks are wondering where the project was going
and why we seem to be wondering aimlessly through motor designs.

I wanted to explore the three different types of axial's in a DIY form, using much of what we've learned so far. Outrunner,
inrunner, and coreless.

So far I think that the inrunner design is the obvious winner, after all is said and done.

The plan is, to finish up this build, get it working, and test it out. Then depending on how that goes, build the inrunner
version next, which I think is a superior and stronger design. It has more power options, better cooling, and versatility.

It all depends on how things go with the current build I guess, but thats kind of what I'm thinking.
 
The good news is that coleasterling is finishing up the Ti plate, and I should be receiving it soon. At that point I will need
to drill all the holes for the axle mounting and the washers, which were done a bit random, since I never expected to
have to reproduce them again.

Once that's done it will be time to cut the slots, which we've talked about quite a bit,.. but I'm still not sure which way I
should go yet. Coleasterling will also be sending a pice of scrap Ti along for me to fool around with, and see exactly what
I can and can't do, with the tools I have. Then I'll have a better idea of what can be done here at least.

Hopefully this will get this build going far enough to see if this motor has what it takes, or at least enough to justify a V3
build. :thumb:
 
Dang, that is beautiful! You are the magic man! Now I'm afraid to touch it... :confused:
 
Beware the inside edges of the slots, as they are not well-deburred. The outside is also only very lightly done. Could be sharpish!
 
[youtube]Zj0v4CogW_s[/youtube]

I seen this video yesterday of the theory behind the Ipm reluctance motor very interesting and easy to follow got me thinking how would this be implementied on an axial machine.

I suppose the rotor would need to be thick enough to have the magnets inside it giving lots of extra mass increase needed compared to a traditional longitudinal type motor in effort to combat bmf, so i can see why tesla choose the shape and form factor but theres room for inprovement on unique motors that dint conform to production cost standards.

One bonus is demag is much less lightly and i just lost my best motor to this still sinking in my bike is no more dead from motor overheating.
 
Thanks Ianhill, very interesting! Quite a bit over my head though, and I struggle to understand such things, but the more
I get exposed to it, the more it sinks in. It is a good video though, in it's simplicity, and deserves a few more viewings yet.

I don't see any way to implement it in axial form yet either, but theres probably a way, once one understands it better.

I also found a short video the other day, on a axial build that slightly resembles this build, other than it's a 200 Kw motor,
but the interesting part is the stator mount. They resin cast the core and coil assembly's to the outer ring. (looks like)

It also looks like they may be turning the magnets down a bit on the lathe,.. something I always wondered about. :?:

https://www.youtube.com/watch?v=SNV3p_9_2WQ
 
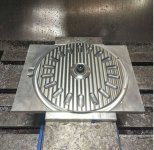
I received the new Titanium stator plate in the mail, and I'm blown away by the quality of machining and workmanship
that Coleasterling has put into it! I can't thank him enough for helping out with this project, and devoting his own time
and effort to the build. A top notch machine shop, and highly recommended for anybody needing machine work. :thumb:

I'm in the middle of another project and Xmas preparations, so time has been short, but I did find a day to test out my
ability to work with the titanium pieces that Cole sent along and do some work on the plate.

I was able to hacksaw a slot in the stuff,.. not the easiest, but doable, and drilling the holes is working, although I've
gone through a few drill bits already. Titanium work hardens, much like stainless steel, and if conditions aren't just
right, things start to self destruct half way through. I have a lot to learn yet, and my fingers are permanently crossed. :wink:

Ti plate mounted..jpg

I have most of the mounting holes drilled, just need to add a few more, and I'm thinking that there might not be a need
for the top washer that was on the wiring side of the stator before. Mostly to keep the screws from crushing into the
fiberglass, and help reinforce it a bit.
The Ti plate seems super strong by itself, and I can use the extra room for wiring on that side too.

The next step is to cut the slots and install some pins in them. I sent off for some ceramic pins that I think will work, and
have found a few more options for that, but need to do a few experiments when they get here to see how it goes first.
I don't think it will take very much to lock the stator fingers in place and keep them from moving. Ceramics have a
300,000 psi compressive strength.

The plate is so beautiful that I can't bring myself to make the 18 long cuts to the center hole that we talked about before,
and I'm not sure I can do it anyway, plus titanium has a tendency to warp when machined. Another problem that would
arise is keeping the mounting bolts and washers from shorting the fingers out when it gets clamped down.
 
The alloy to titanium is like pine to oak, looks stunning got good vibes coming off that plate.
 
Man, I'm super excited about this!

The key to drilling is to keep a high feed and absolutely don't let it rub. Go lower in sfm and up the feed if you're burning drills vs. mechanical erosion. If you have a decent coolant, it'll help significantly at high concentrations. I thiiink I have some Hocut left I could bottle and send you if you need it. Try not to peck, as well. The holes are shallow enough that you should be able to get coolant to the tip of the drill just fine.
 
Yea, I'm starting to get my hopes up again too,.. I think this is going to work, but still trying to remain cautious.
Pray for the best, and plan fro the worst.

Coolant,.. well thats where I failed, I used lots of cutting oil, and it worked well for several holes, until I cooked one.
But looking back, I should have used the mill, which has a coolant return table. I'll need to rig up a pump yet.
If you have a small sample of Hocut coolant, I would be most appreciative,. or I can just buy some if you give me a brand
number. My only experience with the stuff is back in the 'factory' days, way too many years ago. I should upgrade the
mill, and have some around anyway.

I did go heavier on the feed, like you recomended, but I think the speed was probably too high. Well, the mounting holes
are done at least, so now all I need to do is drill some small shallow holes on the diameter, and cut the slots.

I'll do some more trial holes before I drill the plate. Luckily I only need to drill down about 4mm for the pins, so I'm hoping
to have a better go of it.
 
Cutting oil should have been fine too, pending what type. I use "Dark Thread Cutting Oil" sometimes, with high sulfur, typically solid in the pipe threading isle at Home Depot. It is super cheap and works well for most things, though it is not ideal for tapping Ti.

The Hocut is only sold in drums or pails as far as I'm aware. I'll check my pail stock and get back to you. I need to top up the mill soon anyway, so if I have to order some, I'll throw a bit in a bottle for you. It is good stuff to have around in general. Do you need any more drills for the pins? The ones I sent before were generic cobalt, but pending size, I may have some Nachi's I could send.
 
I received the .125" ceramic pins in the mail yesterday, so now I can play around some, and see if they are going to work.
They look a little small, and I might have to order some larger OD ceramic beads or rod from McMaster, so drill bit size is
unknown yet.

It would be good to have a tight fit, so I'm hoping to find a combination that I can pound in a bit.

Are drill bits the way to go, or do end mills work better? I can buy some higher-end end mills no problem, but you will
know the answer to that question, I'm not sure if they might be stronger/sharper or not. Just curious.
 
It depends more on the fit you want, I think. If you want them tight, I'd use a drill, then ream to size. That said, with as shallow of a hole as you're boring, I'd think that you can get away with using a decent carbide EM without having significant chatter. You'd need to make sure that you're not filling the gullets with chips, so fairly slow feed. Might even use a 2 flute vs. 4 flute in this case. More chip clearance.
 
Well, the holidays and snow storms have put the brakes on very much progress around here, but I was able to try out
the 1/8" pins that I have, and they are too small of a diameter, and a sloppy fit. I need a larger OD.

The next option is the ceramic beads from McMaster, which are .170" OD, and more precision ground, with .003" +/-
tolerance. An 11/64" drill or end mill is .172" so I'm hoping for a better fit.
I hope I don't have to ream, but whatever it takes.

Ceramic bead .170%22.gif

I can get the solid ceramic rod too, but I'm not so sure I can cut it very well, and size options are limited. The beads are
more than strong enough, and ready to install, so I'll try them first. Maybe I'll get lucky.

Such a simple thing holding up the project, I know, but it needs to be done fairly well. After this, it's just a matter of
putting it back together and trying it out.
 
I was thinking about this more, and wouldn't the cores keep the cut end from moving? They are kinda a large pin, then pinching the plate lightly between the cores should keep it constrained. Maybe you don't need the pins at all?
 
The core material isn’t very strong but it should be pretty stiff. Not sure if core breaking would be a concern.
 
I thought about just trying it out with just the cuts. It's tempting, but the time and effort of all that would be a lot.
The cores will hold it a little but not much, as I only tighten the screws enough to hold them from rattling around.
I'm wary that the screws will crack the cores in the middle. If I bonded everything it might have a better chance.

I also thought about maybe just filling the cut and drilled holes with epoxy, it might be rigid enough, if it was a very
hard epoxy. But I'll keep trying to get the ceramic to work first, as I think it's the most positive solution.

My main concern is that if each set of fingers has just a little give, then one side can sag overall, so I want something
more positive. What I really need is a wedge, or cone shaped pin that can be pressed or ponded in the hole a bit.

Perhaps ceramic is a bit of overkill, although I like it a lot, if I can get it to fit. Is there another material thats an
insulator and hard that might be more shapeable? Fiberglass, plastic, stone, etc.
 
When I tried tapping them, they tapped well, but any significant bolt torque split them right in two. The force from the countersunk head may do the same, so that's likely a valid concern. The bending force in the ti plate would be across the strongest section of the cores though, too. I might have a scrap core here I can play with to see how much it takes in shear to get a core to break.

Macor is the go-to machinable ceramic, but beware the cost. It makes the Ti look like pocket change. https://www.mcmaster.com/macor-ceramic/shape~rod-and-disc/

You could also get unfired alumina, but it is similar in price. Maybe worth a look on eBay for either?
 
Back
Top