Hardware temperature control tsdz2

I think removing cover would be a very good test. I will add to my list for next summer evaluation. My overall goal is to keep motor in safe temperature range for the normal routes that I ride which are mostly flat but include 200’ elevation change halfway thru the ride. My riding speed is ~ 18 MPH. I think limiting the power to 450 W and 12 A and using low gear for climb maybe all that is necessary. Full temperature sensing will enable a good evaluation.

I thought about cutting windows in the motor housing, but water ingress and dirt would be a problem. That is why I added snorkel for air inlet and road tube for exit air. I can’t believe how dirty the bike gets while riding only on dry hard surfaces.

Excellent sharing ideas with you guys….
 
I’ve been thinking about how to clean up the air-scoop for my motor housing. I have a temporary plastic funnel for testing. The front end of the Mini Shark battery has the right shape to scoop air from up-high on the bike frame in a nicely protected spot.

I’m thinking of cutting a window in the front of the battery case and a round exit hole in the back of the case for my corrugated tubing that feeds the front of the motor housing. It would be a really “clean” installation. The air opening could have a filter material to keep crap out and to enhance appearance.

So, the motor cooling air would get warmed by the battery cells – how much… I don’t know. I can add a third temperature sensor at the discharge of the battery to measure and quantify.

I shouldn’t have so much time on my hands…..
 

Attachments

  • Screenshot 2022-12-15 at 5.41.37 PM.png
    Screenshot 2022-12-15 at 5.41.37 PM.png
    238.9 KB · Views: 432
  • Screenshot 2022-12-15 at 5.53.31 PM.png
    Screenshot 2022-12-15 at 5.53.31 PM.png
    193.6 KB · Views: 432
Piper J3 said:
I’m thinking of cutting a window in the front of the battery case ....
So, the motor cooling air would get warmed by the battery cells...
IMO don`t mess with battery case. At first i was thinking you will using empty battery case, but full with cells...
My suggestion is using fan on funnel or using wheel rotation for airflow. Maybe i`m wrong (i`m no expert), but this pressure design will need higher airflow than convection one
 
yes . I was thinking of stripped thick wire . actually it's essential to compress this mesh as much as possible. did you test heat dissipation before and after this mod ?
 
andrea_104kg said:
.... A soft copper mesh that compresses and expands ensuring good contact between parts.
My main concerns are the small particles after cutting such mesh, which aren't a good combination with the controller.

Repeating and improving solutions :wink:
Silentguy did some experiments with copper mesh too.
Here he made some improvements with thin copper plate.
The results of his mod on youtube.

Raylo32 had a variation on this mod with braided copper strips.

@andrea_104kg
What is that grey stuff on top of the motor? Putty or melted thermopads?
 
I did a 7-mile ride today to further test the air-cooling mod for the motor. Outside air temp today is +58F compared to -30F windchill last weekend with Bomb Cyclone...

I have power limited to 450W and 12A. I again used max power level (9) and one or two gears higher than normal to task the motor. A steep 200’ elevation rise halfway through the ride caused motor to reach 161F. Motor cooled quickly when back on level ground. The motor housing exit air temperature runs about 17 degrees higher than ambient at 16 mph speed. So, air is flowing through the motor housing and heat is being expelled. The real test will be during the heat of summer….
 

Attachments

  • IMG_4954.jpeg
    IMG_4954.jpeg
    2.4 MB · Views: 238
  • Screenshot 2022-12-30 at 12.41.10 PM.png
    Screenshot 2022-12-30 at 12.41.10 PM.png
    2.7 MB · Views: 238
Elinx said:
andrea_104kg said:
.... A soft copper mesh that compresses and expands ensuring good contact between parts.
My main concerns are the small particles after cutting such mesh, which aren't a good combination with the controller.

Repeating and improving solutions :wink:
Silentguy did some experiments with copper mesh too.
Here he made some improvements with thin copper plate.
The results of his mod on youtube.

Raylo32 had a variation on this mod with braided copper strips.

@andrea_104kg
What is that grey stuff on top of the motor? Putty or melted thermopads?
Yes small particles my be a problem but just be careful to remove all the small pieces before assembly. Yes, there are new pads that I squeezed with my hands before installing. This is the full tread of bike build http://www.jobike.it/forum/topic.asp?TOPIC_ID=81788
 
pxl666 said:
yes . I was thinking of stripped thick wire . actually it's essential to compress this mesh as much as possible. did you test heat dissipation before and after this mod ?
not before, this motor it's new and modified before installiing.
Actually (winter) motor it's normally betwine 35-50° celsius even after very long climbs
 
If you want a complete solution.
A Polish webshop has put together a complete set for better heat management of the Tsdz2 and made a video how to do it.

- heatsink plate between motor and case
- heatsink ring between motor and cover
- heatsink insert between stator and cover
- heatsink radiator on outer case and cover

source
_______________________________________________________________________________________________

Edit:
@hayden222 has found these mods too and has given also an possible alternative with Permatex Steel Weld putty.

motor_end_cooling-jpg.330446
 
Last edited:
I have been meaning to post my Temp mods which Elinix has posted above.

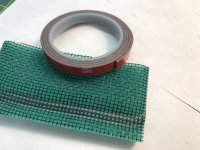
I had some Permatex steel weld putty lying around so i decided to see how it went at transferring heat. Using a gas torch lighter i placed it near the set piece of putty for a second and then felt it and it was very hot. Not the most scientific but it proved it was good enough for the project.
motor_end_parts.JPG
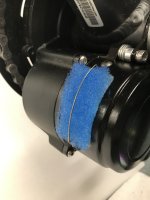
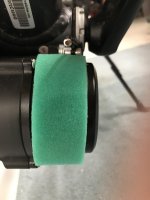
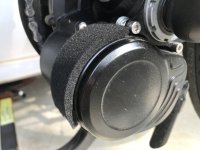
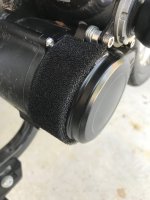
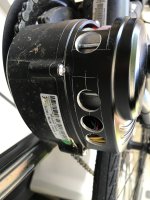
I used some Tesa tape 51036 to prevent the steel putty from sticking to the end of the motor.
The Tesa Harness Tape was also something i had lying around and they say its ok for up to 150 deg. Celcius... so thought that would suit fine. Its probable that other tapes could work.

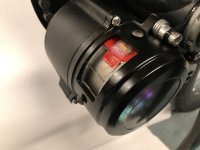
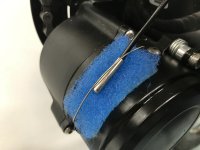
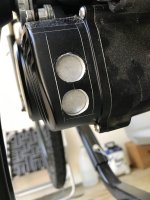
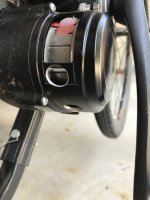
I kneaded and then rolled the putty into a long cylinder of about 6mm(?) cant remember exactly. I taped over the end of the motor as pictured, then placed the roll in the centre of the outer section. I put the motor back together, pushing tightly to squeeze the putty, then screwed housing back on.

motor_end_cooling.JPG

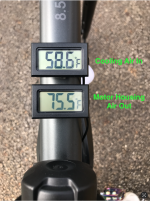
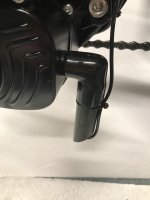
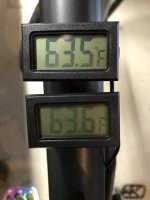
I had it like this for about a month, not knowing whether the putty would stick to the aluminium case, which it didnt.... I installed a temp sensor at this stage (TMP35GT9Z w/ 1uf poly Cap across its + & - ) which works great, thanks to the forum member who posted this! At this stage i also applied a very small amount of thermal compound (Chipquik TC3 - not the best best but not the worst either) to the set putty.

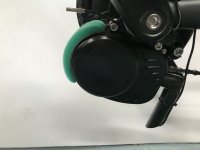
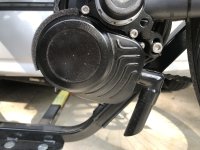
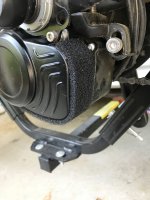
The heatsinks on the main motor housing are for Raspberry pi's, which I bent to suit the motor shape. I also have the Silent Ordanance motor/ housing aluminium gap filler plate.

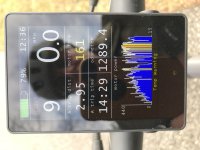
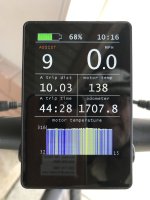
I am running 48v 15a w/ latest embrusa OSF. I haven't ridden up any huge hills but I rode the other day in Power mode @450% assist, turbo mode, ~31 degrees Celcius. After about 20mins riding back from the beach in top gear and trying to let the motor do all the work the reading was 71 degrees. I only weigh 60kg so that prob helps too. I am pretty happy with the power and thermal mods. Next heat mod will hopefully be one of those wrap around motor covers (stator to cover) from the Polish site 
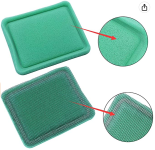
Thermal conductive insert for TSDZ2

To be honest though I hardly ever ride like this and don't use turbo mode much (and usually always in torque sensing mode) There arn't many big hills near me which i think would def. change my mind on cooling mods needed. It certainly is fun though when cranked up!
 
Hi — Quick question. The wiki says that you only need 2-3 g of thermal paste: "Heat conducting paste 5 W / mK or better - 2-3 g"

Ecocycles, in their kit, sells 100 gram lots, "enough for one motor". In addition, the pictures in the wiki look to me like a fair bit more than 2-3 grams, if nowhere near 100 grams.

Can anyone give me a clue as to how much I will need? Is the wiki right? I plan on using a metal shim and thermal pads. Any recommendations on where to buy a good paste?

Thanks!

John
 
@AnonJohn
The wiki is a description from someone that has done it this way. So if you follow his exact description you only need 3gr.
I don't know exactly how the mods from Ecocycles are done. So I only can guess.
The differce imho is Ecocycles use aluminium with both sides heatpaste and the wiki uses heatpads that don't need heat paste.
Thanks Elinx. Appreciate the reply. I'm not looking to go crazy (in terms of power demands on the motor) so will just follow track the wiki pretty closely. Just didn't want to get half way into it and find out I was nowhere close. Cheers.
 
TZDZ2 Air Cooling

I have completed the air-cooling for my TSDZ2B... I changed air intake to a simple foam filter screen with large opening at front side of motor housing. I intend to ride bike only on hard surfaces and only in dry weather. Filter screen (blue) is from a dehumidifier. I retained the warm-air exit tube with 45 degree angle to create a venturi effect which improves air flow through the motor housing. I will leave in/out temperature sensors in place for initial testing when weather gets warm. I found a better foam filter – pre-filter replacement (green) for Briggs & Stratton. The foam is held in place with 1/4” 3M body-side molding tape.
 

Attachments

  • IMG_5535.jpeg
    IMG_5535.jpeg
    1.7 MB · Views: 32
  • IMG_5551.jpeg
    IMG_5551.jpeg
    1.3 MB · Views: 30
  • IMG_5558.jpeg
    IMG_5558.jpeg
    2 MB · Views: 26
  • IMG_5556.jpeg
    IMG_5556.jpeg
    1.1 MB · Views: 27
  • IMG_5580.jpeg
    IMG_5580.jpeg
    1.2 MB · Views: 19
  • IMG_5583.jpeg
    IMG_5583.jpeg
    1.3 MB · Views: 20
  • IMG_5584.jpeg
    IMG_5584.jpeg
    1.5 MB · Views: 19
  • IMG_5585.jpeg
    IMG_5585.jpeg
    2.5 MB · Views: 19
  • IMG_5586.jpeg
    IMG_5586.jpeg
    1.8 MB · Views: 17
  • Screenshot 2023-03-09 at 3.00.42 AM.png
    Screenshot 2023-03-09 at 3.00.42 AM.png
    1.1 MB · Views: 23
Last edited:
I don't intend to let that happen. I only ride if weather forecast is dry. I suppose I could take a plastic bag in my tool kit and use some tape to cover the filter in emergency....
 
See my post #291 above... So, here we are end of June and temps in mid-80’s with high humidity. Today I rode TSDZ2B OSF with my air-cooling modification and I like it a lot. I was using full power (I have limit at 450W) and rode level ground for 10 miles with stabilized motor temp of 138F. Speed was 16-18 mph.

The Motor Temp Graph shows max 316F, but it is off by factor of 2X in software calculation.....
 

Attachments

  • IMG_6563.jpeg
    IMG_6563.jpeg
    1.5 MB · Views: 8
  • IMG_6554.jpeg
    IMG_6554.jpeg
    2.4 MB · Views: 8
  • IMG_6550.jpeg
    IMG_6550.jpeg
    2.3 MB · Views: 8
....Today I rode TSDZ2B OSF with my air-cooling modification and I like it a lot. .....
Compliments. You made a very clean looking modifiaction of your aircooling system.
Thanks for the update of it.
Personally I would't choose for such an option, because of wet weatherconditions, but I can imagine that for some this isn't an issue.
 
I’ve even been thinking about liquid cooling the motor. I know….crazy idea. I wonder if the motor is sealed? Looks like it might be… The speed controller / CPU is potted, so it should be sealed. The three electrical cables that feed out the ring gear side would need to be sealed well with silicone.

So, my thought is to use a dielectric liquid like used in big power transformers. For this small scale we could use something simple – perhaps a thin motor oil. Run a small 5V micro pump to circulate the “coolant” through a small radiator, and then return the liquid back to the motor housing. It’s just an idea... Thought I’d bounce it off you guys – wife’s tired of listening to me. :oop:
I did everything you want to do three years ago. I sealed the three areas that need to be sealed, the area that the torque sensor wires go through, the area behind the controller and the wires, and the bearing behind the blue gear. I used silicon to seal it with and a new double-sealed bearing.
I also used a pump and radiator. The motor ran so coolly, and I was running at 800 watts. But sooner or later, it would start leaking, and if it leaked on the toque sensor rings, they would separate. I was told to use epoxy, not silicon, but I never tried because you would never be able to take it apart to replace parts again. Maybe you would not need to replace parts if it didn't leak.
 
Next logical step…. I figured as long as I have one cutout for inlet air that is covered by a filter foam, I might as well make more openings to improve airflow. So, I did…. I bought Frost King Air Conditioner Filters, 15 in. x24 in. x3/16 in. Open Cell Foam on Amazon for $2.39. Only drawback is I can't ride in the rain. I have plastic bag to cover motor in case in emergency.....
 

Attachments

  • IMG_6663.jpeg
    IMG_6663.jpeg
    1.7 MB · Views: 19
  • IMG_6662.jpeg
    IMG_6662.jpeg
    1.5 MB · Views: 21
  • IMG_6661.jpeg
    IMG_6661.jpeg
    1.8 MB · Views: 21
  • IMG_6660.jpeg
    IMG_6660.jpeg
    1.5 MB · Views: 21
  • IMG_6659.jpeg
    IMG_6659.jpeg
    1.4 MB · Views: 18
  • IMG_6658.jpeg
    IMG_6658.jpeg
    2.1 MB · Views: 19
This should be my last update for air-cooling the TSDZ2b motor. I added three more large cooling holes in the cover so it looks like Swiss Cheese. I just rode at power level 9 (making 450W) on level road at +20 mph for 7 miles and only saw 140F briefly. I was peddling hard... Outside air temp is 75F. I consider this modification fully refined and complete.

Let the good times roll......
 
Back
Top